一、安装git
-
Linux下安装
sudo apt-get install git //即可 -
windows下安装
直接到官网下载镜像 传送门下载安装完第一步,配置用户名和email
git config --global user.name "solicucu"
git config --global user.email "[email protected]"
注意git config命令的–global参数,用了这个参数,表示你这台机器上所有的Git仓库都会使用这个配置,当然也可以对某个仓库指定不同的用户名和Email地址。
一些小意外:
如果你设置错了用户名或者想改修改,要怎么办呢,小编是从新在git bash 上面从新配置就行了
可以通过命令 git config --list 来查看配置结果
warning: user.name has multiple values
error: cannot overwrite multiple values with a single value,如果出现了这种错误,可以用一下命令修改:
git config --global --replace-all user.name “solicucu”
二、创建版本库和添加文件
-
随便找一个方便一点的位置,新建一个文件夹
linux下可以用指令mkdir respository git init //初始化版本库 -
新建一个文本
假定有一个文本test1.txt,可以通过vi指令编辑 -
提交文本
git add test1.txt
git add test2.txt test3.txt   //可以提交多个文件
git commit -m "explaintion"    //-m 带的参数是提交修改的描述
commit成功之后会有提示,但是git add 如果成功是没有任何消息提示的
三、git常用的指令
1、git status //检查当前工作目录是否有变动
当你准备提交新的文件到版本库的时候,可能忘了已经改动了哪里,那么就可以用这个指令来查看是否有修改
例如我修改了test2.txt ,但是还没有提交,执行git status 会发现
$ git status
On branch master
Changes not staged for commit:
  (use "git add <file>..." to update what will be committed)
  (use "git checkout -- <file>..." to discard changes in working directory)

        modified:   test2.txt  //指明了被修改的文件

no changes added to commit (use "git add" and/or "git commit -a")

//可以看到会提醒有文件被修改了,但是还没有被提交
2、git diff //查看修改的地方
$ git diff test2.txt
diff --git a/test2.txt b/test2.txt
index df97e8b..0ccba71 100644
--- a/test2.txt
+++ b/test2.txt
@@ -1 +1,2 @@
 hello chacha!
+hello jun !   //这里看到修改的地方
warning: LF will be replaced by CRLF in test2.txt.
The file will have its original line endings in your working directory.

//按照前面的提交之后,再检查一下当前工作目录发现是干净的
$ git status
On branch master
nothing to commit, working directory clean
3、git log //查看版本库所有的提交版本
由于某次修改,把文件改坏了,那么想测回到上一个版本库,那怎么办呢,所以能够回退版本就很有必要了
$ git log
commit c29613dca2e61ec61146397fcf4fe58ea056cecd
Author: solicucu <2748847613@qq.com>
Date:   Fri Feb 15 17:10:26 2019 +0800

    modify test2.txt

commit f012faf6d76d716a6b866bcf180c43cd4b90c90a
Author: solicucu <2748847613@qq.com>
Date:   Fri Feb 15 16:53:25 2019 +0800

    add test2.txt

commit 4fa05850dcbea2adb6a89952d75674a82b57d0bf
Author: solicucu <2748847613@qq.com>
Date:   Fri Feb 15 16:51:15 2019 +0800

    add two file just now

如果想看简单一点的,可以用下面的指令
$ git log --pretty=oneline
c29613dca2e61ec61146397fcf4fe58ea056cecd modify test2.txt
f012faf6d76d716a6b866bcf180c43cd4b90c90a add test2.txt
4fa05850dcbea2adb6a89952d75674a82b57d0bf add two file just now
可以看到到目前为止有三个版本,有具体的版本号id,作者,以及提交日期,提交说明。这个是按最新到最旧的顺序排列的
4、git reset --hard head^ // 回退到上一个版本,两个^就是上上个版本,100个就用head~100
//回退之前
$ git reset --hard head
HEAD is now at c29613d modify test2.txt

little jun@DESKTOP-9I2JAHT MINGW64 /d/repository/repository (master)
$ cat test2.txt
hello chacha!
hello jun !
//回退之后
little jun@DESKTOP-9I2JAHT MINGW64 /d/repository/repository (master)
$ git reset --hard head^
HEAD is now at f012faf add test2.txt

little jun@DESKTOP-9I2JAHT MINGW64 /d/repository/repository (master)
$ cat test2.txt
hello chacha!

//如果我突然又后悔回退版本了,那怎么也可以通过id号更新到最新的版本,注意id号只要前面一部分差不多就可以了
$ git reset --hard c29613dc
HEAD is now at c29613d modify test2.txt
git reset 其他参数的一些介绍
 -q, --quiet           be quiet, only report errors
    --mixed               reset HEAD and index
    --soft                reset only HEAD
    --hard                reset HEAD, index and working tree
    --merge               reset HEAD, index and working tree
    --keep                reset HEAD but keep local changes
    -p, --patch           select hunks interactively
    -N, --intent-to-add   record only the fact that removed paths will be added later
5、git reflog //查看所有更改过的版本号的id
$ git reflog
c29613d HEAD@{0}: reset: moving to c29613dc
f012faf HEAD@{1}: reset: moving to head^
c29613d HEAD@{2}: commit: modify test2.txt
f012faf HEAD@{3}: commit: add test2.txt
4fa0585 HEAD@{4}: commit (initial): add two file just now
如此一来,那再也不怕,回退版本后,又不记得新版本号的id带来的麻烦了
注意一下,–hard 回退版本后,工作目录的所有相关文件,都会回退到修改为跟版本库一样
工作区和暂存区的理解
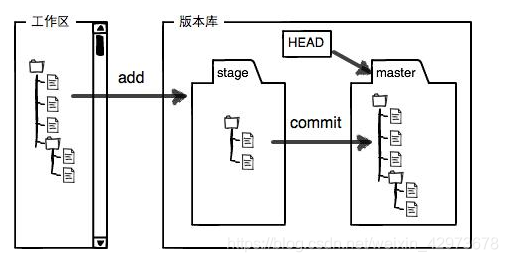
在我们的版本库文件夹里面有一个.git 文件夹,这个就是我们的版本库
Git的版本库里存了很多东西,其中最重要的就是称为stage(或者叫index)的暂存区,还有Git为我们自动创建的第一个分支master,以及指向master的一个指针叫HEAD。
而工作区就是.git 之外的所有文件夹或者文件
我们每次git add 的文件就是放到暂存区里面,一旦git commit了之后,就会把当前暂存区所有的内容提交到当前分支
如果当前的工作区有文件还没有添加到暂存区,用git status指令可以发现 有 untracked files,提示你git add
$ git status
On branch master
Untracked files:
  (use "git add <file>..." to include in what will be committed)

        test3.txt

nothing added to commit but untracked files present (use "git add" to track)
6、git checkout -- file //丢弃工作区的修改
注意-- 与file 之间是要有空格的
两种情况:
1、如果文件修改了,还没有提交到暂存区,那么用这条指令之后,工作区的所有修改就会撤销到跟版本库一样
2、如果文件修改了,并且提交到暂存区,那么,撤销后,工作区跟暂存区的一样
总之,就是跟最近的git commit 或git add 的一样
7、git reset head file // 撤销暂存区的修改,退回到未add之前的状态
$ git status   //撤销后查看状态
On branch master
Changes not staged for commit:
  (use "git add <file>..." to update what will be committed)
  (use "git checkout -- <file>..." to discard changes in working directory)

        modified:   test3.txt

no changes added to commit (use "git add" and/or "git commit -a")

little jun@DESKTOP-9I2JAHT MINGW64 /d/repository/repository (master)
$ git checkout -- test3.txt  //丢弃工作区的修改
8、git rm file //从版本库里面删除文件
$ rm test3.txt

little jun@DESKTOP-9I2JAHT MINGW64 /d/repository/repository (master)
$ git status
On branch master
Changes not staged for commit:
  (use "git add/rm <file>..." to update what will be committed)
  (use "git checkout -- <file>..." to discard changes in working directory)

        deleted:    test3.txt

no changes added to commit (use "git add" and/or "git commit -a")
如果你不小心把文件给删了,那么版本库可以检测出工作区的内容不一样。此时你有两个选择
1、恢复文件
git checkout – file 就可以撤销误删了
2、从版本库删除
$ git rm test3.txt
rm 'test3.txt'

little jun@DESKTOP-9I2JAHT MINGW64 /d/repository/repository (master)
$ git commit -m "rm test3.txt"
[master 8542f9e] rm test3.txt
 1 file changed, 1 deletion(-)
 delete mode 100644 test3.txt
三、添加远程仓库
1、在github上新建一个仓库
如果没有账号可以注册一个 github
然后创建一个新的仓库,create repository,名字可以随便
2、把本地仓库和远程仓库关联起来,执行以下指令
$ git remote add origin [email protected]:solicucu/repository.git
初次使用的时候,可能要验证权限,即要输入github用户名和密码,所以要记得
3、把本地仓库的内容推送到远程仓库上面
$ git push -u origin master //初次的时候,加-u
总的来说,GitHub上面的仓库,就是我们本地仓库的一个备份,而且他可以给我们更多的信息显示,比如提交版本,提交历史,修改说明等等都有
4、把远程仓库克隆下来
$ git clone [email protected]:solicucu/repository.git
要新建一个新的文件夹才行,要克隆一个仓库,首先必须知道仓库的地址,然后使用git clone命令克隆
如果出现以下没有权限的错误,那可能就是没有设置ssh的问题
Permission denied (publickey).
fatal: Could not read from remote repository.

Please make sure you have the correct access rights
and the repository exists.
通过下面的指令,可以生成一个密钥
$ ssh-keygen -t rsa -C "邮箱名"
一路按enter键就行,或者根据实际情况输入文件名,如下面的solicucu
little jun@DESKTOP-9I2JAHT MINGW64 /d/repository
$ ssh-keygen -t rsa -C "[email protected]"
Generating public/private rsa key pair.
Enter file in which to save the key (/c/Users/little jun/.ssh/id_rsa): solicucu
Enter passphrase (empty for no passphrase):
Enter same passphrase again:
Your identification has been saved in solicucu.
Your public key has been saved in solicucu.pub.
The key fingerprint is:
SHA256:7knYo7DZL6fI/Bbay453tdYL3BRQq8iP0/DlnDi9Ww0 2748847613@qq.com
The key's randomart image is:
然后在c盘:C:\Users\little jun下有个这样的文件夹.ssh
Id-rsa是你的私钥,用笔记本方式打开id_rsa.pub把里面的公钥复制到GitHub的SSH key 里面就行
或者参考下图
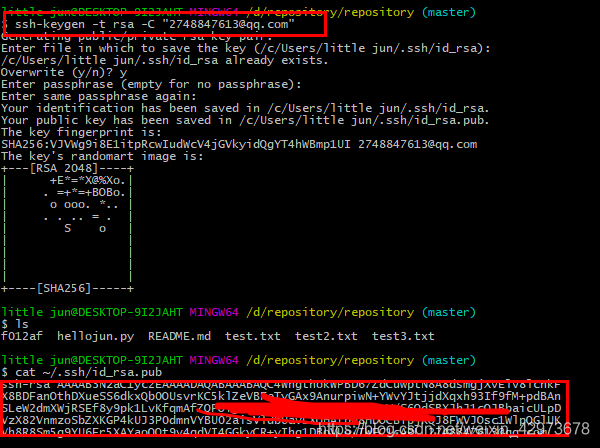
把红色框的加到ssh key 里面即可
四、分支管理
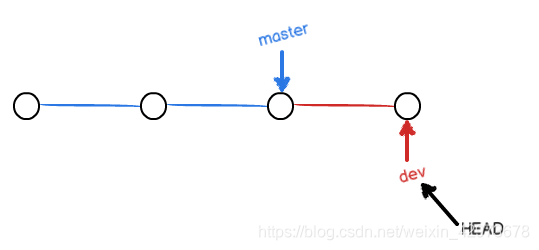
理解分支
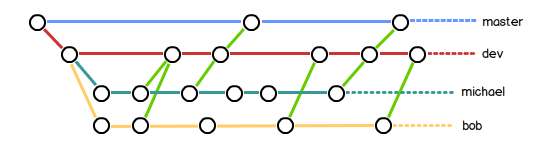
如下图所示,我们每次提交的时候,以前总是指向一个master,这个叫主分支,有时候,需要产生别的分支,如下图的dev,那么他们就指向了不同的版本库
1、分支的创建
git checkout -b branchname
$ git checkout -b one
Switched to a new branch 'one'
//这个相当于执行了两个指令,创建分支并切换到该分支

git branch one
git checkout one
git branch // 查看当前的分支
$ git branch
  master
* one  //* 号表示当前的分支,所以不同的名字,可以有不同的继承,可以并行开发
2、切换分支
git checkout branchname
可以尝试在branch one 修改,再切换大master分支,发现内容是不一样的
$ git checkout master
Switched to branch 'master'
Your branch is up-to-date with 'origin/master'.
3、合并分支
git merge branchname
$ git merge one
Updating 8542f9e..4afd7a4
Fast-forward
 test3.txt | 1 +
 1 file changed, 1 insertion(+)
 create mode 100644 test3.txt
注意到上面的Fast-forward信息,Git告诉我们,这次合并是“快进模式”,也就是直接把master指向one的当前提交,所以合并速度非常快
4、删除分支
$ git branch -d branchname
总结一下:
查看分支:git branch
创建分支:git branch name
切换分支:git checkout name
创建+切换:git checkout -b name
合并分支:git merge name
删除分支:git branch -d name
删除未合并的分支:git branch -D name
解决冲突分支
制造冲突
目前我们有两个分支,one and master
我们在one分支提交的test3 添加了内容为 modify in one
在master分支提交的test3 添加了内容为modify in master
显然,这两个文件不一样,合并的时候,自然会产生冲突
$ git merge one
Auto-merging test3.txt
CONFLICT (content): Merge conflict in test3.txt
Automatic merge failed; fix conflicts and then commit the result.

//用git status 也可以检查
$ git status
On branch master
Your branch is ahead of 'origin/master' by 1 commit.
  (use "git push" to publish your local commits)
You have unmerged paths.
  (fix conflicts and run "git commit")

Unmerged paths:
  (use "git add <file>..." to mark resolution)

        both modified:   test3.txt
little jun@DESKTOP-9I2JAHT MINGW64 /d/repository/repository (master|MERGING)
$ cat test3.txt
test branch one
<<<<<<< HEAD
modify in master
=======
modify in one
>>>>>>> one
git 用<<< === >>> 标记分隔冲突的内容,然后需要手动修改后才能提交,注意上面的分支是(master|MERGING) 合并中的状态
修改改后,git add and commit 就可以完成了合并了
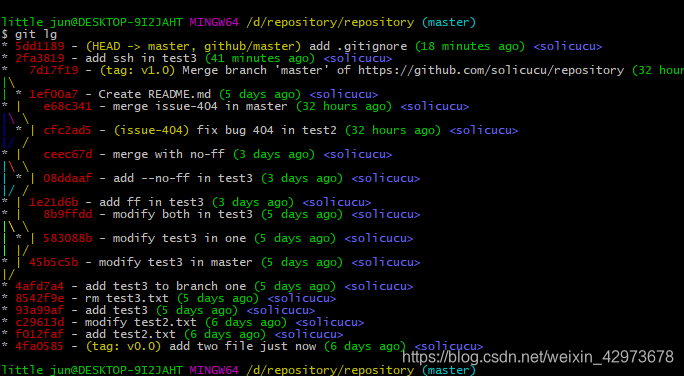
git log --graph //可以查看合并图
合并之后,master 和 one 合并成一个新的的版本
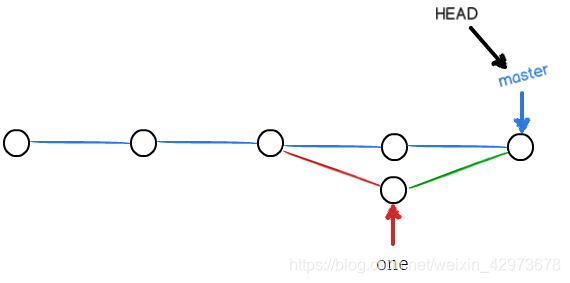
合并分支的两种方式的区别
1、merge with ff (Fast-forward)
新建一个分支one ,修改test3,然后提交
切换到master 分支,采用默认方式合并one 分支
$ git merge one
Updating 8b9ffdd..1e21d6b
Fast-forward
test3.txt | 1 +
1 file changed, 1 insertion(+)
little jun@DESKTOP-9I2JAHT MINGW64 /d/repository/repository (master)
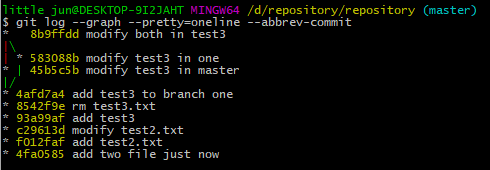
$ git log --graph --pretty=oneline --abbrev-commit
* 1e21d6b add ff in test3 //one 分支的那次提交,可以发现master 合并后,直接共用一个id
* 8b9ffdd modify both in test3
|\
| * 583088b modify test3 in one
* | 45b5c5b modify test3 in master
|/
* 4afd7a4 add test3 to branch one
* 8542f9e rm test3.txt
* 93a99af add test3
整的效果如下图:
根据上图可以看到,这种合并的方式,如果合并和,删去了分支one,那么,就没有one的提交记录了(虽然这里master和one指向的版本一样)
但这种模式下,删除分支后,会丢掉分支信息
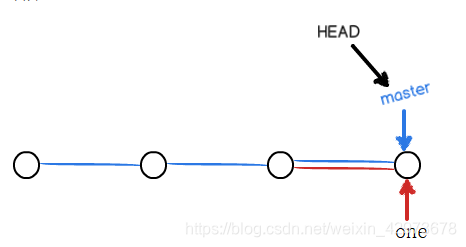
2、merge without ff(Fast-forward)
还是像上面那样,在分支one 修改该test3,添加了–no-ff内容
提交,然后切换回master分支
合并的时候如下,注意带上参数 --no-ff -m 是因为它会额外新建一个提交,所以要添加一个提交说明(这就是no-ff的区别)
$ git merge --no-ff -m "merge with no-ff" one
Merge made by the 'recursive' strategy.
 test3.txt | 1 +
 1 file changed, 1 insertion(+)


$ git log --graph --pretty=oneline --abbrev-commit
*   ceec67d merge with no-ff
|\
| * 08ddaaf add --no-ff in test3
|/
* 1e21d6b add ff in test3
*   8b9ffdd modify both in test3
|\
| * 583088b modify test3 in one
* | 45b5c5b modify test3 in master
|/
* 4afd7a4 add test3 to branch one
从上面可以看着,这种模式下的合并,会创建一个新的提交,所以,one 和msater指向的位置不一样。这样,就保留了one分支的提交历史,删掉了分支还可以看到,效果图如下
分支策略
在实际开发中,我们应该按照几个基本原则进行分支管理:
首先,master分支应该是非常稳定的,也就是仅用来发布新版本,平时不能在上面干活;
那在哪干活呢?干活都在dev分支上,也就是说,dev分支是不稳定的,到某个时候,比如1.0版本发布时,再把dev分支合并到master上,在master分支发布1.0版本;
你和你的小伙伴们每个人都在dev分支上干活,每个人都有自己的分支,时不时地往dev分支上合并就可以了。
所以,团队合作的分支看起来就像这样:
创建bug分支
必要性:
有时候,我们正在某个分支工作时,已经修改了某些工作,但是又没有完成,不能提交这么快。此时需要急需修复一个bug,那么,我们需要怎么处理才行呢
情景设置:我们在one分支的test3修改了,但是需要在master上修复bug,处理文档是test2
通过git status 可以看到有修改在test3 分支one
$ cat test3.txt
test branch one
modify in both
merge with ff
merge with --no-ff
fix bug 404

little jun@DESKTOP-9I2JAHT MINGW64 /d/repository/repository (one)
$ git status
On branch one
Changes not staged for commit:
  (use "git add <file>..." to update what will be committed)
  (use "git checkout -- <file>..." to discard changes in working directory)

        modified:   test3.txt
git stash //可以吧当时工作区的修改放到某个地方存好
$ git stash
Saved working directory and index state WIP on one: 08ddaaf add --no-ff in test3
HEAD is now at 08ddaaf add --no-ff in test3
然后可以安心到master创建bug分支修复bug了
$ git checkout -b issue-404
$ vi test2.txt
$ git add test2.txt
little jun@DESKTOP-9I2JAHT MINGW64 /d/repository/repository (issue-404)
$ git commit -m "fix bug 404 in test2"
[issue-404 cfc2ad5] fix bug 404 in test2
 1 file changed, 1 insertion(+)

//然后可以到master上合并分支
$ git merge --no-ff -m "merge issue-404 in master" issue-404
Merge made by the 'recursive' strategy.
 test2.txt | 1 +
 1 file changed, 1 insertion(+)

little jun@DESKTOP-9I2JAHT MINGW64 /d/repository/repository (master)
$ git log --graph --pretty=oneline --abbrev-commit
*   e68c341 merge issue-404 in master
|\
| * cfc2ad5 fix bug 404 in test2
|/
*   ceec67d merge with no-ff
|\
| * 08ddaaf add --no-ff in test3
|/
* 1e21d6b add ff in test3
此时恢复工作现场,切换到one分支
git stash list 可以看所有曾经被备份好的工作现场,然后选择对应的恢复
git stash pop  与   先 git stash apply(恢复现场)git stash drop (删除备份) 是一样的效果
$ git stash apply stash@{0}  指定恢复
$ git stash list
stash@{0}: WIP on one: 08ddaaf add --no-ff in test3

little jun@DESKTOP-9I2JAHT MINGW64 /d/repository/repository (one)
$ git stash pop
On branch one
Changes not staged for commit:
  (use "git add <file>..." to update what will be committed)
修复bug大功告成
多人协作
1、查看远程版本库信息
一般远程库的名字默认为remote
git remote // 显示远程版本库的名字
git remote -v //显示更加详细的信息

$ git remote -v
origin  https://github.com/solicucu/repository.git (fetch)
origin  https://github.com/solicucu/repository.git (push)
2、推送分支
//之前一直看到的是这样,最后一个是分支名,目前我们一直都是只是推送master分支
//如果要推送其他分支,就要把master 改成对应的分支名
git push origin master
但是我们并不是总想把所有的分支都提交上去,要有所选择,那么那些分支要推送,那些分支不用呢?
- master分支是主分支,因此要时刻与远程同步;
- dev分支是开发分支,团队所有成员都需要在上面工作,所以也需要与远程同步
- bug分支只用于在本地修复bug,就没必要推到远程了,除非老板要看看你每周到底修复了几个bug;
- feature分支是否推到远程,取决于你是否和你的小伙伴合作在上面开发。
3、创建远程库分支
git chekout -b dev
.....修改文件,提交
最后
git push origin dev // 初次新建一个dev分支,直接推上去,远程库会自动创建的
4、推送远程分支
在前面,有个合作者,修改了远程分支dev,提交了。而你现在正想向dev分支推送
$ git push origin dev
Fatal: AggregateException encountered.
Username for 'https://github.com': solicucu
To https://github.com/solicucu/repository.git
 ! [rejected]        dev -> dev (fetch first)
error: failed to push some refs to 'https://github.com/solicucu/repository.git'
hint: Updates were rejected because the remote contains work that you do
hint: not have locally. This is usually caused by another repository pushing
hint: to the same ref. You may want to first integrate the remote changes
hint: (e.g., 'git pull ...') before pushing again.
hint: See the 'Note about fast-forwards' in 'git push --help' for details.
根据提示会发现,rejected了,因为有更新的的版本,需要先合并再推上去
git pull // 实现合并,但也不一定很顺畅,可能有冲突
git pull 也要确定是哪个分支
$ git pull
remote: Enumerating objects: 5, done.
remote: Counting objects: 100% (5/5), done.
remote: Compressing objects: 100% (2/2), done.
remote: Total 3 (delta 1), reused 3 (delta 1), pack-reused 0
Unpacking objects: 100% (3/3), done.
From https://github.com/solicucu/repository
 * [new branch]      dev        -> origin/dev
There is no tracking information for the current branch.
Please specify which branch you want to merge with.
See git-pull(1) for details.

    git pull <remote> <branch>

If you wish to set tracking information for this branch you can do so with:

    git branch --set-upstream-to=origin/<branch> dev
通过下面指令,指定本地dev分支与远程origin/dev分支的链接
$ git branch --set-upstream-to=origin/dev dev
Branch dev set up to track remote branch dev from origin.
然后再pull
$ git pull
Auto-merging test3.txt
CONFLICT (content): Merge conflict in test3.txt
Automatic merge failed; fix conflicts and then commit the result.
//有冲突就按照往常,解决冲突的办法解决就好

$ git push origin dev
Fatal: HttpRequestException encountered.
Username for 'https://github.com': solicucu
Counting objects: 4, done.
Delta compression using up to 4 threads.
Compressing objects: 100% (4/4), done.
Writing objects: 100% (4/4), 484 bytes | 0 bytes/s, done.
Total 4 (delta 2), reused 0 (delta 0)
remote: Resolving deltas: 100% (2/2), completed with 2 local objects.
To https://github.com/solicucu/repository.git
   4a996af..92e2153  dev -> dev
总结一下,多人协作一般如下:
1、首先试图用git push origin branch-name 把自己最新的修改推送上去
2、如果推送失败,则因为远程分支比你的本地更新,需要先用git pull试图合并;
3、如果合并有冲突,则解决冲突,并在本地提交;
4、没有冲突或者解决掉冲突后,再用git push origin branch-name推送就能成功
如果git pull提示no tracking information,则说明本地分支和远程分支的链接关系没有创建,用命令git branch --set-upstream-to branch-name origin/branch-name
rebase 把合并的历史变成一个直线
git pull 之后:会产生分支
git rebase
rebase操作的特点:把分叉的提交历史“整理”成一条直线,看上去更直观。缺点是本地的分叉提交已经被修改过了。
给版本库添加标签
想想我们版本库的id这么长,我们能够记得吗,要是能给他们起名字多好,所以,就是接下来介绍的标签
git tag tag-name commit-id //如果不带id,默认是head,也就是当前最新的commit-id
git tag //可以查询所有的标签,而顺序是按tag-name 的顺序排序的

$ git tag
v0.0
v1.0

//利用tag 来查看版本库的信息
$ git show v0.0
commit 4fa05850dcbea2adb6a89952d75674a82b57d0bf
Author: solicucu <2748847613@qq.com>
Date:   Fri Feb 15 16:51:15 2019 +0800

    add two file just now
//创建带有说明的标签,用-a指定标签名,-m指定说明文字
//给版本号附加说明
$ git tag -a v0.1 -m "version 0.1 released" f012faf
$ git show v0.1
tag v0.1
Tagger: solicucu <2748847613@qq.com>
Date:   Thu Feb 21 17:08:46 2019 +0800

version 0.1 released

commit f012faf6d76d716a6b866bcf180c43cd4b90c90a
Author: solicucu <2748847613@qq.com>
Date:   Fri Feb 15 16:53:25 2019 +0800

    add test2.txt
标签的操作
1、标签的删除
$ git tag -d v1.0 //本地删除就这样就行了
2、标签推送
//推送单个的
$ git push origin v1.0
//推送所有标签
$ git push origin --tags
3、删除远程库的标签
(1)先删除本地的tag
(2)再推送上去,注意格式
$ git tag -d v0.1
Deleted tag 'v0.1' (was 1bbcfbd)
$ git push origin :refs/tags/v0.1   //注意是是 :refs/tags/tag-name
五、使用码云
如果我们希望体验Git飞一般的速度,可以使用国内的Git托管服务——码云。和GitHub相比,码云也提供免费的Git仓库。
此外,还集成了代码质量检测、项目演示等功能。对于团队协作开发,码云还提供了项目管理、代码托管、文档管理的服务,5人以下小团队免费。
传送门,注册了之后,基本跟GitHub一样,而且是中文的。
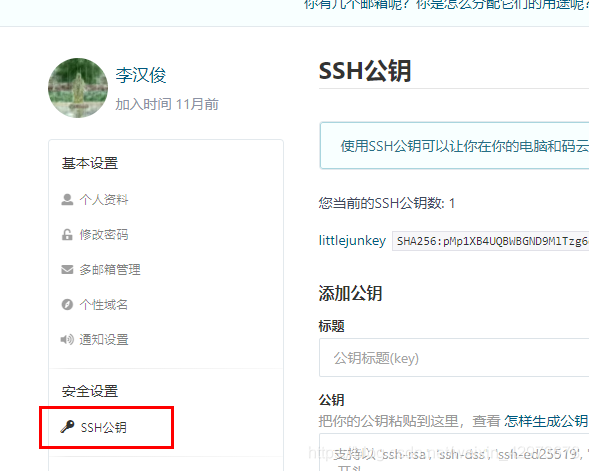
按照github的方法,添加一个ssh公钥,这样才能够推送上去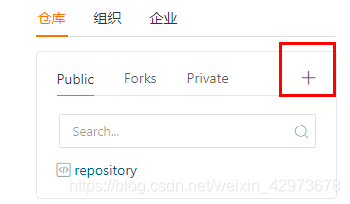
在此处新建一个仓库,这就不多说了。
话不多说,关联一下本地仓库试试水
$ git remote add origin git@gitee.com:solicucu/repository.git
fatal: remote origin already exists.
发现事情并不简单,提示已经有一个origin 存在了
那么我们需要把之前的关联删掉
$ git remote rm origin
$ git remote add origin git@gitee.com:solicucu/repository.git
$ git push origin master
Counting objects: 42, done.
Delta compression using up to 4 threads.
Compressing objects: 100% (33/33), done.
Writing objects: 100% (42/42), 10.12 KiB | 0 bytes/s, done.
Total 42 (delta 16), reused 0 (delta 0)
remote: Powered By Gitee.com
To git@gitee.com:solicucu/repository.git
 * [new branch]      master -> master
这样可以把gitee 当作GitHub用了。
有的小伙伴又要问了,一个本地库能不能既关联GitHub,又关联码云呢?
答案是肯定的,因为git本身是分布式版本控制系统,可以同步到另外一个远程库,当然也可以同步到另外两个远程库。
使用多个远程库时,我们要注意,git给远程库起的默认名称是origin,如果有多个远程库,我们需要用不同的名称来标识不同的远程库。
$ git remote rm origin

little jun@DESKTOP-9I2JAHT MINGW64 /d/repository/repository (master)
$ git remote add github git@github.com:solicucu/repository.git
//关联github ,把远程库命名为github
little jun@DESKTOP-9I2JAHT MINGW64 /d/repository/repository (master)
$ git remote add gitee git@gitee.com:solicucu/repository.git
//关联gitee ,把远程库命名为gitee
little jun@DESKTOP-9I2JAHT MINGW64 /d/repository/repository (master)
$ git remote -v
gitee   git@gitee.com:solicucu/repository.git (fetch)
gitee   git@gitee.com:solicucu/repository.git (push)
github  git@github.com:solicucu/repository.git (fetch)
github  git@github.com:solicucu/repository.git (push)
所以要添加其他远程库,原理一样
六、自定义Git
有些时候,你必须把某些文件放到Git工作目录中,但又不能提交它们,比如保存了数据库密码的配置文件啦,等等,每次git status都会显示Untracked files …
那么有什么可以让它忽略呢,那是必然的
需要写一个.gitigore 文件,告诉那些不需要跟踪的
我这里是对这种两文件忽视,当然其他的可以自己设置
$ cat .gitignore
*.init
*.class
有一个要提示的是,.gitignore 也要提交到版本库里面的
然后git status
$ git status
On branch master
nothing to commit, working directory clean
有些时候,你想添加一个文件到Git,但发现添加不了,原因是这个文件被.gitignore忽略了:
如果实在要添加的话,就要加-f
$ git add config.init
The following paths are ignored by one of your .gitignore files:
config.init
Use -f if you really want to add them.

$ git add -f config.init
或者你发现,可能是.gitignore写得有问题,需要找出来到底哪个规则写错了,可以用git check-ignore命令检查
可以查看是怎样被忽略掉的
$ git check-ignore -v config.init
.gitignore:1:*.init     config.init
配置别名
通过修改 --global 参数 修改alias.name origin-name 配置
$ git config --global alias.st status

little jun@DESKTOP-9I2JAHT MINGW64 /d/repository/repository (master)
$ git st
On branch master
nothing to commit, working directory clean
有些人喜欢如下的配置
$ git config --global alias.co checkout
$ git config --global alias.ci commit
$ git config --global alias.br branch
$ git config --global alias.last ‘log -1’ // git last 查看最后一次的提交
git config --global alias.lg “log --color --graph --pretty=format:’%Cred%h%Creset -%C(yellow)%d%Creset %s %Cgreen(%cr) %C(bold blue)<%an>%Creset’ --abbrev-commit” 这个更加炫酷
是不是是不是
配置文件
配置Git的时候,加上–global是针对当前用户起作用的,如果不加,那只针对当前的仓库起作用。
配置文件放哪了?每个仓库的Git配置文件都放在.git/config文件中:
$ cat .git/config
[core]
        repositoryformatversion = 0
        filemode = false
        bare = false
        logallrefupdates = true
        symlinks = false
        ignorecase = true
[branch "master"]
[branch "dev"]
[remote "github"]
        url = [email protected]:solicucu/repository.git
        fetch = +refs/heads/*:refs/remotes/github/*
[remote "gitee"]
        url = [email protected]:solicucu/repository.git
        fetch = +refs/heads/*:refs/remotes/gitee/*
而当前用户的Git配置文件放在用户主目录下的一个隐藏文件.gitconfig中:
完结撒花