本文内容
- 精灵 类的使用
- Rect 类的使用
- 实现一个坦克的移动和旋转
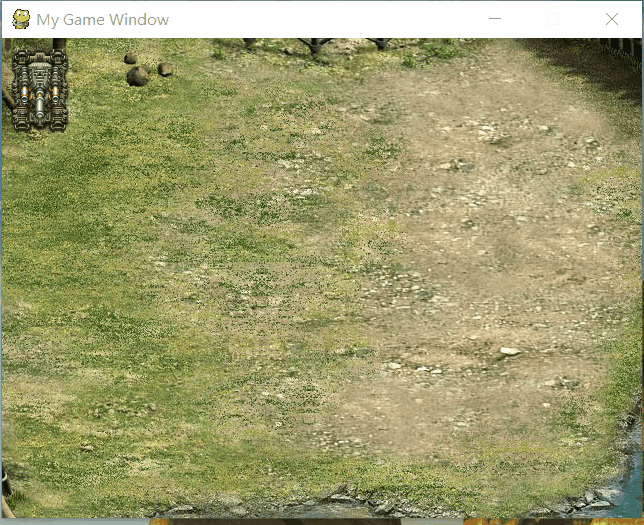
效果演示
添加一个静态坦克
我们已经知道如何创建一个游戏窗口,并设置背景图片,还让游戏程序可以对键盘和鼠标进行响应,接着我们需要给游戏添加一个精灵,精灵是游戏开发里的一个概念,比如游戏里面的一个坦克,一棵树木,一个子弹都可以是一个精灵。
pgame.sprite提供了一个最基础的精灵类Sprite,它包含了图片image和位置rect,它只能让一个图片移动,当我们要更多的功能的时候,比如动画等,则需要继承Sprite,自己进一步编写代码。本次学习中,我们准备了3个图片,分别是一个坦克机身,和2个炮筒:

首先,我们把准备好的素材添加到游戏工程中,可以通过拖拽,复制粘贴等方式:
导入好资源之后,我们开始正式编写代码。首先,我们创建1个Surface对象,来存放我们第1个资源文件,和添加背景一样的操作,如下所示:
tank_image = pygame.image.load('tank.png').convert() #创建坦克
接着,我们继承Sprite类,创建一个HeroTank类,以便我们进一步扩展功能,先看具体代码:
class HeroTank(pygame.sprite.Sprite):
    def __init__(self):
        pygame.sprite.Sprite.__init__(self)								#初始化 Sprite类构造函数
        self.tank_image = tank_image								 	#初始化坦克机生图片
        self.tank_rect = self.tank_image.get_rect()            			#获取机身rect对象

    def display(self,screen):
        screen.blit(self.tank_image, self.tank_rect)					#screen在坦克机身的rect上绘制坦克机身图片
现在,它只有一个构造函数,和一个显示函数。接着我们使用HeroTank类创建一个对象,并调用该类的display方法,来显示坦克机身,完整的程序如下:
# 导入模块
import pygame
from pygame.locals import *
from sys import exit

# 初始化部分
pygame.init()

# 设置游戏窗口
screen = pygame.display.set_mode((640,480))
pygame.display.set_caption("My Game Window")
background = pygame.image.load("background_640x480.jpg").convert()

# 坦克精灵类
tank_image = pygame.image.load('tank.png').convert_alpha()		#使用convert_alpha()保留透明信息,而不是convert()

class HeroTank(pygame.sprite.Sprite):
    def __init__(self):
        pygame.sprite.Sprite.__init__(self)
        self.tank_image = tank_image
        self.tank_rect = self.tank_image.get_rect()

    def display(self,screen):
        screen.blit(self.tank_image, self.tank_rect)

my_tank = HeroTank()

while True:
    for event in pygame.event.get():
        if event.type == QUIT:
            exit()

    screen.blit(background, (0, 0))
    my_tank.display(screen)
    pygame.display.update()
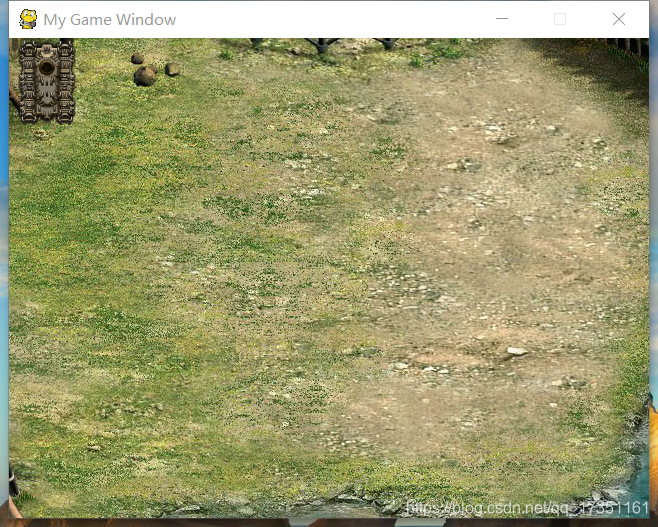
因为在对象中,我们没有指定生成的坦克机身image的rect位置,所以默认是(0,0)。当我们在rect上填充坦克image的时候,就会默认在srceen的左上角,程序运行如下所示:
我们顺利的添加了坦克的机身,接下来就是添加炮筒了,其逻辑是相似的,以下是具体代码:
# 导入模块
import pygame
from pygame.locals import *
from sys import exit

# 初始化部分
pygame.init()

# 设置游戏窗口
screen = pygame.display.set_mode((640,480))
pygame.display.set_caption("My Game Window")
background = pygame.image.load("background_640x480.jpg").convert()

# 坦克精灵类
tank_image = pygame.image.load('tank.png').convert_alpha()
cannon1_image = pygame.image.load('cannon_1.png').convert_alpha()

class HeroTank(pygame.sprite.Sprite):
    def __init__(self):
        pygame.sprite.Sprite.__init__(self)
        self.tank_image = tank_image
        self.cannon1_image = cannon1_image
        self.tank_rect = self.tank_image.get_rect()
        self.cannon1_rect = self.cannon1_image.get_rect()

    def display(self,screen):
        screen.blit(self.tank_image, self.tank_rect)
        self.cannon1_rect.center = self.tank_rect.center #炮筒中心点和坦克机生rect的中心点保持一致
        screen.blit(self.cannon1_image, self.cannon1_rect)

my_tank = HeroTank()

while True:
    for event in pygame.event.get():
        if event.type == QUIT:
            exit()

    screen.blit(background, (0, 0))
    my_tank.display(screen)
    pygame.display.update()
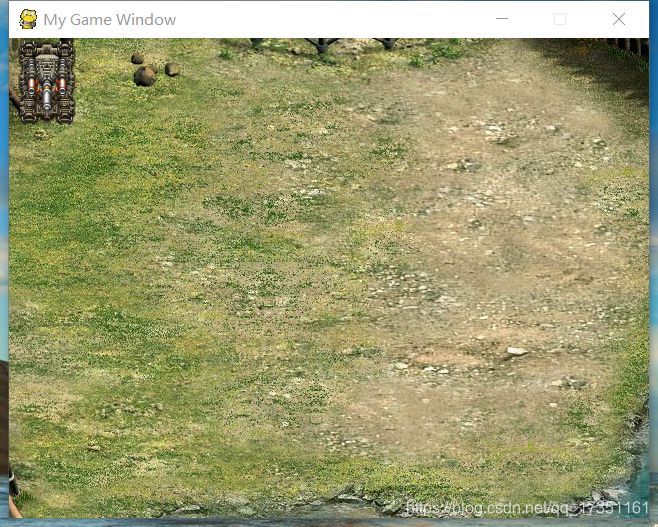
这里我们在display()函数中添加了rect中心点的赋值语句,这是因为如果没有,那么炮筒绘画的也会在程序左上角,这样看起来炮筒就错位了,程序运行如下所示:
移动坦克
我们已经创建了一个精灵类,也初步了解了surface和rect对象,接着我们通过操作rect对象,来控制坦克的移动,首先我们是在类里面添加方法,分别添加四个方法来控制坦克的上下左右移动,具体类的代码如下(这里用了和上节不一样的键盘的获取方式,个人它的控制体验感觉更好):
# 导入模块
import pygame
from pygame.locals import *
from sys import exit

# 初始化部分
pygame.init()

# 设置游戏窗口
screen = pygame.display.set_mode((640,480))
pygame.display.set_caption("My Game Window")
background = pygame.image.load("background_640x480.jpg").convert()

# 坦克精灵类
tank_image = pygame.image.load('tank.png').convert_alpha()
cannon1_image = pygame.image.load('cannon_1.png').convert_alpha()

class HeroTank(pygame.sprite.Sprite):
    def __init__(self):
        pygame.sprite.Sprite.__init__(self)
        self.tank_image = tank_image
        self.cannon1_image = cannon1_image
        self.tank_rect = self.tank_image.get_rect()
        self.cannon1_rect = self.cannon1_image.get_rect()
        self.speed = 1;												#每次移动的像素

    def moveLeft(self):
        if self.tank_rect.left > 0:									#显示rect的范围,不至于玩家坦克移出屏幕
            self.tank_rect.x -= self.speed
    def moveRight(self):
        elif self.tank_rect.right < 640:
            self.tank_rect.x += self.speed
    def moveUp(self):
        elif self.tank_rect.top > 0:
            self.tank_rect.y -= self.speed
    def moveDown(self):
        elif self.tank_rect.bottom < 480:
            self.tank_rect.y += self.speed

    def display(self,screen):
        screen.blit(self.tank_image, self.tank_rect)
        self.cannon1_rect.center = self.tank_rect.center
        screen.blit(self.cannon1_image, self.cannon1_rect)

my_tank = HeroTank()

while True:
    for event in pygame.event.get():
        if event.type == QUIT:
            exit()
    key_press = pygame.key.get_pressed()
    if key_press[K_w]:
        my_tank.moveUp()
    elif key_press[K_s]:
        my_tank.moveDown()
    elif key_press[K_a]:
        my_tank.moveLeft()
    elif key_press[K_d]:
        my_tank.moveRight()

    screen.blit(background, (0, 0))
    my_tank.display(screen)
    pygame.display.update()
控制游戏速率——帧率的设置
当我们运行程序后,会发现坦克可以移动了,但是速度太快了,这是因为我们虽然每次只移动1个像素,但是我们1秒移动太多次了,这里我们用帧来控制整个游戏的速度。我们如果能够控制1秒程序刷新30次,那么1秒我们坦克就只会移动30个像素,虽然有点慢,但是看起来可控多了。我们使用以下函数来实现
framerate = pygame.time.Clock()        #实例化一个之中对象
framerate .tick(30)								#控制循环为30帧/秒
clock.tick(30)函数的工作控制游戏速率原理是,当本次运行到这个函数和上次运行到这个函数时间差不到设定的时间1/30秒的时候,就等待,然后再接着运行,我们需要将函数放在主要循环中。接着我们稍微调整了下坦克的移动速度,即实例中的speed变量后,达到一个不错的效果(改动较小,所以完整代码和下一部分一起贴出):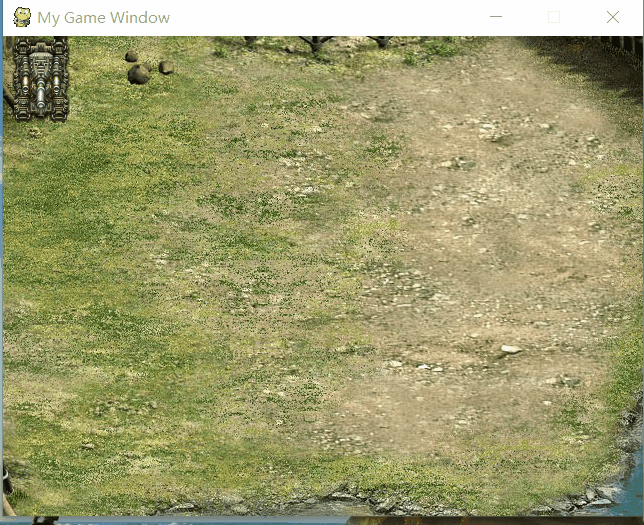
也许你感觉他还是有点快,我把speed调节到了8,也就是每次8像素。每1秒30次,480像素宽的地图,只需要移动不到2秒(因为我们坦克有宽度),当然,速度的调节是简单的,现在还有一个问题,坦克好像装了麦克纳姆轮一样,平移着移动,不符合实际情况,接下来我们来解决这一问题。
旋转坦克精灵
我们可以通过Rect的旋转来实现:
pygame.transform.rotate(image,angle)
transform.rotate()的第1个参数为图像,第2个参数为角度,选择以后返回一个新的对象,在程序设计中,我们则会使用这个新的对象。因为我们现在坦克只有上下左右移动,所以我们图像有4个角度,0°,90°,180°,270°。我们为我们的坦克类新添加一个函数,以便我们更好的控制选择:
def rotate(self,angle):
    self.tank_image = pygame.transform.rotate(tank_image, angle)  # 选择并生成一个新的对象
    self.rect = self.image.get_rect(center=self.rect.center)      #更新rect,否则旋转起来会“摇摇晃晃”
这里稍作解释,我们在旋转图像后,它的rect也就变化了,所以我们需要读取出旋转后的图像的rect,并且我们是以原来图像的中心点作为现在的中心点来读取的,否则它会默认在左上角生成。这就会造成如果你更新了rect,一旋转,坦克就会复位的初始点。
关于旋转的理解,可以参考这篇博客:pygame 笔记-9 图片旋转及边界反弹,博主以及做了不错的分析,这里不再赘述。现在看一下完整的程序:
# 导入模块
import pygame
from pygame.locals import *
from sys import exit

# 初始化部分
pygame.init()

# 设置游戏窗口
screen = pygame.display.set_mode((640,480))
pygame.display.set_caption("My Game Window")
background = pygame.image.load("background_640x480.jpg").convert()

# 坦克精灵类
tank_image = pygame.image.load('tank.png').convert_alpha()
cannon1_image = pygame.image.load('cannon_1.png').convert_alpha()

class HeroTank(pygame.sprite.Sprite):
    def __init__(self):
        pygame.sprite.Sprite.__init__(self)
        self.tank_image = tank_image
        self.cannon1_image = cannon1_image
        self.tank_rect = self.tank_image.get_rect()
        self.cannon1_rect = self.cannon1_image.get_rect()
        self.speed = 8

    def moveLeft(self):
        if self.tank_rect.left > 0:
            self.tank_rect.x -= self.speed
        self.rotate(270)

    def moveRight(self):
        if self.tank_rect.right < 640:
            self.tank_rect.x += self.speed
        self.rotate(90)

    def moveUp(self):
        if self.tank_rect.top > 0:
            self.tank_rect.y -= self.speed
        self.rotate(180)

    def moveDown(self):
        if self.tank_rect.bottom < 480:
            self.tank_rect.y += self.speed
        self.rotate(0)

    def rotate(self, angle):
        # 选择机身
        self.tank_image = pygame.transform.rotate(tank_image, angle)
        self.tank_rect = self.tank_image.get_rect(center=self.tank_rect.center)
        # 旋转炮筒
        self.cannon1_image = pygame.transform.rotate(cannon1_image, angle)
        self.cannon1_rect = self.cannon1_image.get_rect(center=self.cannon1_rect.center)

    def display(self, screen):
        screen.blit(self.tank_image, self.tank_rect)
        self.cannon1_rect.center = self.tank_rect.center
        screen.blit(self.cannon1_image, self.cannon1_rect)


my_tank = HeroTank()
framerate = pygame.time.Clock()

while True:
    framerate .tick(30)
    for event in pygame.event.get():
        if event.type == QUIT:
            exit()
    key_press = pygame.key.get_pressed()
    if key_press[K_w]:
        my_tank.moveUp()
    elif key_press[K_s]:
        my_tank.moveDown()
    elif key_press[K_a]:
        my_tank.moveLeft()
    elif key_press[K_d]:
        my_tank.moveRight()
    screen.blit(background, (0, 0))
    my_tank.display(screen)
    pygame.display.update()
运行程序,就得到了我们文章开始的效果。我们还有一个炮筒素材没有用上,这里我们可以作为额外练习,通过按一个键盘按键,来切换炮筒。
以下是整个工程,包括代码和图片资源的下载地址:
链接:资源下载
提取码:8xkc