众所周知,在WinForm中,如果要制作一个无边框窗体,可以将窗体的FormBorderStyle属性设置为None来完成。
如果要制作成异形窗体,则需要使用图片或者使用GDI+自定义绘制。
那么,在WPF中,我们怎样制作一个无边框窗体呢?
答案是将Window的WindowStyle属性设置为None,即WindowStyle="None" 。如果是非矩形的异形窗体,则需要将背景设为Null,将允许透明设置为True,也就是:Background="{x:Null}" AllowsTransparency="True",可能有些人还希望这个窗口可以拖来拖去,那么,就还需要设置MouseLeftButtonDown事件,比如:MouseLeftButtonDown="DragWindow",这里DragWindow由Window的DragMove()来完成。想关闭窗口?那就自己做一个按钮,然后使用Window本身的Close()方法吧。
下面是效果: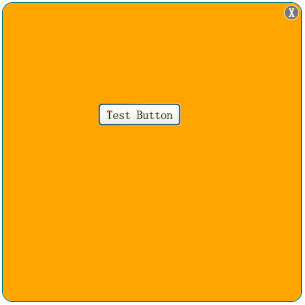
这里右上角有个圆形的X按钮,是用Button,但将它的样式设置成了圆角矩形制作的。具体代码见下:
XAML代码:
// Window1.xaml
<Window x:Class="BorderlessWindow.Window1"
xmlns="http://schemas.microsoft.com/winfx/2006/xaml/presentation"
xmlns:x="http://schemas.microsoft.com/winfx/2006/xaml"
Title="BorderlessWindow" Height="300" Width="300"
WindowStyle="None" Background="{x:Null}" AllowsTransparency="True"
MouseLeftButtonDown="DragWindow"
>
<Window.Resources>
<Style x:Key="ButtonStyle" TargetType="{x:Type Button}">
<Setter Property="Foreground" Value="White"/>
<Setter Property="Template">
<Setter.Value>
<!--设置样式 -->
<ControlTemplate TargetType="{x:Type Button}">
<Grid>
<Rectangle x:Name="Rectangle" Stroke="#FFFFFFFF" StrokeMiterLimit="1.000000" StrokeThickness="0.500000" RadiusX="10" RadiusY="10" Fill="#FF777777">
</Rectangle>
<ContentPresenter x:Name="ContentPresenter" SnapsToDevicePixels="{TemplateBinding SnapsToDevicePixels}" HorizontalAlignment="{TemplateBinding HorizontalContentAlignment}"
VerticalAlignment="{TemplateBinding VerticalContentAlignment}" RecognizesAccessKey="True"/>
</Grid>
<!-- 设置鼠标移到关闭按钮上的效果 -->
<ControlTemplate.Triggers>
<Trigger Property="IsMouseOver" Value="true">
<Setter Property="Fill" TargetName="Rectangle">
<Setter.Value>
<SolidColorBrush Color="White"></SolidColorBrush>
</Setter.Value>
</Setter>
<Setter Property="Foreground" Value="Black"></Setter>
</Trigger>
</ControlTemplate.Triggers>
</ControlTemplate>
</Setter.Value>
</Setter>
</Style>
</Window.Resources>
<!-- 窗体中的内容 -->
<Grid>
<!--
窗体的边框,底色设置,注意将CornerRadius与左上角“X”叉形按钮的设置保持一致或约大于叉形按钮的RadiusX/Y设置 -->
<Border CornerRadius="10,10,10,10" Background="Orange" Height="Auto" BorderBrush="Teal" BorderThickness="1"> </Border>
<!--左上角的“X”叉形按钮-->
<Button Name="Button1" Style="{StaticResource ButtonStyle}" Click="CloseWindow" Width="15" Height="15" Content="X" HorizontalAlignment="Right" VerticalAlignment="Top" Margin="3,3,3,3"></Button>
<Button Height="23" Margin="96,101,121,0" Name="button2" VerticalAlignment="Top">Test Button</Button>
</Grid>
</Window>
C#代码:
// Window1.xaml.cs
using System;
using System.Collections.Generic;
using System.Text;
using System.Windows;
using System.Windows.Controls;
using System.Windows.Data;
using System.Windows.Documents;
using System.Windows.Input;
using System.Windows.Media;
using System.Windows.Media.Imaging;
using System.Windows.Shapes;
namespace BorderlessWindow
{
/// <summary>
/// Interaction logic for Window1.xaml
/// </summary>
public partial class Window1 : System.Windows.Window
{
public Window1()
{
InitializeComponent();
}
public void DragWindow(object sender, MouseButtonEventArgs args)
{
this.DragMove();
}
public void CloseWindow(object sender, RoutedEventArgs args)
{
this.Close();
}
}
}
如果是异形窗体呢,比如是个这样的窗体形状:
如何做?其实道理都一样,只是画法不同而已(想知道怎么画出来的?那就看看这里吧:http://blog.csdn.net/johnsuna/archive/2007/09/19/1790997.aspx)。这就有待你举一返三了,不再赘述。