应用:
认证 授权 加密 会话管理(单点登录) 缓存 与web集成
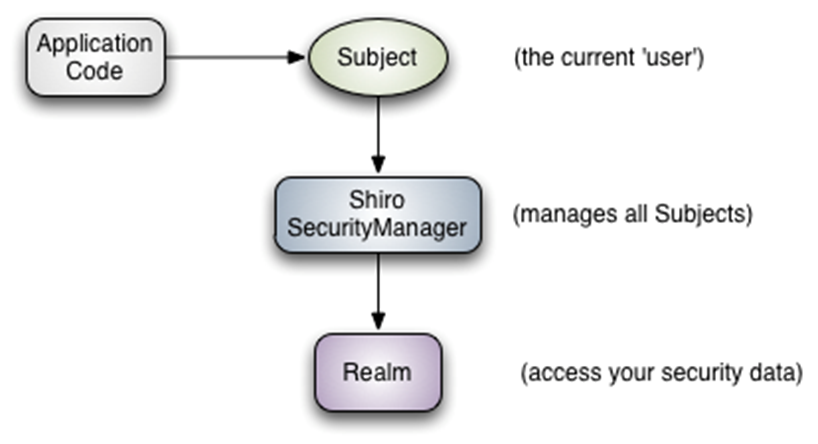
Subject:主体,代表了当前“用户”,这个用户不一定是一个具体的人,与当前应用交互的任何东西都是Subject,如网络爬虫,机器人等;即一个抽象概念;所有Subject都绑定到SecurityManager,与Subject的所有交互都会委托给SecurityManager;可以把Subject认为是一个门面;SecurityManager才是实际的执行者;
SecurityManager:安全管理器;即所有与安全有关的操作都会与SecurityManager交互;且它管理着所有Subject;可以看出它是Shiro的核心,它负责与后边介绍的其他组件进行交互,如果学习过SpringMVC,你可以把它看成DispatcherServlet前端控制器;
Realm:域,Shiro从Realm获取安全数据(如用户、角色、权限),就是说SecurityManager要验证用户身份,那么它需要从Realm获取相应的用户进行比较以确定用户身份是否合法;也需要从Realm得到用户相应的角色/权限进行验证用户是否能进行操作;可以把Realm看成DataSource,即安全数据源
使用步骤:
过滤器的配置:
共有10个过滤器 但是实际使用的时候只要配置一个核心过滤器就行了。
<!--注意:如果是和struts2整合的话,shiro的filter必须在struts2的filter之前,否则action无法创建-->
<filter>
<filter-name>shiroFilter</filter-name>
<filter-class>org.springframework.web.filter.DelegatingFilterProxy</filter-class>
<init-param>
<param-name>targetFilterLifecycle</param-name>
<param-value>true</param-value>
</init-param>
</filter>
<filter-mapping>
<filter-name>shiroFilter</filter-name>
<url-pattern>/*</url-pattern>
</filter-mapping>
过滤器种类:

产生代理类的方式:
<!--放在applicationContext.xml事务管理器声明前-->
<!--产生Shiro控制器的方式 使用cglib生成代理-->
<aop:aspectj-autoproxy proxy-target-class="true" />
applicationContext-shiro.xml(web层):
<?xml version="1.0" encoding="UTF-8"?>
<beans xmlns="http://www.springframework.org/schema/beans"
xmlns:xsi="http://www.w3.org/2001/XMLSchema-instance" xmlns:p="http://www.springframework.org/schema/p"
xmlns:context="http://www.springframework.org/schema/context" xmlns:tx="http://www.springframework.org/schema/tx"
xmlns:aop="http://www.springframework.org/schema/aop"
xsi:schemaLocation="http://www.springframework.org/schema/beans
http://www.springframework.org/schema/beans/spring-beans.xsd
http://www.springframework.org/schema/aop
http://www.springframework.org/schema/aop/spring-aop.xsd
http://www.springframework.org/schema/tx
http://www.springframework.org/schema/tx/spring-tx.xsd
http://www.springframework.org/schema/context
http://www.springframework.org/schema/context/spring-context.xsd">
<description>Shiro与spring整合的配置文件(天然整合)</description>
<!-- SecurityManager配置 -->
<!-- 配置Realm域 -->
<!-- 密码比较器 -->
<!-- 代理如何生成? 用工厂来生成Shiro的相关过滤器 -->
<!-- 配置缓存:ehcache缓存 -->
<!-- 安全管理 -->
<bean id="securityManager" class="org.apache.shiro.web.mgt.DefaultWebSecurityManager">
2<property name="realm" ref="authRealm" /><!-- 引用自定义的realm -->
<!-- 二级缓存 -->
<property name="cacheManager" ref="shiroEhcacheManager" />
</bean>
<!-- 自定义权限认证 -->
<bean id="authRealm" class="com.zixue.shiro.AuthRealm">
<!-- class由程序员定义 -->
<property name="userService" ref="userService" />
<!-- 自定义密码加密算法 -->
<property name="credentialsMatcher" ref="passwordMatcher" />
<!-- ref由程序员定义 -->
</bean>
<!-- 设置密码加密策略 md5hash -->
<bean id="passwordMatcher" class="com.zixue.shiro.CustomCredentialsMatcher" />
<!-- class由程序员定义 -->
<!-- filter-name这个名字的值来自于web.xml中filter的名字 -->
<bean id="shiroFilter" class="org.apache.shiro.spring.web.ShiroFilterFactoryBean"><!--这个才是生产过滤器的根源  web.xml的DelegatingFilterProxy并不能直接生成-->
<property name="securityManager" ref="securityManager" />
<!--登录页面 -->
<!--接收loginAction中的subject.login(token)方法,调用了Realm域中的认证方法(反射来实现调用)-->
<property name="loginUrl" value="/index.jsp"></property>
<!-- 登录成功后 -->
<property name="successUrl" value="/home.action"></property>
<property name="filterChainDefinitions">
<!-- /**代表下面的多级目录也过滤 -->
<value>
/index.jsp* = anon <!-- (过滤器名) -->
/home* = anon
/sysadmin/login/login.jsp* = anon
/sysadmin/login/logout.jsp* = anon
/login* = anon
/logout* = anon
/components/** = anon
/css/** = anon
/images/** = anon
/js/** = anon
/make/** = anon
/skin/** = anon
/stat/** = anon
/ufiles/** = anon
/validator/** = anon
/resource/** = anon
/** = authc     <!--根目录下所有资源及子目录 -->
/*.* = authc       <!-- 本目录所有资源 -->
</value>
</property>
</bean>
<!-- 用户授权/认证信息Cache, 采用EhCache 缓存 -->
<bean id="shiroEhcacheManager" class="org.apache.shiro.cache.ehcache.EhCacheManager">
<property name="cacheManagerConfigFile" value="classpath:ehcache-shiro.xml" />
<!-- 引入ehcache-shiro.xml -->
</bean>
<!-- 保证实现了Shiro内部lifecycle函数的bean执行 -->
<bean id="lifecycleBeanPostProcessor" class="org.apache.shiro.spring.LifecycleBeanPostProcessor" />
<!-- 生成代理,通过代理进行控制 -->
<bean        class="org.springframework.aop.framework.autoproxy.DefaultAdvisorAutoProxyCreator"
depends-on="lifecycleBeanPostProcessor">
<property name="proxyTargetClass" value="true" />
</bean>
<!-- 安全管理器 -->
<bean    class="org.apache.shiro.spring.security.interceptor.AuthorizationAttributeSourceAdvisor">
<property name="securityManager" ref="securityManager" />
</bean>
</beans>
在applicationContext.xml文件中加载shiro配置文件:
<import resource="classpath:spring/applicationContext-shiro.xml"></import>
ehcache-shiro.xml 缓存(和applicationContext.xml一起)
<?xml version="1.0" encoding="UTF-8"?>
<ehcache updateCheck="false" name="shiroCache">
<defaultCache
maxElementsInMemory="10000"
eternal="false"
timeToIdleSeconds="120"
timeToLiveSeconds="120"
overflowToDisk="false"
diskPersistent="false"
diskExpiryThreadIntervalSeconds="120"/>
</ehcache>
编写密码比较器:
1.Encrypt.java(使用Md5Hash算法 放在工具包下)
public class Encrypt {
/*
* 散列算法一般用于生成数据的摘要信息,是一种不可逆的算法,一般适合存储密码之类的数据,
* 常见的散列算法如MD5、SHA等。一般进行散列时最好提供一个salt(盐),比如加密密码“admin”,
* 产生的散列值是“21232f297a57a5a743894a0e4a801fc3”,
* 可以到一些md5解密网站很容易的通过散列值得到密码“admin”,
* 即如果直接对密码进行散列相对来说破解更容易,此时我们可以加一些只有系统知道的干扰数据,
* 如用户名和ID(即盐);这样散列的对象是“密码+用户名+ID”,这样生成的散列值相对来说更难破解。
*/
//高强度加密算法,不可逆
public static String md5(String password, String salt){
return new Md5Hash(password,salt,2).toString();
}
public static void main(String[] args) {
System.out.println(new Md5Hash("123456","tony",2).toString());
}
}
2.密码比较器 CustomCredentialsMatcher.java(和web并级的shiro包下)
public class CustomCredentialsMatcher extends SimpleCredentialsMatcher {
/**
* 提供一个专门用于进行密码比较的方法
* token:代表用户在界面输入的用户名密码
* AuthenticationInfo info: 代表数据库中的用户信息
*
* Md5Hash算法
* 将用户在界面上输入的明文-----------------加密成密文
* 将用户在数据库中的密文获取出来---------------跟用户输入的明文加密后的结果进行比较------------如果相同证明密码也正确,此时返回值就是true
*
* 返回值:  true代表密码比较成功
*        false代表密码比较失败,此时程序也会报出异常
*/
public boolean doCredentialsMatch(AuthenticationToken token, AuthenticationInfo info) {
//1.向下转型
UsernamePasswordToken upToken = (UsernamePasswordToken) token;
//2.将用户输入的原始密码进行加密    Md5Hash的参数说明:第一个参数是明文     第二个参数:代表盐     第三个参数:迭代次数
//new Md5Hash(new String(upToken.getPassword()),upToken.getUsername(),2);
String encryptPwd = Encrypt.md5(new String(upToken.getPassword()), upToken.getUsername());
//3.跟数据库串密文进行比较
String pwd = info.getCredentials().toString();
//return encryptPwd.equals(pwd);
return super.equals(pwd, encryptPwd);
}
}
配置(applicationContext-shiro.xml已配好 记得修改路径):
//设置密码加密策略 md5hash
<bean id="passwordMatcher" class="com.zixue.shiro.CustomCredentialsMatcher">
编写自定义Realm域:
作用:
1.调用业务层和CustomCredentialsMatcher密码比较器(所以需要注入属性)
2.进行认证和授权操作
AuthRealm.java(和web并级的shiro包下):
public class AuthRealm extends AuthorizingRealm {
private UserService userService;
public void setUserService(UserService userService) {
this.userService = userService;
}

/**
* 认证   (登录)
* AuthenticationInfo  返回值:代表用户的认证信息
 *                     如果返回值不为null,说明用户名正确,程序就会继续定位到密码比较器,进行密码的比较
*                     如果返回值为null,程序就会抛出异常
*/
protected AuthenticationInfo doGetAuthenticationInfo(AuthenticationToken token) throws AuthenticationException {
//向下转型
UsernamePasswordToken upToken = (UsernamePasswordToken) token;
//1.调用业务方法,实现根据用户名查询
List<User> userList = userService.find("from User where userName=?", User.class, new String[]{upToken.getUsername()});
//2.如果用户存在,就一步验证密码是否正确
if(userList!=null && userList.size()>0){
User user = userList.get(0);//取出查询的用户对象
//用户名正确了    第一个参数:用户对象       第二个参数:代表用户的密码     第三个参数:realm的名字,只要是一个字符串就可以
return new SimpleAuthenticationInfo(user,user.getPassword(),this.getName());//返回密码比较器的类(进入我们注入的密码比较器的对象)
}
//3.返回结果
return null;
}


/**
 * 授权---------------在jsp页面碰到shiro标签时,就要执行授权方法
*/
protected AuthorizationInfo doGetAuthorizationInfo(PrincipalCollection pc) {
//1.获取当前登录的用户信息
User user = (User)pc.fromRealm(this.getName()).iterator().next();
//2.通过对象导航,得到角色列表
Set<Role> roleSet = user.getRoles();
List<String> moduleList = new ArrayList<String>();
//3.遍历角色列表,得到每个角色
for (Role role : roleSet) {
//通过对象导航,得到角色下面的模块列表
Set<Module> moduleSet = role.getModules();
for (Module module : moduleSet) {
if(!moduleList.contains(module.getName())){
moduleList.add(module.getName());
}
}
}
//设置返回值
SimpleAuthorizationInfo info = new SimpleAuthorizationInfo();
info.addStringPermissions(moduleList);
return info;
}
}
将编写的AuthRealm域配置好(applicationContext-shiro.xml已配好 记得修改路径):
//自定义权限认证
<bean id="autoRealm" class="com.zixue.shiro.AuthRealm">
<property name="userService" ref="userService"/>
//自定义密码加密算法
<propetty name="credentialsMatcher" ref="passwordMatcher">
</bean>
登陆操作:
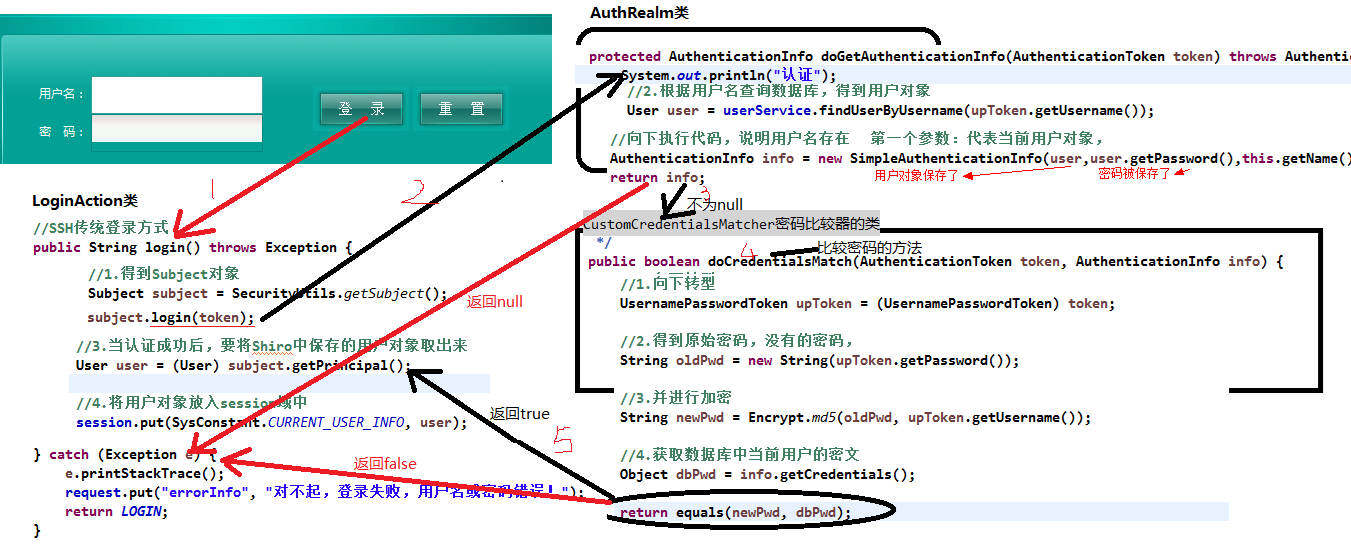
loginAction
作用:应用程序与Shiro框架进行交互的Subject对象获取
public class LoginAction extends BaseAction {
private static final long serialVersionUID = 1L;
private String username;
private String password;
//SSH传统登录方式
public String login() throws Exception {
//        if(true){
//            String msg = "登录错误,请重新填写用户名密码!";
//            this.addActionError(msg);
//            throw new Exception(msg);
//        }
//        User user = new User(username, password);
//        User login = userService.login(user);
//        if (login != null) {
//            ActionContext.getContext().getValueStack().push(user);
//            session.put(SysConstant.CURRENT_USER_INFO, login);    //记录session
//            return SUCCESS;
//        }
//        return "login";            if(UtilFuns.isEmpty(username)){
return "login";
}
try {
//1.应用程序与Shiro框架进行交互的Subject对象如何获取 ?
Subject subject = SecurityUtils.getSubject();
//2.AuthenicationToken是接口  所以只能new子类的对象
AuthenticationToken token = new UsernamePasswordToken(username, password);
//3.实现登录操作
subject.login(token);//进入AuthRealm类中的方法doGetAuthenticationInfo
//4.从Shiro中获取登录的用户信息
User user = (User)subject.getPrincipal();
//5.将用户信息存入session中
session.put(SysConstant.CURRENT_USER_INFO, user);
} catch (Exception e) {
e.printStackTrace();
request.put("errorInfo", "用户名或密码错误!!");
return "login";
}
return SUCCESS;
}
//退出
public String logout(){
session.remove(SysConstant.CURRENT_USER_INFO);        //删除session
SecurityUtils.getSubject().logout();   //登出
return "logout";
}
public String getUsername() {
return username;
}
public void setUsername(String username) {
this.username = username;
}
public String getPassword() {
return password;
}
public void setPassword(String password) {
this.password = password;
}
}
测试:
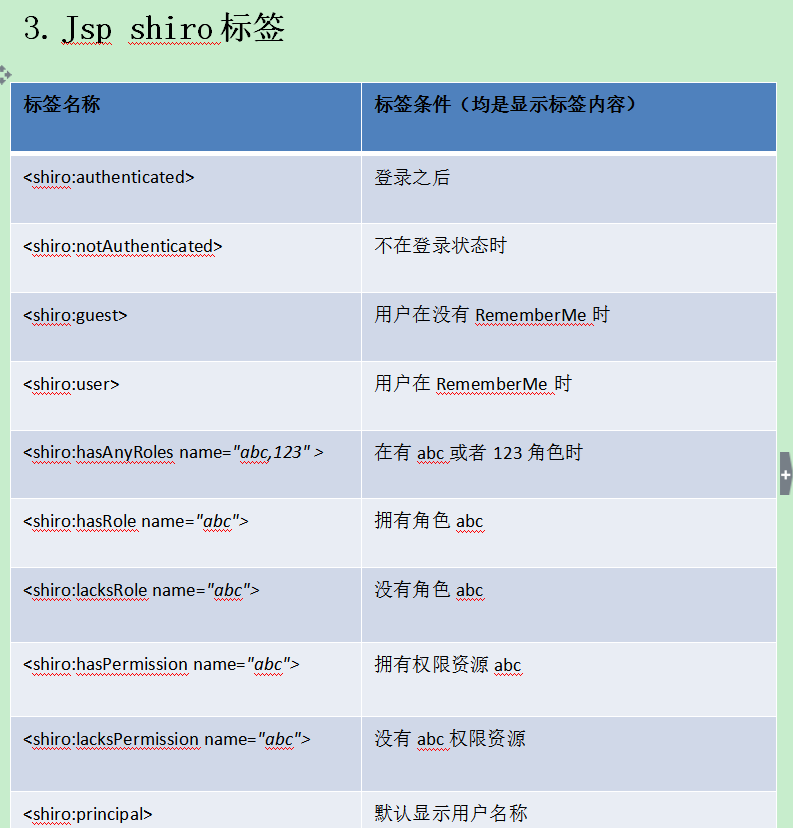
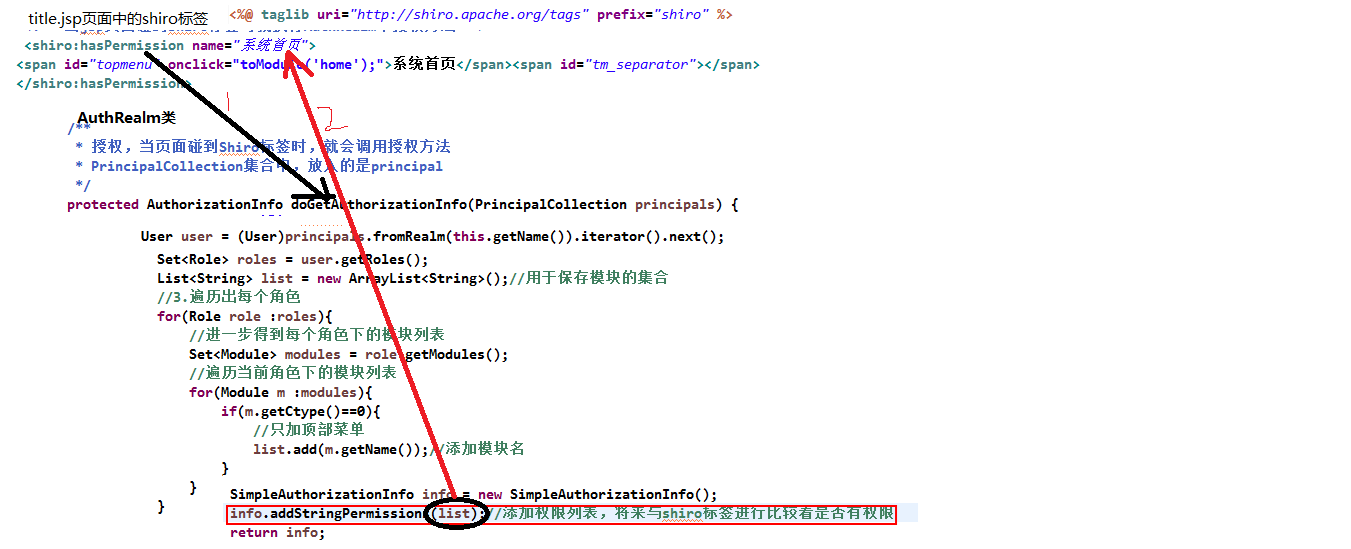
当jsp页面上出现Shiro标签就会执行AuthRealm域中的授权方法
1.引入Shiro标签
<%@taglib uri="http:shiro.apache.org/tags" prefix="shiro" %>
2.使用Shiro标签进行授权判断
<shiro:hasPermission name="货运管理"><span id="topmenu" onclick="toModule('cargo');">货运管理</span><span id="tm_separator"></span></shiro:hasPermission>
Shiro运行流程分析:
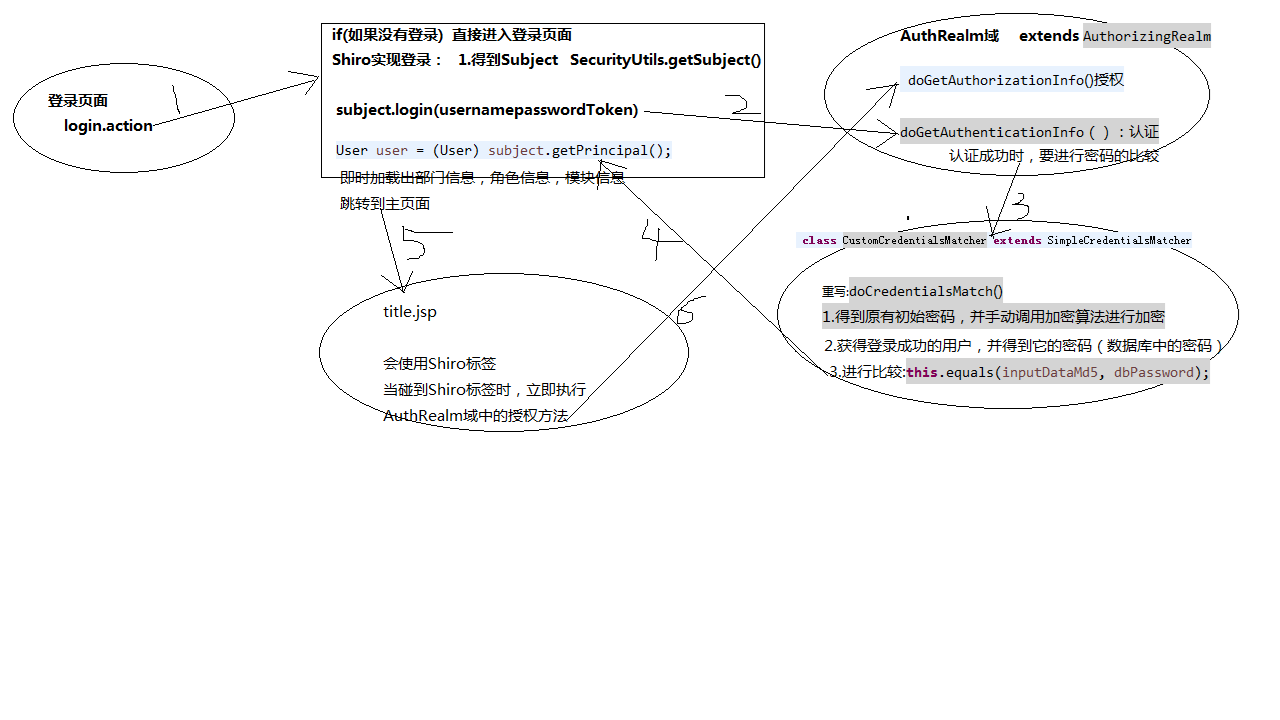
登陆流程:
授权流程:
关于进入自己账户后直接在地址栏输入权限不同的其他用户地址,依旧可以进入的
BUG解决:
使用perms过滤器进行权限拦截
1.配置
/sysadmin/deptAction_* = perms["部门管理"]
2.方法加入注解
@RequiresPermissions("部门管理")
3.加入配置
<property name="unauthorizedUrl" value="/index.jsp"></property>