本章讲述:手动搭建一个简单的MVVMLight框架步骤:
1、下载MVVMLight所需要的dll库文件
主要文件包括:CommonServiceLocator.dll、GalaSoft.MvvmLight.dll、GalaSoft.MvvmLight.Extras.dll、GalaSoft.MvvmLight.Platform.dll、System.Windows.Interactivity.dll
下载地址:
2、新建项目,项目名称为:“DSViewerTooling”,在项目中引用下载的dll库文件,新建文件夹“Model”、“View”和“ViewModel”;
3、添加类文件“MainViewModel”
    using GalaSoft.MvvmLight;
    using GalaSoft.MvvmLight.Command;
    using GalaSoft.MvvmLight.Messaging;
    using System;
    using System.Collections.Generic;
    using System.Linq;
    using System.Text;
    using System.Threading.Tasks;

    namespace DSViewerTooling.ViewModel
    {
        public class MainViewModel : ViewModelBase
        {

        }
    }
4、添加类文件“ViewModelLocator”
using CommonServiceLocator;
using GalaSoft.MvvmLight;
using GalaSoft.MvvmLight.Ioc;
namespace DSViewerTooling.ViewModel
{
public class ViewModelLocator
{
/// <summary>
/// Initializes a new instance of the ViewModelLocator class.
/// </summary>
public ViewModelLocator()
{
ServiceLocator.SetLocatorProvider(() => SimpleIoc.Default);
SimpleIoc.Default.Register<MainViewModel>();
}
public MainViewModel Main
{
get { return ServiceLocator.Current.GetInstance<MainViewModel>(); }
}
public static void Cleanup()
{
// TODO Clear the ViewModels
}
}
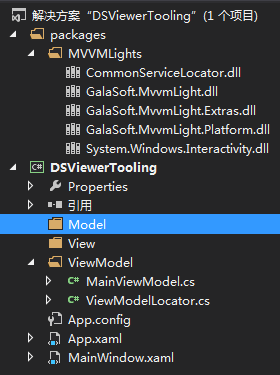
}项目文件结构图:
5、修改“App.xaml”文件
<Application x:Class="DSViewerTooling.App"
             xmlns="http://schemas.microsoft.com/winfx/2006/xaml/presentation"
             xmlns:x="http://schemas.microsoft.com/winfx/2006/xaml"
             xmlns:d="http://schemas.microsoft.com/expression/blend/2008"
             d1p1:Ignorable="d"
             xmlns:d1p1="http://schemas.openxmlformats.org/markup-compatibility/2006"
             StartupUri="MainWindow.xaml">
    <Application.Resources>
        <ResourceDictionary>
            <vm:ViewModelLocator x:Key="Locator" d:IsDataSource="True" xmlns:vm="clr-namespace:DSViewerTooling.ViewModel" />
        </ResourceDictionary>
    </Application.Resources>
</Application>
首先View和ViewModel之间不再直接引用,而是通过ViewModelLocator关联,

其次储存在ViewModelLocator里的ViewModel类似于单例的存在,可以在全局引用绑定。
同时避免了某些情况下频繁创建ViewModel,却未做好资源释放造成的内存泄漏。(这里并不是说所有的ViewModel都必须放到ViewModelLocator)
下面我们来看下Command是如何绑定的,通知PropertyChanged以及ViewModelBase类 。
MvvmLight的ViewModelBase很有意思,继承了INotifyPropertyChanged接口,并提供了一个Set方法来给属性赋值,简单理解就是不用自己在ViewModel实现INotifyPropertyChanged,然后在属性赋值时通知了。
6、绑定MainWindow.xaml到ViewModelLocator中的Main
<Window x:Class="DSViewerTooling.MainWindow"
        xmlns="http://schemas.microsoft.com/winfx/2006/xaml/presentation"
        xmlns:x="http://schemas.microsoft.com/winfx/2006/xaml"
        Title="MainWindow" Height="350" Width="525"
        DataContext="{Binding Main ,Source={StaticResource Locator}}">
    <StackPanel VerticalAlignment="Center">
        <TextBlock Text="{Binding Title}" FontFamily="微软雅黑" Foreground="Black" FontSize="25" HorizontalAlignment="Center" VerticalAlignment="Center"/>
        <Button Margin="30" Width="80" Height="35" Content="改变文本" Command="{Binding ChangeTitleCmd}"/>
    </StackPanel>
</Window>
7、属性和ICommand定义声明,在MainViewModel.cs
using GalaSoft.MvvmLight;
using GalaSoft.MvvmLight.Command;
using GalaSoft.MvvmLight.Messaging;
using System;
using System.Collections.Generic;
using System.Linq;
using System.Text;
using System.Threading.Tasks;
using System.Windows.Input;
namespace DSViewerTooling.ViewModel
{
public class MainViewModel : ViewModelBase
{
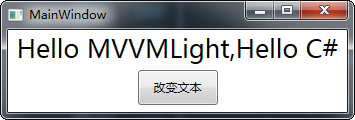
private string title = "Hello MVVMLight,Hello C#";
public string Title
{
get { return title; }
set { title = value; RaisePropertyChanged(); }
}
#region
private ICommand m_ChangeTitleCmd;
public ICommand ChangeTitleCmd
{
get
{
return m_ChangeTitleCmd ?? (m_ChangeTitleCmd = new RelayCommand(() =>
{
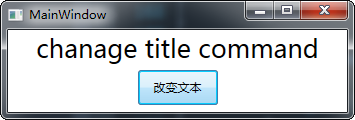
Title = "chanage title command";
}));
}
}
#endregion
}
}8、运行结果图,右图为点击按钮改变文本框显示ICommand 命令响应;