一、简要说明
本篇文章主要分析 Abp vNext 当中的模块系统,从类型构造层面上来看,Abp vNext 当中不再只是单纯的通过 AbpModuleManager 来管理其他的模块,它现在则是 IModuleManager 和 IModuleLoader 来协同工作,其他的代码逻辑并无太大变化。
Abp vNext 规定每个模块必须继承自 IAbpModule 接口,这样 vNext 系统在启动的时候才会扫描到相应的模块。与原来 Abp 框架一样,每个模块可以通过 DependsOnAttribute 特性来确定依赖关系,算法还是使用拓扑排序算法,来根据依赖性确定模块的加载顺序。(从最顶层的模块,依次加载,直到启动模块。)
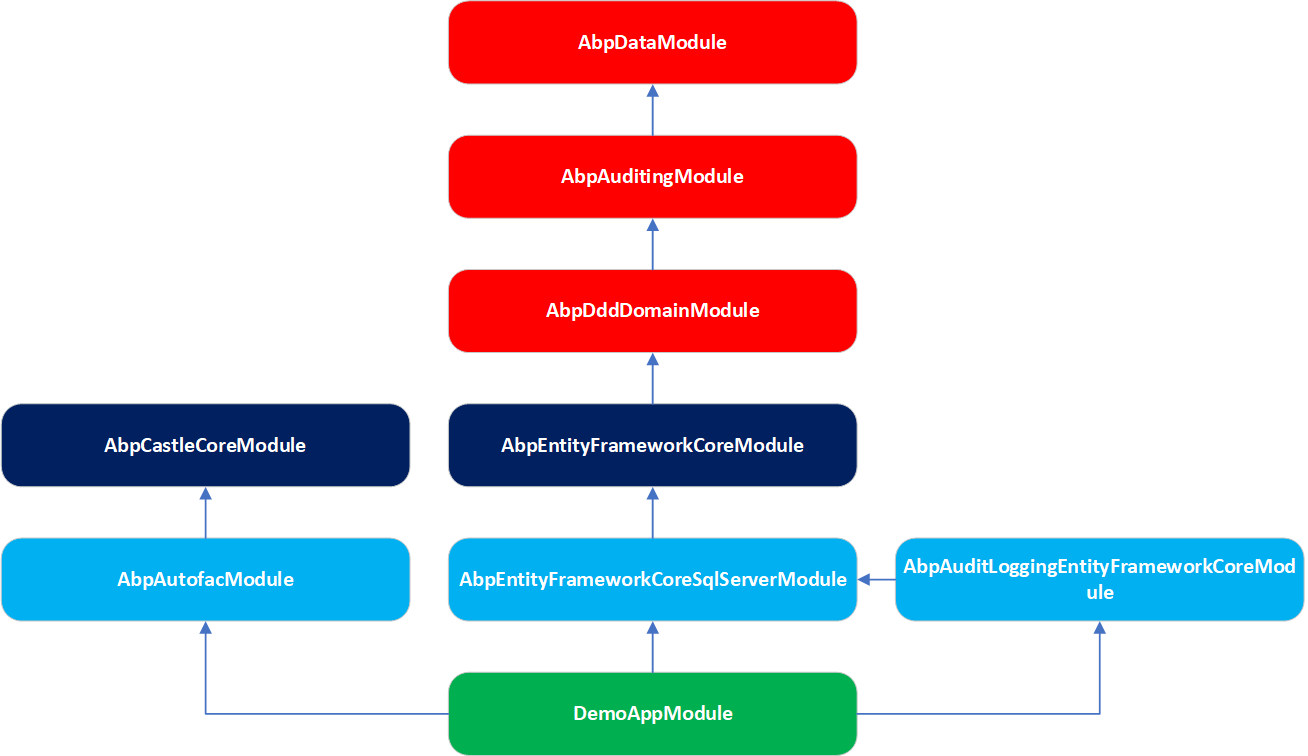
以我们的 Demo 项目为例,这里通过拓扑排序之后的依赖关系如上图,这样最开始执行的即 AbpDataModule 模块,然后再是 AbpAuditingModule 以此类推,直到我们的启动模块 DemoAppModule。
在 Abp vNext 当中,所有的组件库/第三方库都是以模块的形式呈现的,模块负责管理整个库的生命周期,包括注册组件,配置组件,销毁组件等。
在最开始的 Abp 框架当中,一个模块有 4 个生命周期,它们都是在抽象基类 AbpModule 当中定义的,分别是 预加载、初始化、初始化完成、销毁。前三个生命周期是依次执行的 预加载->初始化->初始化完成,而最后一个销毁动作则是在程序终止的时候,通过 AbpModuleManager 遍历模块,调用其 ShutDown() 方法进行销毁动作。
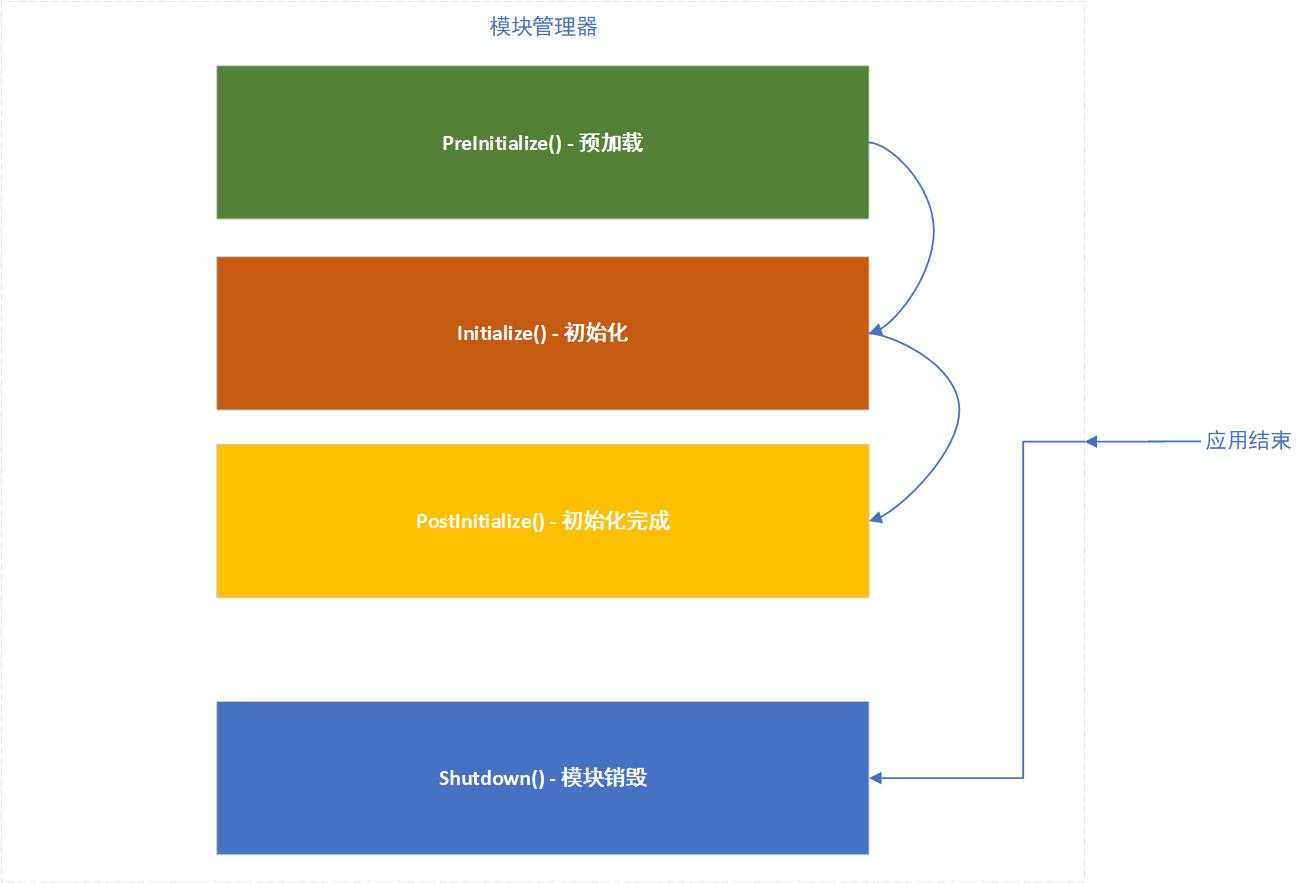
新的 Abp vNext 框架除了原有的四个生命周期以外,还抽象出了 IOnPreApplicationInitialization、IOnApplicationInitialization、IOnPostApplicationInitialization、IOnApplicationShutdown。从名字就可以看出来,新的四个生命周期是基于应用程序级别的,而不是模块级别。
这是什么意思呢?在 Abp vNext 框架当中,模块按照功能用途划分为两种类型的模块。第一种是 框架模块,它是框架的核心模块,比如缓存、EF Core 等基础设施就属于框架模块,其模块的逻辑与处理基本都在传统的三个生命周期进行处理。
在我们的 services.AddApplication() 阶段就已经完成所有初始化,可以给 应用程序模块 提供服务。
第二种则是 应用程序模块,这种模块则是实现了特定的业务/功能,例如身份管理、租户管理等,而新增加的四个生命周期基本是为这种类型的模块服务的。
在代码和结构上来说,两者并没有区别,在这里仅仅是按用途进行了一次分类。单就模块系统来说,其基本的作用就类似于一个配置类,配置某种组件的各种参数和一些默认逻辑。
二、源码分析
2.1 模块系统的基础设施
模块的初始化动作是在 AbpApplicationBase 基类开始的,在该基类当中除了注入模块相关的基础设施以外。还定义了模块的初始化方法,即 LoadModules() 方法,在该方法内部是调用的 IModuleLoader 去执行具体的加载操作。
internal AbpApplicationBase(
    [NotNull] Type startupModuleType,
    [NotNull] IServiceCollection services,
    [CanBeNull] Action<AbpApplicationCreationOptions> optionsAction)
{
    Check.NotNull(startupModuleType, nameof(startupModuleType));
    Check.NotNull(services, nameof(services));

    // 配置当前系统的启动模块,以便按照依赖关系进行查找。
    StartupModuleType = startupModuleType;
    Services = services;

    services.TryAddObjectAccessor<IServiceProvider>();

    var options = new AbpApplicationCreationOptions(services);
    optionsAction?.Invoke(options);

    // 当前的 Application 就是一个模块容器。
    services.AddSingleton<IAbpApplication>(this);
    services.AddSingleton<IModuleContainer>(this);

    services.AddCoreServices();
    // 注入模块加载类,以及模块的四个应用程序生命周期。
    services.AddCoreAbpServices(this, options);

    // 遍历所有模块,并按照预加载、初始化、初始化完成的顺序执行其生命周期方法。
    Modules = LoadModules(services, options);
}

private IReadOnlyList<IAbpModuleDescriptor> LoadModules(IServiceCollection services, AbpApplicationCreationOptions options)
{
    // 从 IoC 容器当中得到模块加载器。
    return services
        .GetSingletonInstance<IModuleLoader>()
        .LoadModules(
            services,
            StartupModuleType,
            options.PlugInSources
        );
}
2.2 模块的初始化
进入 IModuleLoader 的默认实现 ModuleLoader,在它的 LoadModules() 方法中,基本逻辑如下:
- 扫描当前应用程序的所有模块类,并构建模块描述对象。
- 基于模块描述对象,使用拓扑排序算法来按照模块的依赖性进行排序。
- 排序完成之后,遍历排序完成的模块描述对象,依次执行它们的三个生命周期方法。
public IAbpModuleDescriptor[] LoadModules(
    IServiceCollection services,
    Type startupModuleType,
    PlugInSourceList plugInSources)
{
    // 验证参数的有效性。
    Check.NotNull(services, nameof(services));
    Check.NotNull(startupModuleType, nameof(startupModuleType));
    Check.NotNull(plugInSources, nameof(plugInSources));

    // 扫描模块类型,并构建模块描述对象集合。
    var modules = GetDescriptors(services, startupModuleType, plugInSources);

    // 按照模块的依赖性重新排序。
    modules = SortByDependency(modules, startupModuleType);

    // 调用模块的三个生命周期方法。
    ConfigureServices(modules, services);

    return modules.ToArray();
}
在搜索模块类型的时候,是使用的 AbpModuleHelper 工具类提供的 .FindAllModuleTypes() 方法。该方法会将我们的启动模块传入,根据模块上面的 DependsOn() 标签递归构建 模块描述对象 的集合。
private List<IAbpModuleDescriptor> GetDescriptors(
    IServiceCollection services,
    Type startupModuleType,
    PlugInSourceList plugInSources)
{
    // 创建一个空的模块描述对象集合。
    var modules = new List<AbpModuleDescriptor>();

    // 按照启动模块,递归构建模块描述对象集合。
    FillModules(modules, services, startupModuleType, plugInSources);
    // 设置每个模块的依赖项。
    SetDependencies(modules);

    // 返回结果。
    return modules.Cast<IAbpModuleDescriptor>().ToList();
}

protected virtual void FillModules(
    List<AbpModuleDescriptor> modules,
    IServiceCollection services,
    Type startupModuleType,
    PlugInSourceList plugInSources)
{
    // 调用 AbpModuleHelper 提供的搜索方法。
    foreach (var moduleType in AbpModuleHelper.FindAllModuleTypes(startupModuleType))
    {
        modules.Add(CreateModuleDescriptor(services, moduleType));
    }

    // ... 其他代码。
}
走进 AbpModuleHelper 静态类,其代码与结构与原有的 Abp 框架类似,首先看下它的 FindAllModuleTypes() 方法,根据启动模块的类型递归查找所有的模块类型,并添加到一个集合当中。
public static List<Type> FindAllModuleTypes(Type startupModuleType)
{
    var moduleTypes = new List<Type>();
    // 递归构建模块类型集合。
    AddModuleAndDependenciesResursively(moduleTypes, startupModuleType);
    return moduleTypes;
}

private static void AddModuleAndDependenciesResursively(List<Type> moduleTypes, Type moduleType)
{
    // 检测传入的类型是否是模块类。
    AbpModule.CheckAbpModuleType(moduleType);

    // 集合已经包含了类型定义,则返回。
    if (moduleTypes.Contains(moduleType))
    {
        return;
    }

    moduleTypes.Add(moduleType);

    // 遍历其 DependsOn 特性定义的类型,递归将其类型添加到集合当中。
    foreach (var dependedModuleType in FindDependedModuleTypes(moduleType))
    {
        AddModuleAndDependenciesResursively(moduleTypes, dependedModuleType);
    }
}

public static List<Type> FindDependedModuleTypes(Type moduleType)
{
    AbpModule.CheckAbpModuleType(moduleType);

    var dependencies = new List<Type>();

    // 从传入的类型当中,获得 DependsOn 特性。
    var dependencyDescriptors = moduleType
        .GetCustomAttributes()
        .OfType<IDependedTypesProvider>();

    // 可能有多个特性标签,遍历。
    foreach (var descriptor in dependencyDescriptors)
    {
        // 根据特性存储的类型,将其添加到返回结果当中。
        foreach (var dependedModuleType in descriptor.GetDependedTypes())
        {
            dependencies.AddIfNotContains(dependedModuleType);
        }
    }

    return dependencies;
}
以上操作完成之后,我们就能获得一个平级的模块描述对象集合,我们如果要使用拓扑排序来重新针对这个集合进行排序,就需要知道每个模块的依赖项,根据 IAbpModuleDescriptor 的定义,我们可以看到它有一个 Dependencies 集合来存储它的依赖项。
public interface IAbpModuleDescriptor
{
    // 模块的具体类型。
    Type Type { get; }

    // 模块所在的程序集。
    Assembly Assembly { get; }

    // 模块的单例实例。
    IAbpModule Instance { get; }

    // 是否是一个插件。
    bool IsLoadedAsPlugIn { get; }

    // 依赖的其他模块。
    IReadOnlyList<IAbpModuleDescriptor> Dependencies { get; }
}
而 SetDependencies(List<AbpModuleDescriptor> modules) 方法就是来设置每个模块的依赖项的,代码逻辑很简单。遍历之前的平级模块描述对象集合,根据当前模块的类型定义,找到其依赖项的类型定义。根据这个类型定义去平级的模块描述对象集合搜索,将搜索到的结果存储到当前的模块描述对象中的 Dependencies 属性当中。
protected virtual void SetDependencies(List<AbpModuleDescriptor> modules)
{
    // 遍历整个模块描述对象集合。
    foreach (var module in modules)
    {
        SetDependencies(modules, module);
    }
}

protected virtual void SetDependencies(List<AbpModuleDescriptor> modules, AbpModuleDescriptor module)
{
    // 根据当前模块描述对象存储的 Type 类型,获得 DependsOn 标签依赖的类型。
    foreach (var dependedModuleType in AbpModuleHelper.FindDependedModuleTypes(module.Type))
    {
        // 在模块描述对象中,按照 Type 类型搜索。
        var dependedModule = modules.FirstOrDefault(m => m.Type == dependedModuleType);
        if (dependedModule == null)
        {
            throw new AbpException("Could not find a depended module " + dependedModuleType.AssemblyQualifiedName + " for " + module.Type.AssemblyQualifiedName);
        }

        // 搜索到结果,则添加到当前模块描述对象的 Dependencies 属性。
        module.AddDependency(dependedModule);
    }
}
最后的拓扑排序就不在赘述,关于拓扑排序的算法,可以在我的 这篇 博文当中找到。
关于模块的最后操作,就是执行模块的三个生命周期方法了,这块代码在 ConfigureServices() 方法当中,没什么特别的的处理,遍历整个模块描述对象集合,依次执行几个方法就完了。
只是在这里的生命周期方法与之前的不一样了,这里会为每个方法传入一个服务上下文对象,主要是可以通过 IServiceCollection 来配置各个模块的参数,而不是原来的 Configuration 属性。
protected virtual void ConfigureServices(List<IAbpModuleDescriptor> modules, IServiceCollection services)
{
    // 构造一个服务上下文,并将其添加到 IoC 容器当中。
    var context = new ServiceConfigurationContext(services);
    services.AddSingleton(context);

    foreach (var module in modules)
    {
        if (module.Instance is AbpModule abpModule)
        {
            abpModule.ServiceConfigurationContext = context;
        }
    }

    // 执行预加载方法 PreConfigureServices。
    foreach (var module in modules.Where(m => m.Instance is IPreConfigureServices))
    {
        ((IPreConfigureServices)module.Instance).PreConfigureServices(context);
    }

    // 执行初始化方法 ConfigureServices。
    foreach (var module in modules)
    {
        if (module.Instance is AbpModule abpModule)
        {
            if (!abpModule.SkipAutoServiceRegistration)
            {
                services.AddAssembly(module.Type.Assembly);
            }
        }

        module.Instance.ConfigureServices(context);
    }

    // 执行初始化完成方法 PostConfigureServices。
    foreach (var module in modules.Where(m => m.Instance is IPostConfigureServices))
    {
        ((IPostConfigureServices)module.Instance).PostConfigureServices(context);
    }

    // 将服务上下文置为 NULL。
    foreach (var module in modules)
    {
        if (module.Instance is AbpModule abpModule)
        {
            abpModule.ServiceConfigurationContext = null;
        }
    }
}
以上动作都是在 Startup 类当中的 ConfigureService() 方法中执行,你可能会奇怪,剩下的四个应用程序生命周期的方法在哪儿执行的呢?
这几个方法是被抽象成了 IModuleLifecycleContributor 类型,在前面的 AddCoreAbpService() 方法的内部就被添加到了配置项里面。
internal static void AddCoreAbpServices(this IServiceCollection services,
    IAbpApplication abpApplication,
    AbpApplicationCreationOptions applicationCreationOptions)
{
    // ... 其他代码

    services.Configure<ModuleLifecycleOptions>(options =>
    {
        options.Contributors.Add<OnPreApplicationInitializationModuleLifecycleContributor>();
        options.Contributors.Add<OnApplicationInitializationModuleLifecycleContributor>();
        options.Contributors.Add<OnPostApplicationInitializationModuleLifecycleContributor>();
        options.Contributors.Add<OnApplicationShutdownModuleLifecycleContributor>();
    });
}
执行的话,则是在 Startup 类的 Configure() 方法当中,它会调用 AbpApplicationBase 基类的 InitializeModules() 方法,在该方法内部也是遍历所有的 Contributor (生命周期),再将所有的模块对应的方法调用一次而已。
public void InitializeModules(ApplicationInitializationContext context)
{
    LogListOfModules();

    // 遍历应用程序的几个生命周期。
    foreach (var Contributor in _lifecycleContributors)
    {
        // 遍历所有的模块,将模块实例传入具体的 Contributor,方便在其内部调用具体的生命周期方法。
        foreach (var module in _moduleContainer.Modules)
        {
            Contributor.Initialize(context, module.Instance);
        }
    }

    _logger.LogInformation("Initialized all modules.");
}
这里操作可能有点看不懂,不是说调用模块的生命周期方法么,为啥还将实例传递给 Contributor 呢?我们找到一个 Contributor 的定义就知道了。
public class OnApplicationInitializationModuleLifecycleContributor : ModuleLifecycleContributorBase
{
    public override void Initialize(ApplicationInitializationContext context, IAbpModule module)
    {
        // 使用模块实例转换为 IOnApplicationInitialization 对象,调用其生命周期方法。
        (module as IOnApplicationInitialization)?.OnApplicationInitialization(context);
    }
}
这里我认为 Abp vNext 把 Contributor 抽象出来可能是为了后面方便扩展吧,如果你也有自己的看法不妨在评论区留言。
三、总结
至此,整个模块系统的解析就结束了,如果看过 Abp 框架源码解析的朋友就可以很明显的感觉到,新框架的模块系统除了生命周期多了几个以外,其他的变化很少,基本没太大的变化。
在 Abp vNext 框架里面,模块系统是整个框架的基石,了解了模块系统以后,对于剩下的设计就很好理解了。