在 flutter 开发的过程中不可能所有项目都是从零构建
换句话说不是所有项目都是 flutter 为主工程,然后 android/ios 的工程为副工程
大概率会遇到需要将 flutter 作为组件加入到原生项目中, 这种例子典型的就是阿里闲鱼,当然闲鱼团队的实力不是普通的小公司可以比的
所幸的是,flutter 团队提供了一个 wiki 用于帮助我们完成这个过程
创建一个 Android 工程
使用 Android Studio 创建一个新工程来模拟这个过程,会看这里的普遍都应该是 android 程序员出身,Hello World 工程是肯定会的,不会的话还是回炉加强一下吧
如果你已经有现有工程,肯定是有 VCS 管理的,放心大胆的走出第一步,大不了就删除当前分支嘛,然后你可以跳过这一步,直接看 flutter 的过程

创建 Flutter
这一步仅作为 官方 wiki Android 部分的参考
我目前使用的是 1.0.0 的发布版
Flutter 1.0.0 • channel dev • https://github.com/flutter/flutter.git
Framework • revision 5391447fae (11 days ago) • 2018-11-29 19:41:26 -0800
Engine • revision 7375a0f414
Tools • Dart 2.1.0 (build 2.1.0-dev.9.4 f9ebf21297)
wiki 后续可能会被修改,请查看最新的文档去解决
这里要注意,你要在和你现有的 Application 同级的目录来使用
比如你的 Application
➜  ExistsApp flutter create -t module my_flutter
Creating project my_flutter...
  my_flutter/.gitignore (created)
  my_flutter/.idea/libraries/Dart_SDK.xml (created)
  my_flutter/.idea/libraries/Flutter_for_Android.xml (created)
  my_flutter/.idea/modules.xml (created)
  my_flutter/.idea/workspace.xml (created)
  my_flutter/.metadata (created)
  my_flutter/lib/main.dart (created)
  my_flutter/my_flutter.iml (created)
  my_flutter/my_flutter_android.iml (created)
  my_flutter/pubspec.yaml (created)
  my_flutter/README.md (created)
  my_flutter/test/widget_test.dart (created)
Running "flutter packages get" in my_flutter...              7.5s
Wrote 12 files.

All done!
Your module code is in my_flutter/lib/main.dart.
这里 flutter 工程就创建成功了
打包 aar 文件/修改 host application
这一步是构建一个 aar 文件
cd .android/
./gradlew flutter:assembleDebug

接着修改 setting.gradle 文件
include ':app'                                     // assumed existing content
setBinding(new Binding([gradle: this]))                                 // new
evaluate(new File(                                                      // new
  settingsDir.parentFile,                                               // new
  'my_flutter/.android/include_flutter.groovy'                          // new
))
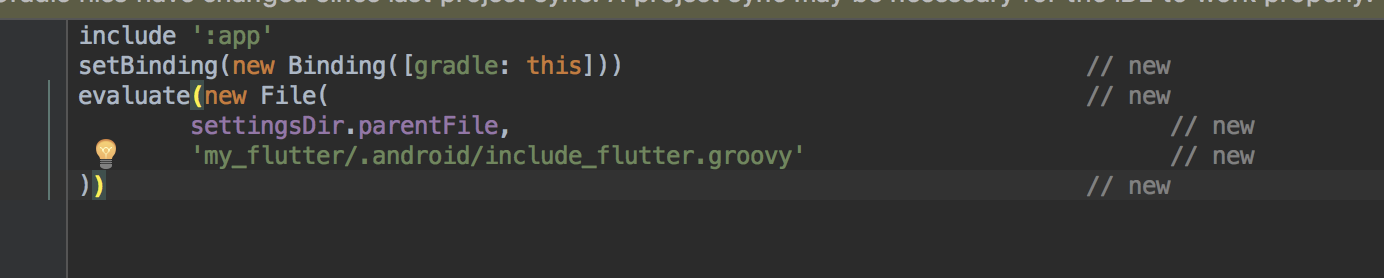
sync 以后 如果有 flutter 说明关联到项目中了
接着,将 flutter 设置为 android 的库
加入这个,然后继续同步一下
dependencies {
  implementation project(':flutter')
}
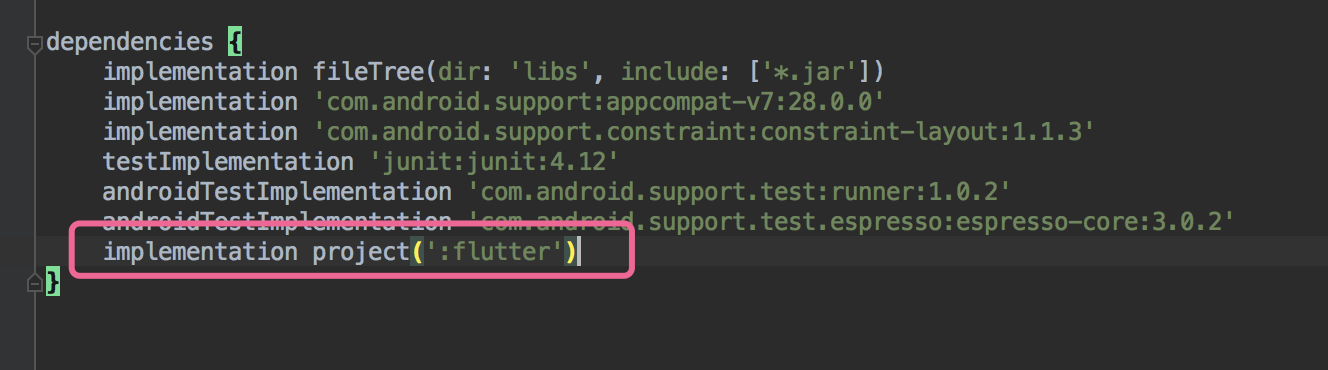
能看见的话就说明加入成功了
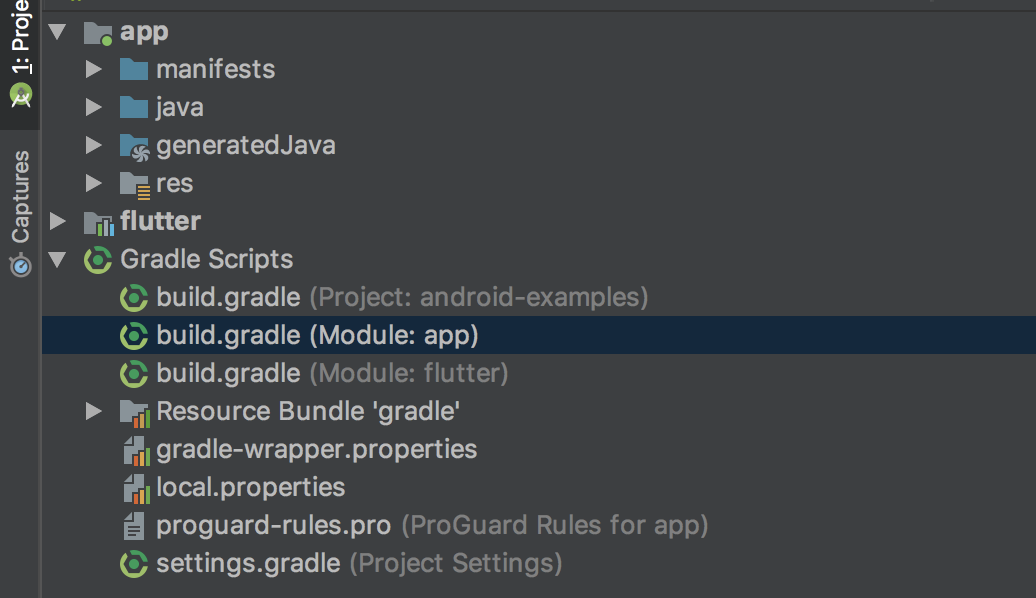
修改 android 工程
activity_main.xml
<?xml version="1.0" encoding="utf-8"?>
<android.support.constraint.ConstraintLayout xmlns:android="http://schemas.android.com/apk/res/android"
    xmlns:app="http://schemas.android.com/apk/res-auto"
    xmlns:tools="http://schemas.android.com/tools"
    android:layout_width="match_parent"
    android:layout_height="match_parent"
    tools:context=".MainActivity">

    <TextView
        android:id="@+id/tv_text"
        android:layout_width="wrap_content"
        android:layout_height="wrap_content"
        android:text="Hello World!"
        app:layout_constraintBottom_toBottomOf="parent"
        app:layout_constraintLeft_toLeftOf="parent"
        app:layout_constraintRight_toRightOf="parent"
        app:layout_constraintTop_toTopOf="parent" />

    <Button
        android:id="@+id/bt_to_flutter"
        android:layout_width="wrap_content"
        android:layout_height="wrap_content"
        android:layout_marginTop="8dp"
        android:text="to Flutter page"
        app:layout_constraintLeft_toLeftOf="parent"
        app:layout_constraintRight_toRightOf="parent"
        app:layout_constraintTop_toBottomOf="@id/tv_text" />

</android.support.constraint.ConstraintLayout>
MainActivity.java
package top.kikt.addexiststoandroid;

import android.content.Intent;
import android.os.Bundle;
import android.support.v7.app.AppCompatActivity;
import android.view.View;

public class MainActivity extends AppCompatActivity {

    @Override
    protected void onCreate(Bundle savedInstanceState) {
        super.onCreate(savedInstanceState);
        setContentView(R.layout.activity_main);

        findViewById(R.id.bt_to_flutter).setOnClickListener(new View.OnClickListener() {
            @Override
            public void onClick(View v) {
                // to flutter activity
                Intent intent = new Intent(MainActivity.this, MyFlutterActivity.class);
                startActivity(intent);
            }
        });
    }
}
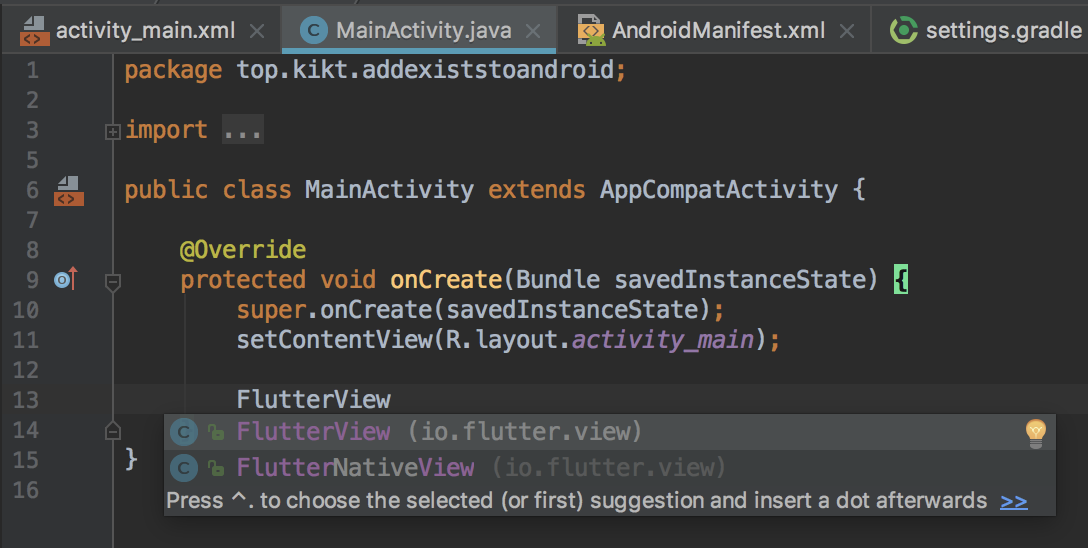
MyFlutterActivity.java
package top.kikt.addexiststoandroid;

import android.os.Bundle;
import android.support.v4.app.FragmentActivity;
import android.widget.FrameLayout;

import io.flutter.facade.Flutter;
import io.flutter.view.FlutterView;

/// create 2019/1/22 by cai


public class MyFlutterActivity extends FragmentActivity {

    @Override
    protected void onCreate(Bundle savedInstanceState) {
        super.onCreate(savedInstanceState);
        FlutterView flutterView = Flutter.createView(this, getLifecycle(), "route1");
        FrameLayout.LayoutParams params = new FrameLayout.LayoutParams(FrameLayout.LayoutParams.MATCH_PARENT, FrameLayout.LayoutParams.MATCH_PARENT);
        addContentView(flutterView, params);
    }

}
别忘了增加 Activity 的清单文件
<activity android:name=".MyFlutterActivity" />
修改 flutter 工程
main.dart
import 'package:flutter/material.dart';
import 'dart:ui' as ui;

void main() {
  var routeName = ui.window.defaultRouteName;

  switch (routeName) {
    case "route1":
      runApp(MyApp());
      break;
    default:
      runApp(EmptyWidget());
  }
}

class EmptyWidget extends StatelessWidget {
  @override
  Widget build(BuildContext context) {
    return MaterialApp(
      home: Scaffold(
        body: Center(
          child: Container(
            child: Text("空路由"),
          ),
        ),
      ),
    );
  }
}

class MyApp extends StatelessWidget {
  // This widget is the root of your application.
  @override
  Widget build(BuildContext context) {
    return MaterialApp(
      title: 'Flutter Demo',
      theme: ThemeData(
        // This is the theme of your application.
        //
        // Try running your application with "flutter run". You'll see the
        // application has a blue toolbar. Then, without quitting the app, try
        // changing the primarySwatch below to Colors.green and then invoke
        // "hot reload" (press "r" in the console where you ran "flutter run",
        // or press Run > Flutter Hot Reload in a Flutter IDE). Notice that the
        // counter didn't reset back to zero; the application is not restarted.
        primarySwatch: Colors.blue,
      ),
      home: MyHomePage(title: 'Flutter Demo Home Page'),
    );
  }
}

class MyHomePage extends StatefulWidget {
  MyHomePage({Key key, this.title}) : super(key: key);

  // This widget is the home page of your application. It is stateful, meaning
  // that it has a State object (defined below) that contains fields that affect
  // how it looks.

  // This class is the configuration for the state. It holds the values (in this
  // case the title) provided by the parent (in this case the App widget) and
  // used by the build method of the State. Fields in a Widget subclass are
  // always marked "final".

  final String title;

  @override
  _MyHomePageState createState() => _MyHomePageState();
}

class _MyHomePageState extends State<MyHomePage> {
  int _counter = 0;

  void _incrementCounter() {
    setState(() {
      // This call to setState tells the Flutter framework that something has
      // changed in this State, which causes it to rerun the build method below
      // so that the display can reflect the updated values. If we changed
      // _counter without calling setState(), then the build method would not be
      // called again, and so nothing would appear to happen.
      _counter++;
    });
  }

  @override
  Widget build(BuildContext context) {
    // This method is rerun every time setState is called, for instance as done
    // by the _incrementCounter method above.
    //
    // The Flutter framework has been optimized to make rerunning build methods
    // fast, so that you can just rebuild anything that needs updating rather
    // than having to individually change instances of widgets.
    return Scaffold(
      appBar: AppBar(
        // Here we take the value from the MyHomePage object that was created by
        // the App.build method, and use it to set our appbar title.
        title: Text(widget.title),
      ),
      body: Center(
        // Center is a layout widget. It takes a single child and positions it
        // in the middle of the parent.
        child: Column(
          // Column is also layout widget. It takes a list of children and
          // arranges them vertically. By default, it sizes itself to fit its
          // children horizontally, and tries to be as tall as its parent.
          //
          // Invoke "debug painting" (press "p" in the console, choose the
          // "Toggle Debug Paint" action from the Flutter Inspector in Android
          // Studio, or the "Toggle Debug Paint" command in Visual Studio Code)
          // to see the wireframe for each widget.
          //
          // Column has various properties to control how it sizes itself and
          // how it positions its children. Here we use mainAxisAlignment to
          // center the children vertically; the main axis here is the vertical
          // axis because Columns are vertical (the cross axis would be
          // horizontal).
          mainAxisAlignment: MainAxisAlignment.center,
          children: <Widget>[
            Text(
              'You have pushed the button this many times:',
            ),
            Text(
              '$_counter',
              style: Theme.of(context).textTheme.display1,
            ),
          ],
        ),
      ),
      floatingActionButton: FloatingActionButton(
        onPressed: _incrementCounter,
        tooltip: 'Increment',
        child: Icon(Icons.add),
      ), // This trailing comma makes auto-formatting nicer for build methods.
    );
  }
}
运行
运行 flutter 工程
这里要注意,我这里在 flutter 下直接运行会得到下面的结果, 所以你需要自己在 debug 的情况下指定一个路由
修改 main.dart 中的 main 方法为如下结果
void main() {
  var routeName = ui.window.defaultRouteName;
  routeName = "route1"; // 新增这一行
  switch (routeName) {
    case "route1":
      runApp(MyApp());
      break;
    default:
      runApp(EmptyWidget());
  }
}
正式运行的时候一定要注释掉,如果不注释掉, 原生工程中的那个 route1 就失效了
然后运行下
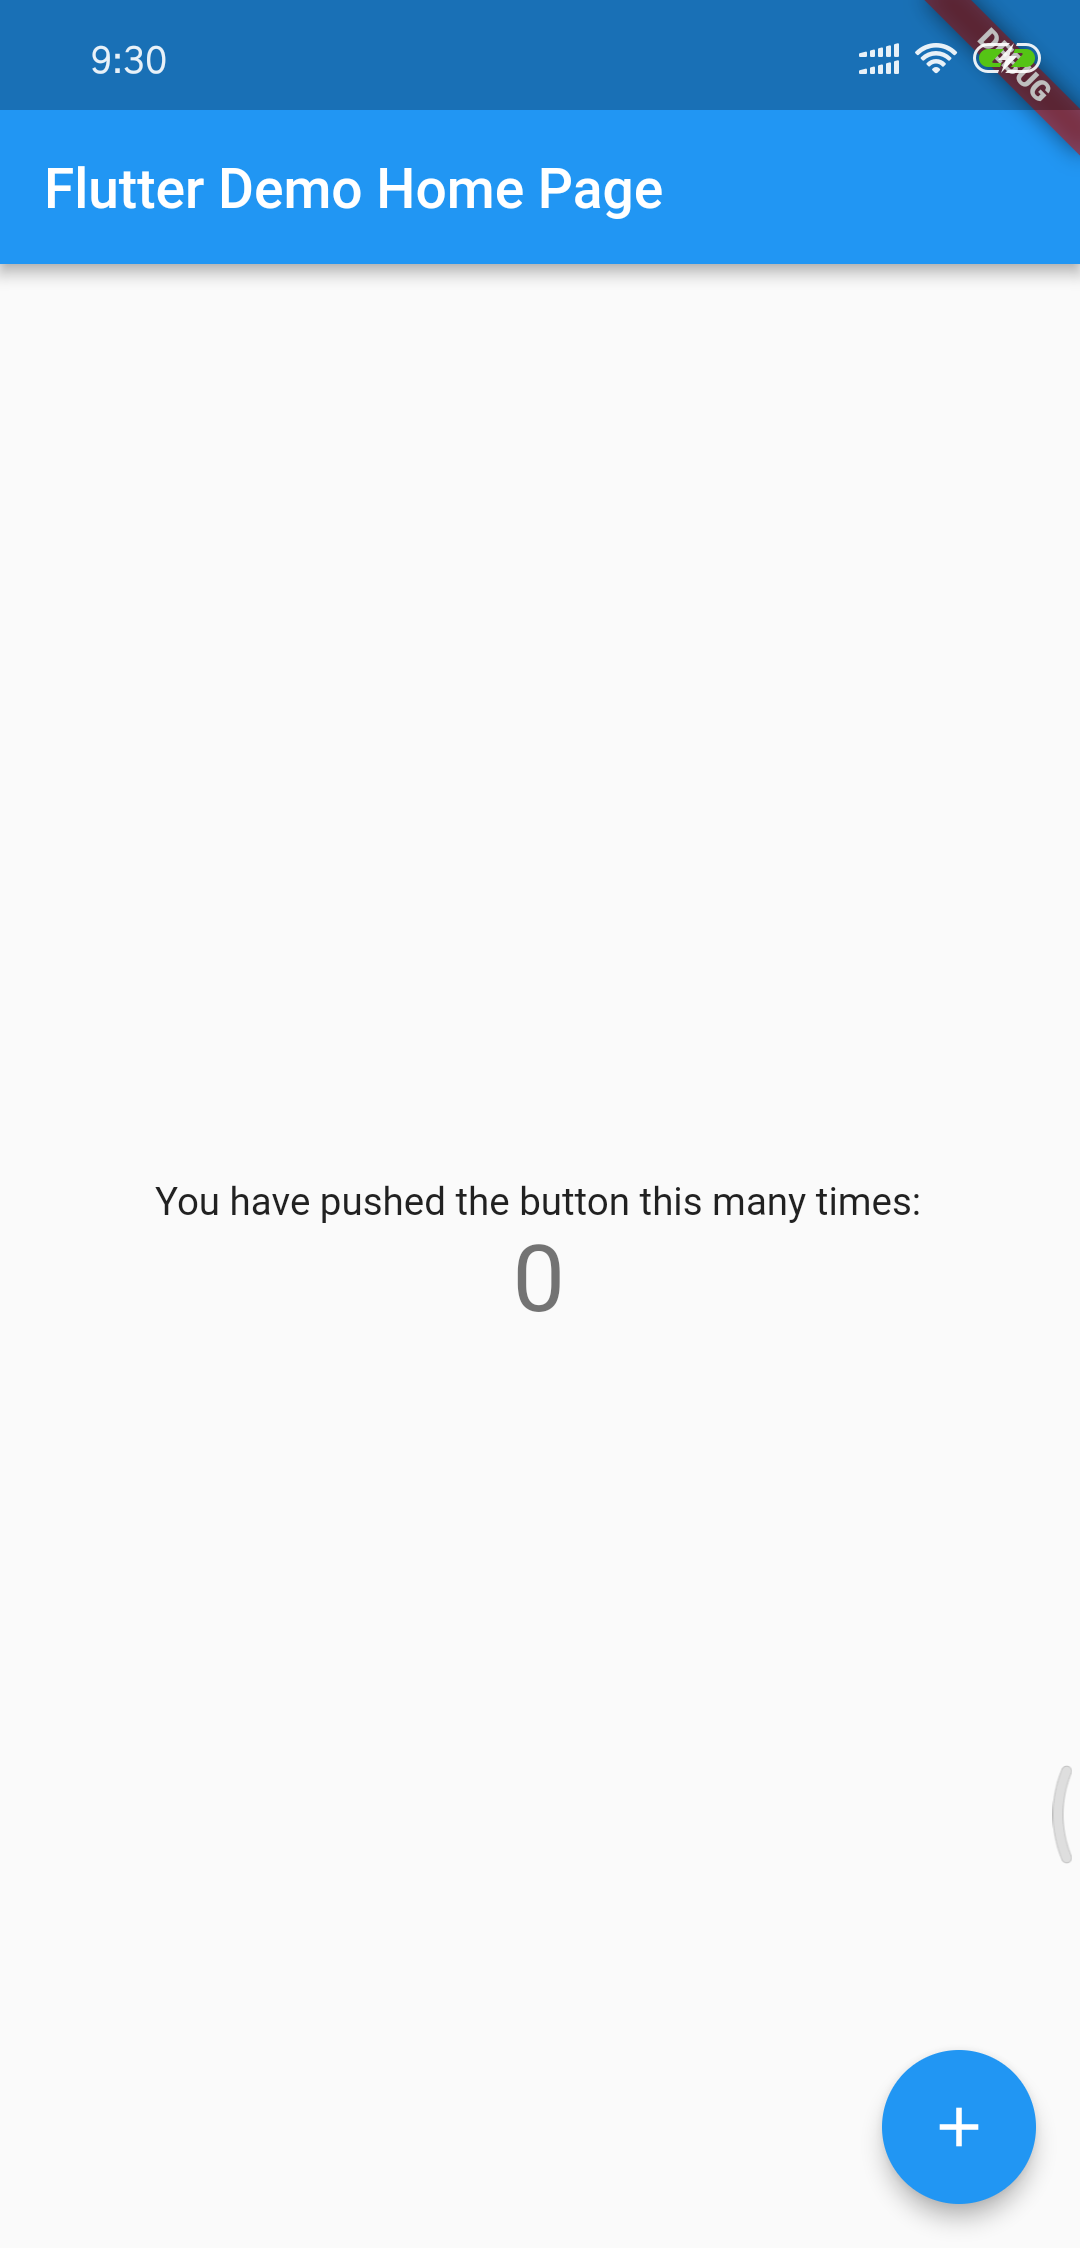
看起来和默认的 hello world 工程是一样的
运行原生工程
为什么看起来是一样的呢,flutter run 默认运行的是当前目录下的 lib/main.dart, 然后找 main 方法, main 方法中就是 runApp,所以看起来就是这样的了
但我们需要的是将 flutter 加入到原生工程中去,那么我们就需要在原生工程里面去运行这个项目
我们直接在 android studio 中运行项目,可能会得到下面的结果,也可能没有 这个应该和你 android 中的 min sdk /target sdk 版本有关系,有原生经验的人

拿着错误信息随手一百度能看到一个连接
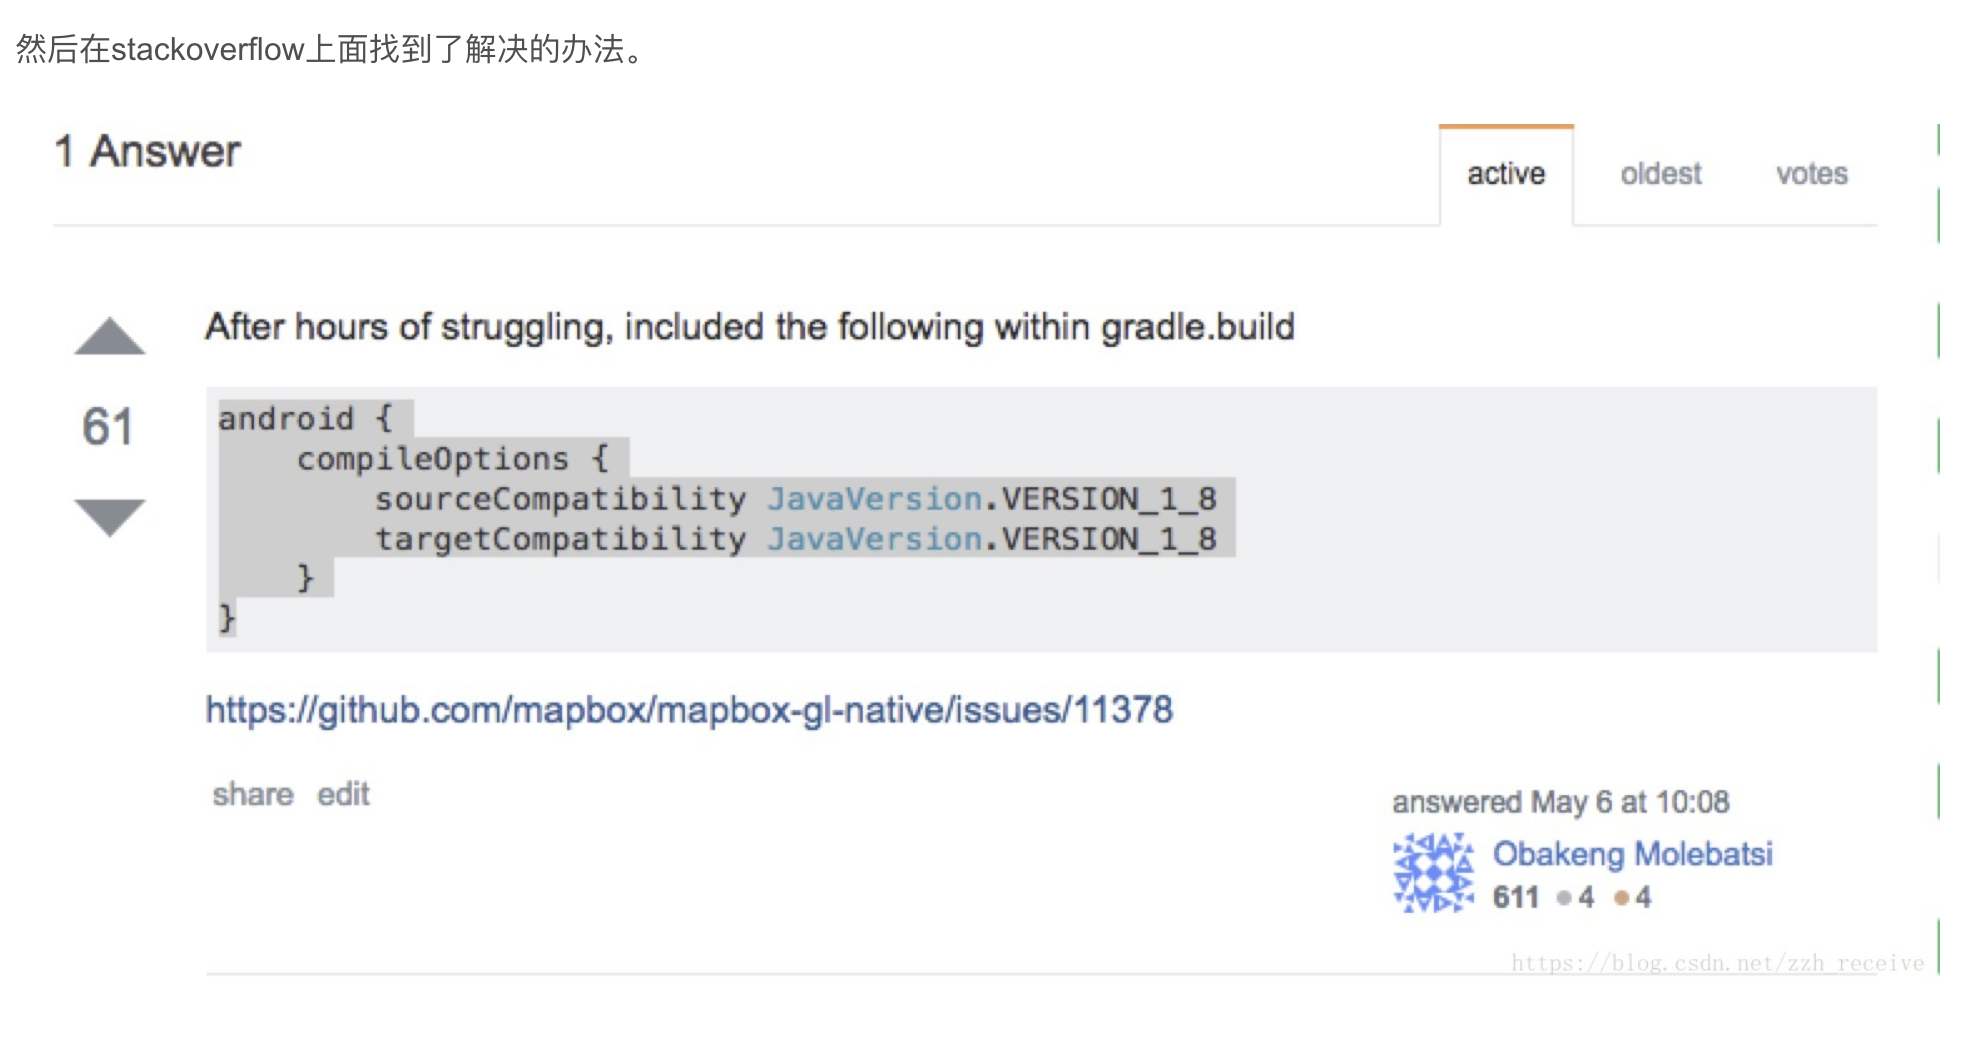
ok 我们在 android 项目中加入这个, 这个意思就是指定 java 的版本为 1.8(java 8)
修改 gradle 文件
app 下的 build.gradle
android{
    compileOptions {
        sourceCompatibility JavaVersion.VERSION_1_8
        targetCompatibility JavaVersion.VERSION_1_8
    }
}
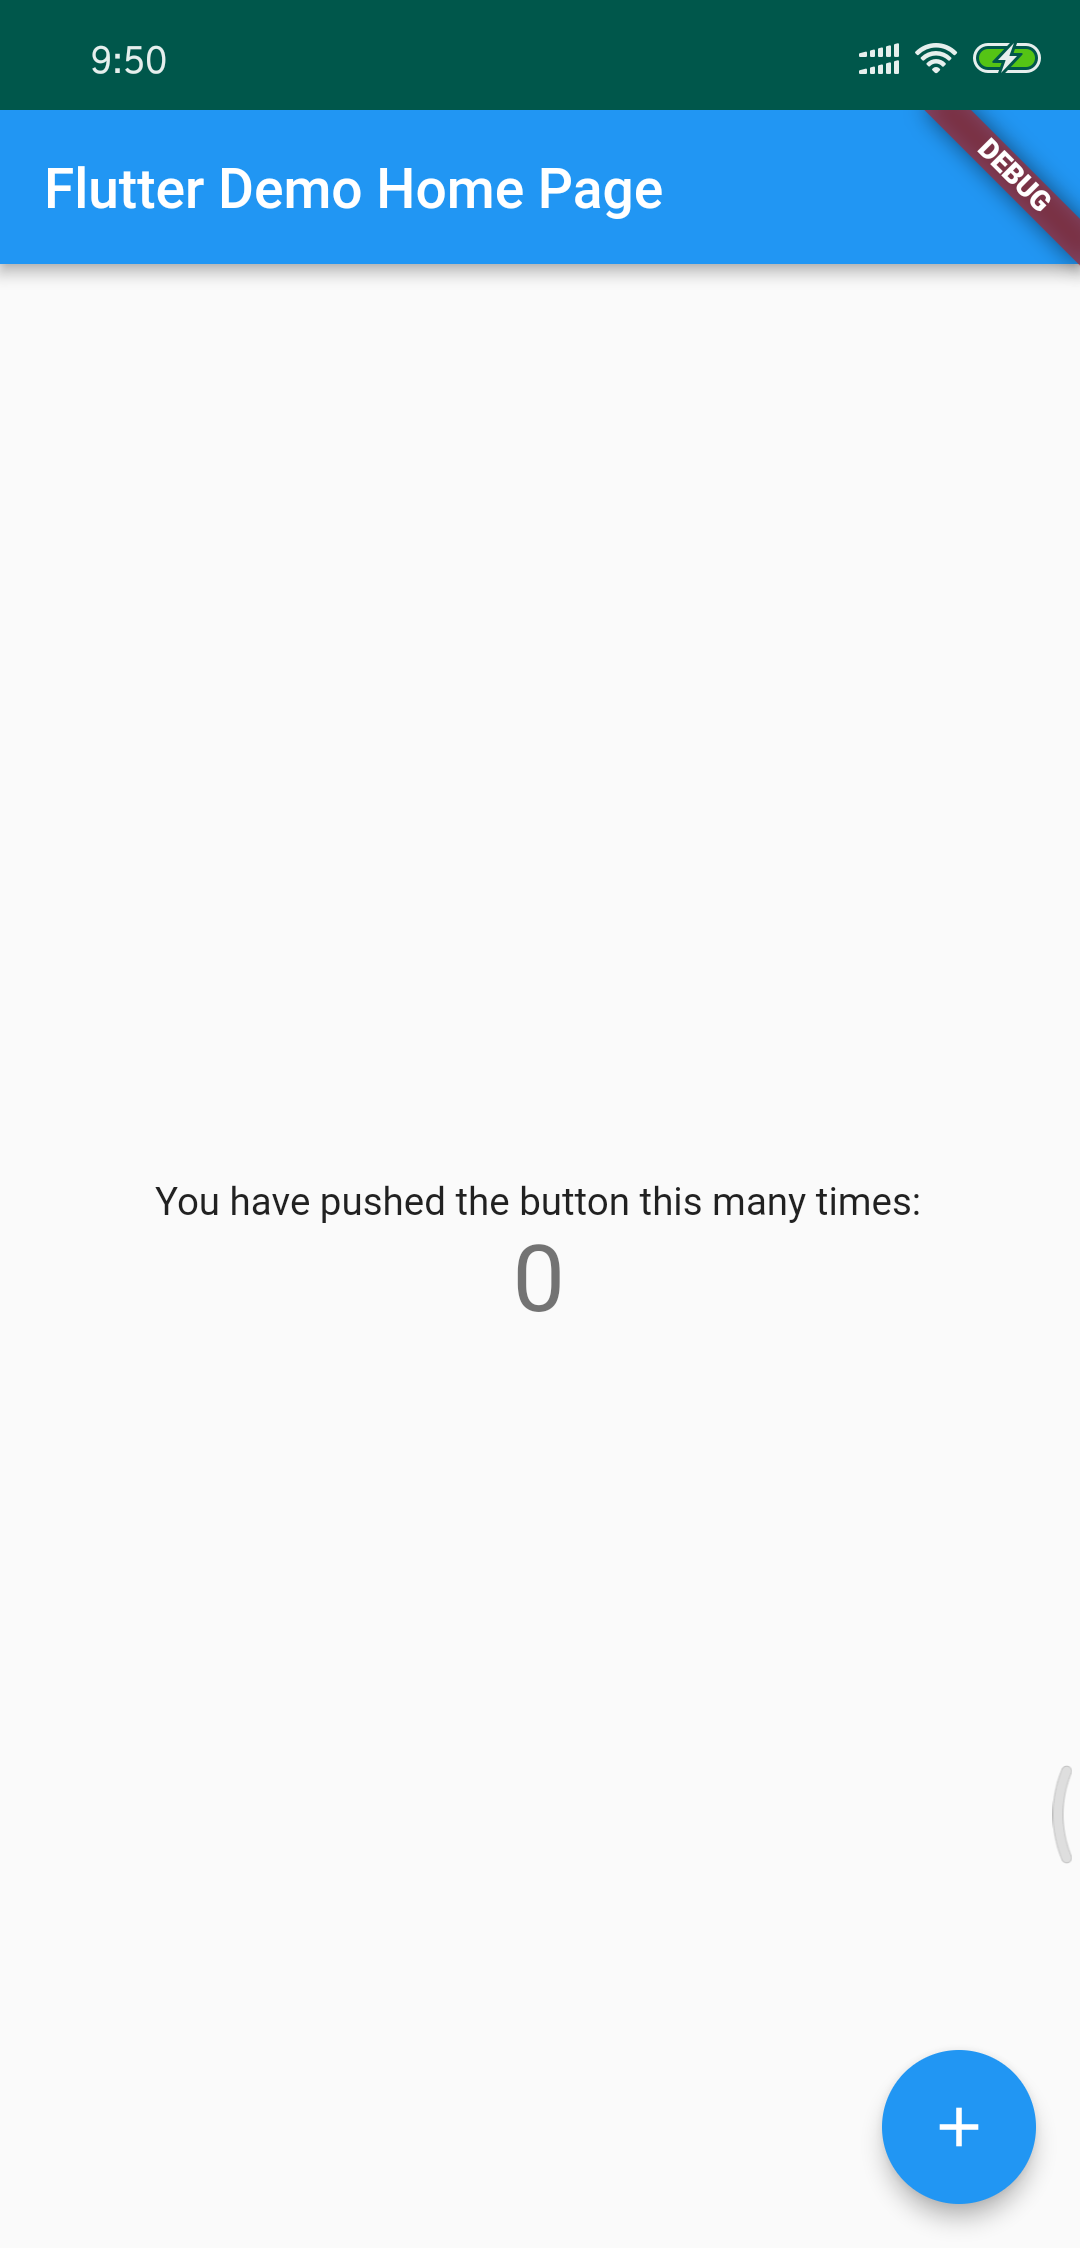
接着就可以跑起来项目了

点击按钮
微调一下
我们看到 flutter 界面上会比较怪, 这是因为原生和 flutter 主题色不一样的原因
修改原生的主题色
colors.xml
<?xml version="1.0" encoding="utf-8"?>
<resources>
    <color name="colorPrimary">#2196F3</color>
    <color name="colorPrimaryDark">#19639e</color>
    <color name="colorAccent">#D81B60</color>
</resources>
再打开原生项目可以看到颜色发生了变化

后记
简单的添加 flutter 到 android 就完成了,当然在具体实施中还会有很多问题,只能在具体情况具体分析了
如果遇到问题,欢迎在后面留言
另外,如果遇到了本篇和 wiki 不同的情况,请以 wiki 为准,毕竟官方 wiki 的更新会比较频繁,就在我写这篇文章的时候,还在间隔几天更新一次