
*基于3.1.2进行源码解析.
首先看一段项目中关于component-scan的配置:
<context:component-scan
        base-package="com.suning.rsc.server,com.suning.uops">
    <context:exclude-filter type="annotation" expression="org.springframework.stereotype.Controller"/>
</context:component-scan>
这段配置配置相信使用过spring mvc的童鞋都很熟悉,上面配置的作用就是spring会扫描
com.suning.rsc.server和com.suning.uops这两个路径下的所有文件,将其中符合要求的文件注册的spring容器的bean来方便调用,exclude-filter则表明过滤掉添加了@Controller的文件。
今天我们就结合源码来分析一下这段配置的具体实现:
需要一提的是,解析spring配置文件的工作是在spring ioc容器创建的过程中进行的,这不是我们今天的工作重点,所以我们直接从解析这段配置的地方开始讲起:
-
BeanDefinitionParserDelegate#parseCustomElement
public BeanDefinition parseCustomElement(Element ele, BeanDefinition containingBd) {
   String namespaceUri = getNamespaceURI(ele);
   NamespaceHandler handler = this.readerContext.getNamespaceHandlerResolver().resolve(namespaceUri);
   if (handler == null) {
      error("Unable to locate Spring NamespaceHandler for XML schema namespace [" + namespaceUri + "]", ele);
      return null;
   }
   return handler.parse(ele, new ParserContext(this.readerContext, this, containingBd));
}
这里的两个入参简单说明一下,第二个BeanDefinition为null不用管,第一个Element对象是Spring将配置文件Xml解析为Document对象以后,解析其中的一个个节点Node,再强转为Element得来的,看下上面解析节点的那部分代码方便大家理解:
protected void parseBeanDefinitions(Element root, BeanDefinitionParserDelegate delegate) {
   if (delegate.isDefaultNamespace(root)) {
      NodeList nl = root.getChildNodes();
      for (int i = 0; i < nl.getLength(); i++) {
         Node node = nl.item(i);
         if (node instanceof Element) {
            Element ele = (Element) node;
            if (delegate.isDefaultNamespace(ele)) {
               parseDefaultElement(ele, delegate);
            }
            else {
               delegate.parseCustomElement(ele);
            }
         }
      }
   }
   else {
      delegate.parseCustomElement(root);
   }
}
除了
public static final String IMPORT_ELEMENT = "import";public static final String ALIAS_ELEMENT = "alias";public static final String BEAN_ELEMENT = BeanDefinitionParserDelegate.BEAN_ELEMENT;
public static final String BEAN_ELEMENT = "bean";
public static final String NESTED_BEANS_ELEMENT = "beans";这四个属于spring默认的标签以外,其他标签的解析都是走的parseCustomElement()方法。

我们仔细看下这个方法的代码:
parseCustomElement第一步:
String namespaceUri = getNamespaceURI(ele);这个方法通过element对象解析得到对应的资源标记的地址,调试看一下具体的值:
ele:

namespaceUri:

parseCustomElement第二步:
NamespaceHandler handler = this.readerContext.getNamespaceHandlerResolver().resolve(namespaceUri);这个方法将放回一个NameSpaceHandler对应,用来处理spring中的命名空间。在我们这里获取的具体对象是ContextNamespaceHandler,在解析namespaceUri的过程中,可以看到调用了一个初始化的方法:

针对我们这边的ContextNameSpaceHandler对象来说,它的init()方法主要对context下的八个命名空间注册不同的解析器,看下这部分的代码:
public class ContextNamespaceHandler extends NamespaceHandlerSupport {

   public void init() {
      registerBeanDefinitionParser("property-placeholder", new PropertyPlaceholderBeanDefinitionParser());
      registerBeanDefinitionParser("property-override", new PropertyOverrideBeanDefinitionParser());
      registerBeanDefinitionParser("annotation-config", new AnnotationConfigBeanDefinitionParser());
      registerBeanDefinitionParser("component-scan", new ComponentScanBeanDefinitionParser());
      registerBeanDefinitionParser("load-time-weaver", new LoadTimeWeaverBeanDefinitionParser());
      registerBeanDefinitionParser("spring-configured", new SpringConfiguredBeanDefinitionParser());
      registerBeanDefinitionParser("mbean-export", new MBeanExportBeanDefinitionParser());
      registerBeanDefinitionParser("mbean-server", new MBeanServerBeanDefinitionParser());
   }

}
这里的八个对象分别对应context下的8个不同namespace,我们这次解析的是component-scan标签,所以使用的解析对象是ComponentScanBeanDefinitionParser对象。对应的也就是parseCustomElement()方法的最后一行:
return handler.parse(ele, new ParserContext(this.readerContext, this, containingBd));这里的具体实现就在ComponentScanBeanDefinitionParse中的parse()方法.这里还有一个参数this.readerContext,这个上下文对象里面主要包含这部分信息:

- ComponentScanBeanDefinitionParse#parse
public BeanDefinition parse(Element element, ParserContext parserContext) {
   String[] basePackages = StringUtils.tokenizeToStringArray(element.getAttribute(BASE_PACKAGE_ATTRIBUTE),
         ConfigurableApplicationContext.CONFIG_LOCATION_DELIMITERS);

   // Actually scan for bean definitions and register them.
   ClassPathBeanDefinitionScanner scanner = configureScanner(parserContext, element);
   Set<BeanDefinitionHolder> beanDefinitions = scanner.doScan(basePackages);
   registerComponents(parserContext.getReaderContext(), beanDefinitions, element);

   return null;
}
可以看到这个解析过程中有四个过程,我们先概括每个的作用,再一个个具体分析实现过程:
-
ComponentScanBeanDefinitionParse第一步
String[] basePackages = StringUtils.tokenizeToStringArray(element.getAttribute(BASE_PACKAGE_ATTRIBUTE),
      ConfigurableApplicationContext.CONFIG_LOCATION_DELIMITERS);
这边主要就是解析配置文件中的
base-package="com.suning.rsc.server,com.suning.uops"属性,会将里面的内容以一个字符串数组的形式返回,可以使用‘,’或者‘;’进行分隔;
-
ComponentScanBeanDefinitionParse第二步:
ClassPathBeanDefinitionScanner scanner = configureScanner(parserContext, element);这个方法主要是创建一个路径的扫描器,会根据配置文件中的内容对扫描器进行属性的复制,用于后面bean的注册。
-
ComponentScanBeanDefinitionParse第三步:
Set<BeanDefinitionHolder> beanDefinitions = scanner.doScan(basePackages);这一步就是会扫描指定路径下的内容,完成bean的注册,返回的是一个存放了BeanDefinitionHolder对象的set集合,这个BeanDefinitionHolder可以当成BeanDefinition的
存放器,里面除了正常的beanname还有alias。
public BeanDefinitionHolder(BeanDefinition beanDefinition, String beanName, String[] aliases) {
   Assert.notNull(beanDefinition, "BeanDefinition must not be null");
   Assert.notNull(beanName, "Bean name must not be null");
   this.beanDefinition = beanDefinition;
   this.beanName = beanName;
   this.aliases = aliases;
}
-
ComponentScanBeanDefinitionParse第四步:
registerComponents(parserContext.getReaderContext(), beanDefinitions, element);这个方法会根据配置内容,选择性的注册组件。
到了这边的conponent-scan的主要工作就已经完成了,接下来就是具体看下方法的实现过程,先从获取scanner开始:
configureScanner(parserContext, element);
protected ClassPathBeanDefinitionScanner configureScanner(ParserContext parserContext, Element element) {
   XmlReaderContext readerContext = parserContext.getReaderContext();

   boolean useDefaultFilters = true;
   if (element.hasAttribute(USE_DEFAULT_FILTERS_ATTRIBUTE)) {
      useDefaultFilters = Boolean.valueOf(element.getAttribute(USE_DEFAULT_FILTERS_ATTRIBUTE));
   }

   // Delegate bean definition registration to scanner class.
   ClassPathBeanDefinitionScanner scanner = createScanner(readerContext, useDefaultFilters);
   scanner.setResourceLoader(readerContext.getResourceLoader());
   scanner.setEnvironment(parserContext.getDelegate().getEnvironment());
   scanner.setBeanDefinitionDefaults(parserContext.getDelegate().getBeanDefinitionDefaults());
   scanner.setAutowireCandidatePatterns(parserContext.getDelegate().getAutowireCandidatePatterns());

   if (element.hasAttribute(RESOURCE_PATTERN_ATTRIBUTE)) {
      scanner.setResourcePattern(element.getAttribute(RESOURCE_PATTERN_ATTRIBUTE));
   }

   try {
      parseBeanNameGenerator(element, scanner);
   }
   catch (Exception ex) {
      readerContext.error(ex.getMessage(), readerContext.extractSource(element), ex.getCause());
   }

   try {
      parseScope(element, scanner);
   }
   catch (Exception ex) {
      readerContext.error(ex.getMessage(), readerContext.extractSource(element), ex.getCause());
   }

   parseTypeFilters(element, scanner, readerContext, parserContext);

   return scanner;
}
可以看到这里面主要的内容就是给scanner设置属性,我们看几个主要部分的内容:
boolean useDefaultFilters = true;
if (element.hasAttribute(USE_DEFAULT_FILTERS_ATTRIBUTE)) {
   useDefaultFilters = Boolean.valueOf(element.getAttribute(USE_DEFAULT_FILTERS_ATTRIBUTE));
}
这边是设置useDefaultFilters属性,这个属性默认是开启的,也就是use-default-filters=”true”,这个属性会在接下来实例化scanner的地方用到。
ClassPathBeanDefinitionScanner scanner = createScanner(readerContext, useDefaultFilters);进去createScanner的方法内部,最终找到处理useDeFaultFilters的地方:\
ClassPathScanningCandidateComponentProvider#ClassPathScanningCandidateComponentProvider
public ClassPathScanningCandidateComponentProvider(boolean useDefaultFilters, Environment environment) {
   if (useDefaultFilters) {
      registerDefaultFilters();
   }
   this.environment = environment;
}
根据useDefaultFilters属性,决定是否注册默认组件:
/**
 * Register the default filter for {@link Component @Component}.
 * <p>This will implicitly register all annotations that have the
 * {@link Component @Component} meta-annotation including the
 * {@link Repository @Repository}, {@link Service @Service}, and
 * {@link Controller @Controller} stereotype annotations.
 * <p>Also supports Java EE 6's {@link javax.annotation.ManagedBean} and
 * JSR-330's {@link javax.inject.Named} annotations, if available.
 *
 */
@SuppressWarnings("unchecked")
protected void registerDefaultFilters() {
   this.includeFilters.add(new AnnotationTypeFilter(Component.class));
   ClassLoader cl = ClassPathScanningCandidateComponentProvider.class.getClassLoader();
   try {
      this.includeFilters.add(new AnnotationTypeFilter(
            ((Class<? extends Annotation>) cl.loadClass("javax.annotation.ManagedBean")), false));
      logger.info("JSR-250 'javax.annotation.ManagedBean' found and supported for component scanning");
   }
   catch (ClassNotFoundException ex) {
      // JSR-250 1.1 API (as included in Java EE 6) not available - simply skip.
   }
   try {
      this.includeFilters.add(new AnnotationTypeFilter(
            ((Class<? extends Annotation>) cl.loadClass("javax.inject.Named")), false));
      logger.info("JSR-330 'javax.inject.Named' annotation found and supported for component scanning");
   }
   catch (ClassNotFoundException ex) {
      // JSR-330 API not available - simply skip.
   }
}
结合注释加代码,可以知道这边的处理是对@Component、@Repository、@Service、@Controller和 JavaEE6的ManagedBean和javax.inject.Named(如果有的话)进行扫描管理。这一部分内容可以在下面得到验证.
还有个需要关注的地方就是这个解析类型过滤器的地方:
parseTypeFilters(element, scanner, readerContext, parserContext);这个方法会针对配置文件中的exclude-filter 和 include-filter属性,为扫描器加上对应的拦截器
protected void parseTypeFilters(
      Element element, ClassPathBeanDefinitionScanner scanner, XmlReaderContext readerContext, ParserContext parserContext) {

   // Parse exclude and include filter elements.
   ClassLoader classLoader = scanner.getResourceLoader().getClassLoader();
   NodeList nodeList = element.getChildNodes();
   for (int i = 0; i < nodeList.getLength(); i++) {
      Node node = nodeList.item(i);
      if (node.getNodeType() == Node.ELEMENT_NODE) {
         String localName = parserContext.getDelegate().getLocalName(node);
         try {
            if (INCLUDE_FILTER_ELEMENT.equals(localName)) {
               TypeFilter typeFilter = createTypeFilter((Element) node, classLoader);
               scanner.addIncludeFilter(typeFilter);
            }
            else if (EXCLUDE_FILTER_ELEMENT.equals(localName)) {
               TypeFilter typeFilter = createTypeFilter((Element) node, classLoader);
               scanner.addExcludeFilter(typeFilter);
            }
         }
         catch (Exception ex) {
            readerContext.error(ex.getMessage(), readerContext.extractSource(element), ex.getCause());
         }
      }
   }
}
通过解析节点,比较节点的名称,添加对应的filter:
if (INCLUDE_FILTER_ELEMENT.equals(localName)) {
   TypeFilter typeFilter = createTypeFilter((Element) node, classLoader);
   scanner.addIncludeFilter(typeFilter);
}
else if (EXCLUDE_FILTER_ELEMENT.equals(localName)) {
   TypeFilter typeFilter = createTypeFilter((Element) node, classLoader);
   scanner.addExcludeFilter(typeFilter);
}
到了这个地方scanner就已经准备完毕了,我们看下这个scanner的样子:

excludeFilters的内容也和配置文件中的内容是一致的:

还记得上面说到的use-default-filter属性么,我们没有配置include-filter的内容,但是scanner中的includeFilters一样有值,就是因为默认的use-default-filters是true,我们看下里面的内容:

可以看到主要有两个内容,一个interface javax.annotation.ManagedBean 和interface org.springframework.stereotype.Component,和我们上面分析的内容是一样的,至于@Controller、@Service、@Repository没有展示,是因为这三个注解都可以算成@Component的子注解:


到此,扫描器的准备工作完成,接下来开始解析具体的文件。
- scanner.doScan(basePackages);
/**
 * Perform a scan within the specified base packages,
 * returning the registered bean definitions.
 * <p>This method does <i>not</i> register an annotation config processor
 * but rather leaves this up to the caller.
 * @param basePackages the packages to check for annotated classes
 * @return set of beans registered if any for tooling registration purposes (never {@code null})
 */
protected Set<BeanDefinitionHolder> doScan(String... basePackages) {
   Assert.notEmpty(basePackages, "At least one base package must be specified");
   Set<BeanDefinitionHolder> beanDefinitions = new LinkedHashSet<BeanDefinitionHolder>();
   for (String basePackage : basePackages) {
      Set<BeanDefinition> candidates = findCandidateComponents(basePackage);
      for (BeanDefinition candidate : candidates) {
         ScopeMetadata scopeMetadata = this.scopeMetadataResolver.resolveScopeMetadata(candidate);
         candidate.setScope(scopeMetadata.getScopeName());
         String beanName = this.beanNameGenerator.generateBeanName(candidate, this.registry);
         if (candidate instanceof AbstractBeanDefinition) {
            postProcessBeanDefinition((AbstractBeanDefinition) candidate, beanName);
         }
         if (candidate instanceof AnnotatedBeanDefinition) {
            AnnotationConfigUtils.processCommonDefinitionAnnotations((AnnotatedBeanDefinition) candidate);
         }
         if (checkCandidate(beanName, candidate)) {
            BeanDefinitionHolder definitionHolder = new BeanDefinitionHolder(candidate, beanName);
            definitionHolder = AnnotationConfigUtils.applyScopedProxyMode(scopeMetadata, definitionHolder, this.registry);
            beanDefinitions.add(definitionHolder);
            registerBeanDefinition(definitionHolder, this.registry);
         }
      }
   }
   return beanDefinitions;
}
我们把doscan这部分内容分成两部分来解析:
doscan第一部分:
Set<BeanDefinition> candidates = findCandidateComponents(basePackage);doscan第二部分:循环上面获取到的BeanDefinition,找出其中符合要求的bean,注册:
ScopeMetadata scopeMetadata = this.scopeMetadataResolver.resolveScopeMetadata(candidate);
candidate.setScope(scopeMetadata.getScopeName());
String beanName = this.beanNameGenerator.generateBeanName(candidate, this.registry);
if (candidate instanceof AbstractBeanDefinition) {
   postProcessBeanDefinition((AbstractBeanDefinition) candidate, beanName);
}
if (candidate instanceof AnnotatedBeanDefinition) {
   AnnotationConfigUtils.processCommonDefinitionAnnotations((AnnotatedBeanDefinition) candidate);
}
if (checkCandidate(beanName, candidate)) {
   BeanDefinitionHolder definitionHolder = new BeanDefinitionHolder(candidate, beanName);
   definitionHolder = AnnotationConfigUtils.applyScopedProxyMode(scopeMetadata, definitionHolder, this.registry);
   beanDefinitions.add(definitionHolder);
   registerBeanDefinition(definitionHolder, this.registry);
}
我们先从dosacan第一部分开始说起,先找符合基本条件的候选bean:
this.resourcePatternResolver.getResources(packageSearchPath);
      boolean traceEnabled = logger.isTraceEnabled();
      boolean debugEnabled = logger.isDebugEnabled();
      for (Resource resource : resources) {
         if (traceEnabled) {
            logger.trace("Scanning " + resource);
         }
         if (resource.isReadable()) {
            try {
               MetadataReader metadataReader = this.metadataReaderFactory.getMetadataReader(resource);
               if (isCandidateComponent(metadataReader)) {
                  ScannedGenericBeanDefinition sbd = new ScannedGenericBeanDefinition(metadataReader);
                  sbd.setResource(resource);
                  sbd.setSource(resource);
                  if (isCandidateComponent(sbd)) {
                     if (debugEnabled) {
                        logger.debug("Identified candidate component class: " + resource);
                     }
                     candidates.add(sbd);
                  }
                  else {
                     if (debugEnabled) {
                        logger.debug("Ignored because not a concrete top-level class: " + resource);
                     }
                  }
               }
               else {
                  if (traceEnabled) {
                     logger.trace("Ignored because not matching any filter: " + resource);
                  }
               }
            }
            catch (Throwable ex) {
               throw new BeanDefinitionStoreException(
                     "Failed to read candidate component class: " + resource, ex);
            }
         }
         else {
            if (traceEnabled) {
               logger.trace("Ignored because not readable: " + resource);
            }
         }
      }
   }
   catch (IOException ex) {
      throw new BeanDefinitionStoreException("I/O failure during classpath scanning", ex);
   }
   return candidates;
}
findCandidateComponents这里面又可以分为三个部分:
findCandidateComponents第一步:首先会根据需要扫描的包名解析出具体搜索的路径:
String packageSearchPath = ResourcePatternResolver.CLASSPATH_ALL_URL_PREFIX +
      resolveBasePackage(basePackage) + "/" + this.resourcePattern;

findCandidateComponents第二步:根据这个路径获取对应的的资源:
Resource[] resources = this.resourcePatternResolver.getResources(packageSearchPath);findCandidateComponents第三步:获取到resource以后,循环判断resource,符合要求的放入set<BeanDefinition>集合中:
MetadataReader metadataReader = this.metadataReaderFactory.getMetadataReader(resource);
if (isCandidateComponent(metadataReader)) {
   ScannedGenericBeanDefinition sbd = new ScannedGenericBeanDefinition(metadataReader);
   sbd.setResource(resource);
   sbd.setSource(resource);
   if (isCandidateComponent(sbd)) {
      if (debugEnabled) {
         logger.debug("Identified candidate component class: " + resource);
      }
      candidates.add(sbd);
   }
   else {
      if (debugEnabled) {
         logger.debug("Ignored because not a concrete top-level class: " + resource);
      }
   }
}
我们具体看下findCandidateComponents的第二部分的内容:
PathMatchingResourcePatternResolver#getResources:
public Resource[] getResources(String locationPattern) throws IOException {
   Assert.notNull(locationPattern, "Location pattern must not be null");
   if (locationPattern.startsWith(CLASSPATH_ALL_URL_PREFIX)) {
      // a class path resource (multiple resources for same name possible)
      if (getPathMatcher().isPattern(locationPattern.substring(CLASSPATH_ALL_URL_PREFIX.length()))) {
         // a class path resource pattern
         return findPathMatchingResources(locationPattern);
      }
      else {
         // all class path resources with the given name
         return findAllClassPathResources(locationPattern.substring(CLASSPATH_ALL_URL_PREFIX.length()));
      }
   }
   else {
      // Only look for a pattern after a prefix here
      // (to not get fooled by a pattern symbol in a strange prefix).
      int prefixEnd = locationPattern.indexOf(":") + 1;
      if (getPathMatcher().isPattern(locationPattern.substring(prefixEnd))) {
         // a file pattern
         return findPathMatchingResources(locationPattern);
      }
      else {
         // a single resource with the given name
         return new Resource[] {getResourceLoader().getResource(locationPattern)};
      }
   }
}
这部分解析获取resource的内容可以分为四种分支:
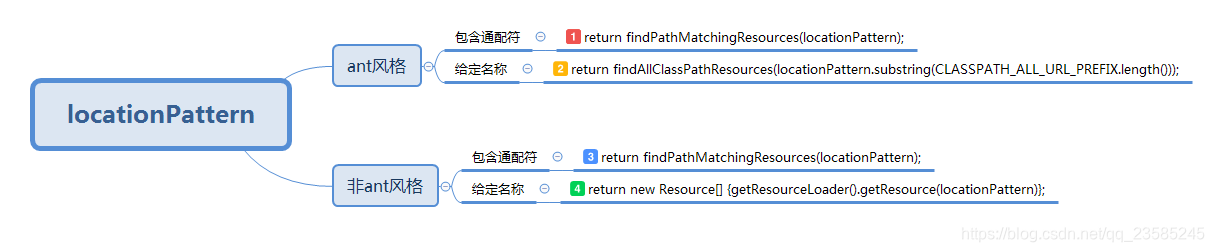
我们这边走的是第一个分支:
PathMatchingResourcePatternResolver#findPathMatchingResources
/**
 * Find all resources that match the given location pattern via the
 * Ant-style PathMatcher. Supports resources in jar files and zip files
 * and in the file system.
 * @param locationPattern the location pattern to match
 * @return the result as Resource array
 * @throws IOException in case of I/O errors
 * @see #doFindPathMatchingJarResources
 * @see #doFindPathMatchingFileResources
 * @see org.springframework.util.PathMatcher
 */
protected Resource[] findPathMatchingResources(String locationPattern) throws IOException {
   String rootDirPath = determineRootDir(locationPattern);
   String subPattern = locationPattern.substring(rootDirPath.length());
   Resource[] rootDirResources = getResources(rootDirPath);
   Set<Resource> result = new LinkedHashSet<Resource>(16);
   for (Resource rootDirResource : rootDirResources) {
      rootDirResource = resolveRootDirResource(rootDirResource);
      if (isJarResource(rootDirResource)) {
         result.addAll(doFindPathMatchingJarResources(rootDirResource, subPattern));
      }
      else if (rootDirResource.getURL().getProtocol().startsWith(ResourceUtils.URL_PROTOCOL_VFS)) {
         result.addAll(VfsResourceMatchingDelegate.findMatchingResources(rootDirResource, subPattern, getPathMatcher()));
      }
      else {
         result.addAll(doFindPathMatchingFileResources(rootDirResource, subPattern));
      }
   }
   if (logger.isDebugEnabled()) {
      logger.debug("Resolved location pattern [" + locationPattern + "] to resources " + result);
   }
   return result.toArray(new Resource[result.size()]);
}
findPathMatchingResources里面的内容主要分为两部分:
findPathMatchingResources第一部分:获取根目录下的资源:
Resource[] rootDirResources = getResources(rootDirPath);这边的getResources方法就是递归调用上面的方法,会取出根目录下的所有目录
findPathMatchingResources第二部分:循环处理获取到的资源:
rootDirResource = resolveRootDirResource(rootDirResource);
if (isJarResource(rootDirResource)) {
   result.addAll(doFindPathMatchingJarResources(rootDirResource, subPattern));
}
else if (rootDirResource.getURL().getProtocol().startsWith(ResourceUtils.URL_PROTOCOL_VFS)) {
   result.addAll(VfsResourceMatchingDelegate.findMatchingResources(rootDirResource, subPattern, getPathMatcher()));
}
else {
   result.addAll(doFindPathMatchingFileResources(rootDirResource, subPattern));
}
findPathMatchingResources第二部分中会处理上面渠道的需要扫描的包的根目录的文件,首先对文件做解析,用于判断文件类型:
rootDirResource = resolveRootDirResource(rootDirResource);接着对资源类型做校验,我们这里主要看第三种,也就是对非jar和不是vsf协议的处理:
result.addAll(doFindPathMatchingFileResources(rootDirResource, subPattern));doFindPathMatchingFileResources
/**
 * Find all resources in the file system that match the given location pattern
 * via the Ant-style PathMatcher.
 * @param rootDirResource the root directory as Resource
 * @param subPattern the sub pattern to match (below the root directory)
 * @return the Set of matching Resource instances
 * @throws IOException in case of I/O errors
 * @see #retrieveMatchingFiles
 * @see org.springframework.util.PathMatcher
 */
protected Set<Resource> doFindPathMatchingFileResources(Resource rootDirResource, String subPattern)
      throws IOException {

   File rootDir;
   try {
      rootDir = rootDirResource.getFile().getAbsoluteFile();
   }
   catch (IOException ex) {
      if (logger.isWarnEnabled()) {
         logger.warn("Cannot search for matching files underneath " + rootDirResource +
               " because it does not correspond to a directory in the file system", ex);
      }
      return Collections.emptySet();
   }
   return doFindMatchingFileSystemResources(rootDir, subPattern);
}
这边首先获取扫描包下的文件对象,也就是:
File rootDir;
rootDir = rootDirResource.getFile().getAbsoluteFile();
然后通过doFindMatchingFileSystemResources结合子目录名称,找出具体资源
doFindMatchingFileSystemResources
/**
 * Find all resources in the file system that match the given location pattern
 * via the Ant-style PathMatcher.
 * @param rootDir the root directory in the file system
 * @param subPattern the sub pattern to match (below the root directory)
 * @return the Set of matching Resource instances
 * @throws IOException in case of I/O errors
 * @see #retrieveMatchingFiles
 * @see org.springframework.util.PathMatcher
 */
protected Set<Resource> doFindMatchingFileSystemResources(File rootDir, String subPattern) throws IOException {
   if (logger.isDebugEnabled()) {
      logger.debug("Looking for matching resources in directory tree [" + rootDir.getPath() + "]");
   }
   Set<File> matchingFiles = retrieveMatchingFiles(rootDir, subPattern);
   Set<Resource> result = new LinkedHashSet<Resource>(matchingFiles.size());
   for (File file : matchingFiles) {
      result.add(new FileSystemResource(file));
   }
   return result;
}
这个方法会找出所有符合路径的要求的资源文件,这里面的内容也有很多,这里也暂不深入,只了解到这个,知道通过这边会返回所有符合条件的资源即可,后面实际需求中需要研究再继续深入。
到了这里我们已经得到了所有的候选者Resource[] resources,接下来我们要看下findCandidateComponents的第三部分,也就是循环处理resource对象,放入Set<BeanDefinition>集合中,留给doscan的第二部分处理:
if (resource.isReadable()) {
   try {
      MetadataReader metadataReader = this.metadataReaderFactory.getMetadataReader(resource);
      if (isCandidateComponent(metadataReader)) {
         ScannedGenericBeanDefinition sbd = new ScannedGenericBeanDefinition(metadataReader);
         sbd.setResource(resource);
         sbd.setSource(resource);
         if (isCandidateComponent(sbd)) {
            if (debugEnabled) {
               logger.debug("Identified candidate component class: " + resource);
            }
            candidates.add(sbd);
         }
         else {
            if (debugEnabled) {
               logger.debug("Ignored because not a concrete top-level class: " + resource);
            }
         }
      }
      else {
         if (traceEnabled) {
            logger.trace("Ignored because not matching any filter: " + resource);
         }
      }
   }
   catch (Throwable ex) {
      throw new BeanDefinitionStoreException(
            "Failed to read candidate component class: " + resource, ex);
   }
}
else {
   if (traceEnabled) {
      logger.trace("Ignored because not readable: " + resource);
   }
}
这里我们先对MetadataReader对象做个简单介绍:
/**
 * Simple facade for accessing class metadata,
 * as read by an ASM {@link org.springframework.asm.ClassReader}.
 *
 * @author Juergen Hoeller
 * @since 2.5
 */
public interface MetadataReader {

   /**
    * Return the resource reference for the class file.
    */
   Resource getResource();

   /**
    * Read basic class metadata for the underlying class.
    */
   ClassMetadata getClassMetadata();

   /**
    * Read full annotation metadata for the underlying class,
    * including metadata for annotated methods.
    */
   AnnotationMetadata getAnnotationMetadata();

}
通过注释我们可以大概知道MetadataReader的作用应该是类似asm一样可以直接操作class文件。对这个有大概了解以后,我们就可以往下看了:
MetadataReader metadataReader = this.metadataReaderFactory.getMetadataReader(resource);这里传入一个资源对象会返回一个对应的MetadataReader对象,我们具体看下getMetaDataReader的实现:
@Override
public MetadataReader getMetadataReader(Resource resource) throws IOException {
   if (getCacheLimit() <= 0) {
      return super.getMetadataReader(resource);
   }
   synchronized (this.classReaderCache) {
      MetadataReader metadataReader = this.classReaderCache.get(resource);
      if (metadataReader == null) {
         metadataReader = super.getMetadataReader(resource);
         this.classReaderCache.put(resource, metadataReader);
      }
      return metadataReader;
   }
}
这里使用了
private final Map<Resource, MetadataReader> classReaderCache =
      new LinkedHashMap<Resource, MetadataReader>(DEFAULT_CACHE_LIMIT, 0.75f, true) {
         @Override
         protected boolean removeEldestEntry(Map.Entry<Resource, MetadataReader> eldest) {
            return size() > getCacheLimit();
         }
      };
作为缓存容器来存放Resource和MetadataReader的关联信息。
在初次获取时,调用父类的super.getMetadataReader(resource)方法获取MetadataReader:
SimpleMetadataReaderFactory#getMetadataReader
return new SimpleMetadataReader(resource, this.resourceLoader.getClassLoader());这里的具体实现就不在这里看了,因为asm相关的并不熟悉。
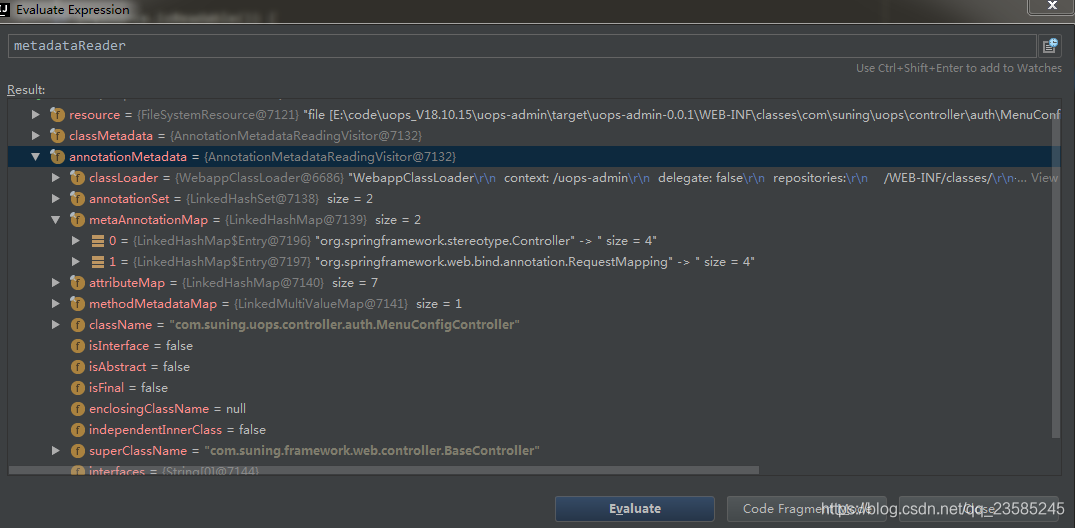
我们结合调试看下这个对象的内容:
Resource的内容:

获取到的MetadataReader的内容:

ClassMetadata中保存class对象的相关元数据
AnnotationMetadata中则保存所有注解相关的内容:
我们继续看findCandidateComponents的第三部分后面对MetadataReader对象的处理:
if (isCandidateComponent(metadataReader)) 这里的处理就是看这个class是否可以匹配上之前配置的exclude-filter和include-filter过滤器:
/**
 * Determine whether the given class does not match any exclude filter
 * and does match at least one include filter.
 * @param metadataReader the ASM ClassReader for the class
 * @return whether the class qualifies as a candidate component
 */
protected boolean isCandidateComponent(MetadataReader metadataReader) throws IOException {
   for (TypeFilter tf : this.excludeFilters) {
      if (tf.match(metadataReader, this.metadataReaderFactory)) {
         return false;
      }
   }
   for (TypeFilter tf : this.includeFilters) {
      if (tf.match(metadataReader, this.metadataReaderFactory)) {
         AnnotationMetadata metadata = metadataReader.getAnnotationMetadata();
         if (!metadata.isAnnotated(Profile.class.getName())) {
            return true;
         }
         AnnotationAttributes profile = MetadataUtils.attributesFor(metadata, Profile.class);
         return this.environment.acceptsProfiles(profile.getStringArray("value"));
      }
   }
   return false;
}
根据两个过滤器的结果比较返回这个类对象是否匹配
这里比较完以后,还有进一步的处理,同时会在进行一次判断:
ScannedGenericBeanDefinition sbd = new ScannedGenericBeanDefinition(metadataReader);
sbd.setResource(resource);
sbd.setSource(resource);
if (isCandidateComponent(sbd)) {
   if (debugEnabled) {
      logger.debug("Identified candidate component class: " + resource);
   }
   candidates.add(sbd);
}
这里又看到一个新对象ScannedGenericBeanDefinition,看下这个对象是用来干什么的:
/**
 * Extension of the {@link org.springframework.beans.factory.support.GenericBeanDefinition}
 * class, based on an ASM ClassReader, with support for annotation metadata exposed
 * through the {@link AnnotatedBeanDefinition} interface.
 *
 * <p>This class does <i>not</i> load the bean {@code Class} early.
 * It rather retrieves all relevant metadata from the ".class" file itself,
 * parsed with the ASM ClassReader. It is functionally equivalent to
 * {@link AnnotatedGenericBeanDefinition#AnnotatedGenericBeanDefinition(AnnotationMetadata)}
 * but distinguishes by type beans that have been <em>scanned</em> vs those that have
 * been otherwise registered or detected by other means.
 *
 * @author Juergen Hoeller
 * @author Chris Beams
 * @since 2.5
 * @see #getMetadata()
 * @see #getBeanClassName()
 * @see org.springframework.core.type.classreading.MetadataReaderFactory
 * @see AnnotatedGenericBeanDefinition
 */
@SuppressWarnings("serial")
public class ScannedGenericBeanDefinition extends GenericBeanDefinition implements AnnotatedBeanDefinition {
大概是说这个对象是对GenericBeanDefinition的扩展,实现了对annotation metadata的支持,
在第一次isComponentCandidate(metadataReader)后,会将metadataReader包装成ScannedGenericBeanDefinition,再判断一次isComponentCandidate(ScannedGenericBeanDefinition),我们看下此时的这个方法作用是什么:
/**
 * Determine whether the given bean definition qualifies as candidate.
 * <p>The default implementation checks whether the class is concrete
 * (i.e. not abstract and not an interface). Can be overridden in subclasses.
 * @param beanDefinition the bean definition to check
 * @return whether the bean definition qualifies as a candidate component
 */
protected boolean isCandidateComponent(AnnotatedBeanDefinition beanDefinition) {
   return (beanDefinition.getMetadata().isConcrete() && beanDefinition.getMetadata().isIndependent());
}
这里的意思是说这次的校验是保证:
这个类是实体类,也就是保证它不是一个接口,也不是一个抽象类
beanDefinition.getMetadata().isConcrete()/**
* Return whether the underlying class represents a concrete class,
* i.e. neither an interface nor an abstract class.
*/
boolean isConcrete();
保证这个类是独立的,确定是顶级类
beanDefinition.getMetadata().isIndependent()/**
* Determine whether the underlying class is independent,
* i.e. whether it is a top-level class or a nested class
* (static inner class) that can be constructed independent
* from an enclosing class.
*/
boolean isIndependent();
满足上面的两个条件以后,这个对象会被放入set<BeanDefinition>这个集合中,交给doscan的第二部分来处理。
这里想一下为什么对候选者需要做是否独立和是否是实体类的校验?带着这个疑问继续分析整个过程。
在这么多方法里面绕来绕去,现在我们终于看完了dosacan第一部分的内容,也就是已经获取了符合基本的一个set<BeanDefinition>的候选者集合。
我们接着解析doscan第二部分的内容:循环处理上面的set<BeanDefinition>:
for (BeanDefinition candidate : candidates) {
   ScopeMetadata scopeMetadata = this.scopeMetadataResolver.resolveScopeMetadata(candidate);
   candidate.setScope(scopeMetadata.getScopeName());
   String beanName = this.beanNameGenerator.generateBeanName(candidate, this.registry);
   if (candidate instanceof AbstractBeanDefinition) {
      postProcessBeanDefinition((AbstractBeanDefinition) candidate, beanName);
   }
   if (candidate instanceof AnnotatedBeanDefinition) {
      AnnotationConfigUtils.processCommonDefinitionAnnotations((AnnotatedBeanDefinition) candidate);
   }
   if (checkCandidate(beanName, candidate)) {
      BeanDefinitionHolder definitionHolder = new BeanDefinitionHolder(candidate, beanName);
      definitionHolder = AnnotationConfigUtils.applyScopedProxyMode(scopeMetadata, definitionHolder, this.registry);
      beanDefinitions.add(definitionHolder);
      registerBeanDefinition(definitionHolder, this.registry);
   }
}
这部分内容都是为了最后注册beanDefinition服务,首先获取候选者的scope属性,默认都是sington实现的:
ScopeMetadata scopeMetadata = this.scopeMetadataResolver.resolveScopeMetadata(candidate);
candidate.setScope(scopeMetadata.getScopeName());
简单看下解析的方法,这边也不深入了:
public ScopeMetadata resolveScopeMetadata(BeanDefinition definition) {
   ScopeMetadata metadata = new ScopeMetadata();
   if (definition instanceof AnnotatedBeanDefinition) {
      AnnotatedBeanDefinition annDef = (AnnotatedBeanDefinition) definition;
      AnnotationAttributes attributes =
            attributesFor(annDef.getMetadata(), this.scopeAnnotationType);
      if (attributes != null) {
         metadata.setScopeName(attributes.getString("value"));
         ScopedProxyMode proxyMode = attributes.getEnum("proxyMode");
         if (proxyMode == null || proxyMode == ScopedProxyMode.DEFAULT) {
            proxyMode = this.defaultProxyMode;
         }
         metadata.setScopedProxyMode(proxyMode);
      }
   }
   return metadata;
}
获取到bean对象的作用域(生命周期)以后,再生成beanname用于后面beanDefinition的注册:
String beanName = this.beanNameGenerator.generateBeanName(candidate, this.registry);接下来对candidate会做两个判断处理:
第一个判断:
if (candidate instanceof AbstractBeanDefinition) {
   postProcessBeanDefinition((AbstractBeanDefinition) candidate, beanName);
}
这个判断用于设置默认属性:
/**
 * Apply further settings to the given bean definition,
 * beyond the contents retrieved from scanning the component class.
 * @param beanDefinition the scanned bean definition
 * @param beanName the generated bean name for the given bean
 */
protected void postProcessBeanDefinition(AbstractBeanDefinition beanDefinition, String beanName) {
   beanDefinition.applyDefaults(this.beanDefinitionDefaults);
   if (this.autowireCandidatePatterns != null) {
      beanDefinition.setAutowireCandidate(PatternMatchUtils.simpleMatch(this.autowireCandidatePatterns, beanName));
   }
}
看一下setAutowireCandidate()这个方法的介绍:
/**
 * Set whether this bean is a candidate for getting autowired into some other bean.
 */
public void setAutowireCandidate(boolean autowireCandidate) {
   this.autowireCandidate = autowireCandidate;
}
看到这里我们大概可以知道,在平时的使用通过@Autowire等注解可以注入bean的开关就是通过这个进行配置的。
第二个判断:
if (candidate instanceof AnnotatedBeanDefinition) {
   AnnotationConfigUtils.processCommonDefinitionAnnotations((AnnotatedBeanDefinition) candidate);
}
这个判断用于处理@Primary 、@Lazy、 @DependsOn、@Role这四个注解的处理:
static void processCommonDefinitionAnnotations(AnnotatedBeanDefinition abd) {
   AnnotationMetadata metadata = abd.getMetadata();
   if (metadata.isAnnotated(Primary.class.getName())) {
      abd.setPrimary(true);
   }
   if (metadata.isAnnotated(Lazy.class.getName())) {
      abd.setLazyInit(attributesFor(metadata, Lazy.class).getBoolean("value"));
   }
   if (metadata.isAnnotated(DependsOn.class.getName())) {
      abd.setDependsOn(attributesFor(metadata, DependsOn.class).getStringArray("value"));
   }
   if (abd instanceof AbstractBeanDefinition) {
      if (metadata.isAnnotated(Role.class.getName())) {
         Integer role = attributesFor(metadata, Role.class).getNumber("value");
         ((AbstractBeanDefinition)abd).setRole(role);
      }
   }
}
关于这些注解具体的作用不在这边深入,这里了解这个方法的作用即可。
完成对candidate的判断处理以后,接下来就是注册beanDefinition的最后一次校验了:
checkCandidate(beanName, candidate)这个方法主要就是判断这个beanDefinition是否可以被注册,如果有一个已存在的beanDefition则返回false,这种场景在重复扫描的时候就会出现:
/**
 * Check the given candidate's bean name, determining whether the corresponding
 * bean definition needs to be registered or conflicts with an existing definition.
 * @param beanName the suggested name for the bean
 * @param beanDefinition the corresponding bean definition
 * @return <code>true</code> if the bean can be registered as-is;
 * <code>false</code> if it should be skipped because there is an
 * existing, compatible bean definition for the specified name
 * @throws ConflictingBeanDefinitionException if an existing, incompatible
 * bean definition has been found for the specified name
 */
protected boolean checkCandidate(String beanName, BeanDefinition beanDefinition) throws IllegalStateException {
   if (!this.registry.containsBeanDefinition(beanName)) {
      return true;
   }
   BeanDefinition existingDef = this.registry.getBeanDefinition(beanName);
   BeanDefinition originatingDef = existingDef.getOriginatingBeanDefinition();
   if (originatingDef != null) {
      existingDef = originatingDef;
   }
   if (isCompatible(beanDefinition, existingDef)) {
      return false;
   }
   throw new ConflictingBeanDefinitionException("Annotation-specified bean name '" + beanName +
         "' for bean class [" + beanDefinition.getBeanClassName() + "] conflicts with existing, " +
         "non-compatible bean definition of same name and class [" + existingDef.getBeanClassName() + "]");
}
校验完候选beanDefinition以后,会将candidate包装成一个BeanDefinitionHolder对象:
BeanDefinitionHolder definitionHolder = new BeanDefinitionHolder(candidate, beanName);
definitionHolder = AnnotationConfigUtils.applyScopedProxyMode(scopeMetadata, definitionHolder, this.registry);
这里看一下BeanDefinitionHolder:
/**
 * Holder for a BeanDefinition with name and aliases.
 * Can be registered as a placeholder for an inner bean.
 *
 * <p>Can also be used for programmatic registration of inner bean
 * definitions. If you don't care about BeanNameAware and the like,
 * registering RootBeanDefinition or ChildBeanDefinition is good enough.
 *
 * @author Juergen Hoeller
 * @since 1.0.2
 * @see org.springframework.beans.factory.BeanNameAware
 * @see org.springframework.beans.factory.support.RootBeanDefinition
 * @see org.springframework.beans.factory.support.ChildBeanDefinition
 */
public class BeanDefinitionHolder implements BeanMetadataElement {

   private final BeanDefinition beanDefinition;

   private final String beanName;

   private final String[] aliases;


   /**
    * Create a new BeanDefinitionHolder.
    * @param beanDefinition the BeanDefinition to wrap
    * @param beanName the name of the bean, as specified for the bean definition
    */
   public BeanDefinitionHolder(BeanDefinition beanDefinition, String beanName) {
      this(beanDefinition, beanName, null);
   }

   /**
    * Create a new BeanDefinitionHolder.
    * @param beanDefinition the BeanDefinition to wrap
    * @param beanName the name of the bean, as specified for the bean definition
    * @param aliases alias names for the bean, or <code>null</code> if none
    */
   public BeanDefinitionHolder(BeanDefinition beanDefinition, String beanName, String[] aliases) {
      Assert.notNull(beanDefinition, "BeanDefinition must not be null");
      Assert.notNull(beanName, "Bean name must not be null");
      this.beanDefinition = beanDefinition;
      this.beanName = beanName;
      this.aliases = aliases;
   }
这里截取到了构造方法,可以看到BeanDefinitionHolder中放的还是BeanDefinition对象,同时还包含的这个BeanDefinition的beanName和aliases的信息。
接着spring对BeanDefinitionHodler的处理:
definitionHolder = AnnotationConfigUtils.applyScopedProxyMode(scopeMetadata, definitionHolder, this.registry);我们看下这个方法:
static BeanDefinitionHolder applyScopedProxyMode(
      ScopeMetadata metadata, BeanDefinitionHolder definition, BeanDefinitionRegistry registry) {

   ScopedProxyMode scopedProxyMode = metadata.getScopedProxyMode();
   if (scopedProxyMode.equals(ScopedProxyMode.NO)) {
      return definition;
   }
   boolean proxyTargetClass = scopedProxyMode.equals(ScopedProxyMode.TARGET_CLASS);
   return ScopedProxyCreator.createScopedProxy(definition, registry, proxyTargetClass);
}
这个方法主要是设置beanDefinition的代理模式,为aop服务,我们这里暂时也不深入,了解到这边即可。
准备工作全部做完以后,将这个已经符合条件的beanDefinitionHolder对象放入一个set<BeanDefinitionHolder>集合中,这个集合对象后面会交给ComponentScanBeanDefinitionParse的第四步,也就是registerComponents()这个方法来调用处理。
Set<BeanDefinitionHolder> beanDefinitions = new LinkedHashSet<BeanDefinitionHolder>();

beanDefinitions.add(definitionHolder);
最后我们看下doscan的的最后一个方法,注册beanDefinition:
registerBeanDefinition(definitionHolder, this.registry);这里看到了registry对象,在上面的代码中它也出现过,我们在这个地方介绍一下这个对象:
private final BeanDefinitionRegistry registry;/**
* Interface for registries that hold bean definitions, for example RootBeanDefinition
* and ChildBeanDefinition instances. Typically implemented by BeanFactories that
* internally work with the AbstractBeanDefinition hierarchy.
*
* <p>This is the only interface in Spring's bean factory packages that encapsulates
* <i>registration</i> of bean definitions. The standard BeanFactory interfaces
* only cover access to a <i>fully configured factory instance</i>.
*
* <p>Spring's bean definition readers expect to work on an implementation of this
* interface. Known implementors within the Spring core are DefaultListableBeanFactory
* and GenericApplicationContext.
*
* @author Juergen Hoeller
* @since 26.11.2003
* @see org.springframework.beans.factory.config.BeanDefinition
* @see AbstractBeanDefinition
* @see RootBeanDefinition
* @see ChildBeanDefinition
* @see DefaultListableBeanFactory
* @see org.springframework.context.support.GenericApplicationContext
* @see org.springframework.beans.factory.xml.XmlBeanDefinitionReader
* @see PropertiesBeanDefinitionReader
*/
public interface BeanDefinitionRegistry extends AliasRegistry {
简单的说就是这个BeanDefinitionRegistry接口定义了对beanDefinition的一些操作,比如注册,获取,删除等等。
了解了基本作用以后,我们看下是怎么注册beanDefinition的:
/**
 * Register the specified bean with the given registry.
 * <p>Can be overridden in subclasses, e.g. to adapt the registration
 * process or to register further bean definitions for each scanned bean.
 * @param definitionHolder the bean definition plus bean name for the bean
 * @param registry the BeanDefinitionRegistry to register the bean with
 */
protected void registerBeanDefinition(BeanDefinitionHolder definitionHolder, BeanDefinitionRegistry registry) {
   BeanDefinitionReaderUtils.registerBeanDefinition(definitionHolder, registry);
}
再看下BeanDefinitionReaderUtils中的注册方法内容:
/**
 * Register the given bean definition with the given bean factory.
 * @param definitionHolder the bean definition including name and aliases
 * @param registry the bean factory to register with
 * @throws BeanDefinitionStoreException if registration failed
 */
public static void registerBeanDefinition(
      BeanDefinitionHolder definitionHolder, BeanDefinitionRegistry registry)
      throws BeanDefinitionStoreException {

   // Register bean definition under primary name.
   String beanName = definitionHolder.getBeanName();
   registry.registerBeanDefinition(beanName, definitionHolder.getBeanDefinition());

   // Register aliases for bean name, if any.
   String[] aliases = definitionHolder.getAliases();
   if (aliases != null) {
      for (String aliase : aliases) {
         registry.registerAlias(beanName, aliase);
      }
   }
}
可以看到具体的注册过程分为两部分处理:
注册第一部分,用beanName注册beanDefinition:
// Register bean definition under primary name.
String beanName = definitionHolder.getBeanName();
registry.registerBeanDefinition(beanName, definitionHolder.getBeanDefinition());
我们在看下这个的具体实现代码:
DefaultLisableBeanFactory#registerBeanDefinition
//---------------------------------------------------------------------
// Implementation of BeanDefinitionRegistry interface
//---------------------------------------------------------------------

public void registerBeanDefinition(String beanName, BeanDefinition beanDefinition)
      throws BeanDefinitionStoreException {

   Assert.hasText(beanName, "Bean name must not be empty");
   Assert.notNull(beanDefinition, "BeanDefinition must not be null");

   if (beanDefinition instanceof AbstractBeanDefinition) {
      try {
         ((AbstractBeanDefinition) beanDefinition).validate();
      }
      catch (BeanDefinitionValidationException ex) {
         throw new BeanDefinitionStoreException(beanDefinition.getResourceDescription(), beanName,
               "Validation of bean definition failed", ex);
      }
   }

   synchronized (this.beanDefinitionMap) {
      Object oldBeanDefinition = this.beanDefinitionMap.get(beanName);
      if (oldBeanDefinition != null) {
         if (!this.allowBeanDefinitionOverriding) {
            throw new BeanDefinitionStoreException(beanDefinition.getResourceDescription(), beanName,
                  "Cannot register bean definition [" + beanDefinition + "] for bean '" + beanName +
                  "': There is already [" + oldBeanDefinition + "] bound.");
         }
         else {
            if (this.logger.isInfoEnabled()) {
               this.logger.info("Overriding bean definition for bean '" + beanName +
                     "': replacing [" + oldBeanDefinition + "] with [" + beanDefinition + "]");
            }
         }
      }
      else {
         this.beanDefinitionNames.add(beanName);
         this.frozenBeanDefinitionNames = null;
      }
      this.beanDefinitionMap.put(beanName, beanDefinition);

      resetBeanDefinition(beanName);
   }
}
可以看到注册的好的beanDefinition最后都会被存入beanDefinitionMap,
/** Map of bean definition objects, keyed by bean name */
private final Map<String, BeanDefinition> beanDefinitionMap = new ConcurrentHashMap<String, BeanDefinition>();
后面需要取beanDefinition的话,也是从这个容器中取。
注册第二部分,用aliases也就是别名来分别注册这个beanDefinition:
// Register aliases for bean name, if any.
String[] aliases = definitionHolder.getAliases();
if (aliases != null) {
   for (String aliase : aliases) {
      registry.registerAlias(beanName, aliase);
   }
}
到了扫描到的文件中所有符合要求的对象都被作为beanDefinition注册到了spring ioc容器中,有关容器部分的内容这边也不做深入。
到了这边ComponentScanBeanDefinitionParse的第三步也已经分析完了,还有最后一步注册组件的内容。
- registerComponents(parserContext.getReaderContext(), beanDefinitions, element);
protected void registerComponents(
      XmlReaderContext readerContext, Set<BeanDefinitionHolder> beanDefinitions, Element element) {

   Object source = readerContext.extractSource(element);
   CompositeComponentDefinition compositeDef = new CompositeComponentDefinition(element.getTagName(), source);

   for (BeanDefinitionHolder beanDefHolder : beanDefinitions) {
      compositeDef.addNestedComponent(new BeanComponentDefinition(beanDefHolder));
   }

   // Register annotation config processors, if necessary.
   boolean annotationConfig = true;
   if (element.hasAttribute(ANNOTATION_CONFIG_ATTRIBUTE)) {
      annotationConfig = Boolean.valueOf(element.getAttribute(ANNOTATION_CONFIG_ATTRIBUTE));
   }
   if (annotationConfig) {
      Set<BeanDefinitionHolder> processorDefinitions =
            AnnotationConfigUtils.registerAnnotationConfigProcessors(readerContext.getRegistry(), source);
      for (BeanDefinitionHolder processorDefinition : processorDefinitions) {
         compositeDef.addNestedComponent(new BeanComponentDefinition(processorDefinition));
      }
   }

   readerContext.fireComponentRegistered(compositeDef);
}
registerComponents这部分代码会包装一个CompositeComponentDefinition对象,然后会通过component-scan节点中的annotation-config的值来决定是否注册组件:
registerComponents第一步:包装CompositeComponentDefinition
Object source = readerContext.extractSource(element);
CompositeComponentDefinition compositeDef = new CompositeComponentDefinition(element.getTagName(), source);

for (BeanDefinitionHolder beanDefHolder : beanDefinitions) {
   compositeDef.addNestedComponent(new BeanComponentDefinition(beanDefHolder));
}
我们先看下CompositeComponentDefinition:
/**
 * {@link ComponentDefinition} implementation that holds one or more nested
 * {@link ComponentDefinition} instances, aggregating them into a named group
 * of components.
 *
 * @author Juergen Hoeller
 * @since 2.0.1
 * @see #getNestedComponents()
 */
public class CompositeComponentDefinition extends AbstractComponentDefinition {

   private final String name;

   private final Object source;

   private final List<ComponentDefinition> nestedComponents = new LinkedList<ComponentDefinition>();


   /**
    * Create a new CompositeComponentDefinition.
    * @param name the name of the composite component
    * @param source the source element that defines the root of the composite component
    */
   public CompositeComponentDefinition(String name, Object source) {
      Assert.notNull(name, "Name must not be null");
      this.name = name;
      this.source = source;
   }


   public String getName() {
      return this.name;
   }

   public Object getSource() {
      return this.source;
   }


   /**
    * Add the given component as nested element of this composite component.
    * @param component the nested component to add
    */
   public void addNestedComponent(ComponentDefinition component) {
      Assert.notNull(component, "ComponentDefinition must not be null");
      this.nestedComponents.add(component);
   }

   /**
    * Return the nested components that this composite component holds.
    * @return the array of nested components, or an empty array if none
    */
   public ComponentDefinition[] getNestedComponents() {
      return this.nestedComponents.toArray(new ComponentDefinition[this.nestedComponents.size()]);
   }

}
CompositeComponentDefinition可以理解为一个容器,这个容器中可以放ConponentDedinition对象,有关这个对象我们可以直接看下调试的结果:

这个里面保存的就是ComponentDefinition。
registerComponents第二步:注册annotation相关的组件:
// Register annotation config processors, if necessary.
boolean annotationConfig = true;
if (element.hasAttribute(ANNOTATION_CONFIG_ATTRIBUTE)) {
   annotationConfig = Boolean.valueOf(element.getAttribute(ANNOTATION_CONFIG_ATTRIBUTE));
}
if (annotationConfig) {
   Set<BeanDefinitionHolder> processorDefinitions =
         AnnotationConfigUtils.registerAnnotationConfigProcessors(readerContext.getRegistry(), source);
   for (BeanDefinitionHolder processorDefinition : processorDefinitions) {
      compositeDef.addNestedComponent(new BeanComponentDefinition(processorDefinition));
   }
}
这里的ANNOTATION_CONFIG_ATTRIBUTE属性和前面提到的use-default-filters属性一样,默认值都是true。如果这个属性值为true,就会执行:
Set<BeanDefinitionHolder> processorDefinitions =
      AnnotationConfigUtils.registerAnnotationConfigProcessors(readerContext.getRegistry(), source);
看下这个方法的实现内容:
/**
 * Register all relevant annotation post processors in the given registry.
 * @param registry the registry to operate on
 * @param source the configuration source element (already extracted)
 * that this registration was triggered from. May be <code>null</code>.
 * @return a Set of BeanDefinitionHolders, containing all bean definitions
 * that have actually been registered by this call
 */
public static Set<BeanDefinitionHolder> registerAnnotationConfigProcessors(
      BeanDefinitionRegistry registry, Object source) {

   Set<BeanDefinitionHolder> beanDefs = new LinkedHashSet<BeanDefinitionHolder>(4);

   if (!registry.containsBeanDefinition(CONFIGURATION_ANNOTATION_PROCESSOR_BEAN_NAME)) {
      RootBeanDefinition def = new RootBeanDefinition(ConfigurationClassPostProcessor.class);
      def.setSource(source);
      beanDefs.add(registerPostProcessor(registry, def, CONFIGURATION_ANNOTATION_PROCESSOR_BEAN_NAME));
   }

   if (!registry.containsBeanDefinition(AUTOWIRED_ANNOTATION_PROCESSOR_BEAN_NAME)) {
      RootBeanDefinition def = new RootBeanDefinition(AutowiredAnnotationBeanPostProcessor.class);
      def.setSource(source);
      beanDefs.add(registerPostProcessor(registry, def, AUTOWIRED_ANNOTATION_PROCESSOR_BEAN_NAME));
   }

   if (!registry.containsBeanDefinition(REQUIRED_ANNOTATION_PROCESSOR_BEAN_NAME)) {
      RootBeanDefinition def = new RootBeanDefinition(RequiredAnnotationBeanPostProcessor.class);
      def.setSource(source);
      beanDefs.add(registerPostProcessor(registry, def, REQUIRED_ANNOTATION_PROCESSOR_BEAN_NAME));
   }

   // Check for JSR-250 support, and if present add the CommonAnnotationBeanPostProcessor.
   if (jsr250Present && !registry.containsBeanDefinition(COMMON_ANNOTATION_PROCESSOR_BEAN_NAME)) {
      RootBeanDefinition def = new RootBeanDefinition(CommonAnnotationBeanPostProcessor.class);
      def.setSource(source);
      beanDefs.add(registerPostProcessor(registry, def, COMMON_ANNOTATION_PROCESSOR_BEAN_NAME));
   }

   // Check for JPA support, and if present add the PersistenceAnnotationBeanPostProcessor.
   if (jpaPresent && !registry.containsBeanDefinition(PERSISTENCE_ANNOTATION_PROCESSOR_BEAN_NAME)) {
      RootBeanDefinition def = new RootBeanDefinition();
      try {
         ClassLoader cl = AnnotationConfigUtils.class.getClassLoader();
         def.setBeanClass(cl.loadClass(PERSISTENCE_ANNOTATION_PROCESSOR_CLASS_NAME));
      }
      catch (ClassNotFoundException ex) {
         throw new IllegalStateException(
               "Cannot load optional framework class: " + PERSISTENCE_ANNOTATION_PROCESSOR_CLASS_NAME, ex);
      }
      def.setSource(source);
      beanDefs.add(registerPostProcessor(registry, def, PERSISTENCE_ANNOTATION_PROCESSOR_BEAN_NAME));
   }

   return beanDefs;
}
这里是注册相关的注解处理器,实现对@Configuration、@Bean、@Import、@Component、@ComponentScan、@ImportResource等注解的支持。
最后还有一个空方法用于BeanDefinition注册完成事件通知,但是并没有实现:
readerContext.fireComponentRegistered(compositeDef);public void componentRegistered(ComponentDefinition componentDefinition) {
// no-op
}
到此有关context:component-scan的解析过程就完成了,里面有很多地方都是点到即止,后续学习到相关内容再继续分析。
附上当时分析画的时序图:


