接上文ioc容器初始化部分,在之前的介绍中,我们介绍了整个ioc容器初始化的过程,但是对于其中的BeanDefinition的解析部分一笔带过,这里就对BeanDefinition做个介绍。
Bean Definition
在IOC容器中,管理的对象是Bean,对于配置文件来说,他们就是<bean>标签配置的对象,这就是我们对Bean的定义,也就是Bean Definition,在容器内部,这些Bean Definition表现为BeanDefinition。
这里我们可以参考spring官方文档:
The bean definition:
| class |
| name |
| scope |
| constructor arguments |
| properties |
| autowiring mode |
| lazy-initialization mode |
| initialization method |
| destruction method |
上面列举的内容就是一个Bean定义的主要配置项,也就是说通过上面这些属性的配置,spring就可以帮我们完成一个Bean的创建并管理。
Class
Bean定义中的class属性在实例化时bean用到,spring中实例化bean主要通过下面三种方式:
Instantiation with a constructor
通过构造函数进行实例化:
<bean id="exampleBean" class="examples.ExampleBean"/>

<bean name="anotherExample" class="examples.ExampleBeanTwo"/>
Instantiation with a static factory method
通过静态工厂方法来代替构造函数:
<bean id="clientService"
    class="examples.ClientService"
    factory-method="createInstance"/>
public class ClientService {
    private static ClientService clientService = new ClientService();
    private ClientService() {}

    public static ClientService createInstance() {
        return clientService;
    }
}
Instantiation using an instance factory method
通过工厂方法返回对象的实例:
<!-- the factory bean, which contains a method called createInstance() -->
<bean id="serviceLocator" class="examples.DefaultServiceLocator">
    <!-- inject any dependencies required by this locator bean -->
</bean>

<!-- the bean to be created via the factory bean -->
<bean id="clientService"
    factory-bean="serviceLocator"
    factory-method="createClientServiceInstance"/>
public class DefaultServiceLocator {

    private static ClientService clientService = new ClientServiceImpl();

    public ClientService createClientServiceInstance() {
        return clientService;
    }
}
以上三种就是class属性在spring中的几种实例化场景的配置形式。
name
在bean中,我们用id来保证一个bean的唯一性,name属性则是作为别名来使用,他有两种配置方法:
使用name标签
<bean id="clientService"
   name ="A,B,C"
class="examples.ClientService"
/>
使用alias标签
<bean id="clientService"
class="examples.ClientService"
/>

<alias name="clientService" alias="A"/>
<alias name="clientService" alias="B/>
*Bean的别名在spring内部也会使用一个ConcurrentHashMap容器来进行保存。
scope
| Scope |
Description |
| (Default) Scopes a single bean definition to a single object instance per Spring IoC container. |
|
| Scopes a single bean definition to any number of object instances. |
|
| Scopes a single bean definition to the lifecycle of a single HTTP request; that is, each HTTP request has its own instance of a bean created off the back of a single bean definition. Only valid in the context of a web-aware Spring ApplicationContext. |
|
| Scopes a single bean definition to the lifecycle of an HTTP Session. Only valid in the context of a web-aware Spring ApplicationContext. |
|
| Scopes a single bean definition to the lifecycle of a global HTTP Session. Typically only valid when used in a Portlet context. Only valid in the context of a web-aware Spring ApplicationContext. |
|
| Scopes a single bean definition to the lifecycle of a ServletContext. Only valid in the context of a web-aware Spring ApplicationContext. |
|
| Scopes a single bean definition to the lifecycle of a WebSocket. Only valid in the context of a web-aware Spring ApplicationContext. |
Spring通过scope属性来控制bean的作用域,其中request、session、globalSession、application和websocket是针对web应用使用。我们这里说下singleton和prototype:
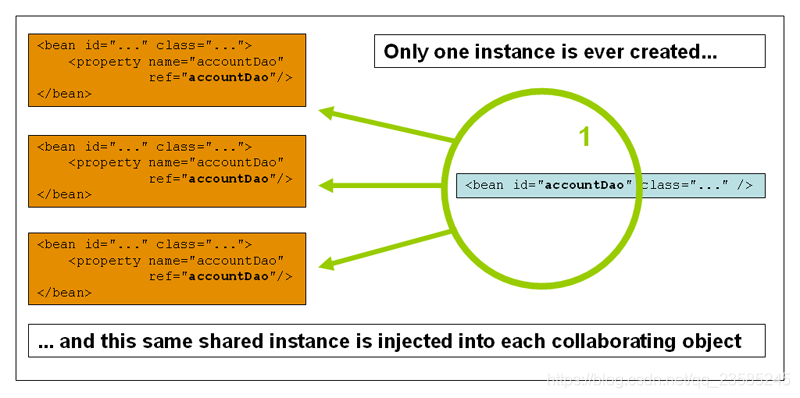
The singleton scope
singleton是spring默认的作用域,使用singleton时,bean只会被创建一次,每次请求获取的bean对象都会是同一个对象:
The prototype scope
使用prototype作为作用域时,每次请求都会创建一个对应的bean实例。

* Spring容器不管理protptyle类型的bean的完整的生命周期,IOC容器实例化,配置并且组装bean,但是后续的销毁工作不负责,需要由调用的client来负责销毁,释放资源。
prototype和 singleton的选择
无状态或者状态不可变的类适合使用singleton;
有状态的对象适合使用prototype;
*在传统开发中,dao类一般持有connection这个非线程安全的变量,因此不利于使用单例模式,但是spring默认的作用域就是singleton,这是怎么做到的呢?spring利用aop和threadlocal,对非线程安全的变量进行特殊处理,使之变成线程安全的类,所以spring中大部分都支持singleton。
constructor arguments
当依赖注入的方式是Constructor-based dependency injection时,bean定义中通过<construcor-arg>标签来指定构造函数的参数。
参数是对象
package x.y;

public class Foo {

    public Foo(Bar bar, Baz baz) {
        // ...
    }
}
<beans>
    <bean id="foo" class="x.y.Foo">
        <constructor-arg ref="bar"/>
        <constructor-arg ref="baz"/>
    </bean>

    <bean id="bar" class="x.y.Bar"/>

    <bean id="baz" class="x.y.Baz"/>
</beans>
参数是简单数据类型(基本数据类型+String)
package examples;

public class ExampleBean {

    // Number of years to calculate the Ultimate Answer
    private int years;

    // The Answer to Life, the Universe, and Everything
    private String ultimateAnswer;

    public ExampleBean(int years, String ultimateAnswer) {
        this.years = years;
        this.ultimateAnswer = ultimateAnswer;
    }
}
根据类型来进行配置:
<bean id="exampleBean" class="examples.ExampleBean">
    <constructor-arg type="int" value="7500000"/>
    <constructor-arg type="java.lang.String" value="42"/>
</bean>
如果两个类型相同,可能会引起歧义的情况,则可以使用下标来指定构造函数参数:
<bean id="exampleBean" class="examples.ExampleBean">
    <constructor-arg index="0" value="7500000"/>
    <constructor-arg index="1" value="42"/>
</bean>
properties
当依赖注入的方式是Setter-based dependency injection时,通过<property>标签来指定参数。
没有有参的构造函数时,通过成员变量的setter方法实现注入:
public class ExampleBean {

    private AnotherBean beanOne;

    private YetAnotherBean beanTwo;

    private int i;

    public void setBeanOne(AnotherBean beanOne) {
        this.beanOne = beanOne;
    }

    public void setBeanTwo(YetAnotherBean beanTwo) {
        this.beanTwo = beanTwo;
    }

    public void setIntegerProperty(int i) {
        this.i = i;
    }
}
<bean id="exampleBean" class="examples.ExampleBean">
    <!-- setter injection using the nested ref element -->
    <property name="beanOne">
        <ref bean="anotherExampleBean"/>
    </property>

    <!-- setter injection using the neater ref attribute -->
    <property name="beanTwo" ref="yetAnotherBean"/>
    <property name="integerProperty" value="1"/>
</bean>

<bean id="anotherExampleBean" class="examples.AnotherBean"/>
<bean id="yetAnotherBean" class="examples.YetAnotherBean"/>
Straight values (primitives, Strings, and so on)
Property中对于简单数据的配置:
<bean id="myDataSource" class="org.apache.commons.dbcp.BasicDataSource" destroy-method="close">
    <!-- results in a setDriverClassName(String) call -->
    <property name="driverClassName" value="com.mysql.jdbc.Driver"/>
    <property name="url" value="jdbc:mysql://localhost:3306/mydb"/>
    <property name="username" value="root"/>
    <property name="password" value="masterkaoli"/>
</bean>
上面这种配置,还可以使用p-namespace来表示,这两个是等价的:
   <bean id="myDataSource" class="org.apache.commons.dbcp.BasicDataSource"
        destroy-method="close"
        p:driverClassName="com.mysql.jdbc.Driver"
        p:url="jdbc:mysql://localhost:3306/mydb"
        p:username="root"
        p:password="masterkaoli"/>
spring中还支持对properties形式的解析:
<bean id="mappings"
    class="org.springframework.beans.factory.config.PropertyPlaceholderConfigurer">

    <!-- typed as a java.util.Properties -->
    <property name="properties">
        <value>
            jdbc.driver.className=com.mysql.jdbc.Driver
            jdbc.url=jdbc:mysql://localhost:3306/mydb
        </value>
    </property>
</bean>
Collections
除了简单的数据类型外,property还支持集合的处理:<list/>, <set/>, <map/>, <props/>
<bean id="moreComplexObject" class="example.ComplexObject">
    <!-- results in a setAdminEmails(java.util.Properties) call -->
    <property name="adminEmails">
        <props>
            <prop key="administrator">[email protected]</prop>
            <prop key="support">[email protected]</prop>
            <prop key="development">[email protected]</prop>
        </props>
    </property>
    <!-- results in a setSomeList(java.util.List) call -->
    <property name="someList">
        <list>
            <value>a list element followed by a reference</value>
            <ref bean="myDataSource" />
        </list>
    </property>
    <!-- results in a setSomeMap(java.util.Map) call -->
    <property name="someMap">
        <map>
            <entry key="an entry" value="just some string"/>
            <entry key ="a ref" value-ref="myDataSource"/>
        </map>
    </property>
    <!-- results in a setSomeSet(java.util.Set) call -->
    <property name="someSet">
        <set>
            <value>just some string</value>
            <ref bean="myDataSource" />
        </set>
    </property>
</bean>
autowiring mode
spring中的自动装配机制,可以让我们不用指定bean之间的关系而通过配置直接使用。这个功能通过<autowire>标签实现,他有以下几种方式:
| no |
(Default) No autowiring. Bean references must be defined via a |
| byName |
Autowiring by property name. Spring looks for a bean with the same name as the property that needs to be autowired. For example, if a bean definition is set to autowire by name, and it contains a master property (that is, it has a setMaster(..) method), Spring looks for a bean definition named |
| byType |
Allows a property to be autowired if exactly one bean of the property type exists in the container. If more than one exists, a fatal exception is thrown, which indicates that you may not use byType autowiring for that bean. If there are no matching beans, nothing happens; the property is not set. |
| constructor |
Analogous to byType, but applies to constructor arguments. If there is not exactly one bean of the constructor argument type in the container, a fatal error is raised. |
简单说明下上面这四种不同的装配方式:
no:不开启自动装配的功能
byName:通过名称来自动装配bean
byType:通过类型来自动装配bean
constructor:通过构造函数自动装配
我们举个小例子来方便大家理解:
我们在厨房中烹饪牛肉和猪肉:
Kitchen:
public class Kitchen {
    private Beef beef;
    private Pork pork;

    static {
        System.out.println("Kitchen run");
    }

    public Beef getBeef() {
        return beef;
    }

    public void setBeef(Beef beef) {
        this.beef = beef;
    }

    public Pork getPork() {
        return pork;
    }

    public void setPork(Pork pork) {
        this.pork = pork;
    }

    public void run(){
        beef.cook();
        pork.cook();
    }
}
Beef:
    public void cook(){
        System.out.println("cook beef");
    }
}
Pork:
    public void cook(){
        System.out.println("cook pork");
    }
}
buName
通过byName配置的Xml:
<bean id="kitchen" class="com.ljw.testSpringMode.Kitchen"
autowire="byName"/>

<bean id="beef" class="com.ljw.testSpringMode.Beef"/>
<bean id="pork" class="com.ljw.testSpringMode.Pork"/>
Test:
    public static void main(String[] args) {
        FileSystemXmlApplicationContext context = new FileSystemXmlApplicationContext("E:/code/SpringMVC/src/resources/Beans.xml");
        Kitchen kitchen = context.getBean("kitchen", Kitchen.class);
        kitchen.run();
    }
}
result:

byType
通过byName配置的Xml:
<bean id="kitchen" class="com.ljw.testSpringMode.Kitchen"
autowire="byType"/>

<bean id="beef" class="com.ljw.testSpringMode.Beef"/>
<bean id="pork" class="com.ljw.testSpringMode.Pork"/>
Test:
public class TestAutowiring {

    public static void main(String[] args) {
        FileSystemXmlApplicationContext context = new FileSystemXmlApplicationContext("E:/code/SpringMVC/src/resources/Beans.xml");
        Kitchen kitchen = context.getBean("kitchen", Kitchen.class);
        kitchen.run();
    }
}
result:

constructor
Kitchen增加构造函数:
public Kitchen(Beef beef, Pork pork) {
    this.beef = beef;
    this.pork = pork;
}
通过constructor配置的Xml:
<bean id="kitchen" class="com.ljw.testSpringMode.Kitchen"
autowire="constructor"/>

<bean id="beef" class="com.ljw.testSpringMode.Beef"/>
<bean id="pork" class="com.ljw.testSpringMode.Pork"/>
Test:
public class TestAutowiring {

    public static void main(String[] args) {
        FileSystemXmlApplicationContext context = new FileSystemXmlApplicationContext("E:/code/SpringMVC/src/resources/Beans.xml");
        Kitchen kitchen = context.getBean("kitchen", Kitchen.class);
        kitchen.run();
    }
}
result:

可以看到上面几张配置都实现了我们的功能,我们没有通过ref来指定bean之间的关系,只是通过spring自身的装配机制完成。
Excluding a bean from autowiring
如果不想这个bean通过自动装配的形式注入,通过<autowire-candidate>标签可以实现:
<bean id="beef" class="com.ljw.testSpringMode.Beef" autowire-candidate="false"/>
lazy-initialization mode
在ioc容器初始化时,会创建在配置文件中的bean定义,如果它有相关联的bean的话,也会在初始化时一起被创建,这就导致初始化的过程可能会很长,spring通过<lazy-init>标签来实现懒加载,当<lazt-init>的属性为true时,只有在首次获取bean的地方才会被创建。
initialization method
通过<init-method>标签在bean定义的配置项都设置完毕以后可以调用配置的初始化方式。
destruction method
通过<destory-method>标签在容器关闭时调用,用来销毁bean。
*上面bean中的配置项在beans中也有对应的配置,beans中的属于容器级别,对下面所有的bean都有效,但发生冲突时,以bean中的配置为主。
| <Beans> |
<Bean> |
| default-lazy-init |
lazy-init |
| default-autowire |
autowire |
| default-autowire-candidates |
autowire-candidates |
| default-init-method |
init-method |
| default-destroy-method |
destroy-method |
BeanDefinition
BeanDefinition就是Bean Definition在ioc容器内部的表现形式,我们结合源码对照bean definition看一下它的结构:
AbstratctBeanDefinition:
public abstract class AbstractBeanDefinition extends BeanMetadataAttributeAccessor
      implements BeanDefinition, Cloneable {

   /**
    * Constant for the default scope name: {@code ""}, equivalent to singleton
    * status unless overridden from a parent bean definition (if applicable).
    */
   public static final String SCOPE_DEFAULT = "";

   /**
    * Constant that indicates no autowiring at all.
    * @see #setAutowireMode
    */
   public static final int AUTOWIRE_NO = AutowireCapableBeanFactory.AUTOWIRE_NO;

   /**
    * Constant that indicates autowiring bean properties by name.
    * @see #setAutowireMode
    */
   public static final int AUTOWIRE_BY_NAME = AutowireCapableBeanFactory.AUTOWIRE_BY_NAME;

   /**
    * Constant that indicates autowiring bean properties by type.
    * @see #setAutowireMode
    */
   public static final int AUTOWIRE_BY_TYPE = AutowireCapableBeanFactory.AUTOWIRE_BY_TYPE;

   /**
    * Constant that indicates autowiring a constructor.
    * @see #setAutowireMode
    */
   public static final int AUTOWIRE_CONSTRUCTOR = AutowireCapableBeanFactory.AUTOWIRE_CONSTRUCTOR;

   /**
    * Constant that indicates determining an appropriate autowire strategy
    * through introspection of the bean class.
    * @see #setAutowireMode
    * @deprecated as of Spring 3.0: If you are using mixed autowiring strategies,
    * use annotation-based autowiring for clearer demarcation of autowiring needs.
    */
   @Deprecated
   public static final int AUTOWIRE_AUTODETECT = AutowireCapableBeanFactory.AUTOWIRE_AUTODETECT;

   /**
    * Constant that indicates no dependency check at all.
    * @see #setDependencyCheck
    */
   public static final int DEPENDENCY_CHECK_NONE = 0;

   /**
    * Constant that indicates dependency checking for object references.
    * @see #setDependencyCheck
    */
   public static final int DEPENDENCY_CHECK_OBJECTS = 1;

   /**
    * Constant that indicates dependency checking for "simple" properties.
    * @see #setDependencyCheck
    * @see org.springframework.beans.BeanUtils#isSimpleProperty
    */
   public static final int DEPENDENCY_CHECK_SIMPLE = 2;

   /**
    * Constant that indicates dependency checking for all properties
    * (object references as well as "simple" properties).
    * @see #setDependencyCheck
    */
   public static final int DEPENDENCY_CHECK_ALL = 3;

   /**
    * Constant that indicates the container should attempt to infer the
    * {@link #setDestroyMethodName destroy method name} for a bean as opposed to
    * explicit specification of a method name. The value {@value} is specifically
    * designed to include characters otherwise illegal in a method name, ensuring
    * no possibility of collisions with legitimately named methods having the same
    * name.
    * <p>Currently, the method names detected during destroy method inference
    * are "close" and "shutdown", if present on the specific bean class.
    */
   public static final String INFER_METHOD = "(inferred)";


   private volatile Object beanClass;

   private String scope = SCOPE_DEFAULT;

   private boolean abstractFlag = false;

   private boolean lazyInit = false;

   private int autowireMode = AUTOWIRE_NO;

   private int dependencyCheck = DEPENDENCY_CHECK_NONE;

   private String[] dependsOn;

   private boolean autowireCandidate = true;

   private boolean primary = false;

   private final Map<String, AutowireCandidateQualifier> qualifiers =
         new LinkedHashMap<String, AutowireCandidateQualifier>(0);

   private boolean nonPublicAccessAllowed = true;

   private boolean lenientConstructorResolution = true;

   private ConstructorArgumentValues constructorArgumentValues;

   private MutablePropertyValues propertyValues;

   private MethodOverrides methodOverrides = new MethodOverrides();

   private String factoryBeanName;

   private String factoryMethodName;

   private String initMethodName;

   private String destroyMethodName;

   private boolean enforceInitMethod = true;

   private boolean enforceDestroyMethod = true;

   private boolean synthetic = false;

   private int role = BeanDefinition.ROLE_APPLICATION;

   private String description;

   private Resource resource;

}
可以看到AbstractBeanDefinition中的成员变量和我们在bean定义中的配置项是关联起来的:
beanClass===class
scope===scope
lazyInit===lazy-init
。。。
对于Bean定义中的父子关系,则可以通过RootBeanDefinition和ChildBeanDefinition来表示。
总结
Bean Definition是配置文件中对bean的描述,BeanDefinition则是ioc容器内部bean的表现形式,Bean Definition转换为BeanDefinition的过程是在ioc容器初始化的过程中完成的。