PS:
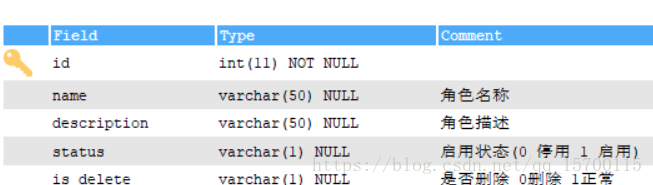
角色表
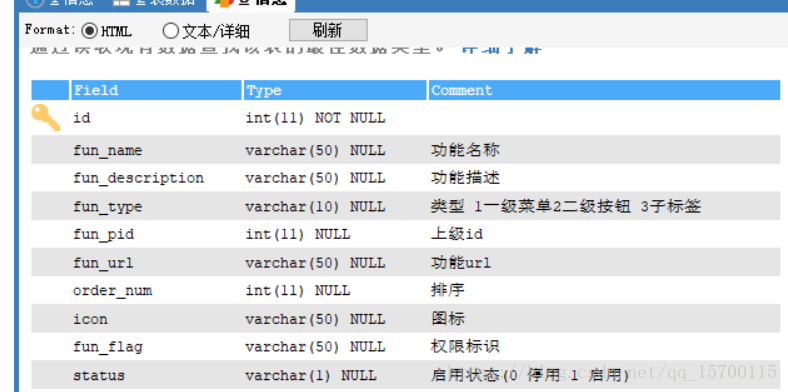
功能表
功能-角色 关联表
1.maven中配置shiro所需要的jar
<!-- shiro -->
<dependency>
<groupId>org.apache.shiro</groupId>
<artifactId>shiro-core</artifactId>
<version>${shiro.version}</version>
</dependency>
<dependency>
<groupId>org.apache.shiro</groupId>
<artifactId>shiro-ehcache</artifactId>
<version>${shiro.version}</version>
</dependency>
<dependency>
<groupId>org.apache.shiro</groupId>
<artifactId>shiro-web</artifactId>
<version>${shiro.version}</version>
</dependency>
<dependency>
<groupId>org.apache.shiro</groupId>
<artifactId>shiro-spring</artifactId>
<version>${shiro.version}</version>
</dependency>
<dependency>
<groupId>com.github.theborakompanioni</groupId>
<artifactId>thymeleaf-extras-shiro</artifactId>
<version>2.0.0</version>
</dependency>
2. 在web.xml中配置
<filter>
<filter-name>shiroFilter</filter-name>
<filter-class>org.springframework.web.filter.DelegatingFilterProxy</filter-class>
<async-supported>true</async-supported>
<init-param>
<param-name>targetFilterLifecycle</param-name>
<param-value>true</param-value>
</init-param>
</filter>
<filter-mapping>
<filter-name>shiroFilter</filter-name>
<url-pattern>/*</url-pattern>
</filter-mapping>
<filter>
<filter-name>setcharacter</filter-name>
<filter-class>org.springframework.web.filter.CharacterEncodingFilter</filter-class>
<init-param>
<param-name>encoding</param-name>
<param-value>UTF-8</param-value>
</init-param>
</filter>
<filter-mapping>
<filter-name>setcharacter</filter-name>
<url-pattern>/*</url-pattern>
</filter-mapping>
<!-- Shiro配置 -->
<context-param>
<param-name>contextConfigLocation</param-name>
<param-value>
classpath:spring-mvc.xml,classpath:spring-mybatis.xml,classpath:spring-shiro.xml
</param-value>
</context-param>
3. 配置 spring-shiro.xml
<?xml version="1.0" encoding="UTF-8"?>
<beans xmlns="http://www.springframework.org/schema/beans"
xmlns:xsi="http://www.w3.org/2001/XMLSchema-instance" xmlns:context="http://www.springframework.org/schema/context"
xmlns:aop="http://www.springframework.org/schema/aop" xmlns:tx="http://www.springframework.org/schema/tx"
xmlns:mvc="http://www.springframework.org/schema/mvc"
xsi:schemaLocation="
http://www.springframework.org/schema/beans
http://www.springframework.org/schema/beans/spring-beans-4.2.xsd
http://www.springframework.org/schema/context
http://www.springframework.org/schema/context/spring-context-4.2.xsd
http://www.springframework.org/schema/tx
http://www.springframework.org/schema/tx/spring-tx-4.2.xsd
http://www.springframework.org/schema/aop
http://www.springframework.org/schema/aop/spring-aop-4.2.xsd
http://www.springframework.org/schema/mvc
http://www.springframework.org/schema/mvc/spring-mvc-4.2.xsd">
<!-- 继承自AuthorizingRealm的自定义Realm,即指定Shiro验证用户登录的类为自定义的UserRealm.java -->
<bean id="userRealm" class="com.picc.common.UserRealm"/>
<!-- Shiro默认会使用Servlet容器的Session,可通过sessionMode属性来指定使用Shiro原生Session -->
<!-- 即<property name="sessionMode" value="native"/>,详细说明见官方文档 -->
<!-- 这里主要是设置自定义的单Realm应用,若有多个Realm,可使用'realms'属性代替 -->
<bean id="securityManager" class="org.apache.shiro.web.mgt.DefaultWebSecurityManager">
<property name="realm" ref="userRealm"/>
</bean>
<!-- Shiro主过滤器本身功能十分强大,其强大之处就在于它支持任何基于URL路径表达式的、自定义的过滤器的执行 -->
<!-- Web应用中,Shiro可控制的Web请求必须经过Shiro主过滤器的拦截,Shiro对基于Spring的Web应用提供了完美的支持 -->
<bean id="shiroFilter" class="org.apache.shiro.spring.web.ShiroFilterFactoryBean">
<!-- Shiro的核心安全接口,这个属性是必须的 -->
<property name="securityManager" ref="securityManager"/>
<!-- 要求登录时的链接(可根据项目的URL进行替换),非必须的属性,默认会自动寻找Web工程根目录下的"/login.html"页面 -->
<property name="loginUrl" value="/login/login"/>
<!-- 登录成功后要跳转的连接 -->
<property name="successUrl" value="/index"/>
<!-- 用户访问未对其授权的资源时,所显示的连接 -->
<!-- 若想更明显的测试此属性可以修改它的值,如unauthor.jsp,然后用[玄玉]登录后访问/admin/listUser.jsp就看见浏览器会显示unauthor.jsp -->
<!-- <property name="unauthorizedUrl" value="/no_permissions.jsp" /> -->
<!-- Shiro连接约束配置,即过滤链的定义 -->
<!-- 此处可配合我的这篇文章来理解各个过滤连的作用http://blog.csdn.net/jadyer/article/details/12172839 -->
<!-- 下面value值的第一个'/'代表的路径是相对于HttpServletRequest.getContextPath()的值来的 -->
<!-- anon:它对应的过滤器里面是空的,什么都没做,这里.do和.jsp后面的*表示参数,比方说login.jsp?main这种 -->
<!-- authc:该过滤器下的页面必须验证后才能访问,它是Shiro内置的一个拦截器org.apache.shiro.web.filter.authc.FormAuthenticationFilter -->
<property name="filterChainDefinitions">
<value>
<!-- anon表示此地址不需要任何权限即可访问 -->
/login/** = anon
/resources/** = anon
/**/statics/**= anon
/** = authc
</value>
</property>
</bean>
<!-- Shiro生命周期处理器 -->
<bean id="lifecycleBeanPostProcessor" class="org.apache.shiro.spring.LifecycleBeanPostProcessor"/>
<!-- Shiro的注解配置放在spring-mvc中 -->
</beans>
4. UserRealm
public class UserRealm extends AuthorizingRealm {
private final static Logger logger = Logger.getLogger(UserRealm.class);
@Autowired
private UserService userService;
@Autowired
private BsePlatRoleService roleService;
@Autowired
private BsePlatFunctionService functionService;
/**
* 为当前登录的Subject授予角色和权限
*/
@Override
protected AuthorizationInfo doGetAuthorizationInfo(PrincipalCollection principalCollection) {
// TODO Auto-generated method stub
logger.info("======用户授权认证======");
String userName = principalCollection.getPrimaryPrincipal().toString();
List<String> roleList = new ArrayList<String>();
List<String> permissionList = new ArrayList<String>();
try {
User user = userService.getUserByuname(Integer.parseInt(userName));
if (null != user) {
// 实体类User中包含有用户角色的实体类信息
if (null != user.getRoleId()) {
// 获取当前登录用户的角色
BsePlatRole role = new BsePlatRole();
role = roleService.selectByPrimaryKey(user.getRoleId());
roleList.add(role.getName());
// 实体类Role中包含有角色权限的实体类信息
List<Map<String, Object>> functionList = functionService.queryFunctionByRoleId(user.getRoleId());
if (null != functionList) {
for (int i = 0; i < functionList.size(); i++) {
String funFlag = functionList.get(i).get("funFlag").toString();
permissionList.add(funFlag);
}
}
ShiroUtils.setSessionByKey("menus", functionList);
}
}
} catch (NumberFormatException e) {
// TODO Auto-generated catch block
e.printStackTrace();
} catch (Exception e) {
// TODO Auto-generated catch block
e.printStackTrace();
}
// 为当前用户设置角色和权限
SimpleAuthorizationInfo simpleAuthorizationInfo = new SimpleAuthorizationInfo();
simpleAuthorizationInfo.addRoles(roleList);
simpleAuthorizationInfo.addStringPermissions(permissionList);
return simpleAuthorizationInfo;
}
/**
* 验证当前登录的Subject
*
* @see 经测试:本例中该方法的调用时机为LoginController.login()方法中执行Subject.login()时
*/
@Override
protected AuthenticationInfo doGetAuthenticationInfo(AuthenticationToken authenticationToken) throws AuthenticationException {
// TODO Auto-generated method stub
logger.info("======用户登陆认证======");
// 获取基于用户名和密码的令牌
// 实际上这个authcToken是从AdminController里面currentUser.login(token)传过来的
UsernamePasswordToken token = (UsernamePasswordToken) authenticationToken;
try {
User user = userService.getUserByuname(Integer.parseInt(token.getUsername()));
if (null != user) {
AuthenticationInfo authcInfo = new SimpleAuthenticationInfo(user.getUsername(), user.getPassword(), String.valueOf(user.getUser_id()));
this.setSession("currentUser", user);
return authcInfo;
} else {
return null;
}
} catch (NumberFormatException e) {
// TODO Auto-generated catch block
e.printStackTrace();
} catch (Exception e) {
// TODO Auto-generated catch block
e.printStackTrace();
}
return null;
}
/**
* 将一些数据放到ShiroSession中,以便于其它地方使用
*
* @see 比如Controller,使用时直接用HttpSession.getAttribute(key)就可以取到
*/
private void setSession(Object key, Object value) {
Subject currentUser = SecurityUtils.getSubject();
if (null != currentUser) {
Session session = currentUser.getSession();
System.out.println("Session默认超时时间为[" + session.getTimeout() + "]毫秒");
if (null != session) {
session.setAttribute(key, value);
}
}
}
}
5. 添加注解即可使用了
@RequiresPermissions("picc.article.add")
@RequestMapping(value = "/add.html")
public ModelAndView articleAdd(HttpServletRequest request, HttpServletResponse response) throws Exception {