======= 第一部分(整体架构 及 流程)===========
1、SpringMVC 运行流程图:

一、首先来讲解下springMVC的底层工作流程
1、首先我们重点放在前端控制器(DispatcherServlet)
其类图:


总结一下各个Servlet的作用:
1. HttpServletBean
主要做一些初始化的工作,将web.xml中配置的参数设置到Servlet中。比如servlet标签的子标签init-param标签中配置的参数。
2. FrameworkServlet
将Servlet与Spring容器上下文关联。其实也就是初始化FrameworkServlet的属性webApplicationContext,这个属性代表SpringMVC上下文,它有个父类上下文,既web.xml中配置的ContextLoaderListener监听器初始化的容器上下文。
3. DispatcherServlet
初始化各个功能的实现类。比如异常处理、视图处理、请求映射处理等。
因为从流程图看,用户的请求最先到达就是DispatcherServlet。它是springmvc的核心,也是中央出处理器。因此我们分析源码,先看看他是什么样的流程:通过源码可看到:他是继承FrameworkServlet,它也是springmvc提供的类,继续往下继承关系看,FrameworkServlet继承HttpServletBean,它依旧是spring提供的.最终直到它继承HttpServlet,如图:


而这个类它就是servlet。因此既然是Servlet类,那么它有一个最终的方法,就是service()方法,它是Servlet最核心的方法。
因此,我们在DispatcherServlet类中找service方法,发现没有,我们继续往上一层FrameworkServlet类中找,发现找到了,因此Spring实现该方法在这个类去实现的。
 protected void service(HttpServletRequest request, HttpServletResponse response) throws ServletException, IOException {
        HttpMethod httpMethod = HttpMethod.resolve(request.getMethod());
        if (httpMethod != HttpMethod.PATCH && httpMethod != null) {
            super.service(request, response);
        } else {
            this.processRequest(request, response);
        }

    }
这里职责主要是先拿到一个请求,然后又做了一个判断请求方式。发现不是PATCH方式就去调用父类(HttpServlet)中service()方法。它去调用父类中的service方法其实就是去调用该父类中doPost(),doGet()等doXXX()方法,而会去FrameworkServlet的对应的doPost(),doGet()等doXXX()方法中去执行唯一的processRequest(request, response)方法,而processRequest方法中调用了doService(request, response)方法,也就是去执行其子类DispatcherServlet的重写的其方法,其中执行doDispatch(request, response);处理不同的业务。比如以FrameworkServlet的service方式为例,调用其父类HttpServlet的service方法

调用

或者执行FrameworkServlet类中service方法中的processRequest方法

然后一直往下执行到子类DispatcherServlet的doService方法

其中最主要的方法doDispatch(request, response);
doDispatch方法功能简单描述一下:
首先根据请求的路径找到HandlerMethod(带有Method反射属性,也就是对应Controller中的方法),然后匹配路径对应的拦截器,有了HandlerMethod和拦截器构造个HandlerExecutionChain对象。HandlerExecutionChain对象的获取是通过HandlerMapping接口提供的方法中得到。有了HandlerExecutionChain之后,通过HandlerAdapter对象进行处理得到ModelAndView对象,HandlerMethod内部handle的时候,使用各种HandlerMethodArgumentResolver实现类处理HandlerMethod的参数,使用各种HandlerMethodReturnValueHandler实现类处理返回值。 最终返回值被处理成ModelAndView对象,这期间发生的异常会被HandlerExceptionResolver接口实现类进行处理。


由源码可得:他首先主要是创建一个视图对象 ModelAndView mv = null;然后检查当前请求是否是二进制的请求processedRequest = this.checkMultipart(request);然后就是只要代码
mappedHandler = this.getHandler(processedRequest);
就是根据当前的请求去拿一个Handler.(在这个源码中springNVC都是使用的Handler,那么他到底是什么?这个Handler其实就是我们的控制器,包括我们写Controller)。
由流程图可知,发送清求到控制器,控制器第二个节点就是发送第二个请求就是去拿Handler,因此可知这里才是最核心代码。由图可知他取Handler最终要去找HandlerMapping,然后他再去拿一个Handler。那么为什么要去找HandlerMapping去要一个Handler呢?首先我们在配置控制器的时候有两种方式1.xml方式,2.注解的方式。因此spring源码他给我们不止一种控制器 。因为两种方式控制器 。因此spring并不知道我们使用的事哪一种控制器。因为两种控制器,spring去底层去找的控制的实现方式是不一样的。因此这就是为什么第二步他要去找Handler(控制器)的了。但是Handler怎么找的到呢?就是通过HandlerMapping这样一个处理器映射器。如代码可知他首先是判断当前this.handlerMappings是否为空
那么接下来他会怎么处理呢?由源码得知,Spring首先是遍历handlerMappings,怎么遍历呢?他会问当前数组中有没有我这控制器。也就是代码中的hm对应的是当前控制器;
protected HandlerExecutionChain getHandler(HttpServletRequest request) throws Exception {
		if (this.handlerMappings != null) {
			for (HandlerMapping hm : this.handlerMappings) {
				if (logger.isTraceEnabled()) {
					logger.trace(
							"Testing handler map [" + hm + "] in DispatcherServlet with name '" + getServletName() + "'");
				}
				HandlerExecutionChain handler = hm.getHandler(request);
				if (handler != null) {
					return handler;
				}
			}
		}
		return null;
	}
找到之后;他返回的是一个HandlerExecutionChain类型的Handler;这里面封装了一个我们自己的创建controlller和它里面还封装一个拦截器。

因此到这里我们就拿到了对应的也是最合适的Handler,然后返回中央处理器。
然后到第二个方法:
HandlerAdapter ha = this.getHandlerAdapter(mappedHandler.getHandler());
获取控制器的适配器。也就是我们之前拿到了控制器,接下来要去执行控制器,也就是拿到控制器适配器中执行控制器。这里为什么要获取适配器呢?因为跟控制器映射器(也就是配置方式)一样。你就有不同的适配器。因此适配器也不是一个。跟我们上面Handler原理一样。

判断再往下执行的时候还要判断你有没有需要执行的拦截器。

接下来就是适配器去执行Handler
mv = ha.handle(processedRequest, response, mappedHandler.getHandler());
如果你有ModelAndView,就返回一个ModelAndView.然后返回给试图对象,然后把视图对象交给视图解析器,去渲染,最后响应给用户。
到这里:其控制器原理大致可以理解为:第一步是去找那个控制器,第二步是去执行控制器,然后返回给试图对象,然后把视图对象交给视图解析器,去渲染,最后响应给用户。
======= 第二部分(具体细节) ======
那么这里有个疑问?Spring MVC中的handlerMappings初始值是哪来的呢?以及自定义的Controller等等
Spring mvc 提供的控制器类型handlerMappings 是如何被初始化的,来引出SpringMVC初始化。那么先看HandlerMappings初始化源码可得:

其初始化是在DispatcherServlet类中的这个方法进行的,而这个初始化方法initHandlerMappings()又是什么时候执行的呢?在该类中发现,是在下面方法中执行初始化的,同时发现好多组件都是在这个方法中执行,比如另一个重要的对象控制器适配器


那么归根究底,其SprinngMVC的初始化是在onRefresh()这个方法中执行的。
因此下面首先通过时序图来探索springMVC的初始化流程:(图片来源于网络)

servlet初始化会调用 init 方法,换句话说就是springMVC进行初始化的时候首先会去执行HttpServletBean的init方法, 下面看看HttpServletBean的源码:


其中有一点值得注意,那就是 initServletBean() 这个方法是由其子类 FrameworkServlet 实现,因此, 接下来 FramworkServlet 会执行 initServletBean 这个方法,下面就继续看看 initServletBean 方法源码:

可以看到 initServletBean 方法中就调用了一个 initFrameworkServlet 方法和 initWebApplicationContext 方法,其中initFrameworkServlet方法是由子类实现,这个不多说,直接看 initWebApplicationContext 方法源码:
 protected WebApplicationContext initWebApplicationContext() {

        //此处的 rootContext 在你配置了ContextLoaderListener的时候注入的
        //通过分析ContextLoaderListenr的源码,可以看到
        //ContextLoaderListener通过ContextLoader根据ApplicationContext.xml的配置会创建一个xmlWebApplicationContext
        //如果没有配置ContextLoaderListener,本处将为null,但不影响springMVC,为何?通过接下来的分析,就能看到原因
        WebApplicationContext rootContext = WebApplicationContextUtils.getWebApplicationContext(this.getServletContext());
        WebApplicationContext wac = null;

       //当webApplicationContext已经存在,那么就直接使用,使用之前会先设置rootContext,为其跟。
       //配置完成之后refresh一次,refresh会涉及到IOC的内容,本处不做探讨。

        if (this.webApplicationContext != null) {
            wac = this.webApplicationContext;
            if (wac instanceof ConfigurableWebApplicationContext) {
                ConfigurableWebApplicationContext cwac = (ConfigurableWebApplicationContext)wac;
                if (!cwac.isActive()) {
                    if (cwac.getParent() == null) {
                        cwac.setParent(rootContext);
                    }

                    this.configureAndRefreshWebApplicationContext(cwac);
                }
            }
        }
        //如果不存在webApplicationContext,那么先去ServletContext中查找
        if (wac == null) {
            wac = this.findWebApplicationContext();
        }
        //如果上述没有查到,那么就创建webApplicationContext
        if (wac == null) {
            wac = this.createWebApplicationContext(rootContext);
        }

        if (!this.refreshEventReceived) {
             //此方法由DispatcherServlet调用 (非常重要!!!)
            this.onRefresh(wac);
        }
        //将webApplicationContext保存在ServletContext
        if (this.publishContext) {
            //将上下文发布为servlet上下文属性。
            String attrName = this.getServletContextAttributeName();
            this.getServletContext().setAttribute(attrName, wac);
            if (this.logger.isDebugEnabled()) {
                this.logger.debug("Published WebApplicationContext of servlet '" + this.getServletName() + "' as ServletContext attribute with name [" + attrName + "]");
            }
        }

        return wac;
    }
上面代码调用了一次 createWebApplicationContext 方法, 下面就看看这个方法的源码:
protected WebApplicationContext createWebApplicationContext(@Nullable ApplicationContext parent) {
		Class<?> contextClass = getContextClass();
		if (this.logger.isDebugEnabled()) {
			this.logger.debug("Servlet with name '" + getServletName() +
					"' will try to create custom WebApplicationContext context of class '" +
					contextClass.getName() + "'" + ", using parent context [" + parent + "]");
		}
		if (!ConfigurableWebApplicationContext.class.isAssignableFrom(contextClass)) {
			throw new ApplicationContextException(
					"Fatal initialization error in servlet with name '" + getServletName() +
					"': custom WebApplicationContext class [" + contextClass.getName() +
					"] is not of type ConfigurableWebApplicationContext");
		}
        //此处利用反射创建
		ConfigurableWebApplicationContext wac =
				(ConfigurableWebApplicationContext) BeanUtils.instantiateClass(contextClass);

		wac.setEnvironment(getEnvironment());
		wac.setParent(parent);
		String configLocation = getContextConfigLocation();
		if (configLocation != null) {
			wac.setConfigLocation(configLocation);
		}
		configureAndRefreshWebApplicationContext(wac);

		return wac;
	}
还记得FrameworkServlet初始化的时候会调用onRefresh()方法吗,这个方法是留给其子类DispatcherServlet调用的, 最后就该看看DispatcherServlet里面的 onRefresh 方法了:
 protected void onRefresh(ApplicationContext context) {
        this.initStrategies(context);
    }
     //初始化此servlet使用的策略对象。
     //可以在子类中重写以初始化其他策略对象
    protected void initStrategies(ApplicationContext context) {
        this.initMultipartResolver(context);
        this.initLocaleResolver(context);
        this.initThemeResolver(context);
        this.initHandlerMappings(context);
        this.initHandlerAdapters(context);
        this.initHandlerExceptionResolvers(context);
        this.initRequestToViewNameTranslator(context);
        this.initViewResolvers(context);
        this.initFlashMapManager(context);
    }
可以看到onRefresh方法就一句话,调用initStrategies方法, 上面给出了 initStrategies 源码, 很直观,就是在初始化SpringMVC 的一系列组件, 但是此处你要明白,SpringMVC的组件其实已经在webApplicationContext创建时就已经实例化了, 此处所谓的初始化只是在选择合适的组件(每一个组件都对应了几个不同的实现)。
到此,就可以很清楚知道,HandlerMappings和HandlerAdapter等是在什么时候初始化的。
===============第三部分(前台请求 到匹配对应的Controller 过程)===============
我们使用浏览器通过地址 http://ip:port/contextPath/path进行访问,SpringMVC是如何得知用户到底是访问哪个Controller中的方法,这期间到底发生了什么。
分析SpringMVC是如何处理请求与Controller之间的映射关系的,这个过程中到底发生了什么事情。
1.这个过程中重要的接口和类。
HandlerMethod类:
是一个封装了方法参数、方法注解,方法返回值等众多元素的类。

MethodParameter类:
HandlerMethod类中的parameters属性类型,是一个MethodParameter数组。MethodParameter是一个封装了方法参数具体信息的工具类,包括参数的的索引位置,类型,注解,参数名等信息。
HandlerMethod在实例化的时候,构造函数中会初始化这个数组,这时只初始化了部分数据,在HandlerAdapter对请求处理过程中会完善其他属性,之后交予合适的HandlerMethodArgumentResolver接口处理。
RequestMappingHandlerMapping类:
 isHandler(Class<?> beanType)方法,判断若有@Controller和@RequestMapping注解 则证明是handler


例子:
当我们访问:http://ip:port/urlPath.....的时候。
会先根据 "/urlPath....." 找urlMap对应的RequestMappingInfo集合,找不到的话取handlerMethods集合中所有的key集合(也就是RequestMappingInfo集合)。
然后进行匹配,匹配根据RequestCondition的getMatchingCondition方法。

然后会使用比较器进行排序。
之前也分析过,比较器是有优先级的。
我们看到,RequestMappingInfo除了pattern,其他属性都是一样的。
我们看下PatternsRequestCondition比较的逻辑:
PatternsRequestCondition的compareTo(PatternsRequestCondition other, HttpServletRequest request)方法:

资源Bean定义解析器类ResourcesBeanDefinitionParser:
 public BeanDefinition parse(Element element, ParserContext context) 方法:
@Override
	public BeanDefinition parse(Element element, ParserContext context) {
		Object source = context.extractSource(element);

		registerUrlProvider(context, source);

		RuntimeBeanReference pathMatcherRef = MvcNamespaceUtils.registerPathMatcher(null, context, source);
		RuntimeBeanReference pathHelperRef = MvcNamespaceUtils.registerUrlPathHelper(null, context, source);

		String resourceHandlerName = registerResourceHandler(context, element, pathHelperRef, source);
		if (resourceHandlerName == null) {
			return null;
		}

		Map<String, String> urlMap = new ManagedMap<>();
		String resourceRequestPath = element.getAttribute("mapping");
		if (!StringUtils.hasText(resourceRequestPath)) {
			context.getReaderContext().error("The 'mapping' attribute is required.", context.extractSource(element));
			return null;
		}
		urlMap.put(resourceRequestPath, resourceHandlerName);

		RootBeanDefinition handlerMappingDef = new RootBeanDefinition(SimpleUrlHandlerMapping.class);
		handlerMappingDef.setSource(source);
		handlerMappingDef.setRole(BeanDefinition.ROLE_INFRASTRUCTURE);
		handlerMappingDef.getPropertyValues().add("urlMap", urlMap);
		handlerMappingDef.getPropertyValues().add("pathMatcher", pathMatcherRef).add("urlPathHelper", pathHelperRef);

		String orderValue = element.getAttribute("order");
		// Use a default of near-lowest precedence, still allowing for even lower precedence in other mappings
		Object order = StringUtils.hasText(orderValue) ? orderValue : Ordered.LOWEST_PRECEDENCE - 1;
		handlerMappingDef.getPropertyValues().add("order", order);

		RuntimeBeanReference corsRef = MvcNamespaceUtils.registerCorsConfigurations(null, context, source);
		handlerMappingDef.getPropertyValues().add("corsConfigurations", corsRef);

		String beanName = context.getReaderContext().generateBeanName(handlerMappingDef);
		context.getRegistry().registerBeanDefinition(beanName, handlerMappingDef);
		context.registerComponent(new BeanComponentDefinition(handlerMappingDef, beanName));

		// Ensure BeanNameUrlHandlerMapping (SPR-8289) and default HandlerAdapters are not "turned off"
		// Register HttpRequestHandlerAdapter
		MvcNamespaceUtils.registerDefaultComponents(context, source);

		return null;
	}
====================第四部分 (SpringMVC实现数据类型的转换、参数数据的绑定)===========
例子:
Controller层的:
public String method(Integer num, Date birth) { ... }
Http请求传递的数据都是字符串String类型的,上面这个方法在Controller中定义,如果该方法对应的地址接收到到浏览器的请求的话,并且请求中含有num和birth参数,那么num会被自动转换成Integer对象;birth会被自动转为Date对象(Date转换需要配置属性编辑器)。

重要的接口和类:
1.PropertyEditorRegistry接口
封装方法来给JavaBean注册对应的属性编辑器。

2.PropertyEditorRegistrySupport:PropertyEditorRegistry接口的基础实现类

3、PropertyEditorRegistrySupport类有个createDefaultEditors方法,会创建默认的属性编辑器。
/**
	 * Actually register the default editors for this registry instance.
	 */
	private void createDefaultEditors() {
		this.defaultEditors = new HashMap<>(64);

		// Simple editors, without parameterization capabilities.
		// The JDK does not contain a default editor for any of these target types.
		this.defaultEditors.put(Charset.class, new CharsetEditor());
		this.defaultEditors.put(Class.class, new ClassEditor());
		this.defaultEditors.put(Class[].class, new ClassArrayEditor());
		this.defaultEditors.put(Currency.class, new CurrencyEditor());
		this.defaultEditors.put(File.class, new FileEditor());
		this.defaultEditors.put(InputStream.class, new InputStreamEditor());
		this.defaultEditors.put(InputSource.class, new InputSourceEditor());
		this.defaultEditors.put(Locale.class, new LocaleEditor());
		this.defaultEditors.put(Path.class, new PathEditor());
		this.defaultEditors.put(Pattern.class, new PatternEditor());
		this.defaultEditors.put(Properties.class, new PropertiesEditor());
		this.defaultEditors.put(Reader.class, new ReaderEditor());
		this.defaultEditors.put(Resource[].class, new ResourceArrayPropertyEditor());
		this.defaultEditors.put(TimeZone.class, new TimeZoneEditor());
		this.defaultEditors.put(URI.class, new URIEditor());
		this.defaultEditors.put(URL.class, new URLEditor());
		this.defaultEditors.put(UUID.class, new UUIDEditor());
		this.defaultEditors.put(ZoneId.class, new ZoneIdEditor());

		// Default instances of collection editors.
		// Can be overridden by registering custom instances of those as custom editors.
		this.defaultEditors.put(Collection.class, new CustomCollectionEditor(Collection.class));
		this.defaultEditors.put(Set.class, new CustomCollectionEditor(Set.class));
		this.defaultEditors.put(SortedSet.class, new CustomCollectionEditor(SortedSet.class));
		this.defaultEditors.put(List.class, new CustomCollectionEditor(List.class));
		this.defaultEditors.put(SortedMap.class, new CustomMapEditor(SortedMap.class));

		// Default editors for primitive arrays.
		this.defaultEditors.put(byte[].class, new ByteArrayPropertyEditor());
		this.defaultEditors.put(char[].class, new CharArrayPropertyEditor());

		// The JDK does not contain a default editor for char!
		this.defaultEditors.put(char.class, new CharacterEditor(false));
		this.defaultEditors.put(Character.class, new CharacterEditor(true));

		// Spring's CustomBooleanEditor accepts more flag values than the JDK's default editor.
		this.defaultEditors.put(boolean.class, new CustomBooleanEditor(false));
		this.defaultEditors.put(Boolean.class, new CustomBooleanEditor(true));

		// The JDK does not contain default editors for number wrapper types!
		// Override JDK primitive number editors with our own CustomNumberEditor.
		this.defaultEditors.put(byte.class, new CustomNumberEditor(Byte.class, false));
		this.defaultEditors.put(Byte.class, new CustomNumberEditor(Byte.class, true));
		this.defaultEditors.put(short.class, new CustomNumberEditor(Short.class, false));
		this.defaultEditors.put(Short.class, new CustomNumberEditor(Short.class, true));
		this.defaultEditors.put(int.class, new CustomNumberEditor(Integer.class, false));
		this.defaultEditors.put(Integer.class, new CustomNumberEditor(Integer.class, true));
		this.defaultEditors.put(long.class, new CustomNumberEditor(Long.class, false));
		this.defaultEditors.put(Long.class, new CustomNumberEditor(Long.class, true));
		this.defaultEditors.put(float.class, new CustomNumberEditor(Float.class, false));
		this.defaultEditors.put(Float.class, new CustomNumberEditor(Float.class, true));
		this.defaultEditors.put(double.class, new CustomNumberEditor(Double.class, false));
		this.defaultEditors.put(Double.class, new CustomNumberEditor(Double.class, true));
		this.defaultEditors.put(BigDecimal.class, new CustomNumberEditor(BigDecimal.class, true));
		this.defaultEditors.put(BigInteger.class, new CustomNumberEditor(BigInteger.class, true));

		// Only register config value editors if explicitly requested.
		if (this.configValueEditorsActive) {
			StringArrayPropertyEditor sae = new StringArrayPropertyEditor();
			this.defaultEditors.put(String[].class, sae);
			this.defaultEditors.put(short[].class, sae);
			this.defaultEditors.put(int[].class, sae);
			this.defaultEditors.put(long[].class, sae);
		}
	}
3.TypeConverter接口
类型转换接口。 通过该接口,可以将value转换为requiredType类型的对象。

4.TypeConverterSupport:TypeConverter基础实现类,并继承了PropertyEditorRegistrySupport
有个属性typeConverterDelegate,类型为TypeConverterDelegate,TypeConverterSupport将类型转换委托给typeConverterDelegate操作。

5.TypeConverterDelegate
类型转换委托类。具体的类型转换操作由此类完成。
6.SimpleTypeConverter
TypeConverterSupport的子类,使用了PropertyEditorRegistrySupport(父类TypeConverterSupport的父类PropertyEditorRegistrySupport)中定义的默认属性编辑器。
7.PropertyAccessor接口
对类中属性操作的接口。
8.BeanWrapper接口
继承ConfigurablePropertyAccessor(继承PropertyAccessor、PropertyEditorRegistry、TypeConverter接口)接口的操作Spring中JavaBean的核心接口。
9.BeanWrapperImpl类
BeanWrapper接口的默认实现类,TypeConverterSupport是它的父类,可以进行类型转换,可以进行属性设置。
10.DataBinder类
实现PropertyEditorRegistry、TypeConverter的类。支持类型转换,参数验证,数据绑定等功能。
有个属性SimpleTypeConverter,用来进行类型转换操作。
11.WebDataBinder
DataBinder的子类,主要是针对Web请求的数据绑定。
-----------
在分析RequestParamMethodArgumentResolver处理请求参数之前,我们简单回顾一下SpringMVC是如何对http请求进行处理的。
HandlerAdapter会对每个请求实例化一个ServletInvocableHandlerMethod对象进行处理,我们仅看下WebDataBinderFactory的构造过程。
WebDataBinderFactory接口是一个创建WebDataBinder的工厂接口。
boolean类型的参数会被RequestParamMethodArgumentResolver这个HandlerMethodArgumentResolver处理。
下面我们进入RequestParamMethodArgumentResolver看看是如何处理的。
RequestParamMethodArgumentResolver的resolveArgument方法是由它的父类AbstractNamedValueMethodArgumentResolver中定义的:
@Nullable
    public final Object resolveArgument(MethodParameter parameter, @Nullable ModelAndViewContainer mavContainer, NativeWebRequest webRequest, @Nullable WebDataBinderFactory binderFactory) throws Exception {
        AbstractNamedValueMethodArgumentResolver.NamedValueInfo namedValueInfo = this.getNamedValueInfo(parameter);
        MethodParameter nestedParameter = parameter.nestedIfOptional();
        Object resolvedName = this.resolveStringValue(namedValueInfo.name);
        if(resolvedName == null) {
            throw new IllegalArgumentException("Specified name must not resolve to null: [" + namedValueInfo.name + "]");
        } else {
            Object arg = this.resolveName(resolvedName.toString(), nestedParameter, webRequest);
            if(arg == null) {
                if(namedValueInfo.defaultValue != null) {
                    arg = this.resolveStringValue(namedValueInfo.defaultValue);
                } else if(namedValueInfo.required && !nestedParameter.isOptional()) {
                    this.handleMissingValue(namedValueInfo.name, nestedParameter, webRequest);
                }

                arg = this.handleNullValue(namedValueInfo.name, arg, nestedParameter.getNestedParameterType());
            } else if("".equals(arg) && namedValueInfo.defaultValue != null) {
                arg = this.resolveStringValue(namedValueInfo.defaultValue);
            }

            if(binderFactory != null) {
                WebDataBinder binder = binderFactory.createBinder(webRequest, (Object)null, namedValueInfo.name);

                try {
                    arg = binder.convertIfNecessary(arg, parameter.getParameterType(), parameter);
                } catch (ConversionNotSupportedException var11) {
                    throw new MethodArgumentConversionNotSupportedException(arg, var11.getRequiredType(), namedValueInfo.name, parameter, var11.getCause());
                } catch (TypeMismatchException var12) {
                    throw new MethodArgumentTypeMismatchException(arg, var12.getRequiredType(), namedValueInfo.name, parameter, var12.getCause());
                }
            }

            this.handleResolvedValue(arg, namedValueInfo.name, parameter, mavContainer, webRequest);
            return arg;
        }
    }
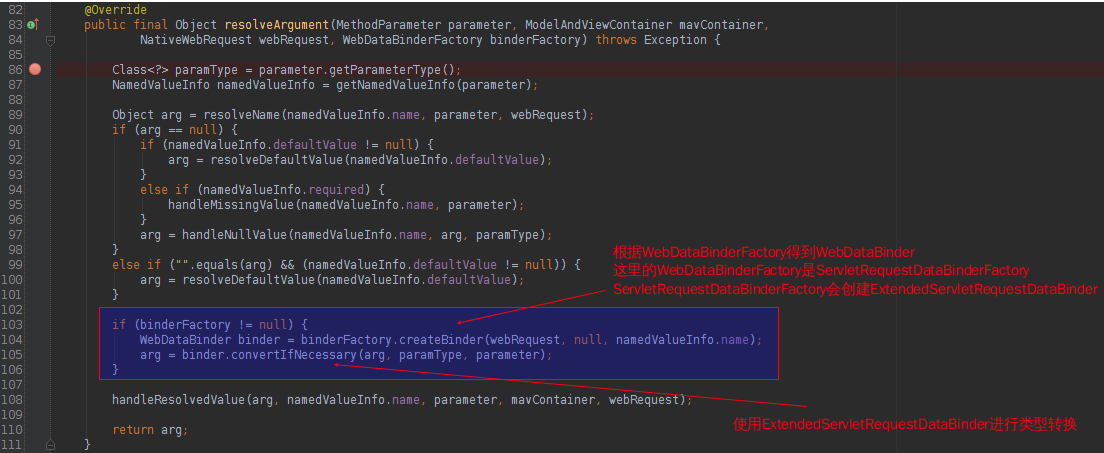
ServletRequestDataBinderFactory创建ExtendedServletRequestDataBinder。
 ExtendedServletRequestDataBinder属于DataBinder的子类。

我们在介绍重要接口的时候说过DataBinder进行类型转换的时候内部会使用SimpleTypeConverter进行数据转换。
boolean类型改成Boolean类型的话,不传参数的话b就是null,我们解释默认属性编辑器的时候Boolean类型的参数是允许空的。但是boolean类型不传参数的话,默认会是false,而不会抛出异常。 原因就是resolveArgument方法中handleNullValue处理null值,spring进行了特殊的处理,如果参数类型是boolean的话,取false。
编写自定义的属性编辑器
1、extends PropertyEditorSupport (继承 PropertyEditorSupport )
public class CustomDeptEditor extends PropertyEditorSupport {

  @Override
  public void setAsText(String text) throws IllegalArgumentException {
    if(text.indexOf(",") > 0) {
        Dept dept = new Dept();
        String[] arr = text.split(",");
        dept.setId(Integer.parseInt(arr[0]));
        dept.setName(arr[1]);
        setValue(dept);
    } else {
        throw new IllegalArgumentException("dept param is error");
    }
  }

}
SpringMVC中使用自定义的属性编辑器有3种方法:
1. Controller方法中添加@InitBinder注解的方法
@InitBinder
public void initBinder(WebDataBinder binder) {
  binder.registerCustomEditor(Dept.class, new CustomDeptEditor());
}
2. 实现WebBindingInitializer接口
public class MyWebBindingInitializer implements WebBindingInitializer {

  @Override
  public void initBinder(WebDataBinder binder, WebRequest request) {
    binder.registerCustomEditor(Dept.class, new CustomDeptEditor());
  }

}
之前分析源码的时候,HandlerAdapter构造WebDataBinderFactory的时候,会传递HandlerAdapter的属性webBindingInitializer。
因此,我们在配置文件中构造RequestMappingHandlerAdapter的时候传入参数webBindingInitializer。
3. @ControllerAdvice注解
@ControllerAdvice
public class InitBinderControllerAdvice {

  @InitBinder
  public void initBinder(WebDataBinder binder) {
    binder.registerCustomEditor(Dept.class, new CustomDeptEditor());
  }

}
加上ControllerAdvice别忘记配置文件component-scan需要扫描到这个类。
==============第五部分(SpringMVC 拦截器 设计)====
==========第六部分 (Order 接口)================
Spring中提供了一个Ordered接口。Ordered接口,顾名思义,就是用来排序的。
Spring是一个大量使用策略设计模式的框架,这意味着有很多相同接口的实现类,那么必定会有优先级的问题。
于是,Spring就提供了Ordered这个接口,来处理相同接口实现类的优先级问题。
=============第七部分(处理视图)============