ContOS7.5 简单使用
看CentOS版本
cat /etc/redhat-release
看内核版本
uname -r
主机名永久:vim /etc/hostname ==》直接删除修改
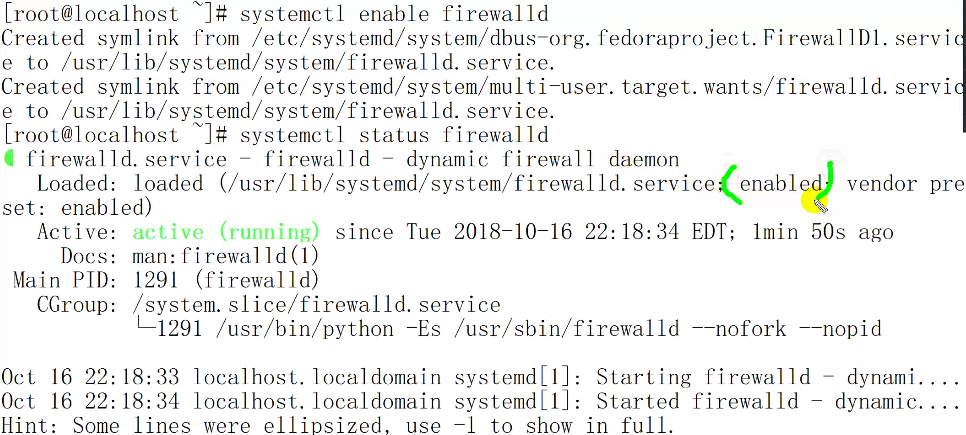
systemctl
不论启动服务service,还是开机自启动chkconfig,都被systemctl取代了
7.5防火墙:firewalld,企业不爱用,通常是关闭firewalld,iptables才生效
[root@ansible-server ~]# systemctl stop firewalld
看服务状态
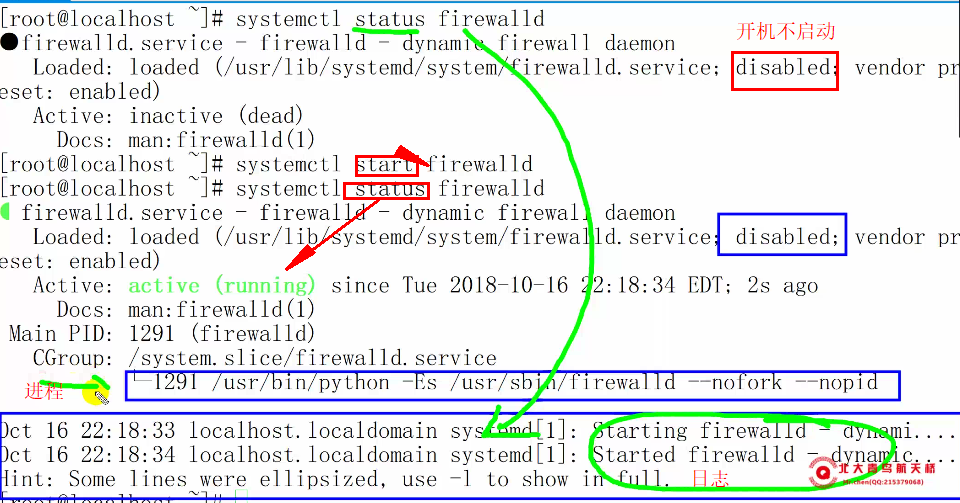
开机自启动
systenctl enable firewalld
新模板机开始时关闭防火墙
[root@ansible-server ~]# systemctl stop firewalld
[root@ansible-server ~]# systemctl disable firewalld
[root@ansible-server ~]# systemctl stop iptables.service
[root@ansible-server ~]# systemctl disable iptables.service
关闭内核防火墙
vim /etc/selinux/config
sestatus
开始时关闭NetworkMannager(代替管理网卡的配置文件并且高于之前的ifcfg-eth0,但是不好用,有时会掉线等)
[root@ansible-server ~]# systemctl stop NetworkManager
[root@ansible-server ~]# systemctl disable NetworkManager
##ansible配置及使用(CentOS7.5)
首先安装云yum 再安装ansible
    7.5版本:yum -y install epel-release #yum源
    yum -y install python2-pip
    pip install ansible
    #6.5安装(没安装上)
   ( rpm -ivh http://dl.fedoraproject.org/pub/epel/6/i386/epel-release-6-8.noarch.rpm
    yum -y install python-pip
    pip install ansible)


默认配置文件:/etc/ansible/hosts
编写,先直接清空
再 vim编辑
[nginx](模块名)
webA    ansible_ssh_host=192.168.200.128  #这个是做的密钥对登陆
webB    ansible_ssh_host=192.168.200.129    ansible_ssh_pass=123123 #这个是密码登陆

ansible     被管理范围      -m  模块    -a '具体命令' #单引号
#说明1
     ansible_ssh_host   被管理主机IP
     ansible_ssh_user   被管理主机用户的名字
     ansible_ssh_pass   被管理主机用户的密码
     ansible_sudo_pass  被管理主机用户的sudo时的密码
#说明2
   ansible 成功了 是绿色
   ansible  不成功 是红色
   ansible  警告   是粉色
#说明3
   安全策略:/etc/ansible/hosts  /etc/hosts
   chmod 600 权限,禁止非root用户查看
#说明4
    /usr/local/python/bin/ansible-doc -l          查看总帮助
    /usr/local/python/bin/ansible-doc -s shell    查看shell模块帮助 -s 后面是模块名
##ansible模块
ansible 被管理范围 -m [模块] -a '命令'
[ping] : -m ping
[command] : -m command -a '' #不支持管道符和重定向
[shell] : -m shell -a '' #支持所有的命令 所以 command被shell取代了
[script] : -m script -a '' #单引号里输入本地(分发端)脚本,zhe'ya这样,脚本不在被分发端留有痕迹
[yum] : -m yum -a 'name=包名 state=absent' #删除:state=absent
[setup] : -m setup |less #获取对方的服务器详细信息
[service] -m service -a 'name=firewalld state=stopped(started,restarted,reloaded)enabled=ture(false)'
[copy] : -m copy -a 'src=源 dest=目标'
        # backup=yes 覆盖同时先备份目标有的
        # owner=root 属主  group=root 属组  mode=500 权限  uid=  gid=
[crontab] : minute 分; hour 时; day 日; mouth 月; weekday 周;
            job 运行命令是什么; name 任务描述; user 以哪个用户执行;
            present 表示添加; absent 表示移除;
    -m cron -a 'minute="*/5" day="*/10" job="/bin/echo hello" name="test cron job"'
    时间不写默认* absent根据name删除,user不写默认root
    -m cron -a 'name="test cron job" state="absent"'
[user] :-m user -a 'name="yunjisuan" comment="描述"  uid=""  groups="" password="123123" shell="/bin/bash" home="/home/yunjisuan"'
        -m user -a 'name="yunjisuan" state="absent" remove="true"'
        #这样做的密码是普通的非加密的,不可用所以如下加密
    首先安装云yum
    7.5版本:yum -y install epel-release #yum源
    再安装ansible
    yum -y install python2-pip
    pip install ansible
    最后安装passlib
    pip install passlib
    python -c "from passlib.hash import sha512_crypt;import getpass;print sha512_crypt.encrypt(getpass.getpass())"
       password: #让我们输入想输入的密码==>回车==>生成加密密码==>我们复制替换到上面的密码位置

##账户安全
安全详解
[root@localhost ~]# cat -n /etc/ssh/sshd_config |sed -n '17p;38p;43p;65p;79p;115p'
    17	#Port 22                    #修改ssh连接端口
    38	#PermitRootLogin yes        #是否允许root账号远程登陆
    43	#PubkeyAuthentication yes   #是否开启公钥连接认证
    47	AuthorizedKeysFile	.ssh/authorized_keys #公钥文件的放置位置
    65	PasswordAuthentication yes  #是否开启密码验证登陆
    79	GSSAPIAuthentication yes    #是否关闭GSSAPI认证
   115	#UseDNS yes                 #是否关闭DNS反向解析

[root@localhost ~]# cat -n /etc/ssh/sshd_config |sed -n '17p;38p;43p;65p;79p;115p'
    17	Port 22221                 #工作中需要设定到1万以上端口,避免被扫描出来
    38	PermitRootLogin yes        #如果不是超大规模的服务器,为了方便可以暂时开启root远程登陆
    43	PubkeyAuthentication yes   #开启公钥认证模式
    47	AuthorizedKeysFile	.ssh/authorized_keys  #公钥放置位置
    65	PasswordAuthentication no  #为了安全,我们关闭服务器的密码认证方式
    79	GSSAPIAuthentication no    #关闭GSSAPI认证,极大提高ssh链接速度
    115	UseDNS no                  #关闭DNS反向解析,极大提高ssh连接速度

#重启服务
[root@localhost ~]#systemctl reload sshd
#做账户安全
 [root@localhost ~]# ssh-keygen -t dsa -f ~/.ssh/id_dsa -P ""  #生成密钥对
 [root@localhost ~]# useradd why1                              #创建新用户
 [root@localhost ~]# sz -E .ssh/id_dsa                         #私钥放到宿主机上
 [root@localhost ~]# cd /home/why1/                            #切换用户家目录
 [root@localhost why1]# mkdir .ssh                             #创建.ssh隐藏目录
 [root@localhost why1]# chmod 700 .ssh                         #权限700
 [root@localhost why1]# chown why1.why1 .ssh/                  #属主属组 why1
 [root@localhost why1]# cat ~/.ssh/id_dsa.pub > .ssh/authorized_keys #生成公钥
 [root@localhost why1]# chmod 600 .ssh/authorized_keys         #权限600
 [root@localhost why1]# chown why1.why1 .ssh/authorized_keys   #属主属组 why1
 [root@localhost .ssh]# ll -a
     total 4
     drwx------ 2 why1 why1  29 Mar 11 18:23 .
     drwx------ 3 why1 why1  74 Mar 11 18:19 ..
     -rw------- 1 why1 why1 616 Mar 11 18:23 authorized_keys
 [root@localhost .ssh]# visudo                                 #root给why1提所有权限
     93 why1    ALL=(ALL)       NOPASSWD:ALL
[root@localhost .ssh]# vim /etc/ssh/sshd_config                #编辑里面内容
    17	Port 22221
    38	PermitRootLogin yes
    43	PubkeyAuthentication yes
    47	AuthorizedKeysFile	.ssh/authorized_keys
    65	PasswordAuthentication no
    79	GSSAPIAuthentication no
    115	UseDNS no
[root@localhost .ssh]# systemctl reload sshd
[why1@localhost ~]$ sudo -l                                     #查看权限
   User why1 may run the following commands on localhost:
    (ALL) NOPASSWD: ALL
[why1@localhost ~]$ su -                                        #直接切换 需要密码
Password:
[why1@localhost ~]$ sudo su -                                   #提权切换
Last login: Mon Mar 11 18:11:08 CST 2019 from 192.168.200.1 on pts/1
[root@localhost ~]#                                             #root账号了
#这就是 工作中 老大怎么远程登陆root账户  全程不允许输入密码


 #开启sudo日志
[root@localhost ~]# echo "local2.debug /var/log/sudo.log" >> /etc/rsyslog.conf
[root@localhost ~]# echo "Defaults logfile=/var/log/sudo.log" >> /etc/sudoers
[root@localhost ~]# systemctl restart rsyslog

#查看
[root@localhost ~]# cat /var/log/sudo.log
Mar 11 18:53:51 : why1 : TTY=pts/2 ; PWD=/home/why1 ; USER=root ;
    COMMAND=/bin/su -

##备注
/etc/crontab 这个文件需要加i锁,黑客最爱攻击这个地方,这个里面写定时任务,crontab -l 查不到
chattr +i /etc/crontab

映射文件也应该在做完配置以后,修改权限,变成600