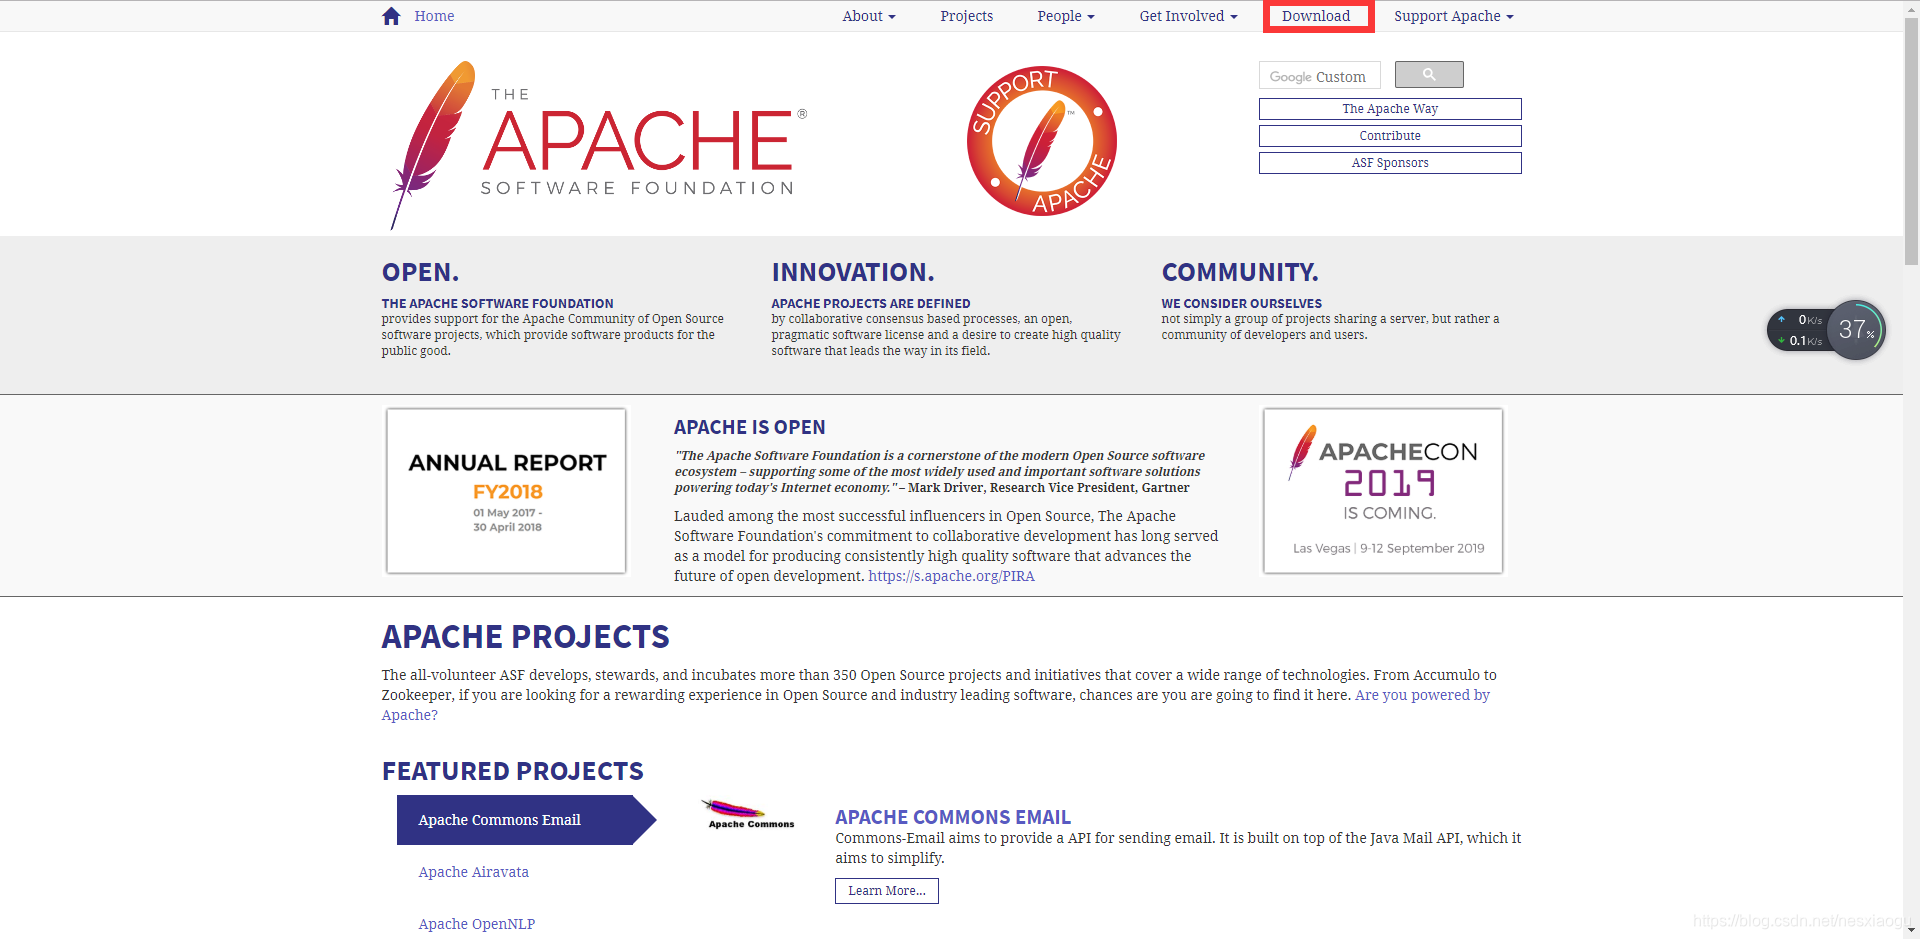
下载
打开官网
点击 download
点击http://mirrors.hust.edu.cn/apache/

点击 archive site

选择 httpd

选择 Binary Releases
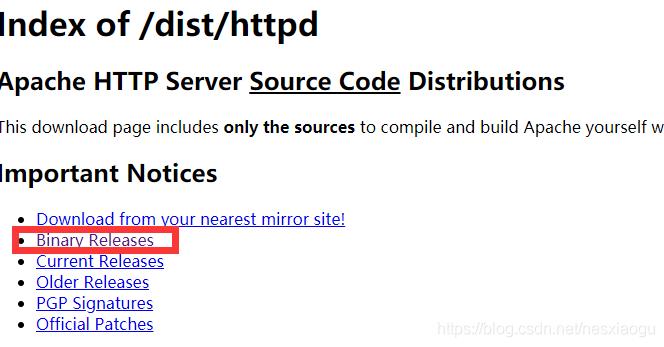
点击 Apache HTTp Server Download Page

选择 Files for Microsoft Windows

选择一个二进制下载站点
- apache 官网本身只提供源码下载,下载之后要自己编译,下面给你提供了几个编译好的站点下载

选择操apache对应操作系统位数的版本和下载通道

安装
将下载好的压缩包解压到任意目录(这里我解压到D盘根目录)


配置SRVROOT目录
-
打开
D:\Apache24\conf\httpd.conf文件 -
搜索SRVROOT
# /Apache24就是路径
# 如果我们把Apache24放在任意盘的根目录下那么这里不用修改
# 如果不是根目录那么我们就需要配置具体路径了
# 如: D:/php_setting/Apache24
Define SRVROOT "/Apache24"
ServerRoot "${SRVROOT}"
- 如果SRVROOT路径不对安装apache会报下面的错误
httpd.exe: Syntax error on line 39 of D:/php_setting/Apache24/conf/httpd.conf: ServerRoot must be a valid directory
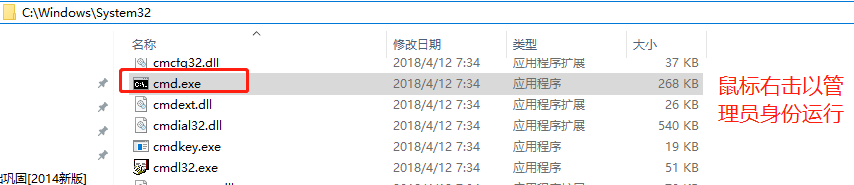
以管理员身份打开cmd(终端)
- cmd.exe路径(
C:\Windows\System32)
- cmd切换到刚刚解压到Apache24目录下的bin目录(我这里是D:\Apache24\bin)

-
输入命令
httpd -k install安装apache -
如果只出现下面提示那么恭喜你安装成功
Installing the 'Apache2.4' service
The 'Apache2.4' service is successfully installed.
Testing httpd.conf....
Errors reported here must be corrected before the service can be started.
- 但是事事总不能如愿 一开始安装遇到了443端口被占用的问题
Installing the 'Apache2.4' service
The 'Apache2.4' service is successfully installed.
Testing httpd.conf....
Errors reported here must be corrected before the service can be started.
(OS 10048)通常每个套接字地址(协议/网络地址/端口)只允许使用一次。  : AH00072: make_sock: could not bind to address [::]:443
(OS 10048)通常每个套接字地址(协议/网络地址/端口)只允许使用一次。  : AH00072: make_sock: could not bind to address 0.0.0.0:443
AH00451: no listening sockets available, shutting down
AH00015: Unable to open logs
解决端口占用占用有两个方法(杀死占用端口的进程或者换个端口进行监听)
杀死占用端口进程
- 先用
netstat -ano命令查看端口占用情况
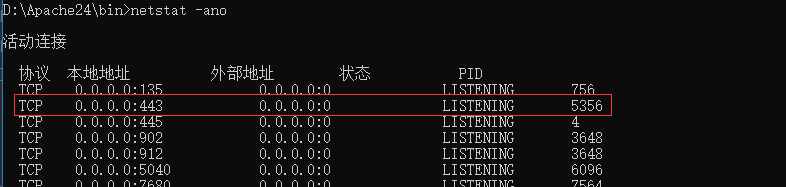
- 用
tasklist | findstr "5356"查看具体是哪个应用占用 (5356为刚刚插到占用进程的pid号)

-
如果杀死该应用不影响你的正常工作那么直接使用
taskkill /pid 5356 -f该进程 -
但是秉承着先来后到的道理这个方法并不是最好的解决办法
更换监听端口
-
打开
D:\Apache24\conf\extra\httpd-ahssl.conf(根据你自己的解压目录为准) -
将所有443替换成另外一个不常用的端口号比如说442然后保存
-
以上我们处理的是443端口的占用 其他端口占用解决方式都一样,只不过改端口号的文件就不一定一样了
再次安装
- 解决端口冲突之后再次使用
httpd -k install安装apache
# 提示已经安装apache
[Fri Nov 30 10:49:17.310949 2018] [mpm_winnt:error] [pid 8736:tid 140] AH00433: Apache2.4: Service is already installed.
-
不要急,我们先使用
httpd -k uninstall卸载apache,然后在httpd -k install安装 -
至此终于安装成功
启动apache
使用cmd自带的net命令启动
- 命令行输入
net start Apache2.4启动apache(我们安装的是Apache2.4)
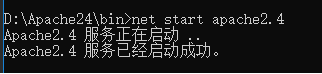
net stop Apache2.4可以关闭apache服务
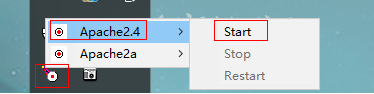
使用ApacheMonitor.exe应用程序启动
- 目录(
Apache24/bin/ApacheMonitor.exe)

- 鼠标点击应用图标选择apache2.4选择start
测试是否成功
- 浏览器访问
http://localhost看是否有页面

配置虚拟主机
-
打开
Apache24/bin/httpd.conf -
搜索
httpd-vhosts.conf

-
打开Apache24/bin/extra/httpd-vhosts.conf
-
追加以下内容
<VirtualHost *:80>
	# 每项配置后面不能写注释
	# 网站管理的 email
    ServerAdmin [email protected]
	# 虚拟主机的根目录
    DocumentRoot "${SRVROOT}/www/test"
	# 主机名
    ServerName www.test.com
	# 主机别名
    ServerAlias a.test.com
    # 没有带文件名情况下查找文件的顺序
    DirectoryIndex index.html index.php
	# 错误日志
    ErrorLog "logs/www.test.com-error.log"
	# 访问日志
    CustomLog "logs/www.test.com-access.log" common
</VirtualHost>
-
打开本机host文件添加
127.0.0.1 www.test.com -
本机host文件目录
C:\Windows\System32\drivers\etc\hosts -
在Apache24目录下创建www,在www下创建test目录(这个是刚刚配置的虚拟主机的根目录)
-
在test目录下新建一个index.html文件(内容自定义)

-
重启apache
-
浏览器访问
http://www.test.com -
出现了下面的情况
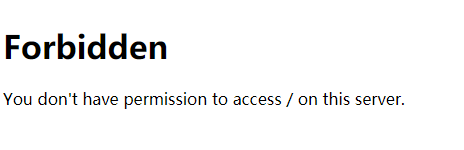
- 打开错误报告(
Apache24/logs/www.test.com-error.log)
AH01630: client denied by server configuration
-
这是因为没有权限访问文件夹
-
apche2.4下在刚刚的配置里面加上如下配置(不同于apache2.2的配置)
<VirtualHost *:80>
	# 每项配置后面不能写注释
	# 网站管理的 email
    ServerAdmin [email protected]
	# 虚拟主机的根目录
    DocumentRoot "${SRVROOT}/www/test"
	# 主机名
    ServerName www.test.com
	# 主机别名
    ServerAlias a.test.com
    # 没有带文件名情况下查找文件的顺序
    DirectoryIndex index.html index.php
	# 错误日志
    ErrorLog "logs/www.test.com-error.log"
	# 访问日志
    CustomLog "logs/www.test.com-access.log" common
    <Directory "${SRVROOT}/www/test">
        Options Indexes FollowSymLinks
        AllowOverride None
        Require all granted
    </Directory>
</VirtualHost>
- 至此虚拟主机配置成功