1 FreeMarker 研究
1.1 FreeMarker介绍
1、freemarker是一个用Java开发的模板引擎
常用的java模板引擎还有哪些?
Jsp、Freemarker、Thymeleaf 、Velocity 等。
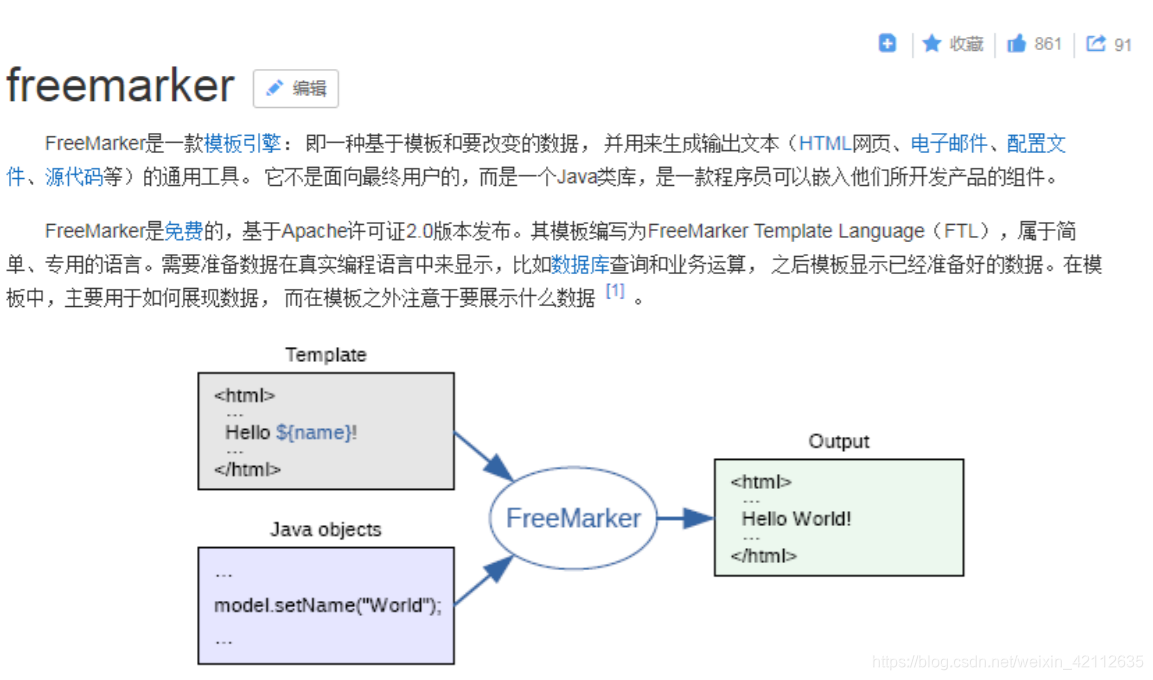
2、模板+数据模型=输出
freemarker并不关心数据的来源,只是根据模板的内容,将数据模型在模板中显示并输出文件(通常为html,也可以生成其它格式的文本文件)
1、数据模型
数据模型在java中可以是基本类型也可以List、Map、Pojo等复杂类型。
2、来自官方的例子:(https://freemarker.apache.org/docs/dgui_quickstart_basics.html)
数据模型:

模板:

输出:

1.2 FreeMarker快速入门
freemarker作为springmvc一种视图格式,默认情况下SpringMVC支持freemarker视图格式。
需要创建Spring Boot+Freemarker工程用于测试模板。
1.2.1 创建测试工程
创建一个freemarker 的测试工程专门用于freemarker的功能测试与模板的测试。
pom.xml如下
<?xml version="1.0" encoding="UTF-8"?>
<project xmlns="http://maven.apache.org/POM/4.0.0"
         xmlns:xsi="http://www.w3.org/2001/XMLSchema-instance"
         xsi:schemaLocation="http://maven.apache.org/POM/4.0.0 http://maven.apache.org/xsd/maven-4.0.0.xsd">

    <parent>
        <groupId>org.springframework.boot</groupId>
        <artifactId>spring-boot-starter-parent</artifactId>
        <version>2.0.1.RELEASE</version>
    </parent>
    <modelVersion>4.0.0</modelVersion>

    <artifactId>test-freemarker</artifactId>
    <dependencies>
        <dependency>
            <groupId>org.springframework.boot</groupId>
            <artifactId>spring-boot-starter-freemarker</artifactId>
        </dependency>
        <dependency>
            <groupId>org.springframework.boot</groupId>
            <artifactId>spring-boot-starter-web</artifactId>
        </dependency>
        <dependency>
            <groupId>org.projectlombok</groupId>
            <artifactId>lombok</artifactId>
        </dependency>
        <dependency>
            <groupId>com.squareup.okhttp3</groupId>
            <artifactId>okhttp</artifactId>
            <version>3.11.0</version>
        </dependency>
        <dependency>
            <groupId>org.springframework.boot</groupId>
            <artifactId>spring-boot-starter-test</artifactId>
        </dependency>
        <dependency>
            <groupId>org.apache.commons</groupId>
            <artifactId>commons-io</artifactId>
            <version>1.3.2</version>
        </dependency>
    </dependencies>
</project>
1.2.2 配置文件
配置application.yml和 logback-spring.xml:
server:
  port: 8088 # 服务端口

spring:
  application:
    name: test-freemarker # 指定服务名
  freemarker:
    cache: false  # 关闭模板缓存,方便测试
    settings:
      template_update_delay: 0 # 检查模板更新延迟时间,设置为0表示立即检查,如果时间大于0会有缓存不方便进行模板测试
<?xml version="1.0" encoding="UTF-8"?>

<configuration>
    <!--定义日志文件的存储地址,使用绝对路径-->
    <property name="LOG_HOME" value="d:/logs"/>

    <!-- Console 输出设置 -->
    <appender name="CONSOLE" class="ch.qos.logback.core.ConsoleAppender">
        <encoder>
            <!--格式化输出:%d表示日期,%thread表示线程名,%-5level:级别从左显示5个字符宽度%msg:日志消息,%n是换行符-->
            <pattern>%d{yyyy-MM-dd HH:mm:ss.SSS} [%thread] %-5level %logger{36} - %msg%n</pattern>
            <charset>utf8</charset>
        </encoder>
    </appender>

    <!-- 按照每天生成日志文件 -->
    <appender name="FILE" class="ch.qos.logback.core.rolling.RollingFileAppender">
        <rollingPolicy class="ch.qos.logback.core.rolling.TimeBasedRollingPolicy">
            <!--日志文件输出的文件名-->
            <fileNamePattern>${LOG_HOME}/xc.%d{yyyy-MM-dd}.log</fileNamePattern>
        </rollingPolicy>
        <encoder>
            <pattern>%d{yyyy-MM-dd HH:mm:ss.SSS} [%thread] %-5level %logger{36} - %msg%n</pattern>
        </encoder>
    </appender>

    <!-- 异步输出 -->
    <appender name="ASYNC" class="ch.qos.logback.classic.AsyncAppender">
        <!-- 不丢失日志.默认的,如果队列的80%已满,则会丢弃TRACT、DEBUG、INFO级别的日志 -->
        <discardingThreshold>0</discardingThreshold>
        <!-- 更改默认的队列的深度,该值会影响性能.默认值为256 -->
        <queueSize>512</queueSize>
        <!-- 添加附加的appender,最多只能添加一个 -->
        <appender-ref ref="FILE"/>
    </appender>


    <logger name="org.apache.ibatis.cache.decorators.LoggingCache" level="DEBUG" additivity="false">
        <appender-ref ref="CONSOLE"/>
    </logger>
    <logger name="org.springframework.boot" level="DEBUG"/>
    <root level="info">
        <!--<appender-ref ref="ASYNC"/>-->
        <appender-ref ref="FILE"/>
        <appender-ref ref="CONSOLE"/>
    </root>
</configuration>
1.2.3 创建模型类
在freemarker的测试工程下创建模型类型用于测试
package com.xuecheng.test.freemarker.model;

import lombok.Data;
import lombok.ToString;

import java.util.Date;
import java.util.List;

@Data
@ToString
public class Student {
    private String name;//姓名
    private int age;//年龄
    private Date birthday;//生日
    private Float mondy;//钱包
    private List<Student> friends;//朋友列表
    private Student bestFriend;//最好的朋友
}
1.2.3 创建模板
在 src/main/resources下创建templates,此目录为freemarker的默认模板存放目录。
在templates下创建模板文件test1.ftl,模板中的${name}最终会被freemarker替换成具体的数据。
<!DOCTYPE html>
<html>
<head>
    <meta charset="utf-8">
    <title>Hello World!</title>
</head>
<body>
Hello ${name}!
</body>
</html>
1.2.4 创建controller
创建Controller类,向Map中添加name,最后返回模板文件。
package com.xuecheng.test.freemarker.controller;

import org.springframework.beans.factory.annotation.Autowired;
import org.springframework.stereotype.Controller;
import org.springframework.web.bind.annotation.RequestMapping;
import org.springframework.web.client.RestTemplate;
import java.util.Map;

@RequestMapping("/freemarker")
@Controller
public class FreemarkerController {
    @Autowired
    RestTemplate restTemplate;

    @RequestMapping("/test1")
    public String freemarker(Map<String, Object> map){
        map.put("name","黑马程序员");
        //返回模板文件名称
        return "test1";
    }
}
1.2.5 创建启动类
@SpringBootApplication
public class FreemarkerTestApplication {
    public static void main(String[] args) {
        SpringApplication.run(FreemarkerTestApplication.class,args);
    }
}
1.2.6 测试
请求:http://localhost:8088/freemarker/test1
屏幕显示:Hello 黑马程序员!
1.3 FreeMarker基础
1.3.1 核心指令
1.3.1.1 数据模型
Freemarker静态化依赖数据模型和模板,下边定义数据模型:
下边方法形参map即为freemarker静态化所需要的数据模型,在map中填充数据:
    @RequestMapping("/test1")
    public String freemarker(Map<String, Object> map){
        //向数据模型放数据
        map.put("name","黑马程序员");
        Student stu1 = new Student();
        stu1.setName("小明");
        stu1.setAge(18);
        stu1.setMondy(1000.86f);
        stu1.setBirthday(new Date());
        Student stu2 = new Student();
        stu2.setName("小红");
        stu2.setMondy(200.1f);
        stu2.setAge(19);
//        stu2.setBirthday(new Date());
        List<Student> friends = new ArrayList<>();
        friends.add(stu1);
        stu2.setFriends(friends);
        stu2.setBestFriend(stu1);
        List<Student> stus = new ArrayList<>();
        stus.add(stu1);
        stus.add(stu2);
        //向数据模型放数据
        map.put("stus",stus);
        //准备map数据
        HashMap<String,Student> stuMap = new HashMap<>();
        stuMap.put("stu1",stu1);
        stuMap.put("stu2",stu2);
        //向数据模型放数据
        map.put("stu1",stu1);
        //向数据模型放数据
        map.put("stuMap",stuMap);
        //返回模板文件名称
        return "test1";
    }
1.3.1.2 List指令
本节定义freemarker模板,模板中使用freemarker的指令,关于freemarker的指令需要知道:
1、注释,即<#‐‐和‐‐>,介于其之间的内容会被freemarker忽略
2、插值(Interpolation):即${..}部分,freemarker会用真实的值代替${..}
3、FTL指令:和HTML标记类似,名字前加#予以区分,Freemarker会解析标签中的表达式或逻辑。
4、文本,仅文本信息,这些不是freemarker的注释、插值、FTL指令的内容会被freemarker忽略解析,直接输出内容。
在test1.ftl模板中使用list指令遍历数据模型中的数据:
<table>
    <tr>
        <td>序号</td>
        <td>姓名</td>
        <td>年龄</td>
        <td>钱包</td>
    </tr>
    <#list stus as stu>
        <tr>
            <td>${stu_index + 1}</td>
            <td <#if stu.name =='小明'>style="background:red;"</#if>>${stu.name}</td>
            <td>${stu.age}</td>
            <td >${stu.mondy}</td>
        </tr>
    </#list>

</table>
3、输出:
Hello 黑马程序员! 序号 姓名 年龄 钱包 1 小明 18 1,000.86 2 小红 19 200.1
说明:
_index:得到循环的下标,使用方法是在stu后边加"_index",它的值是从0开始
1.3.1.3 遍历Map数据
1、数据模型
使用map指令遍历数据模型中的stuMap。
2、模板
输出stu1的学生信息:<br/>
姓名:${stuMap['stu1'].name}<br/>
年龄:${stuMap['stu1'].age}<br/>
输出stu1的学生信息:<br/>
姓名:${stu1.name}<br/>
年龄:${stu1.age}<br/>
遍历输出两个学生信息:<br/>
<table>
    <tr>
        <td>序号</td>
        <td>姓名</td>
        <td>年龄</td>
        <td>钱包</td>
    </tr>
<#list stuMap?keys as k>
<tr>
    <td>${k_index + 1}</td>
    <td>${stuMap[k].name}</td>
    <td>${stuMap[k].age}</td>
    <td >${stuMap[k].mondy}</td>
</tr>
</#list>
</table>
3、输出
输出stu1的学生信息:
姓名:小明
年龄:18
输出stu1的学生信息:
姓名:小明
年龄:18
遍历输出两个学生信息:
序号 姓名 年龄 钱包
1 小红 19 200.1
2 小明 18 1,000.86
1.3.1.4 if指令
if 指令即判断指令,是常用的FTL指令,freemarker在解析时遇到if会进行判断,条件为真则输出if中间的内容,否则跳过内容不再输出。
1、数据模型:
使用list指令中测试数据模型。
2、模板:
<table>
    <tr>
        <td>序号</td>
        <td>姓名</td>
        <td>年龄</td>
        <td>钱包</td>
    </tr>
    <#list stus as stu>
        <tr>
            <td>${stu_index + 1}</td>
            <td <#if stu.name =='小明'>style="background:red;"</#if>>${stu.name}</td>
            <td>${stu.age}</td>
            <td >${stu.mondy}</td>
        </tr>
    </#list>

</table>
通过阅读上边的代码,实现的功能是:如果姓名为“小明”则背景色显示为红色。
3、输出:
通过测试发现 姓名为小明的背景色为红色。
1.3.2 其它指令
1.3.2.1 运算符
1、算数运算符 FreeMarker表达式中完全支持算术运算,FreeMarker支持的算术运算符包括:+, - , * , / , %
2、逻辑运算符 逻辑运算符有如下几个: 逻辑与:&& 逻辑或:|| 逻辑非:! 逻辑运算符只能作用于布尔值,否则将产生错误
3、比较运算符 表达式中支持的比较运算符有如下几个:
1 =或者==:判断两个值是否相等.
2 !=:判断两个值是否不等.
3 >或者gt:判断左边值是否大于右边值
4 >=或者gte:判断左边值是否大于等于右边值
5 <或者lt:判断左边值是否小于右边值
6 <=或者lte:判断左边值是否小于等于右边值
注意: =和!=可以用于字符串,数值和日期来比较是否相等,但=和!=两边必须是相同类型的值,否则会产生错误,而且FreeMarker是精确比较,“x”,"x ","X"是不等的。其它的运行符可以作用于数字和日期,但不能作用于字符串,大部分的时候,使用gt等字母运算符代替>会有更好的效果,因为FreeMarker会把>解释成FTL标签的结束字符,当然,也可以使用括号来避免这种情况,如:<#if (x>y)>。
1.3.2.2 空值处理
1、判断某变量是否存在使用 “??” 用法为:variable??,如果该变量存在,返回true,否则返回false
例:为防止stus为空报错可以加上判断如下:
<#if stus??>
<#list stus as stu>
......
</#list>
</#if>
2、缺失变量默认值使用 “!” 使用!要以指定一个默认值,当变量为空时显示默认值。
例: ${name!’’}表示如果name为空显示空字符串。
如果是嵌套对象则建议使用()括起来。
例: ${(stu.bestFriend.name)!’’}表示,如果stu或bestFriend或name为空默认显示空字符串。
1.3.2.3 内建函数
内建函数语法格式: 变量+?+函数名称
1、和到某个集合的大小
${集合名?size}
2、日期格式化
显示年月日: ${today?date}
显示时分秒:${today?time}
显示日期+时间:${today?datetime} <br>
自定义格式化: ${today?string("yyyy年MM月")}
3、内建函数c
map.put(“point”, 102920122);
point是数字型,使用 {point?c}`
4、将json字符串转成对象
一个例子:
其中用到了 assign标签,assign的作用是定义一个变量。
<#assign text="{'bank':'工商银行','account':'10101920201920212'}" />
<#assign data=text?eval />
开户行:${data.bank} 账号:${data.account}
1.3.2.4 完整的模板
上边测试的模板内容如下,可自行进行对照测试。
<!DOCTYPE html>
<html>
<head>
    <meta charset="utf-8">
    <title>Hello World!</title>
</head>
<body>
Hello ${name}!
<br/>
<table>
    <tr>
        <td>序号</td>
        <td>姓名</td>
        <td>年龄</td>
        <td>钱包</td>
    </tr>
    <#list stus as stu>
        <tr>
            <td>${stu_index + 1}</td>
            <td <#if stu.name =='小明'>style="background:red;"</#if>>${stu.name}</td>
            <td>${stu.age}</td>
            <td >${stu.mondy}</td>
        </tr>
    </#list>

</table>
<br/><br/>
输出stu1的学生信息:<br/>
姓名:${stuMap['stu1'].name}<br/>
年龄:${stuMap['stu1'].age}<br/>
输出stu1的学生信息:<br/>
姓名:${stu1.name}<br/>
年龄:${stu1.age}<br/>
遍历输出两个学生信息:<br/>
<table>
    <tr>
        <td>序号</td>
        <td>姓名</td>
        <td>年龄</td>
        <td>钱包</td>
    </tr>
<#list stuMap?keys as k>
<tr>
    <td>${k_index + 1}</td>
    <td>${stuMap[k].name}</td>
    <td>${stuMap[k].age}</td>
    <td >${stuMap[k].mondy}</td>
</tr>
</#list>
</table>
</br>
<table>
    <tr>
        <td>姓名</td>
        <td>年龄</td>
        <td>出生日期</td>
        <td>钱包</td>
        <td>最好的朋友</td>
        <td>朋友个数</td>
        <td>朋友列表</td>
    </tr>
    <#if stus??>
    <#list stus as stu>
        <tr>
            <td>${stu.name!''}</td>
            <td>${stu.age}</td>
            <td>${(stu.birthday?date)!''}</td>
            <td>${stu.mondy}</td>
            <td>${(stu.bestFriend.name)!''}</td>
            <td>${(stu.friends?size)!0}</td>
            <td>
                <#if stu.friends??>
                <#list stu.friends as firend>
                    ${firend.name!''}<br/>
                </#list>
                </#if>
            </td>
        </tr>
    </#list>
    </#if>

</table>
<br/>
<#assign text="{'bank':'工商银行','account':'10101920201920212'}" />
<#assign data=text?eval />
开户行:${data.bank}  账号:${data.account}

</body>
</html>
1.3.3 静态化测试
在cms中使用freemarker将页面生成html文件,本节测试html文件生成的方法:
1、使用模板文件静态化
定义模板文件,使用freemarker静态化程序生成html文件。
2、使用模板字符串静态化
定义模板字符串,使用freemarker静态化程序生成html文件。
1.3.3.1 使用模板文件静态化
在test下创建测试类,并且将main下的resource/templates拷贝到test下,本次测试使用之前我们在main下创建的模板文件。
package com.xuecheng.test.freemarker;

import com.xuecheng.test.freemarker.model.Student;
import freemarker.cache.StringTemplateLoader;
import freemarker.template.Configuration;
import freemarker.template.Template;
import freemarker.template.TemplateException;
import org.apache.commons.io.IOUtils;
import org.junit.Test;
import org.junit.runner.RunWith;
import org.springframework.boot.test.context.SpringBootTest;
import org.springframework.test.context.junit4.SpringRunner;
import org.springframework.ui.freemarker.FreeMarkerTemplateUtils;

import java.io.*;
import java.util.*;

@SpringBootTest
@RunWith(SpringRunner.class)
public class FreemarkerTest {

    //基于模板生成静态化文件
    @Test
    public void testGenerateHtml() throws IOException, TemplateException {
        //创建配置类
        Configuration configuration=new Configuration(Configuration.getVersion());
        String classpath = this.getClass().getResource("/").getPath();
        //设置模板路径
        configuration.setDirectoryForTemplateLoading(new File(classpath + "/templates/"));
        //设置字符集
        configuration.setDefaultEncoding("utf-8");
        //加载模板
        Template template = configuration.getTemplate("test1.ftl");
        //数据模型
        Map map = getMap();
        //静态化
        String content = FreeMarkerTemplateUtils.processTemplateIntoString(template, map);
        //静态化内容
        System.out.println(content);
        InputStream inputStream = IOUtils.toInputStream(content);
        //输出文件
        FileOutputStream fileOutputStream = new FileOutputStream(new File("d:/test1.html"));
        int copy = IOUtils.copy(inputStream, fileOutputStream);
        inputStream.close();
        fileOutputStream.close();
    }

    //数据模型
    private Map getMap(){
        Map<String, Object> map = new HashMap<>();
        //向数据模型放数据
        map.put("name","黑马程序员");
        Student stu1 = new Student();
        stu1.setName("小明");
        stu1.setAge(18);
        stu1.setMondy(1000.86f);
        stu1.setBirthday(new Date());
        Student stu2 = new Student();
        stu2.setName("小红");
        stu2.setMondy(200.1f);
        stu2.setAge(19);
//        stu2.setBirthday(new Date());
        List<Student> friends = new ArrayList<>();
        friends.add(stu1);
        stu2.setFriends(friends);
        stu2.setBestFriend(stu1);
        List<Student> stus = new ArrayList<>();
        stus.add(stu1);
        stus.add(stu2);
        //向数据模型放数据
        map.put("stus",stus);
        //准备map数据
        HashMap<String,Student> stuMap = new HashMap<>();
        stuMap.put("stu1",stu1);
        stuMap.put("stu2",stu2);
        //向数据模型放数据
        map.put("stu1",stu1);
        //向数据模型放数据
        map.put("stuMap",stuMap);
        return map;
    }
}
1.3.3.2 使用模板字符串静态化
package com.xuecheng.test.freemarker;

import com.xuecheng.test.freemarker.model.Student;
import freemarker.cache.StringTemplateLoader;
import freemarker.template.Configuration;
import freemarker.template.Template;
import freemarker.template.TemplateException;
import org.apache.commons.io.IOUtils;
import org.junit.Test;
import org.junit.runner.RunWith;
import org.springframework.boot.test.context.SpringBootTest;
import org.springframework.test.context.junit4.SpringRunner;
import org.springframework.ui.freemarker.FreeMarkerTemplateUtils;

import java.io.*;
import java.util.*;

@SpringBootTest
@RunWith(SpringRunner.class)
public class FreemarkerTest {

    //基于模板字符串生成静态化文件
    @Test
    public void testGenerateHtmlByString() throws IOException, TemplateException {
        //创建配置类
        Configuration configuration=new Configuration(Configuration.getVersion());
        //获取模板内容
        //模板内容,这里测试时使用简单的字符串作为模板
        String templateString="" +
                "<html>\n" +
                "    <head></head>\n" +
                "    <body>\n" +
                "    名称:${name}\n" +
                "    </body>\n" +
                "</html>";

        //加载模板
        //模板加载器
        StringTemplateLoader stringTemplateLoader = new StringTemplateLoader();
        stringTemplateLoader.putTemplate("template",templateString);
        configuration.setTemplateLoader(stringTemplateLoader);
        Template template = configuration.getTemplate("template","utf-8");

        //数据模型
        Map map = getMap();
        //静态化
        String content = FreeMarkerTemplateUtils.processTemplateIntoString(template, map);
        //静态化内容
        System.out.println(content);
        InputStream inputStream = IOUtils.toInputStream(content);
        //输出文件
        FileOutputStream fileOutputStream = new FileOutputStream(new File("d:/test1.html"));
        IOUtils.copy(inputStream, fileOutputStream);
    }

    //数据模型
    private Map getMap(){
        Map<String, Object> map = new HashMap<>();
        //向数据模型放数据
        map.put("name","黑马程序员");
        Student stu1 = new Student();
        stu1.setName("小明");
        stu1.setAge(18);
        stu1.setMondy(1000.86f);
        stu1.setBirthday(new Date());
        Student stu2 = new Student();
        stu2.setName("小红");
        stu2.setMondy(200.1f);
        stu2.setAge(19);
//        stu2.setBirthday(new Date());
        List<Student> friends = new ArrayList<>();
        friends.add(stu1);
        stu2.setFriends(friends);
        stu2.setBestFriend(stu1);
        List<Student> stus = new ArrayList<>();
        stus.add(stu1);
        stus.add(stu2);
        //向数据模型放数据
        map.put("stus",stus);
        //准备map数据
        HashMap<String,Student> stuMap = new HashMap<>();
        stuMap.put("stu1",stu1);
        stuMap.put("stu2",stu2);
        //向数据模型放数据
        map.put("stu1",stu1);
        //向数据模型放数据
        map.put("stuMap",stuMap);
        return map;
    }
}