Https分单向认证和双向认证
单向认证表现形式:网站URL链接为https://xxx.com格式
双向认证表现心事:网站URL链接为https://xxx.com格式,并且需要客户端浏览器安装一个client.pfx格式的证书文件才能打开网址
需求说明:假设需要实现本地环境newdefend.com域名双向认证。单向认证,直接忽略本文中黄色底的操作步骤即可。也不需要生成和安装客户端证书:client.pfx
参考网址:http://blog.163.com/hr_php/blog/static/235853083201503011428985/
安装环境:Wampserver集成安装包;window7系统。
第一步:cmd进入apache的bin目录。eg:D:\wamp5.3\bin\apache\Apache2.2.21\bin
指明配置文件
|
1
|
set
OPENSSL_CONF=../conf/openssl.cnf
|
配置参考(不需要手动去改这个文件的内容,这里只是贴出代码,提供参考。下面建立文件夹,主要就是从这里看的):

dir        = ./demoCA # Where everything is kept
certs        = $dir/certs        # Where the issued certs are kept
crl_dir        = $dir/crl        # Where the issued crl are kept
database    = $dir/index.txt    # database index file.
# several ctificates with same subject.
new_certs_dir    = $dir/newcerts        # default place for new certs.

certificate    = $dir/cacert.pem     # The CA certificate
serial        = $dir/serial         # The current serial number
crlnumber    = $dir/crlnumber    # the current crl number
# must be commented out to leave a V1 CRL
crl        = $dir/crl.pem         # The current CRL
private_key    = $dir/private/cakey.pem# The private key
RANDFILE    = $dir/private/.rand    # private random number file
新建一些目录和文件。创建目录的原因:由于配置文件openssl.cnf里面会用到这些目录或者文件,继续下面的命令时,会操作这些目录和文件
在apache/bin目录创建如下文件夹
demoCA/newcerts/
demoCA/private/
创建如下文件
demoCA/index.txt
demoCA/serial   //内容写 2个(0-9,A-F)的字符即可,如1A
第二步:生成需要的私钥key
|
1
2
3
|
openssl genrsa > root.key
// 生成根密钥
openssl genrsa > server.key
// 生成服务端密钥
openssl genrsa > client.key
// 生成客户端密钥
|
第三步:生成自签名的根证书
|
1
|
openssl req -x509 -
new
-key root.key >root.crt
|
说明:-new 生成一个新的文件 -key filename 参数filename指明我们的私有密钥文件名 -x509 将产生自签名的证书,一般用来测试用,或者自己玩下做个Root CA.证书的扩展在config文件里面指定
第四步:生成服务端,客户端签名请求文件。
|
1
2
|
openssl req -
new
-key server.key -
out
server.csr
openssl req -
new
-key client.key -
out
client.csr
//此处可能会有错误信息,请看下面的错误解决方案
|
说明:按提示输入一系列的参数 CN - SH - SH - '' - '' - 域名/IP 。除了Common Name处填写域名/ip需要特别注意,国家地区填写“中国CN上海SH”。其余地方可以为空
Country Name (2 letter code) [AU]:CNISO国家代码(只支持两位字符)
State or Province Name (full name) [Some-State]:ZJ所在省份
Locality Name (eg, city) []:HZ所在城市
Organization Name (eg, company):THS公司名称
Organizational Unit Name (eg, section) []:THS组织名称
Common Name (eg, YOUR name) []:localhost(申请证书的域名或IP地址)
Email Address []:[email protected]管理员邮箱
Please enter the following 'extra' attributes
to be sent with your certificate request
A challenge password []:交换密钥
An optional company name []:
提示:错误解决方案(出现在最开始创建的那堆文件里)
//错误提示
Sign the certificate? [y/n]:y
failed to update database
TXT_DB error number 2

//产生的原因是:
This thing happens when certificates share common data. You cannot have two
certificates that look otherwise the same.

//解决办法
//方法一:
    修改demoCA下 index.txt.attr
    unique_subject = yes  为  unique_subject = no
//方法二:
    删除demoCA下的index.txt里面的内容
//方法三:
    将 common name设置成不同的
第五步:使用根证书为服务端及客户端签名
openssl ca -in server.csr -cert root.crt -keyfile root.key -out server.crt
openssl ca -in client.csr -cert root.crt -keyfile root.key -out client.crt
说明:-in filename要签名的csr文件 -cert CA本身的证书文件名 -keyfile CA自己的私有密钥文件 -out filename签名后的证书文件名。证书的细节也会给写进去
第六步:配置openssl.cnf,创建文件路径,生成所需cakey.pem(CA的key文件)和cacert.pem(CA的crt文件)文件
openssl genrsa -out demoCA/private/cakey.pem 2048
openssl req -out demoCA/cacert.pem   -x509 -new -key demoCA/private/cakey.pem
第七步:客户端证书转成pfx格式,生成后,直接双击文件安装到浏览器 (重要)
openssl pkcs12 -export -clcerts -in client.crt -inkey client.key -out client.pfx
注意:这个时候填写的密码,是客户安装证书的时候,需要填写的密码。密码可以为空
到此openssl相关的证书文件就结束了
第八步:配置apache目录httpd.conf文件
LoadModule ssl_module modules/mod_ssl.so
Include conf/extra/httpd-ssl.conf
第九步:配置httpd-ssl.conf。说明:如果apache下有多个站点,还要配置http-vhosts.conf
SSLSessionCache        "shmcb:D:/wamp/bin/apache/apache2.4.9/logs/ssl_scache(512000)"
<VirtualHost _default_:443>

    DocumentRoot "D:/wamp/www"
    ServerName  localhost

    SSLEngine on
    SSLCertificateFile "D:/wamp/bin/apache/apache2.4.9/bin/server.crt"
    SSLCertificateKeyFile "D:/wamp/bin/apache/apache2.4.9/bin/server.key"

   # 如果是单向认证,下面3行注释掉
    SSLCACertificateFile "D:/wamp/bin/apache/apache2.4.9/bin/root.crt"
    SSLVerifyClient require
    SSLVerifyDepth  1

    CustomLog "D:/wamp/bin/apache/apache2.4.9/logs/ssl_request.log" \
              "%t %h %{SSL_PROTOCOL}x %{SSL_CIPHER}x \"%r\" %b"

</VirtualHost>
http-vhosts.conf
<VirtualHost *:80>
    DocumentRoot "D:/wamp/www/www.newdefend.com"
    ServerName my.newdefend.com
</VirtualHost>
<VirtualHost *:443>
    DocumentRoot "D:/wamp/www/www.newdefend.com"
    ServerName my.newdefend.com
    ErrorLog "D:/wamp/www/logs/error.log"
    TransferLog "D:/wamp/www/logs/access.log"

    SSLEngine on
    SSLCertificateFile "D:/wamp/bin/apache/apache2.4.9/bin/server.crt"
    SSLCertificateKeyFile "D:/wamp/bin/apache/apache2.4.9/bin/server.key"

    # 如果是单向认证,下面3行注释掉
    SSLCACertificateFile "D:/wamp/bin/apache/apache2.4.9/bin/root.crt"
    SSLVerifyClient require
    SSLVerifyDepth  10
</VirtualHost>
重启wamp
双向认证效果展示:
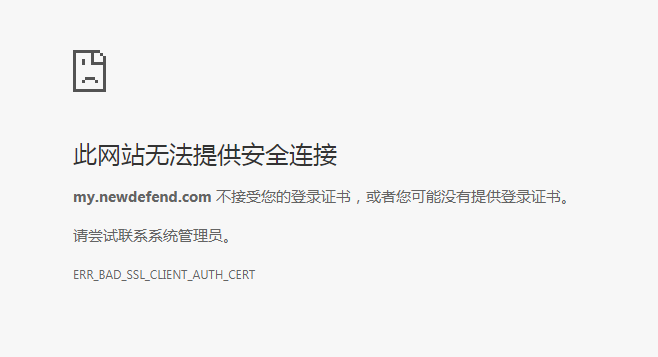
下图表示:client.pfx文件还没有在电脑上安装,请双击安装
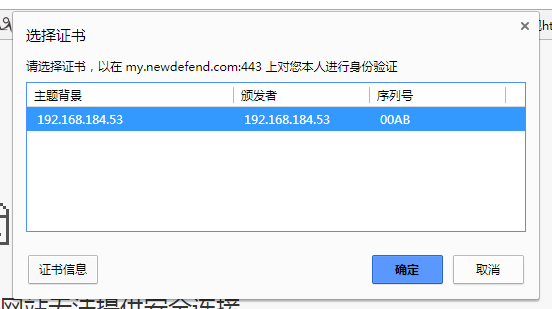
下图表示:client.pfx已经安装,客户端打开时,需要选择证书
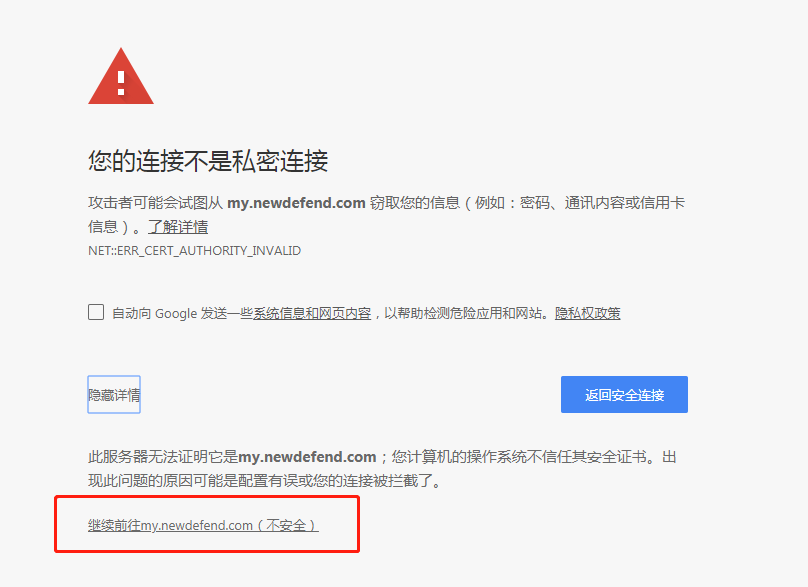
下图表示:成功,直接访问即可。因为是本地生成的证书,所以不被浏览器信任。真是上线的时候,找个权威的CA机构就不会出现这种情况了
最后:查看电脑上已经安装了那些证书,请参考:https://jingyan.baidu.com/article/c275f6baf8622ae33d756794.html
效果展示如下:192.168.184.53就是我自己生成的证书
