本环境在虚拟机进行,先测试在上线。
主机:192.168.161.179
从机:192.168.161.180
1、 安装主redis
自己本地环境,关闭防火墙。
#sed -i 's/SELINUX=enforcing/SELINUX=disabled/g' /etc/selinux/config
#setenforce 0
#systemctl stop firewalld
#systemctl disable firewalld
安装相关依赖
yum install –y gcc gcc-c++ make
下载redis4.0.2包
http://download.redis.io/releases/redis-4.0.2.tar.gz
下载好后上传至服务器,进行解压(我上传至opt目录)

解压后编译安装
cd redis-4.0.2/
make PREFIX=/usr/local/redis install

将redis-4.0.2目录的redis.conf sentinel.conf配置文件复制到安装目录/usr/local/redis

将redis-4.0.2/src目录的redis-cli redis-sentinel redis-server复制到安装目录 /usr/local/redis/

修改配置
cd /usr/local/redis
Vim redis.conf
修改内容如下:
将bind 127.0.0.1这一行注释掉
将protected-mode yes改为protected-mode no
将daemonize no改为daemonize yes
将logfile ""改为logfile"/var/log/redis.log"
Vim sentinel.conf
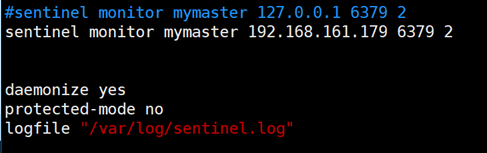
将sentinel monitor mymaster 127.0.0.1 6379 2改为sentinel monitor mymaster 192.168.161.179 6379 2
添加一下几行
daemonize yes
protected-mode no
logfile "/var/log/sentinel.log"

1、 配置redis从
安装的方法及路径与redis1主一样
复制redis配置文件
cp redis.conf sentinel.conf /usr/local/redis/

cp redis-cli redis-sentinel redis-server /usr/local/redis/

cd /usr/local/redis/
vim redis.conf
修改内容如下:
将bind 127.0.0.1注释掉
将protected-mode yes改为protected-mode no
将daemonize no改为daemonize yes
将logfile ""改为logfile "/var/log/redis.log"
添加一行slaveof 192.168.161.179 6379 (主服务器ip)

修改sentinel.conf
修改内容如下:
192.168.161,179是主服务器ip
sentinel monitor mymaster 192.168.161.179 6379 2
daemonize yes
protected-mode no
logfile "/var/log/sentinel.log"
复制从文件在从机配置两台从,需要修改端口,默认端口为6379,但是在同一台服务器搭建两台,则需要改变端口。
cp redis.conf redis6380.conf
vim redis6380.conf
将port 6379改为port 6380
将pidfile /var/run/redis_6379.pid改为pidfile /var/run/redis_6380.pid
将logfile "/var/log/redis.log"改为logfile "/var/log/redis6380.log"
cp sentinel.conf sentinel26380.conf
vim sentinel26380.conf
将port 26379改为port 26380
将logfile "/var/log/sentinel.log"改为logfile "/var/log/sentinel26380.log"
3、 启动主机

启动从机,6380为从机2,
登陆时./redis-cli 进入的6379从redis 需要进入6380redis,加个端口就ok
./redis-cli 6380

1、 测试
主机上设置一个键值对
#set a 1

在从主机6379端口获取
#get a

测试从主机
#quit
#./redis-cli –p 6380
#get a

从主机测试
#set b 2 (报错因为从机是只读)

1、 测试主从切换
模拟主挂了,关闭主
Ps –ef | grep redis
Kill -9 2074
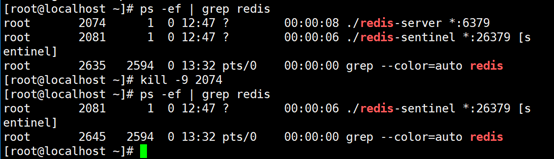
登陆从机6380端口查看


切换为master了。
在启动主redis查看
Cd /usr/local/redis
./redis-server ./redis.conf
./redis-sentinel ./sentinel.conf
./redis-cli
输入info

原来的主现在变为了从,说明主从配置成功

如需设置主从带密码参考文档