1. 背景
因为项目需要,需要把我在一个A盒子上写的Launcher App,移植到B盒子上,唯一的要求就是快。
A盒子和B盒子都是1080PUI.
2. 遇到问题And找解决方法
我简单挪过去了后发现,屏幕显示不对,经过我自己分析,发现,A盒子上1dp=2px,而B盒子上1dp=1.5px,
我们做Android的都知道,densityDpi/160就是dp和px的比例,也就是density。而在Android里得到density:
density=context.getResources().getDisplayMetrics().density;于是我就查看源码:
/**
     * Return the current display metrics that are in effect for this resource
     * object.  The returned object should be treated as read-only.
     *
     * @return The resource's current display metrics.
     */
    public DisplayMetrics getDisplayMetrics() {
        return mResourcesImpl.getDisplayMetrics();
    }
再往里跟
DisplayMetrics getDisplayMetrics() {
        if (DEBUG_CONFIG) Slog.v(TAG, "Returning DisplayMetrics: " + mMetrics.widthPixels
                + "x" + mMetrics.heightPixels + " " + mMetrics.density);
        return mMetrics;
    }
发现了直接返回的是mMetrics,而mMetrics是如何初始画的呢,发现:
private final DisplayMetrics mMetrics = new DisplayMetrics();继续跟进去:
 public void setToDefaults() {
        widthPixels = 0;
        heightPixels = 0;
        density =  DENSITY_DEVICE / (float) DENSITY_DEFAULT;
        densityDpi =  DENSITY_DEVICE;
        scaledDensity = density;
        xdpi = DENSITY_DEVICE;
        ydpi = DENSITY_DEVICE;
        noncompatWidthPixels = widthPixels;
        noncompatHeightPixels = heightPixels;
        noncompatDensity = density;
        noncompatDensityDpi = densityDpi;
        noncompatScaledDensity = scaledDensity;
        noncompatXdpi = xdpi;
        noncompatYdpi = ydpi;
    }
以上是DisplayMetrics.java中的代码,随便说一句,是Android 7.0的
仔细看
densityDpi = DENSITY_DEVICE;而
public static int DENSITY_DEVICE = getDeviceDensity();private static int getDeviceDensity() {
// qemu.sf.lcd_density can be used to override ro.sf.lcd_density
// when running in the emulator, allowing for dynamic configurations.
// The reason for this is that ro.sf.lcd_density is write-once and is
// set by the init process when it parses build.prop before anything else.
return SystemProperties.getInt("qemu.sf.lcd_density",
SystemProperties.getInt("ro.sf.lcd_density", DENSITY_DEFAULT));
}看到这里,我们知道了,我只要把属性ro.sf.lcd_density改成320就完全不需要修改任何代码,我们的Launcher就能适配到B盒子上。
3. 解决
这里有两总解决方案,第一种,adb shell进去 wm density 320 搞定。
第二种,改Physical density
通过2阶段的分析,我们知道,我们只要把ro.sf.lcd_density 改了就可以
所以我们adb shell进去
然后 getprop |grep density
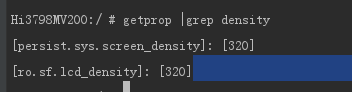
(这里显示的320是我已经改过的。改之前是240)
当时一看,两个值都是240,所以我就吧system/build.prop 拿出来,修改了ro.sf.lcd_density 的值,然后adb remount
然后 adb push 把build.prop放回到原来位置。使用setprop persist.sys.screen_density 320 命令把persist.sys.screen_density也改
成了320, 然后 sync 。reboot
机器重启后,发现界面果然正常了,但是竟然出现了虚拟Home键。

而我们知道在build.prop中qemu.hw.mainkeys属性为0表示打开虚拟见,而为1表示隐藏虚拟键,所以在此把/system/build.prop拿出来,改了这个属性值,重启机器。Ok。解决。

已经没有了虚拟按键