参考:http://www.zuidaima.com/share/1751859714182144.htm
SpringMVC框架介绍
Spring框架提供了构造Web应用程序的全能MVC模块。Spring MVC分离了控制器、模型对象、分派器以及处理程序对象的角色,这种分离让它们更容易进行制定。是一个标准的MVC框架。
SpringMVC框架图
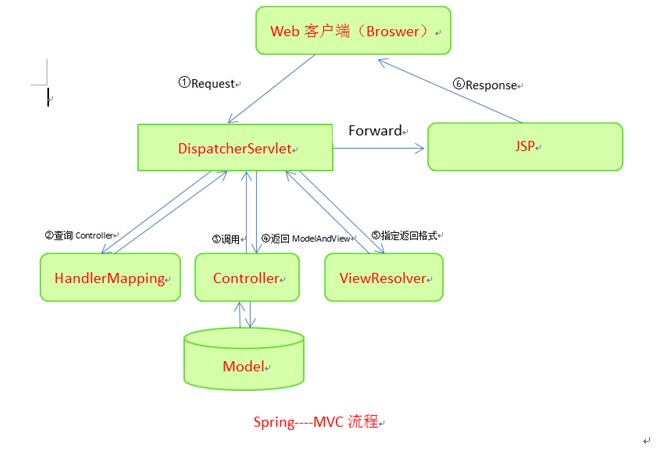
那你猜一猜哪一部分应该是哪一部分?
SpringMVC接口解释
DispatcherServlet接口:
Spring提供的前端控制器,所有的请求都有经过它来统一分发。在DispatcherServlet将请求分发给Spring Controller之前,需要借助于Spring提供的HandlerMapping定位到具体的Controller。
HandlerMapping接口:
能够完成客户请求到Controller映射。
Controller接口:
需要为并发用户处理上述请求,因此实现Controller接口时,必须保证线程安全并且可重用。Controller将处理用户请求,这和Struts Action扮演的角色是一致的。一旦Controller处理完用户请求,则返回ModelAndView对象给DispatcherServlet前端控制器,ModelAndView中包含了模型(Model)和视图(View)。从宏观角度考虑,DispatcherServlet是整个Web应用的控制器;从微观考虑,Controller是单个Http请求处理过程中的控制器,而ModelAndView是Http请求过程中返回的模型(Model)和视图(View)。
ViewResolver接口:
Spring提供的视图解析器(ViewResolver)在Web应用中查找View对象,从而将相应结果渲染给客户。
SpringMVC运行原理
1. 客户端请求提交到DispatcherServlet
2. 由DispatcherServlet控制器查询一个或多个HandlerMapping,找到处理请求的Controller
3. DispatcherServlet将请求提交到Controller
4. Controller调用业务逻辑处理后,返回ModelAndView
5. DispatcherServlet查询一个或多个ViewResoler视图解析器,找到ModelAndView指定的视图
6. 视图负责将结果显示到客户端
SpringMVC运行实例
1.Account 实体类
package com.pb.entity;

public class Account {

	private String cardNo;
	private String password;
	private float balance;

	public String getCardNo() {
		return cardNo;
	}

	public void setCardNo(String cardNo) {
		this.cardNo = cardNo;
	}

	public String getPassword() {
		return password;
	}

	public void setPassword(String password) {
		this.password = password;
	}

	public float getBalance() {
		return balance;
	}

	public void setBalance(float balance) {
		this.balance = balance;
	}

}
2. LoginController类:
package com.pb.web.controller;

import java.util.HashMap;
import java.util.Map;
import javax.servlet.http.HttpServletRequest;
import javax.servlet.http.HttpServletResponse;
import org.springframework.web.servlet.ModelAndView;
import org.springframework.web.servlet.mvc.AbstractController;
import com.pb.entity.Account;

public class LoginController extends AbstractController {
   /*这两个字段名不能随便瞎取,必须与SpringMVC的配置文件中的Controller的property保持一致,如下图
     <bean id="loginController" class="com.pb.web.controller.LoginController">
		<property name="successView" value="showAccount"></property>
		<property name="failView" value="login"></property>
    </bean>
  */
    private String successView;
    private String failView;
    @Override
    protected ModelAndView handleRequestInternal(HttpServletRequest request,
            HttpServletResponse response) throws Exception {

        // TODO Auto-generated method stub
        String cardNo=request.getParameter("cardNo");
        String password=request.getParameter("password");
        Account account =getAccount(cardNo,password);
        Map<String ,Object> model=new HashMap<String,Object>();

        if(account !=null){
            model.put("account", account);
            return new ModelAndView(getSuccessView(),model);
        }else{
            model.put("error", "卡号和密码不正确");
            return new ModelAndView(getFailView(),model);
        }

    }
    //本应该这个方法写在模型层,这地方直接给放在了逻辑层这个地方偷懒了。
    public Account getAccount(String cardNo,String password){

        if(cardNo.equals("123")&&password.equals("123")){

            Account account =new Account();
            account.setCardNo(cardNo);
            account.setBalance(88.8f);
            return account;

        }else{

            return null;

        }

    }

    public String getSuccessView() {
        return successView;
    }

    public void setSuccessView(String successView) {
        this.successView = successView;
    }

    public String getFailView() {
        return failView;
    }

    public void setFailView(String failView) {
        this.failView = failView;
    }

}
说明:

web.xml配置
<?xml version="1.0" encoding="UTF-8"?>
<web-app xmlns:xsi="http://www.w3.org/2001/XMLSchema-instance"
	xmlns="http://java.sun.com/xml/ns/javaee"
	xsi:schemaLocation="http://java.sun.com/xml/ns/javaee http://java.sun.com/xml/ns/javaee/web-app_2_5.xsd"
	id="WebApp_ID" version="2.5">
	<display-name>SpringMVCDemo</display-name>
	<welcome-file-list>
		<welcome-file>index.jsp</welcome-file>
	</welcome-file-list>

	<servlet>
		<servlet-name>dispatcher</servlet-name>
		<servlet-class>org.springframework.web.servlet.DispatcherServlet</servlet-class>
		<!-- spring mvc配置文件名称,默认名称为dispatcher-servlet.xml。如果更名后,需要在这里配置。如果是将springmvc的配置文件更名为applicationContext.xml后配置情况
		<init-param>
			<param-name>contextConfigLocation</param-name>
			<param-value>classpath:applicationContext.xml</param-value>
		</init-param>
		 -->
	</servlet>

	<servlet-mapping>
		<servlet-name>dispatcher</servlet-name>
		<url-pattern>*.do</url-pattern>
	</servlet-mapping>
</web-app>
编写springmvc配置文件,在WEB-INF目录下面建立dispatcher-servlet.xml文件
说明:DispatcherServlet默认加载的是WEB-INF目录下dispatcher-servlet.xml文件,但是也可以替换成其它的名字(比如:applicationContext.xml)。这样的话就需要在web.xml中做额外的配置了
<?xml version="1.0" encoding="UTF-8"?>
<beans xmlns="http://www.springframework.org/schema/beans"
     xmlns:xsi="http://www.w3.org/2001/XMLSchema-instance"
     xmlns:aop="http://www.springframework.org/schema/aop"
     xmlns:tx="http://www.springframework.org/schema/tx"
     xsi:schemaLocation="
     http://www.springframework.org/schema/beans
     http://www.springframework.org/schema/beans/spring-beans.xsd
     http://www.springframework.org/schema/tx
     http://www.springframework.org/schema/tx/spring-tx.xsd
     http://www.springframework.org/schema/aop
     http://www.springframework.org/schema/aop/spring-aop.xsd">

	<bean id="urlMapping"
		class="org.springframework.web.servlet.handler.SimpleUrlHandlerMapping">
		<property name="mappings">
			<props>
				<prop key="/login.do">loginController</prop>
			</props>
		</property>
	</bean>

	<bean id="loginController" class="com.pb.web.controller.LoginController">
		<property name="successView" value="showAccount"></property>
		<property name="failView" value="login"></property>
	</bean>


	<bean id="viewResolver"
		class="org.springframework.web.servlet.view.InternalResourceViewResolver">
		<property name="prefix" value="/"></property>
		<property name="suffix" value=".jsp"></property>
	</bean>

</beans>
Login.jsp页面
<%@ page language="java" contentType="text/html; charset=UTF-8"
	pageEncoding="UTF-8"%>
<!DOCTYPE html PUBLIC "-//W3C//DTD HTML 4. Transitional//EN" "http://www.w3.org/TR/html4/loose.dtd">
<html>
<head>
<meta http-equiv="Content-Type" content="text/html; charset=GB0">
<title>Insert title here</title>
</head>
<body>
	${error }
	<form action="login.do" method="post">
		账号登陆<br>
		<hr>
		卡号:<input type="text" name="cardNo"><br>
		密码:<input type="text" name="password"><br>
		<input type="submit" value="登陆">
	</form>
</body>
</html>
showAccount.jsp页面
<%@ page language="java" contentType="text/html; charset=UTF-8"
	pageEncoding="UTF-8"%>
<!DOCTYPE html PUBLIC "-//W3C//DTD HTML 4.01 Transitional//EN" "http://www.w3.org/TR/html4/loose.dtd">
<html>
<head>
<meta http-equiv="Content-Type" content="text/html; charset=GB0">
<title>Insert title here</title>
</head>

<body>

	账户信息
	<br> 卡号:${account.cardNo }
	<br> 密码:${account.password }
	<br> 钱数:${account.balance }
	<br>

	<h1>${user.username }</h1>
	<h2>${user.password }</h2>

</body>
</html>