python实现JWT
一、常见的几种实现认证的方法
1.1basic auth
1.2cookie
1.3token
json web token--一种基于token的json格式web认证方法。基本原理是,第一次认证通过用户名和面膜,服务端签发一个json格式的token,后续客户端的请求都带着这个token,服务端仅需要解析这个token,来判断客户端的身份和合法性。jwt协议只是规范了这个协议的格式,分为三个部分
1.3.1header头部
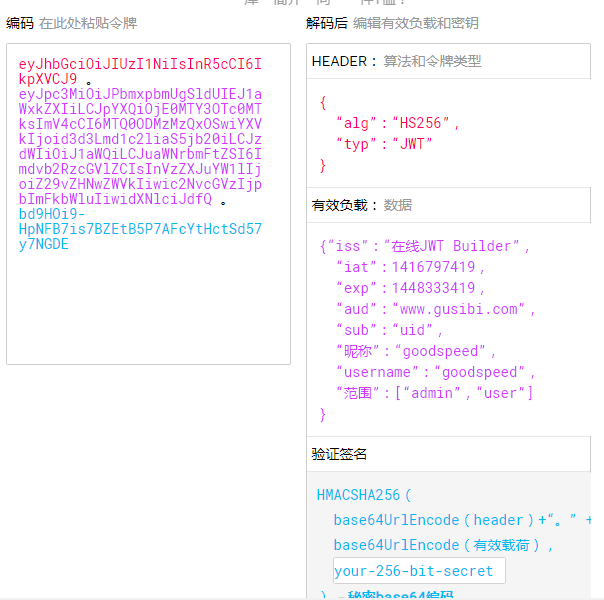
{
    'type':'JWT',   #声名类型,这里是JWT
    'alg':'HS256'  #声名加密的算法,通常为 HMAC  SHA256
}
再将其解析base64编码
1.3.2payload载荷
payload是放置实际有效信息的地方。jwt定义了几种内容,包括:

  标准中注册的声明,如签发者,接收者,有效时间(exp),时间戳(iat,issued at)等;为官方建议但非必须
  公共声明
  私有声明
#一个常见的payload
{
    'user_id':12345,
    'user_role':admin,
    'iat':14234234
}
// 包括需要传递的用户信息;
{ "iss": "Online JWT Builder",       #该JWT的签发者,是否使用是可选的;
  "iat": 1416797419,                #在什么时候签发的(UNIX时间),是否使用是可选的;
  "exp": 1448333419,                #什么时候过期,这里是一个Unix时间戳,是否使用是可选的;
  "aud": "www.gusibi.com",           #接收该JWT的一方,是否使用是可选的;
  "sub": "uid",                        #该JWT所面向的用户,是否使用是可选的;
  "nickname": "goodspeed",
  "username": "goodspeed",
  "scopes": [ "admin", "user" ]
}
1.3.3signature
原理
// 根据alg算法与私有秘钥进行加密得到的签名字串;
// 这一段是最重要的敏感信息,只能在服务端解密;
HMACSHA256(
    base64UrlEncode(header) + "." +
    base64UrlEncode(payload),
    SECREATE_KEY
)
第三部分是个签证信息,有三部分组成:
header(base64后的)
payload(base64后的)
secret

存储了序列化的secreate key和salt key。这个部分需要base64加密后的header和base64加密后的payload使用.连接组成的字符串,
然后通过header中声明的加密方式进行加盐secret组合加密,然后就构成了jwt的第三部分。
示例图:
二、认证需求
目标场景是一个前后端分离的后端系统,用于运维工作,虽在内网使用,也有一定的保密性要求
    API为restful+json的无状态接口,要求认证也是相同模式
    可横向扩展
    较低数据库压力
    证书可注销
    证书可自动延期
这样就选择JWT
三、JWT实现
如何生成token


import jwt
import time

# 使用 sanic 作为restful api 框架
def create_token(request):
    grant_type = request.json.get('grant_type')
    username = request.json['username']
    password = request.json['password']
    if grant_type == 'password':
        account = verify_password(username, password)
    elif grant_type == 'wxapp':
        account = verify_wxapp(username, password)
    if not account:
        return {}
    payload = {
        "iss": "gusibi.com",
         "iat": int(time.time()),
         "exp": int(time.time()) + 86400 * 7,
         "aud": "www.gusibi.com",
         "sub": account['_id'],
         "username": account['username'],
         "scopes": ['open']
    }
    token = jwt.encode(payload, 'secret', algorithm='HS256')
    return True, {'access_token': token, 'account_id': account['_id']}


def verify_bearer_token(token):
    #  如果在生成token的时候使用了aud参数,那么校验的时候也需要添加此参数
    payload = jwt.decode(token, 'secret', audience='www.gusibi.com', algorithms=['HS256'])
    if payload:
        return True, token
    return False, token
如何解析token
四、优化
总结
我们做了一个JWT的认证模块:
(access token在以下代码中为'token',refresh token在代码中为'rftoken')

首次认证
client -----用户名密码-----------> server

client <------token、rftoken----- server

access token存续期内的请求
client ------请求(携带token)----> server

client <-----结果----------------- server

access token超时
client ------请求(携带token)----> server

client <-----msg:token expired--- server

重新申请access token
client -请求新token(携带rftoken)-> server

client <-----新token-------------- server

rftoken token超时
client -请求新token(携带rftoken)-> server

client <----msg:rftoken expired--- server

如果设计一个针对此认证的前端,需要:

存储access token、refresh token

访问时携带access token,自动检查access token超时,超时则使用refresh token更新access token;状态延期用户无感知

用户登出直接抛弃access token与refresh token