实验环境
redhat6.5
iptables和selinux关闭
| 主机名 | 角色 | ip |
|---|---|---|
| server1 | master服务端 | 172.25.35.51 |
| server2 | minion客户端 | 172.25.35.52 |
| server3 | minion客户端 | 172.25.35.53 |
配置yum源
1、下载rhel6安装包到物理机的/var/www/html下
2、修改yum源:
[root@server1 ~]# vim /etc/yum.repos.d/rhel-source.repo
[rhel-source]
name=Red Hat Enterprise Linux $releasever - $basearch - Source
baseurl=http://172.25.35.250/rhel6.5
enabled=1
gpgcheck=1
gpgkey=file:///etc/pki/rpm-gpg/RPM-GPG-KEY-redhat-release

[salt]
name=saltstack
baseurl=http://172.25.35.250/rhel6
gpgcheck=0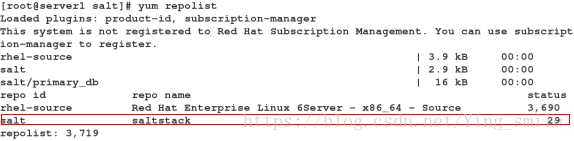
安装配置saltstack
1、安装
server1:
[root@server1 ~]# yum install salt-master -y
[root@server1 ~]# /etc/init.d/salt-master start

server2:
[root@server2 ~]# yum install salt-minion -y
[root@server2 ~]# cd /etc/salt/
[root@server2 salt]# vim minion
17 master: 172.25.35.51    //如果有解析可以用主机名,注意冒号后面有空格
[root@server2 salt]# /etc/init.d/salt-minion start
2、交换公钥
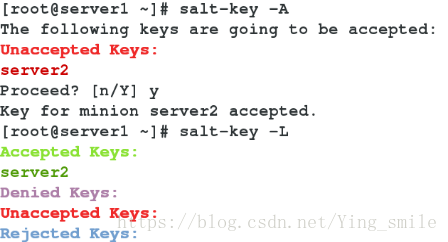
3、查看服务是否开启

4、检测salt服务:
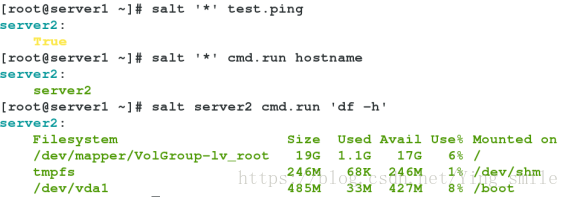
5、查看信息:
yum install tree -y
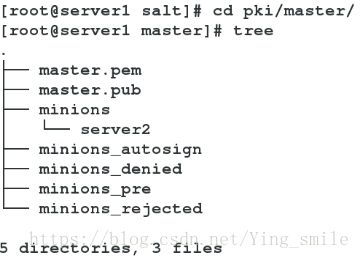
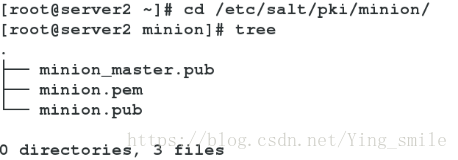
6、查看公钥存放
server1:
[root@server1 master]# md5sum master.pub
19714df7eb91538aa9bb71ff783d4b8d  master.pub
[root@server1 master]# cd minions
[root@server1 minions]# md5sum server2
4d90fe8b74f379f7a3af1c3a5b2a54a6  server2

server2:
[root@server2 minion]# md5sum minion_master.pub
19714df7eb91538aa9bb71ff783d4b8d  minion_master.pub
[root@server2 minion]# md5sum minion.pub
4d90fe8b74f379f7a3af1c3a5b2a54a6  minion.pub
7、查看端口运行情况
servre1和server2有订阅的长连接

8、查看python端口进程
[root@server1 master]# yum install python-setproctitle.x86_64 -y
[root@server1 master]# /etc/init.d/salt-master restart
[root@server1 master]# ps ax  //进程如下图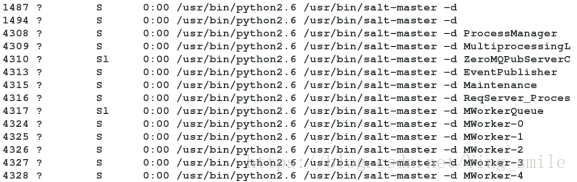
部署安装apache && 开启apache服务
Server1:
[root@server1 master]#  vim /etc/salt/master //文件里面不能使用Tab,直接用空格键
 534 file_roots:
 535   base:
 536     - /srv/salt
[root@server1 master]# ls /srv
[root@server1 master]# mkdir /srv/salt
[root@server1 master]# /etc/init.d/salt-master restart
[root@server1 master]# cd /srv/salt/
[root@server1 salt]# mkdir httpd
[root@server1 salt]# cd httpd
[root@server1 httpd]# vim apache.sls  //部署脚本,文件里面不能使用Tab,直接用空格键

apache-install:
  pkg.installed:         //调用pkg模块里面的installed方法
    - pkgs:
      - httpd
      - php
  service.running:
    - name: httpd
    - enable: True
- reload: True
[root@server1 httpd]# salt server2 state.sls httpd.install  //调用httpd下的install.sls文件

Server2:
[root@server2 minion]#  netstat -antlp | grep 80
tcp        0      0 :::80                       :::*                        LISTEN      4261/httpd
[root@server2 minion]# chkconfig --list httpd
httpd           0:off   1:off   2:on    3:on    4:on    5:on    6:off
部署安装apache&修改端口&开启服务
server1:
[root@server1 httpd]# vim install.sls
apache-install:
  pkg.installed:
    - pkgs:
      - httpd
      - php
  file.managed:
    - name: /etc/httpd/conf/httpd.conf
    - source: salt://httpd/files/httpd.conf
    - mode: 644        //控制权限为664
    - user: root        //控制用户为root
  service.running:
    - name: httpd
    - enable: True
    - reload: True
    - watch:
      - file: apache-install
[root@server1 httpd]# mkdir files

server2:
[root@server2 minion]# scp /etc/httpd/conf/httpd.conf server1:/srv/salt/httpd/files/     //传文件给server1

[root@server1 files]# ll
total 36
-rw-r--r-- 1 root root 34418 Aug 17 02:53 httpd.conf
[root@server1 files]# salt server2 state.sls httpd.install


[root@server2 minion]#  netstat -antlp | grep 80  //端口已经修改
tcp        0      0 :::80                    :::*                        LISTEN      4261/httpd

第二种写法:
[root@server1 httpd]# vim apache.sls
httpd:
  pkg.installed
php:
  pkg.installed
apache:
  service.running:
    - name: httpd
    - enable: True
    - reload: True
    - watch:
      - file: /etc/httpd/conf/httpd.conf
/etc/httpd/conf/httpd.conf:
  file.managed:
    - source: salt://httpd/files/httpd.conf
    - mode: 644
    - user: root
[root@server1 httpd]# salt server2 state.sls httpd.apache
原码编译nginx
server3与server2配置相同
server1:
[root@server1 httpd]# cd ..
[root@server1 salt]# mkdir nginx
[root@server1 salt]# cd nginx
[root@server1 nginx]# mkdir files
[root@server1 files]# ls
nginx-1.8.1.tar.gz
[root@server1 files]# cd ..
[root@server1 nginx]# vim install.sls
nginx-install:
  pkg.installed:
    - pkgs:
      - gcc
      - pcre-devel
      - openssl-devel

  file.managed:
    - name: /mnt/nginx-1.8.1.tar.gz
    - source: salt://nginx/files/nginx-1.8.1.tar.gz

  cmd.run:
    - name: cd /mnt && tar zxf nginx-1.8.1.tar.gz && cd nginx-1.8.1 && sed -i.bak 's/#define NGINX_VER          "nginx\/" NGINX_VERSION/#define NGINX_VER          "nginx"'/g src/core/nginx.h && sed -i.bak 's/CFLAGS="$CFLAGS -g"/#CFLAGS="$CFLAGS -g"/g' auto/cc/gcc && ./configure --prefix=/usr/local/nginx --with-http_ssl_module --with-http_stub_status_module --with-threads --with-file-aio &> /dev/null && make &> /dev/null && make install &> /dev/null
    - creates: /usr/local/nginx
[root@server1 nginx]# salt server3 state.sls nginx.install
安装启动配置nginx——文件分离
1、nginx管理脚本
[root@server1 nginx]# vim service.sls
include:
  - nginx.install    //nginx目录下的install脚本

/usr/local/nginx/conf/nginx.conf:
  file.managed:
    - source: salt://nginx/files/nginx.conf

nginx-service:
  file.managed:
    - name: /etc/init.d/nginx
    - source: salt://nginx/files/nginx
    - mode: 755

  service.running:
    - name: nginx
    - reload: True
    - watch:
      - file: /usr/local/nginx/conf/nginx.conf
2、nginx源码编译脚本
[root@server1 nginx]# vim install.sls
Include:
  - pkgs.make   //pkgs目录下的make脚本
  - users.users

nginx-install
  file.managed:
    - name: /mnt/nginx-1.8.1.tar.gz
    - source: salt://nginx/files/nginx-1.8.1.tar.gz

  cmd.run:
    - name: cd /mnt && tar zxf nginx-1.8.1.tar.gz && cd nginx-1.8.1 && sed -i.bak 's/#define NGINX_VER          "nginx\/" NGINX_VERSION/#define NGINX_VER          "nginx"'/g src/core/nginx.h && sed -i.bak 's/CFLAGS="$CFLAGS -g"/#CFLAGS="$CFLAGS -g"/g' auto/cc/gcc && ./configure --prefix=/usr/local/nginx --with-http_ssl_module --with-http_stub_status_module --with-threads --with-file-aio &> /dev/null && make &> /dev/null && make install &> /dev/null
    - creates: /usr/local/nginx
3、创建make.sls安装包
[root@server1 nginx]# cd ..
[root@server1 salt]# mkdir pkgs
[root@server1 salt]# cd pkgs/
[root@server1 pkgs]# vim make.sls
make:
  pkg.installed:
    - pkgs:
      - gcc
      - pcre-devel
      - openssl-devel
5、创建nginx用户信息管理脚本
[root@server1 pkgs]# cd ..
[root@server1 salt]# mkdir users
[root@server1 users]# vim users.sls
nginx-group:
  group.present:
    - name: nginx
    - gid: 800

nginx-user:
  user.present:
    - name: nginx
    - uid: 800
    - gid: 800
    - shell: /sbin/nologin
    - createhome: False
- home: /usr/local/nginx

[root@server1 users]# cd ..nginx/files/
[root@server1 files]# ls  //存放nginx的执行脚本和配置文件
nginx  nginx-1.8.1.tar.gz  nginx.conf
[root@server1 files]# vim nginx.conf
user  nginx nginx;
worker_processes  2;
6、推送测试
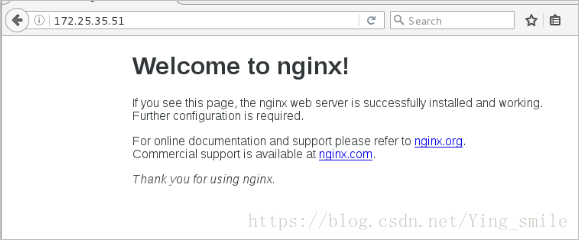
[root@server1 users]# salt server3 state.sls nginx.service 7、查看是否成功
[root@server3 ~]# id nginx
uid=800(nginx) gid=800(nginx) groups=800(nginx)
[root@server3 ~]# ll /mnt
total 820
drwxr-xr-x 9 1001 1001   4096 Aug 17 04:10 nginx-1.8.1
-rw-r--r-- 1 root root 833473 Aug 17 04:00 nginx-1.8.1.tar.gz
[root@server3 ~]# ll /etc/init.d/nginx
-rwxr-xr-x 1 root root 3136 Aug 17 05:14 /etc/init.d/nginx
[root@server3 ~]# /etc/init.d/nginx status
nginx (pid  4427) is running...
[root@server3 ~]# ps ax
 4427 ?        Ss     0:00 nginx: master process /usr/local/nginx/sbin
 4516 ?        S      0:00 nginx: worker process
 4517 ?        S      0:00 nginx: worker process
saltstack多节点推送实现haproxy负载均衡集群
1、负载均衡
[root@server1 ~]# yum install salt-minion -y
[root@server1 ~]# /etc/init.d/salt-minion start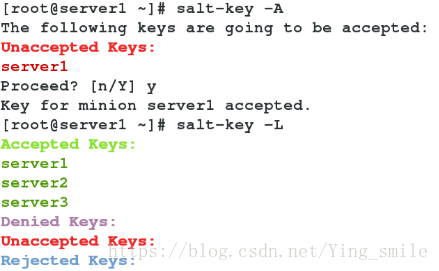
server1:
[root@server1 ~]# vim /etc/yum.repos.d/rhel-source.repo //配置添加负载均衡的yum源
[LoadBalancer]
name=LoadBalancer
baseurl=http://172.25.35.250/rhel6.5/LoadBalancer
gpgcheck=0
[root@server1 haproxy]# vim install.sls //编辑部署haproxy脚本
haproxy-install:
pkg.installed:
- pkgs:
- haproxy
file.managed:
- name: /etc/haproxy/haproxy.cfg
- source: salt://haproxy/files/haproxy.cfg
service.running:
- name: haproxy
- reload: True
- watch:
- file: haproxy-install
[root@server1 haproxy]# mkdir files
[root@server1 haproxy]# cd files/
[root@server1 files]# vim haproxy.cfg //修改配置文件
63 frontend main *:80
64 default_backend app
65
66 backend app
67 balance roundrobin
68 server app1 172.25.35.52:80 check
69 server app2 172.25.35.53:80 check
[root@server1 files]# salt server1 state.sls haproxy.install //推送给server1
server:
[root@server2 ~]# cd /var/www/html
[root@server2 html]# vim index.html
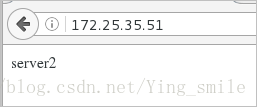
server2浏览器访问:不断刷新页面,实现负载均衡
2、多节点推送
[root@server1 salt]# vim top.sls  //脚本名字必须是top.sls
base:
  'server1':
    - haproxy.install
  'server2':
    - httpd.install
  'server3':
    - nginx.service
测试:
扫描二维码关注公众号,回复:
5809577 查看本文章

[root@server2 html]# /etc/init.d/httpd stop

浏览器一直会访问server3的页面

[root@server1 files]# salt '*' state.highstate  //会调用top.sls脚本实现多节点推送

浏览器访问的是server2和server3页面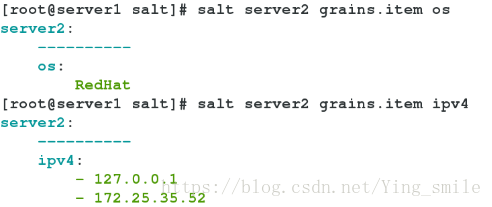
[root@server2 ~]# vim /etc/salt/minion
120 grains:
121   roles:
122     - apache
[root@server2 ~]# /etc/init.d/salt-minion restart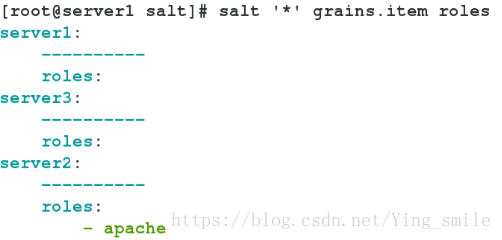
[root@server3 ~]# vim /etc/salt/grains
roles:
  nginx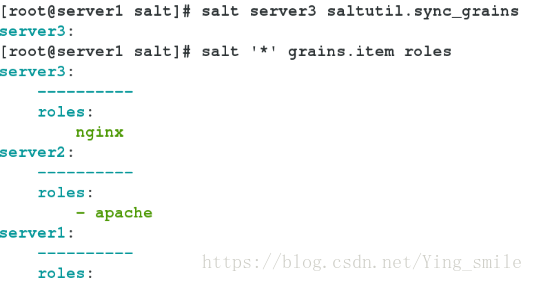
[root@server1 salt]# vim top.sls
base:
  'server1':
    - haproxy.install
  'roles:apache':
    - match: grain
    - httpd.install
  'roles:nginx':
    - match: grain
- nginx.service
[root@server1 salt]# salt '*' state.highstate
导入模块
1、grains
grains的信息不是动态的,并不会时时更新,只是在minion启动时收集到
server1:
[root@server1 salt]# mkdir _grains
[root@server1 salt]# cd _grains/
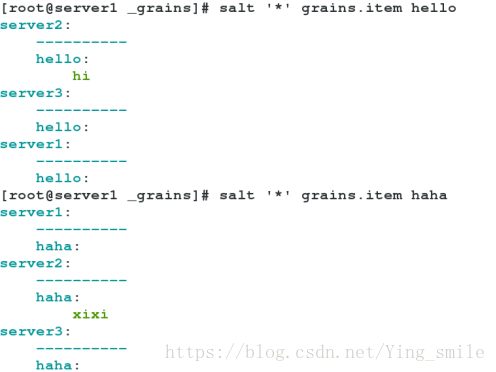
[root@server1 _grains]# vim my_grains.py
#!/usr/bin/env python
def my_grains():
grains = {} //定义一个空字典
grains['hello'] = 'hi'
grains['haha'] = 'xixi'
return grains
[root@server1 _grains]# salt server2 saltutil.sync_grains //将模块同步到server2
server2:
- grains.my_grains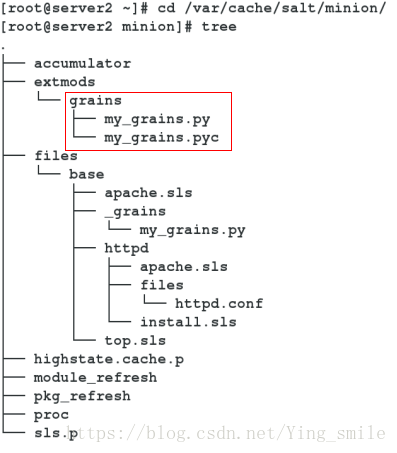
2、ipllar
pillar和grains不一样,是在master上定义的,并且是针对minion定义的一些信息,还可以定义变量
[root@server1 ~]# vim /etc/salt/master
 694 pillar_roots:
 695   base:
 696     - /srv/pillar
[root@server1 ~]# /etc/init.d/salt-master restart  //重启master
[root@server1 ~]# mkdir /srv/pillar
[root@server1 ~]# cd /srv/pillar/
[root@server1 pillar]# mkdir web
[root@server1 pillar]# cd web/
[root@server1 web]# vim install.sls
{% if grains['fqdn'] == 'server2' %}    //fqdn代表主机名
webserver: httpd
{% elif grains['fqdn'] == 'server3' %}
webserver: nginx
{% endif %}
[root@server1 web]# cd ..
[root@server1 pillar]# vim top.sls
base:
  '*':
- web.install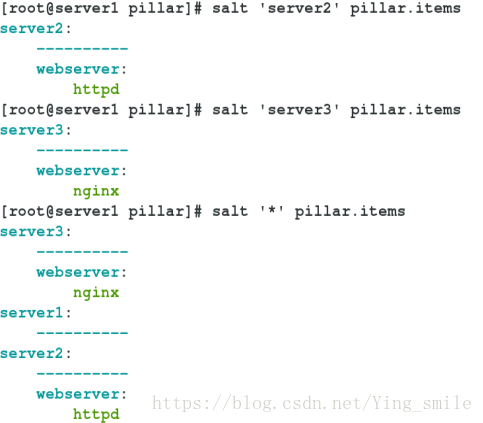
刷新: salt ‘*’ saltutil.refresh_pillar
jinja的使用
方式一:
[root@server1 httpd]# vim install.sls
apache-install:
  pkg.installed:
    - pkgs:
      - httpd
      - php
  file.managed:
    - name: /etc/httpd/conf/httpd.conf
    - source: salt://httpd/files/httpd.conf
    - mode: 644
    - user: root
    - template: jinja
    - context:
        bind: 172.25.35.52
        port: 8080
  service.running:
    - name: httpd
    - enable: True
    - reload: True
    - watch:
[root@server1 httpd]# vim files/httpd.conf
 136 Listen {{ port }}
[root@server1 httpd]# salt server2 state.sls httpd.install

[root@server2 minion]# cat /etc/httpd/conf/httpd.conf | head -n 136 | tail -n 1
Listen 8080
方式二:
[root@server1 httpd]# vim files/httpd.conf
 136 Listen {{ bind }}:{{ port }}
[root@server1 httpd]# salt server2 state.sls httpd.install

[root@server2 minion]# cat /etc/httpd/conf/httpd.conf | head -n 136 | tail -n 1
Listen 172.25.35.52:8080
方式三:
[root@server1 httpd]# vim files/httpd.conf
 1 {% from 'httpd/lib.sls' import port with context %}
[root@server1 httpd]# vim lib.sls
{% set port = 80 %}
[root@server1 httpd]# salt server2 state.sls httpd.install

[root@server2 minion]# cat /etc/httpd/conf/httpd.conf | head -n 137 | tail -n 1
Listen 172.25.35.52:80
方式四:
[root@server2 ~]# vim /etc/httpd/conf/httpd.conf
Listen 172.25.35.52:8080

[root@server1 httpd]# vim install.sls
apache-install:
  pkg.installed:
    - pkgs:
      - httpd
      - php
  file.managed:
    - name: /etc/httpd/conf/httpd.conf
    - source: salt://httpd/files/httpd.conf
    - mode: 644
    - user: root
    - template: jinja
    - context:
        bind: {{ grains['ipv4'][-1] }}
        port: 80
  service.running:
    - name: httpd
    - enable: True
    - reload: True
    - watch:
      - file: apache-install
[root@server1 httpd]# vim files/httpd.conf
136 Listen {{ bind }}:{{ port }}
[root@server1 httpd]# salt server2 state.sls httpd.install

[root@server2 ~]# cat /etc/httpd/conf/httpd.conf | head -n 136 | tail -n 1
Listen 172.25.35.52:80
方式五:
[root@server2 ~]# vim /etc/httpd/conf/httpd.conf
Listen 172.25.35.52:8080
[root@server1 httpd]# vim install.sls
apache-install:
pkg.installed:
- pkgs:
- httpd
- php
file.managed:
- name: /etc/httpd/conf/httpd.conf
- source: salt://httpd/files/httpd.conf
- mode: 644
- user: root
- template: jinja
- context:
bind: 172.25.35.53
port: 80
service.running:
- name: httpd
- enable: True
- reload: True
- watch:
[root@server1 httpd]# vim files/httpd.conf
136 Listen {{ grains['ipv4'][-1] }}:{{ port }}
[root@server1 httpd]# salt server2 state.sls httpd.install
[root@server2 ~]# cat /etc/httpd/conf/httpd.conf | head -n 136 | tail -n 1
Listen 172.25.35.52:80方式六:
[root@server1 httpd]# cd /srv/pillar/web
[root@server1 web]# vim install.sls
{% if grains['fqdn'] == 'server2' %}
webserver: httpd
bind: 172.25.35.52
port: 8080
{% elif grains['fqdn'] == 'server3' %}
webserver: nginx
{% endif %}
[root@server1 web]# cd ..
[root@server1 pillar]# cd ..
[root@server1 srv]# cd salt/httpd/
[root@server1 httpd]# vim files/httpd.conf
 136 Listen {{ pillar['bind'] }}:{{ pillar['port'] }}
[root@server1 httpd]# salt server2 state.sls httpd.install
[root@server2 conf]# cat /etc/httpd/conf/httpd.conf | head -n 136 | tail -n 1
Listen 172.25.35.52:8080