Fragments
1.Fragments简介
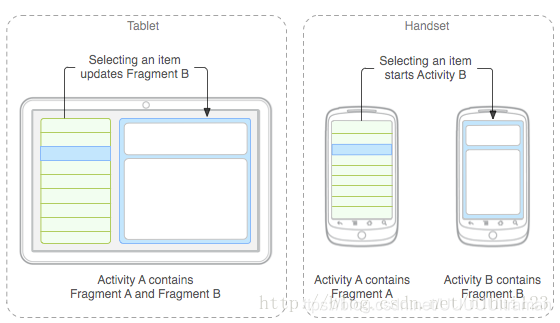
Fragment是Activity中用户界面的一个行为或者一个部分。你可以在单独的Activity上把多个Fragment组合成为一个多区域的UI,并且可以在多个Activity中再使用。你可以认为Fragment是Activity的一个模块零件,它有自己的生命周期,接收它自己的输入事件,并且可以在Activity运行时添加或者删除。
两个概念:
Fragment、宿主
Fragment的生命周期直接受其宿主Activity的生命周期的影响。例如,一旦Activity被暂停,它里面的所有Fragment也被暂停;一旦Activity被销毁,它里面的所有Fragment也被销毁。
2.设计原理
Android在3.0(11)版本中引入了Fragment的概念
有了Fragment,你可以不必去管理视图体系的复杂变化。通过将activity的布局分割成若干个Fragment,可以在运行是编辑Activity的呈现,并且那些变化会被保存在由Activity管理的后台栈里面。
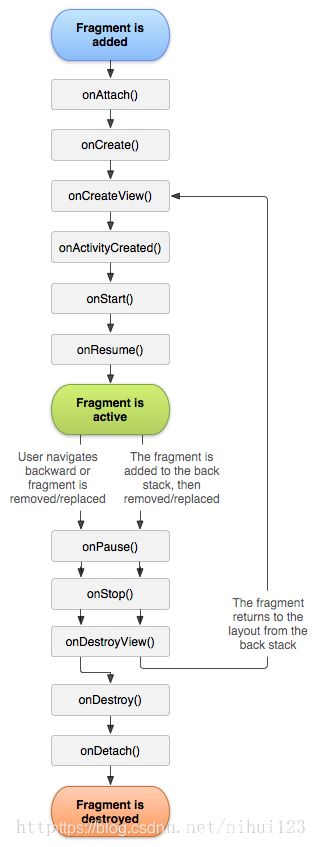
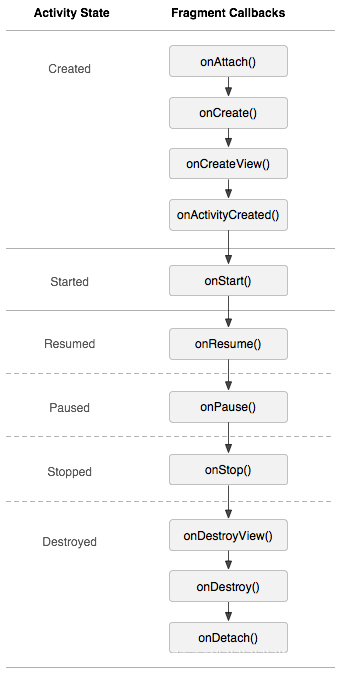
生命周期
3.创建Fragment
要创建一个Fragment,必须创建一个Fragment的子类(或是继承自它的子类)。Fragment类的代码看起来很像Activity。它与Activity一样都有回调函数,例如onCreate()、onStarr()、onPause()、onStop()。事实上,如果你正在将一个现成的Android应用转而使用Fragment来实现,可以简单将代码从Activity的回调函数移植到各自的Fragment回调函数中。
除了基类Fragment,这里还有几个可能会继承的子类:
DialogFragment
ListFragment
PerferenceFragment
一般情况下,你至少需要实现以下几个生命周期方法:
onCreate()
在创建fragment时系统会调用此方法。在实现代码中,你可以初始化想要在fragment中保持的那些必要组件,当fragment处于暂停或者停止状态之后可重新启用它们。
onCreateView()
在第一次为fragment绘制用户界面时系统会调用此方法。为fragment绘制用户界面, 这个函数必须要返回所绘出的fragment的根View。如果fragment没有 用户界面可以返回空。
onPause()
系统会调用该函数作为用户离开fragment的第一个预兆(尽管这并不总意味着fragment被销毁)。在当前用户会话结束之前,通常要在这里提交任何应该持久化的变化(因为用户可能不再返回)。
添加用户界面
Fragment常被作为Activity用户界面的一部分,并且将本身的布局构建到Activity中去。
将Fragment添加到Activity有两种方式:
1. 在Activity 布局文件里声明Fragment
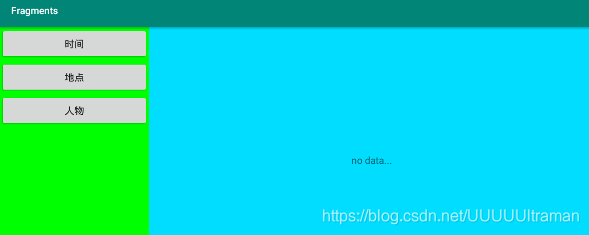
布局两个fragment
<?xml version="1.0" encoding="utf-8"?>
<LinearLayout xmlns:android="http://schemas.android.com/apk/res/android"
    xmlns:app="http://schemas.android.com/apk/res-auto"
    xmlns:tools="http://schemas.android.com/tools"
    android:layout_width="match_parent"
    android:layout_height="match_parent"
    android:orientation="horizontal"
    tools:context=".MainActivity">

    <fragment
        android:layout_width="0dp"
        android:layout_height="match_parent"
        android:layout_weight="1"
        android:id="@+id/title_fragment"
        android:name="com.example.fragments.TitleFragment"></fragment>

    <fragment
        android:layout_width="0dp"
        android:layout_height="match_parent"
        android:layout_weight="3"
        android:id="@+id/content_fragment"
        android:name="com.example.fragments.ContentFragment"></fragment>
</LinearLayout>
定义两个fragment类,title_fragment和content_fragment并绑定对应布局文件
package com.example.fragments;

import android.app.Fragment;
import android.os.Bundle;
import android.support.annotation.Nullable;
import android.view.LayoutInflater;
import android.view.View;
import android.view.ViewGroup;

public class TitleFragment extends Fragment {

    //绑定对应布局文件
    @Nullable
    @Override
    public View onCreateView(LayoutInflater inflater, @Nullable ViewGroup container, Bundle savedInstanceState) {
        View view=inflater.inflate(R.layout.title_layout,container,false);
        return view;
    }
}
package com.example.fragments;

import android.app.Fragment;
import android.os.Bundle;
import android.support.annotation.Nullable;
import android.view.LayoutInflater;
import android.view.View;
import android.view.ViewGroup;

public class ContentFragment extends Fragment {
    //绑定对应布局文件
    @Nullable
    @Override
    public View onCreateView(LayoutInflater inflater, @Nullable ViewGroup container, Bundle savedInstanceState) {
        View view=inflater.inflate(R.layout.content_layout,container,false);
        return view;
    }
}
对应的布局文件title_layout和content_layout
<?xml version="1.0" encoding="utf-8"?>
<LinearLayout xmlns:android="http://schemas.android.com/apk/res/android"
    android:layout_width="match_parent"
    android:layout_height="match_parent"
    android:orientation="vertical"
    android:background="#00ff00">


    <Button
        android:id="@+id/button"
        android:layout_width="match_parent"
        android:layout_height="wrap_content"
        android:text="时间" />

    <Button
        android:id="@+id/button2"
        android:layout_width="match_parent"
        android:layout_height="wrap_content"
        android:text="地点" />

    <Button
        android:id="@+id/button3"
        android:layout_width="match_parent"
        android:layout_height="wrap_content"
        android:text="人物" />
</LinearLayout>
<?xml version="1.0" encoding="utf-8"?>
<LinearLayout xmlns:android="http://schemas.android.com/apk/res/android"
    android:layout_width="match_parent"
    android:layout_height="match_parent"
    android:background="#00ddff">

    <TextView
        android:layout_width="match_parent"
        android:layout_height="match_parent"
        android:text="no data..."
        android:gravity="center"
        android:id="@+id/textView"/>

</LinearLayout>
在Main中声明获取fragment
package com.example.fragments;

import android.support.v7.app.AppCompatActivity;
import android.os.Bundle;

public class MainActivity extends AppCompatActivity {

    TitleFragment titleFragment;
    ContentFragment contentFragment;

    @Override
    protected void onCreate(Bundle savedInstanceState) {
        super.onCreate(savedInstanceState);
        setContentView(R.layout.activity_main);
        //通过FragmentManager(Fragment管理器)获取fragment
        titleFragment= (TitleFragment) getFragmentManager().findFragmentById(R.id.title_fragment);
        contentFragment= (ContentFragment) getFragmentManager().findFragmentById(R.id.content_fragment);
    }
}
2. 通过编码将Fragment添加到已存在的ViewGroup中
新建布局
<?xml version="1.0" encoding="utf-8"?>
<LinearLayout xmlns:android="http://schemas.android.com/apk/res/android"
    xmlns:app="http://schemas.android.com/apk/res-auto"
    xmlns:tools="http://schemas.android.com/tools"
    android:layout_width="match_parent"
    android:layout_height="match_parent"
    tools:context=".Main2Activity">

    <fragment
        android:layout_width="0dp"
        android:layout_height="match_parent"
        android:id="@+id/title_fragment"
        android:layout_weight="1"
        android:name="com.example.fragments.TitleFragment"/>
    <FrameLayout
        android:layout_width="0dp"
        android:layout_height="match_parent"
        android:id="@+id/content_fragment"
        android:layout_weight="3">

    </FrameLayout>

</LinearLayout>
在Main中添加Fragment
package com.example.fragments;

import android.annotation.SuppressLint;
import android.app.FragmentManager;
import android.app.FragmentTransaction;
import android.support.v4.app.Fragment;
import android.support.v7.app.AppCompatActivity;
import android.os.Bundle;

public class Main2Activity extends AppCompatActivity {

    ContentFragment contentFragment;
    @Override
    protected void onCreate(Bundle savedInstanceState) {
        super.onCreate(savedInstanceState);
        setContentView(R.layout.activity_main2);
        addContentLayout();
    }
    /*
    * 通过代码添加Fragment
    * */
    private void addContentLayout(){
        FragmentManager fn=getFragmentManager();
        //开启一个事务
        FragmentTransaction ft=fn.beginTransaction();
        contentFragment=new ContentFragment();
        //添加Fragment
        ft.add(R.id.content_fragment,contentFragment);
//        ft.remove();//删除
//        ft.replace();//替换
        ft.commit();
    }
}

4.管理Fragment
想要管理Activity中的Fragment,可以使用FragmentManager. 可以通过在Activity中调用getFragmentManager()获得。使用FragmentManager可以做如下事情,包括:
(1)使用findFragmentByld[] (用于在activity布局中提供有界面的fragment)或者findFragmentByTag()获取activity中存在的fragment (用于有界面或者没有界面的fragment)。
(2)使用popBackStack() (模仿用户的BACK命令)从后台栈弹出fragment。
(3)使用addOnBackStackChangedListener[)注册一个监听后台栈变化的监听器。
Fragment的传参方式
创建fragment对象,将参数封装保存到Bundle里,再用setArguments方法保存参数,如此使得参数不会丢失
public static PopBlankFragment getInstance(String title){
        PopBlankFragment p=new PopBlankFragment();
        Bundle b=new Bundle();
        b.putString("title",title);
        p.setArguments(b);
        return p;
    }
主界面
<?xml version="1.0" encoding="utf-8"?>
<RelativeLayout xmlns:android="http://schemas.android.com/apk/res/android"
    xmlns:app="http://schemas.android.com/apk/res-auto"
    xmlns:tools="http://schemas.android.com/tools"
    android:layout_width="match_parent"
    android:layout_height="match_parent"
    tools:context=".PopBackActivity">


    <Button
        android:id="@+id/button4"
        android:layout_width="wrap_content"
        android:layout_height="wrap_content"
        android:layout_alignParentStart="true"
        android:layout_alignParentLeft="true"
        android:layout_alignParentTop="true"
        android:text="one"
        android:onClick="oneClick"
        android:textSize="24sp"/>

    <Button
        android:id="@+id/button5"
        android:layout_width="wrap_content"
        android:layout_height="wrap_content"
        android:layout_alignParentTop="true"
        android:layout_alignParentEnd="true"
        android:layout_alignParentRight="true"
        android:text="two"
        android:onClick="twoClick"
        android:textSize="24sp"/>

    <FrameLayout
        android:id="@+id/content"
        android:layout_width="match_parent"
        android:layout_height="match_parent"
        android:layout_below="@id/button4"
        android:layout_alignParentStart="true"
        android:layout_alignParentLeft="true">

    </FrameLayout>
</RelativeLayout>
新建Fragment
package com.example.fragments;


import android.annotation.SuppressLint;
import android.os.Bundle;
import android.app.Fragment;
import android.view.LayoutInflater;
import android.view.View;
import android.view.ViewGroup;
import android.widget.TextView;


/**
 * A simple {@link Fragment} subclass.
 */
public class PopBlankFragment extends Fragment {

    public PopBlankFragment(){}

    public static PopBlankFragment getInstance(String title){
        PopBlankFragment p=new PopBlankFragment();
        Bundle b=new Bundle();
        b.putString("title",title);
        p.setArguments(b);
        return p;
    }

    @Override
    public View onCreateView(LayoutInflater inflater, ViewGroup container,
                             Bundle savedInstanceState) {
        // Inflate the layout for this fragment
        View view=inflater.inflate(R.layout.fragment_pop_blank,container,false);
        TextView tv=view.findViewById(R.id.textView_text);
        tv.setText(getArguments().getString("title"));
        return view;
    }

}
对应的fragment布局文件
<?xml version="1.0" encoding="utf-8"?>
<FrameLayout xmlns:android="http://schemas.android.com/apk/res/android"
xmlns:tools="http://schemas.android.com/tools"
android:layout_width="match_parent"
android:layout_height="match_parent"
tools:context=".PopBlankFragment">
<!-- TODO: Update blank fragment layout -->
<TextView
android:layout_width="match_parent"
android:layout_height="match_parent"
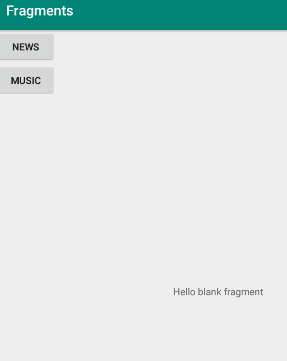
android:text="@string/hello_blank_fragment"
android:textSize="24sp"
android:id="@+id/textView_text"
android:gravity="center"/>
</FrameLayout>
将fragment添加到activity中
package com.example.fragments;
import android.app.FragmentTransaction;
import android.os.Bundle;
import android.support.design.widget.FloatingActionButton;
import android.support.design.widget.Snackbar;
import android.support.v7.app.AppCompatActivity;
import android.support.v7.widget.Toolbar;
import android.view.View;
public class PopBackActivity extends AppCompatActivity {
@Override
protected void onCreate(Bundle savedInstanceState) {
super.onCreate(savedInstanceState);
setContentView(R.layout.activity_pop_back);
}
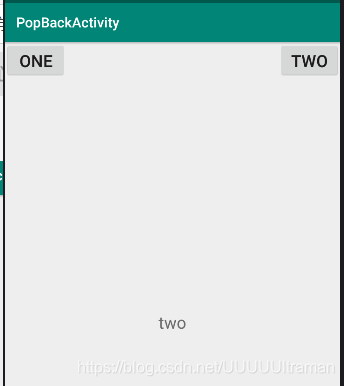
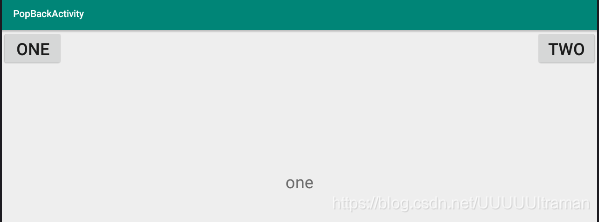
public void oneClick(View v){
PopBlankFragment p1=PopBlankFragment.getInstance("one");
FragmentTransaction ft=getFragmentManager().beginTransaction();
ft.replace(R.id.content,p1);
//把当前fragment添加到Activity栈
ft.addToBackStack(null);
ft.commit();
}
public void twoClick(View v){
PopBlankFragment p2=PopBlankFragment.getInstance("two");
FragmentTransaction ft=getFragmentManager().beginTransaction();
ft.replace(R.id.content,p2);
//把当前fragment添加到Activity栈
ft.addToBackStack(null);
ft.commit();
}
@Override
public boolean onKeyDown(int keyCode, KeyEvent event) {
if (keyCode==KeyEvent.KEYCODE_BACK){
if (getFragmentManager().getBackStackEntryCount()==0){//判断返回栈里是否有返回值
finish();
}else {
getFragmentManager().popBackStack();//出栈
}
return true;
}
return super.onKeyDown(keyCode, event);
}
}

5.处理Fragment事务
在activity中使用fragment的一大特点是具有添加、删除、替换,和执行其它动作的能力,以响应用户的互动。提交给activity的每一系列变化被称为事务,并且可以用FragmentTransaction中的APIs处理。
你也可以将每-个事务保存在由activity管理的后台栈中,并且允许用户导航回退fragment变更(类似于activity的导航回退)。
6.与Activity的交互
fragment可以通过getActivity0函数访问Activity,并且很容易的执行类似于查找activity布局中的视图的任务:View listView = getActivityl.findViewByld(R.id.ist);
activity能够调用fragment的函数findFragmentByld()或者findFragmentByTag(),从FragmentManager中获取FragmentExampleFragment fragment = (ExampleFragment) getFragmentManagerO).findFragmentByd(R id example _fragment);
fragment与activity共享事件
一个好方法是在fragment内部定义一个回调接口,并需要宿主activity实现它。
当activity通过接口接收到回调时,可以在必要时与布局中的其它fragment共享信息。
fragment布局
<?xml version="1.0" encoding="utf-8"?>
<LinearLayout xmlns:android="http://schemas.android.com/apk/res/android"
    xmlns:app="http://schemas.android.com/apk/res-auto"
    xmlns:tools="http://schemas.android.com/tools"
    android:layout_width="match_parent"
    android:layout_height="match_parent"
    tools:context=".Main3Activity">

    <fragment
        android:layout_width="0dp"
        android:layout_height="match_parent"
        android:layout_weight="1"
        android:id="@+id/menuFragment"
        android:name="com.example.fragments.MenuFragment"/>

    <fragment
        android:layout_width="0dp"
        android:layout_height="match_parent"
        android:layout_weight="2"
        android:id="@+id/mainFragment"
        android:name="com.example.fragments.MainFragment"/>

</LinearLayout>
创建fragment类MenuFragment、Mainfragment绑定对应布局文件
package com.example.fragments;
import android.app.Activity;
import android.os.Bundle;
import android.app.Fragment;
import android.view.LayoutInflater;
import android.view.View;
import android.view.ViewGroup;
/**
* A simple {@link Fragment} subclass.
*/
public class MenuFragment extends Fragment implements View.OnClickListener {
private MyMenuListener myMenuListener;
public MenuFragment() {
// Required empty public constructor
}
//myMenuListener实例化
@Override
public void onAttach(Activity activity) {
super.onAttach(activity);
myMenuListener=(MyMenuListener)activity;
}
@Override
public View onCreateView(LayoutInflater inflater, ViewGroup container,
Bundle savedInstanceState) {
View view=inflater.inflate(R.layout.fragment_menu,container,false);
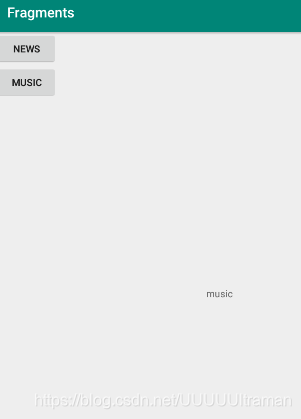
view.findViewById(R.id.button_news).setOnClickListener(this);
view.findViewById(R.id.button_music).setOnClickListener(this);
return view;
}
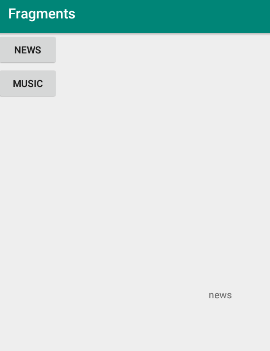
@Override
public void onClick(View v) {
switch (v.getId()){
case R.id.button_news:
myMenuListener.changeValue("news");
break;
case R.id.button_music:
myMenuListener.changeValue("music");
break;
}
}
//定义一个回调接口
public static interface MyMenuListener{
public void changeValue(String value);
}
}
package com.example.fragments;

import android.os.Bundle;
import android.app.Fragment;
import android.view.LayoutInflater;
import android.view.View;
import android.view.ViewGroup;
import android.widget.TextView;

/**
 * A simple {@link Fragment} subclass.
 */
public class MainFragment extends Fragment {

    private TextView textView_value;
    public MainFragment() {
        // Required empty public constructor
    }


    @Override
    public View onCreateView(LayoutInflater inflater, ViewGroup container,
                             Bundle savedInstanceState) {
        // Inflate the layout for this fragment
        View view=inflater.inflate(R.layout.fragment_main,container,false);
        textView_value=view.findViewById(R.id.textView_value);
        return view;
    }

    public void changeTextViewValue(String value){
        textView_value.setText(value);
    }

}
MianActivity
package com.example.fragments;

import android.support.v7.app.AppCompatActivity;
import android.os.Bundle;

public class Main3Activity extends AppCompatActivity implements MenuFragment.MyMenuListener{

    private MenuFragment menuFragment;
    private MainFragment mainFragment;
    @Override
    protected void onCreate(Bundle savedInstanceState) {
        super.onCreate(savedInstanceState);
        setContentView(R.layout.activity_main3);
        menuFragment=(MenuFragment) getFragmentManager().findFragmentById(R.id.menuFragment);
        mainFragment=(MainFragment) getFragmentManager().findFragmentById(R.id.mainFragment);
    }


    @Override
    public void changeValue(String value) {
        mainFragment.changeTextViewValue(value);
    }
}
7.PreferenceFragment
有时候,我们的程序需要提供一些选项功能,能让用户去定制化自己的使用风格。例如,允许用户是否自动保存登录信,允许用户设定某个页面的刷新时间等等。我们可以使用PreferenceActivity基 类去显示给用户一个选项设置的界面。在Android3.0或更高的版本上,可以使用PreferenceFragment类 去实现这个功能。
下面将展示如何去创建和使用PreferenceFragment。
- 在res文件来下面新建-一个xmI文件夹,在xmI文件夹下面新建一个文件: preferences.xml,用来描述你有那些选项。
- 在包路径下面新建一个类: Fragment继承PreferenceFragment。
- 从xmI文件加载选项addPreferencesFromResource(R.xml. preferences);
- 在本类中获取shared_pref文件
String name=getPreferenceManager().getSharedPreferencesName();
获取默认的属性配置SharedPreferences sp=PreferenceManager.getDefaultSharedPreferences(this); String name=sp.getString("edittext_preference","");
新建preferences.xml
<?xml version="1.0" encoding="utf-8"?>
<PreferenceScreen xmlns:android="http://schemas.android.com/apk/res/android">
    <PreferenceCategory android:title="是否打开声音">
        <CheckBoxPreference android:key="checkbox_preference"
            android:title="打开声音"
            android:summary="设置打开声音后可以自动开启音乐"/>
    </PreferenceCategory>
    <PreferenceCategory android:title="城市">
        <EditTextPreference
            android:key="edittext_preference"
            android:title="昵称"
            android:summary="请输入你的昵称"
            android:dialogTitle="你的昵称"/>
        <ListPreference
            android:key="list_preference"
            android:title="城市名称"
            android:summary="请选择一个城市名称"
            android:entries="@array/city"
            android:entryValues="@array/city"
            android:dialogTitle="城市名称"/>
    </PreferenceCategory>
</PreferenceScreen>
城市列表
<string-array name="city">
        <item>温州</item>
        <item>宁波</item>
        <item>杭州</item>
        <item>台州</item>
        <item>衢州</item>
        <item>金华</item>
        <item>嘉兴</item>
    </string-array>
新建Fragment继承PreferenceFragment
package com.example.fragments;


import android.os.Bundle;
import android.app.Fragment;
import android.view.LayoutInflater;
import android.view.View;
import android.view.ViewGroup;


/**
 * A simple {@link Fragment} subclass.
 */
public class PreferenceFragment extends android.preference.PreferenceFragment {

    @Override
    public void onCreate(Bundle savedInstanceState) {
        super.onCreate(savedInstanceState);
        addPreferencesFromResource(R.xml.perference);
    }
}
获取默认的属性配置
package com.example.fragments;

import android.content.SharedPreferences;
import android.os.Bundle;
import android.preference.PreferenceManager;
import android.support.design.widget.FloatingActionButton;
import android.support.design.widget.Snackbar;
import android.support.v7.app.AppCompatActivity;
import android.support.v7.widget.Toolbar;
import android.view.View;

public class Main4Activity extends AppCompatActivity {

    @Override
    protected void onCreate(Bundle savedInstanceState) {
        super.onCreate(savedInstanceState);
        setContentView(R.layout.activity_main4);

        SharedPreferences sp= PreferenceManager.getDefaultSharedPreferences(this);
        String name=sp.getString("edittext_preference","");
    }

}