自己学习搭建的第一个区块链,通过实践了解了区块链的实现细节,对理论知识中的挖矿、分布式共识有了更深刻的认识。
原文地址
源码:https://github.com/dvf/blockchain
参考:[1]https://blog.csdn.net/blockchain_lemon/article/details/80837336
[2]https://www.jianshu.com/p/e2dd2398555b
准备工作
区块链概念:区块链是一种按时间将数据区块以顺序相连的方式组合在一起的链式数据结构,并通过密码学来保证其不可篡改和不可伪造的分布式账本。这些区块可以包含交易、文件以及任何你想要的数据,重要的是它们通过哈希链接在一起。
学习者:可以轻松地阅读和编写一些基本的Python,并且对HTTP有一些了解。
环境(本实验):PyCharm、Python 3.7、Flask、Requests。
本次学习中同时学习了Flask,视频地址
除此之外还需安装HTTP工具,如Postman、cURL。本次实验是在Postman上完成的。
第一步 创建区块链
①实现一个Blockchain类——表示一个区块链
打开一个你常用的文本编辑器或者IDE(本实验使用的是Pycharm),新建一个blockchain.py的python文件,并创建一个Blockchain类,在构造函数中创建两个空的队列,一个用于存储区块链,另一个用于存储交易。下面是Blockchain类的模板代码:
class Blockchain(object):
    def __init__(self):
        self.chain = []
        self.current_transactions = []

    def new_block(self):
        # Creates a new Block and adds it to the chain
        pass

    def new_transaction(self):
        # Adds a new transaction to the list of transactions
        pass

    @staticmethod
    def hash(block):
        # Hashes a Block
        pass

    @property
    def last_block(self):
        # Returns the last Block in the chain
        pass
我们所创建的Blockchain类将用来管理链,它会存储交易,并且提供一些方法来帮助添加新的区块到链。下面是详细的实现方法。
每个区块所包含5个基本属性:index,timestamp (in Unix time),交易列表,工作量证明和前一个区块的哈希值。我们来看一个区块:
block = {
    'index': 1,
    'timestamp': 1506057125.900785,
    'transactions': [
        {
            'sender': "8527147fe1f5426f9dd545de4b27ee00",
            'recipient': "a77f5cdfa2934df3954a5c7c7da5df1f",
            'amount': 5,
        }
    ],
    'proof': 324984774000,
    'previous_hash': "2cf24dba5fb0a30e26e83b2ac5b9e29e1b161e5c1fa7425e73043362938b9824"
}
这是区块链技术的核心思想,每个新的区块都会包含上一个区块的哈希值,从而让区块链具有不可篡改的特性。如果攻击者攻击了链中比较靠前的区块,则所有后面的区块将包含不正确的哈希值。
②将交易添加到区块
接下来我们实现一个将交易添加到区块的方法
class Blockchain(object):
    ...

    def new_transaction(self, sender, recipient, amount):
        """
        Creates a new transaction to go into the next mined Block

        :param sender: <str> Address of the Sender
        :param recipient: <str> Address of the Recipient
        :param amount: <int> Amount
        :return: <int> The index of the Block that will hold this transaction
        """

        self.current_transactions.append({
            'sender': sender,
            'recipient': recipient,
            'amount': amount,
        })

        return self.last_block['index'] + 1
在new_transaction()方法中向列表中添加一笔交易之后,它返回值是本次交易的index,该index会被添加到下一个待挖掘区块,后面在用户提交交易时也会用到。
③建一个新的区块
当Blockchain被实例化后,我们需要创建一个创世区块,同时为我们的创世区块添加一个工作量证明,这是挖矿的结果。
除了创建创世区块的代码,我们还需要补充new_block(),new_transaction()和hash()的方法:
import hashlib
import json
from time import time


class Blockchain(object):
    def __init__(self):
        self.current_transactions = []
        self.chain = []

        # Create the genesis block
        self.new_block(previous_hash=1, proof=100)

    def new_block(self, proof, previous_hash=None):
        """
        Create a new Block in the Blockchain
        :param proof: <int> The proof given by the Proof of Work algorithm
        :param previous_hash: (Optional) <str> Hash of previous Block
        :return: <dict> New Block
        """

        block = {
            'index': len(self.chain) + 1,
            'timestamp': time(),
            'transactions': self.current_transactions,
            'proof': proof,
            'previous_hash': previous_hash or self.hash(self.chain[-1]),
        }

        # Reset the current list of transactions
        self.current_transactions = []

        self.chain.append(block)
        return block

    def new_transaction(self, sender, recipient, amount):
        """
        Creates a new transaction to go into the next mined Block
        :param sender: <str> Address of the Sender
        :param recipient: <str> Address of the Recipient
        :param amount: <int> Amount
        :return: <int> The index of the Block that will hold this transaction
        """
        self.current_transactions.append({
            'sender': sender,
            'recipient': recipient,
            'amount': amount,
        })

        return self.last_block['index'] + 1

    @property
    def last_block(self):
        return self.chain[-1]

    @staticmethod
    def hash(block):
        """
        Creates a SHA-256 hash of a Block
        :param block: <dict> Block
        :return: <str>
        """

        # We must make sure that the Dictionary is Ordered, or we'll have inconsistent hashes
        block_string = json.dumps(block, sort_keys=True).encode()
        return hashlib.sha256(block_string).hexdigest()
到此,我们的区块链已经基本上实现了雏形。不过我们还是要知道,区块链是怎么创建、怎么开发,以及跟矿工有什么关系。
④工作量证明
工作证明算法(PoW)的作用,是对区块链上创建或开发新的区块的证明。其背后的核心是:找到一串解决某个数学问题的数字,这个数字必须符合两个条件:第一,难找;第二,很容易被验证(而且是很容易被任何人验证)。
我们来举个非常简单的例子来帮助大家理解。
我们来看一下这个例子,某个整数 x 乘以另外一个数 y ,得到的结果的哈希值必须是以 0 结尾。可以简单表示为:hash(x * y) = ac23dc…0。所以,我们的目标是找到满足这个条件的一个 y 值。为了方便理解,我们暂定x=5。下面我们就用Python来做这样一个运算:
from hashlib import sha256
x = 5
y = 0  # We don't know what y should be yet...
while sha256(f'{x*y}'.encode()).hexdigest()[-1] != "0":
    y += 1
print(f'The solution is y = {y}')
最终,计算结果是 y=21。因此,生成的以 0 结尾的哈希值是:
hash(5 * 21) = 1253e9373e...5e3600155e860
在比特币中,工作证明算法被称为Hashcash,这和我们上面所举的例子差不多,结果难于发现却易于校验。Hashcash是矿工为了创建一个新区块而争相计算的问题,计算难度通常取决于字符串中搜索的字符数,通常也会花费一定的时间才能计算得到,最终计算出来的矿工们会通过交易获得一定数量的比特币作为奖励。
⑤实现一个基本的工作量证明
首先我们为Blockchain类实现一个类似的算法:
规则:找到一个数字p,使得它与前一个区块的 proof 拼接成的字符串的 Hash 值以 4 个零开头。
import hashlib
import json

from time import time
from uuid import uuid4


class Blockchain(object):
    ...

    def proof_of_work(self, last_proof):
        """
        Simple Proof of Work Algorithm:
         - Find a number p' such that hash(pp') contains leading 4 zeroes, where p is the previous p'
         - p is the previous proof, and p' is the new proof
        :param last_proof: <int>
        :return: <int>
        """

        proof = 0
        while self.valid_proof(last_proof, proof) is False:
            proof += 1

        return proof

    @staticmethod
    def valid_proof(last_proof, proof):
        """
        Validates the Proof: Does hash(last_proof, proof) contain 4 leading zeroes?
        :param last_proof: <int> Previous Proof
        :param proof: <int> Current Proof
        :return: <bool> True if correct, False if not.
        """

        guess = f'{last_proof}{proof}'.encode()
        guess_hash = hashlib.sha256(guess).hexdigest()
        return guess_hash[:4] == "0000"
通过修改前导零的数量,可以调整算法的难度,但是4个零完全足够了。你会发现,每当增加一个前导零,找到一个对应的解决方案与所需的时间之间会产生巨大的差异。
进行到这里,我们的Blockchain类已经基本完成,接下来我们实现HTTP服务进行交互。
第二步:区块链API
我们将使用Python Flask框架,Flask是一个轻量级的Web应用框架,这使我们可以通过web服务来调用Blockchian类。
①创建三个API:
- /transactions / new为区块创建一个新的交易
- /mine告诉我们的服务器开采新的区块。
- /chain返回整个区块链。
②使用Flask我们的“服务器”将基于Flask框架来实现区块链网络中的一个节点。 我们来添加一些模板代码:
import hashlib
import json
from textwrap import dedent
from time import time
from uuid import uuid4

from flask import Flask


class Blockchain(object):
    ...


# Instantiate our Node
app = Flask(__name__)

# Generate a globally unique address for this node
node_identifier = str(uuid4()).replace('-', '')

# Instantiate the Blockchain
blockchain = Blockchain()


@app.route('/mine', methods=['GET'])
def mine():
    return "We'll mine a new Block"

@app.route('/transactions/new', methods=['POST'])
def new_transaction():
    return "We'll add a new transaction"

@app.route('/chain', methods=['GET'])
def full_chain():
    response = {
        'chain': blockchain.chain,
        'length': len(blockchain.chain),
    }
    return jsonify(response), 200

if __name__ == '__main__':
    app.run(host='0.0.0.0', port=5000)
我们来简单的解释一下上边的代码:
- 第15行: 实例化我们的节点;加载 Flask 框架。
- 第18行:为我们的节点创建一个随机名称。
- 第21行:实例化 Blockchain 类。
- 第24-26行:创建 /mine 端点,这是一个GET请求。
- 第28-30行:创建 /transactions/new 端点,这是一个 POST 请求,我们将用它来发送数据。
- 第32-38行:创建 /chain 端点,它是用来返回整个 Blockchain 类。
- 第40-41行:设置服务器运行端口为 5000。
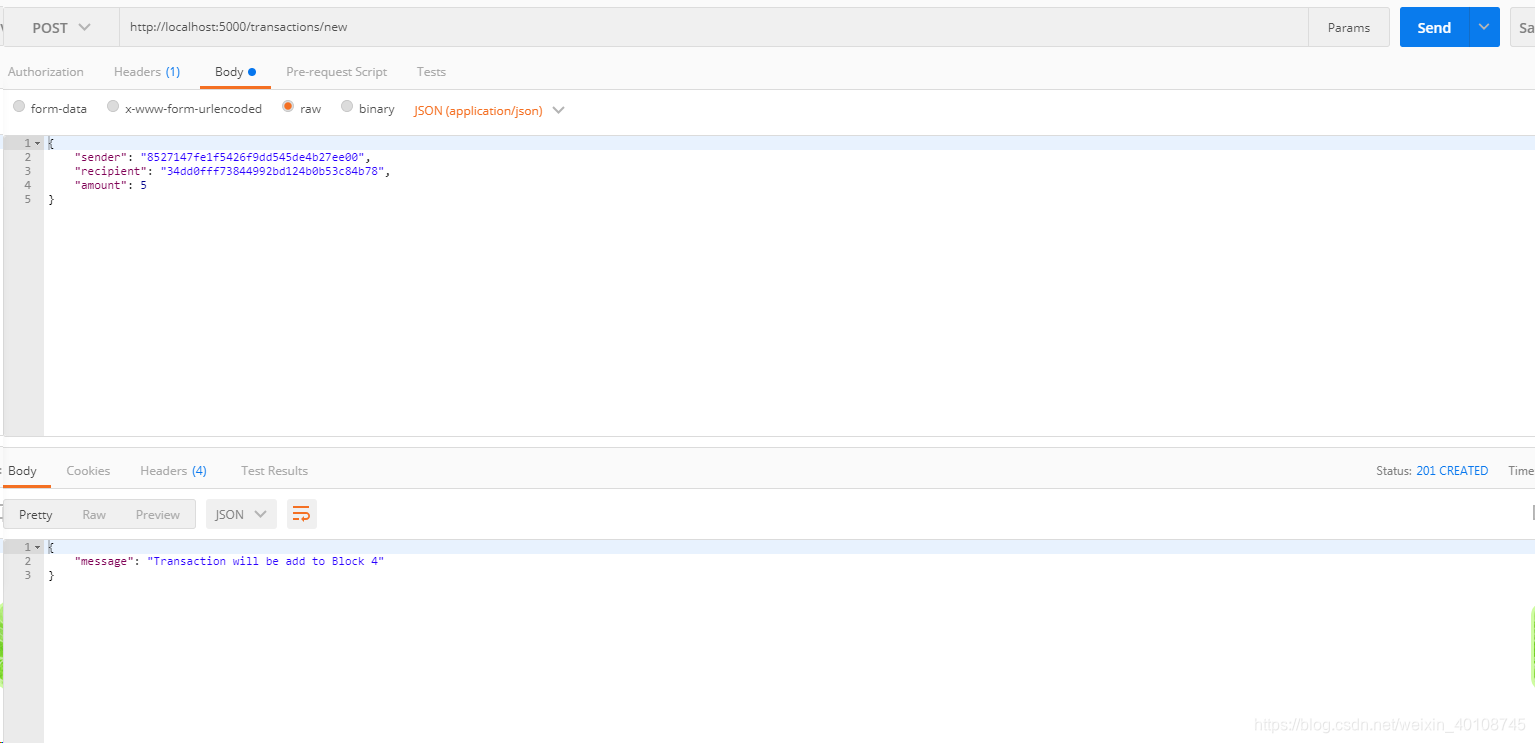
③实现交易
下面是用户发起交易时发送到服务器的请求:
{
 "sender": "my address",
 "recipient": "someone else's address",
 "amount": 5
}
由于我们已经有了将交易添加到区块的方法,接下去就十分容易了。
下面我们来实现添加交易的函数:
import hashlib
import json
from textwrap import dedent
from time import time
from uuid import uuid4

from flask import Flask, jsonify, request

...

@app.route('/transactions/new', methods=['POST'])
def new_transaction():
    values = request.get_json()

    # Check that the required fields are in the POST'ed data
    required = ['sender', 'recipient', 'amount']
    if not all(k in values for k in required):
        return 'Missing values', 400

    # Create a new Transaction
    index = blockchain.new_transaction(values['sender'], values['recipient'], values['amount'])

    response = {'message': f'Transaction will be added to Block {index}'}
    return jsonify(response), 201
④实现挖矿
挖矿节点是整个过程中最有趣的部分,它必须要达到三个目的:
- 计算工作量证明;
- 通过打包交易奖励矿工一个币;
- 通过将新块添加到链中来伪造新块。
import hashlib
import json

from time import time
from uuid import uuid4

from flask import Flask, jsonify, request

...

@app.route('/mine', methods=['GET'])
def mine():
    # We run the proof of work algorithm to get the next proof...
    last_block = blockchain.last_block
    last_proof = last_block['proof']
    proof = blockchain.proof_of_work(last_proof)

    # We must receive a reward for finding the proof.
    # The sender is "0" to signify that this node has mined a new coin.
    blockchain.new_transaction(
        sender="0",
        recipient=node_identifier,
        amount=1,
    )

    # Forge the new Block by adding it to the chain
    previous_hash = blockchain.hash(last_block)
    block = blockchain.new_block(proof, previous_hash)

    response = {
        'message': "New Block Forged",
        'index': block['index'],
        'transactions': block['transactions'],
        'proof': block['proof'],
        'previous_hash': block['previous_hash'],
    }
    return jsonify(response), 200
这儿要注意一下,开采区块的接收者是我们节点的地址。在这里完成的大部分工作只是与Blockchain类中的方法进行交互。下面可以开始与我们的区块链交互啦。
第三步:实现与 Blockchain 类交互
你可以使用普通的 cURL 或者 Postman 通过网络和刚才生成的 API 进行交互。
启动服务器:
* Running on http://127.0.0.1:5000/ (Press CTRL+C to quit)
通过向以下地址发送请求,我们可以尝试一下挖矿。
http://localhost:5000/mine

http://localhost:5000/transactions/new 。
请求中要包含我们的交易结构。
 如果你用的是cURL,则可以通过下面代码来实现。
$ curl -X POST -H "Content-Type: application/json" -d '{
 "sender": "d4ee26eee15148ee92c6cd394edd974e",
 "recipient": "someone-other-address",
 "amount": 5
}' "http://localhost:5000/transactions/new"
完成上面步骤之后,需要重启下服务器。这时候,我挖出了2个区块,获得了3个币的奖励。这里,我们还可以像以下地址发送请求,来对整条链进行检查。
{
    "chain": [
        {
            "index": 1,
            "previous_hash": 1,
            "proof": 100,
            "timestamp": 1551432679.168566,
            "transactions": []
        },
        {
            "index": 2,
            "previous_hash": "a4020e29488e262fcaa0d296869fd87539fc280df4ccc952db6ad22c24ea952f",
            "proof": 35293,
            "timestamp": 1551432683.5308156,
            "transactions": [
                {
                    "amount": 1,
                    "recipient": "8527147fe1f5426f9dd545de4b27ee00",
                    "sender": "0"
                }
            ]
        },
        {
            "index": 3,
            "previous_hash": "e84d1c0058cdd9c5a84062fe48f376ad65d9dd07a9b3845853f1173be3d1a3d5",
            "proof": 35089,
            "timestamp": 1551432685.3289182,
            "transactions": [
                {
                    "amount": 1,
                    "recipient": "8527147fe1f5426f9dd545de4b27ee00",
                    "sender": "0"
                }
            ]
        },
        {
            "index": 4,
            "previous_hash": "980b8de826f8b8e5f1f1116aa8db3eb4628bfd751f8d7cb047d147b923e33f34",
            "proof": 119678,
            "timestamp": 1551432841.4448206,
            "transactions": [
                {
                    "amount": 5,
                    "recipient": "34dd0fff73844992bd124b0b53c84b78",
                    "sender": "8527147fe1f5426f9dd545de4b27ee00"
                },
                {
                    "amount": 1,
                    "recipient": "8527147fe1f5426f9dd545de4b27ee00",
                    "sender": "0"
                }
            ]
        },
        {
            "index": 5,
            "previous_hash": "08bfb374f056f8e7cfa86cc628a835bc2f6d23cf217fd9a461606e512742d135",
            "proof": 146502,
            "timestamp": 1551432854.6245747,
            "transactions": [
                {
                    "amount": 1,
                    "recipient": "8527147fe1f5426f9dd545de4b27ee00",
                    "sender": "0"
                }
            ]
        }
    ],
    "length": 5
}
第四步:形成共识
在上面的步骤中,我们已经创建完成了一个简单的区块链,并且能够实现交易、挖矿等基本功能。 不过,区块链上的节点应该是分散的。 如果它们是分散的,我们究竟如何确保它们记录的都是同一条链? 这就叫共识问题。如果我们的网络中需要多个节点,我们必须实现共识算法。
注册新节点
加粗样式
在我们实现共识算法之前,需要解决一个问题:在同一个网络上,让其中一个节点知道它的相邻节点有哪些。每一个节点需要网络上的其他节点进行注册。因此,我们将需要更多的节点:
- /nodes/register 接受URL形式的新节点列表。
- /nodes/resolve 实现我们的共识算法,它可以解决任何争议,保证节点具有正确的链。
下面,我们需要修改Blockchain类的结构,以及找到注册节点实现的方法。
...
from urllib.parse import urlparse
...


class Blockchain(object):
    def __init__(self):
        ...
        self.nodes = set()
        ...

    def register_node(self, address):
        """
        Add a new node to the list of nodes
        :param address: <str> Address of node. Eg. 'http://192.168.0.5:5000'
        :return: None
        """

        parsed_url = urlparse(address)
        self.nodes.add(parsed_url.netloc)
这儿需要注意一下,set()函数用来保存节点列表。 它是确保添加的新节点具有幂等性的方法,意思是无论我们使用这个方法添加特定节点多少次,它都只会出现一次。
实现共识算法
先前提到的,当某个节点与另一个节点的记录不一致时,会「打架」。为了解决这个冲突,我们需要制定一个规则,即最长而有效的链是最有权威性的。换句话说,网络上最长的链就是事实。使用这个算法,我们就可以在我们的网络上达成共识。
...
import requests


class Blockchain(object)
    ...

    def valid_chain(self, chain):
        """
        Determine if a given blockchain is valid
        :param chain: <list> A blockchain
        :return: <bool> True if valid, False if not
        """

        last_block = chain[0]
        current_index = 1

        while current_index < len(chain):
            block = chain[current_index]
            print(f'{last_block}')
            print(f'{block}')
            print("\n-----------\n")
            # Check that the hash of the block is correct
            if block['previous_hash'] != self.hash(last_block):
                return False

            # Check that the Proof of Work is correct
            if not self.valid_proof(last_block['proof'], block['proof']):
                return False

            last_block = block
            current_index += 1

        return True

    def resolve_conflicts(self):
        """
        This is our Consensus Algorithm, it resolves conflicts
        by replacing our chain with the longest one in the network.
        :return: <bool> True if our chain was replaced, False if not
        """

        neighbours = self.nodes
        new_chain = None

        # We're only looking for chains longer than ours
        max_length = len(self.chain)

        # Grab and verify the chains from all the nodes in our network
        for node in neighbours:
            response = requests.get(f'http://{node}/chain')

            if response.status_code == 200:
                length = response.json()['length']
                chain = response.json()['chain']

                # Check if the length is longer and the chain is valid
                if length > max_length and self.valid_chain(chain):
                    max_length = length
                    new_chain = chain

        # Replace our chain if we discovered a new, valid chain longer than ours
        if new_chain:
            self.chain = new_chain
            return True

        return False
其中,valid_chain() 方法是负责校验这一条链是否是有效的,怎么校验呢?遍历每一个区块,验证它们的哈希值和工作量证明。
resolve_conflicts() 是遍历我们所有相邻节点的方法,会下载它们的链,然后使用上述方法去验证它们。如果找到一个有效的链,其长度大于我们的链,就将我们的链条替换为该链。
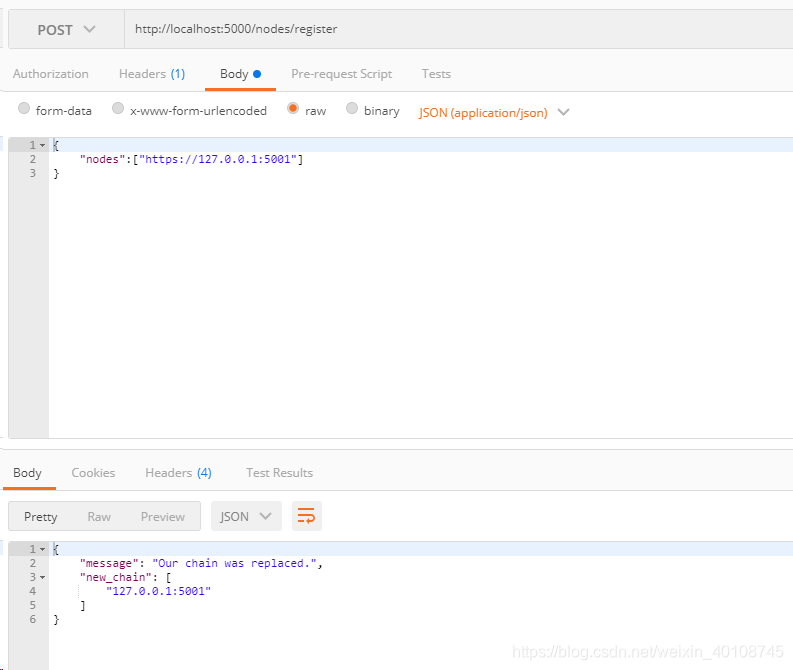
下面我们在API中,注册两个节点,一个用于添加相邻节点,另一个用于解决冲突:
@app.route('/nodes/register', methods=['POST'])
def register_nodes():
values = request.get_json()
nodes = values.get('nodes')
if nodes is None:
return "Error: Please supply a valid list of nodes", 400
for node in nodes:
blockchain.register_node(node)
response = {
'message': 'New nodes have been added',
'total_nodes': list(blockchain.nodes),
}
return jsonify(response), 201
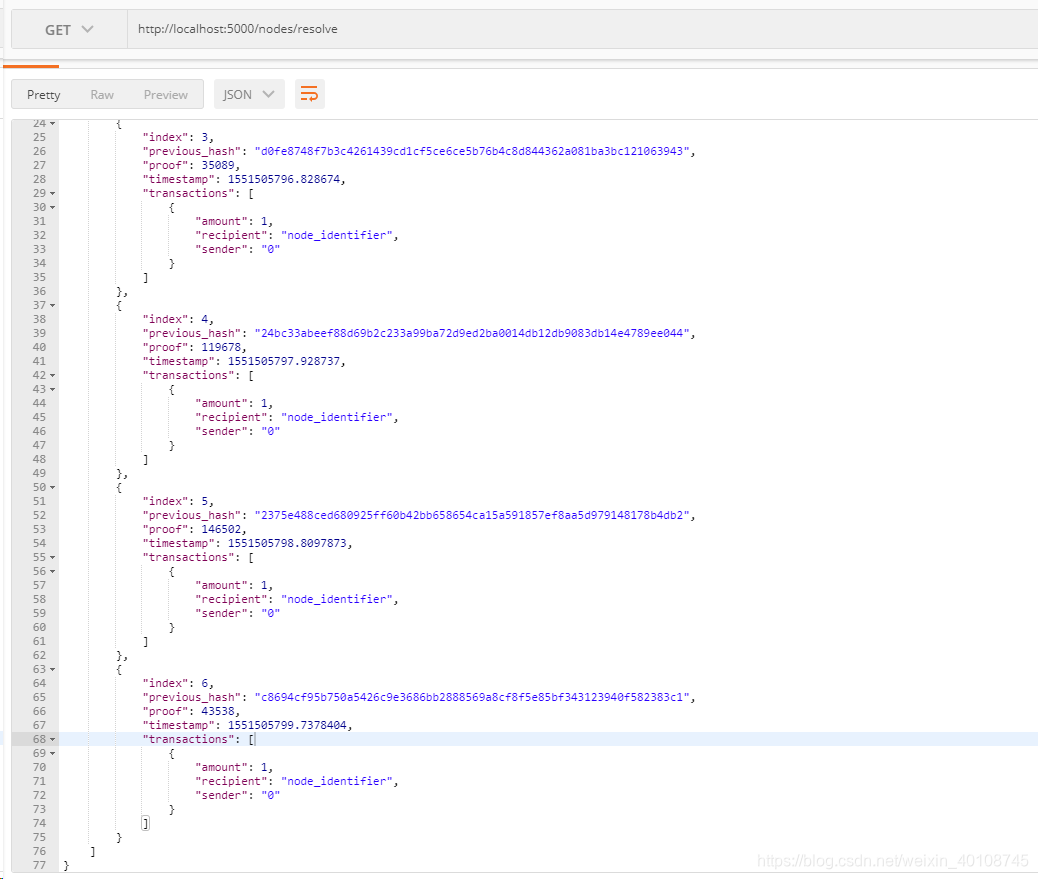
@app.route('/nodes/resolve', methods=['GET'])
def consensus():
replaced = blockchain.resolve_conflicts()
if replaced:
response = {
'message': 'Our chain was replaced',
'new_chain': blockchain.chain
}
else:
response = {
'message': 'Our chain is authoritative',
'chain': blockchain.chain
}
return jsonify(response), 200
此时,你可以使用不同机器(或使用同一台机器的不同端口)启动不同的节点。 我是使用的同一台机器,在另外一个端口上创建了另一个节点,并将其注册到当前节点。 因此,我有两个节点:http:// localhost:5000 和 http:// localhost:5001。
 然后,我在第二个节点上挖出了一些新的区块,以确保第二个节点的链条比第一个节点的链条更长。 之后,我在第一个节点上调用 GET / nodes / resolve,使其中链通过共识算法被第二个节点的链条取代: