文章目录
- 一、注册中心CAP理论知识
- 二、注册中心CAP原理
- 三.注册中心-Eureka_Server搭建
- 四、Eureka_Client客户端搭建(ProductServerApplication,用来向Eureka服务端提供服务)
- 五、服务消费者Ribbon和Feign
- 六、互联网架构服务熔断降级Hystrix
一、注册中心CAP理论知识
二、注册中心CAP原理

三.注册中心-Eureka_Server搭建
1、搭建项目(勾选上该选项后会自动添加eureka的一些依赖)

2、在启动类上加eureka服务注解-@EnableEurekaServer
@SpringBootApplication
@EnableEurekaServer
public class EurekaServerApplication {
    public static void main(String[] args) {
        SpringApplication.run(EurekaServerApplication.class, args);
    }
}
3、application.yml配置(注意空格)
server:
  port: 8761
eureka:
  instance:
    hostname: localhost
  client:
    #声明自己是服务端(不向自己注册自己)
    register-with-eureka: false
    fetch-registry: false
    #注册中心地址
    serviceUrl:
      defaultZone: http://${eureka.instance.hostname}:${server.port}/eureka/
4、访问eureka页面
http://localhost:8761/

四、Eureka_Client客户端搭建(ProductServerApplication,用来向Eureka服务端提供服务)
1、搭建项目


2、写接口
/**
 * Author: sgw
 * Date 2019/3/23
 * Description:
 **/
@RestController
@RequestMapping("/api/v1/product")
public class ProductController {
    @Autowired
    private ProductService productService;

    /**
     * 查询商品列表
     * @return
     */
    @RequestMapping("list")
    public Object list() {
        return productService.listProduct();
    }

    /**
     * 根据id查询商品
     * @param id
     * @return
     */
    @RequestMapping("find")
    public Object findById(@RequestParam("id") int id) {
        return productService.findById(id);
    }
}
3、向应用中心注册服务(application.yml)
server:
  port: 8771

#指定注册中心地址
eureka:
  client:
    serviceUrl:
      defaultZone: http://localhost:8761/eureka/

#服务名称
spring:
  application:
    name: product-service
4、访问注册中心,可以看到刚注册的服务

5、利用idea启动多个服务来进行测试(多个服务向注册中心注册地址)

此时,访问这两个地址效果是一样的:
http://localhost:8771/api/v1/product/find?id=1
http://localhost:8772/api/v1/product/find?id=1
Eureka可以看到两个服务

6、去掉Eureka界面的红色提示(不建议去掉)
server:
  port: 8761
eureka:
  instance:
    hostname: localhost
  client:
    #声明自己是服务端
    register-with-eureka: false
    fetch-registry: false
    #注册中心地址
    serviceUrl:
      defaultZone: http://${eureka.instance.hostname}:${server.port}/eureka/
  server:
    #去掉页面红色提示,默认是true(自我保护,默认开启,不建议关闭)
    enable-self-preservation: false
五、服务消费者Ribbon和Feign
1、常用的服务间的调用方式

2、创建服务调用方order_service(也可能会向注册中心注册服务)


application.yml:
server:
  port: 8781

#指定注册中心地址
eureka:
  client:
    serviceUrl:
      defaultZone: http://localhost:8761/eureka/

#服务名称
spring:
  application:
    name: order-service
3、想使用ribbon(相当于httpClient,用来调远程接口的),有两种方式
方式一:
3.1 在启动类里加入RestTemplate
@SpringBootApplication
public class OrderServiceApplication {

    public static void main(String[] args) {
        SpringApplication.run(OrderServiceApplication.class, args);
    }

    //使用Ribbon需要加下边的RestTemplate
    @Bean
    @LoadBalanced
    public RestTemplate restTemplate() {
        return new RestTemplate();
    }
}
3.2 在需要调远程接口的地方注入RestTemplate
/**
 * Author: sgw
 * Date 2019/3/26
 * Description:
 **/
@Service
public class ProductOrderServiceImpl implements ProductOrderService {
    //注入启动类里的restTemplate
    @Autowired
    private RestTemplate restTemplate;

    @Override
    public ProductOrder save(int user_id, int product_id) {
        /**
         * product-service:服务提供方在自己的配置文件里配置的服务名字
         * api/v1/product/find:服务提供方controller的地址
         * 此处自动做了负载均衡,即服务提供者有多个的话,这里会随机调用其中一个(也可以指定权重)
         */
        Object obj = restTemplate.getForObject("http://product-service/api/v1/product/find?id=" + product_id, Object.class);
        System.out.println(obj);

        ProductOrder productOrder=new ProductOrder();
        productOrder.setCreateTime(new Date());
        productOrder.setUserId(user_id);
        productOrder.setTradeNo(UUID.randomUUID().toString());

        return productOrder;
    }
}
方式二:注入LoadBalancerClient
/**
 * Author: sgw
 * Date 2019/3/26
 * Description:
 **/
@Service
public class ProductOrderServiceImpl implements ProductOrderService {
    @Autowired
    private LoadBalancerClient loadBalancerClient;

    @Override
    public ProductOrder save(int user_id, int product_id) {
        ServiceInstance instance=loadBalancerClient.choose("product-service");
        //拼接地址,instance.getHost()放在第一个%s上,instance.getPort()放在第二个%s上
        //拼接后的url:http://localhost:8772/api/v1/product/find?id=6
        String url=String.format("http://%s:%s/api/v1/product/find?id="+product_id,instance.getHost(),instance.getPort());

        RestTemplate restTemplate=new RestTemplate();
        Map<String,Object> productMap = restTemplate.getForObject(url, Map.class);
        ProductOrder productOrder=new ProductOrder();
        productOrder.setCreateTime(new Date());
        productOrder.setUserId(user_id);
        productOrder.setTradeNo(UUID.randomUUID().toString());
        productOrder.setProductName(productMap.get("name").toString());
        productOrder.setPrice(Integer.parseInt(productMap.get("price").toString()));
        return productOrder;

        /**
         * product-service:服务提供方在自己的配置文件里配置的服务名字
         * api/v1/product/find:服务提供方controller的地址
         * 此处自动做了负载均衡,即服务提供者有多个的话,这里会随机调用其中一个(也可以指定权重)
         */
       /* Object obj = restTemplate.getForObject("http://product-service/api/v1/product/find?id=" + product_id, Object.class);
        System.out.println(obj);
*/
    }
}
3.3 Controller类
/**
 * Author: sgw
 * Date 2019/3/26
 * Description:
 **/
@RestController
@RequestMapping("api/v1/order")
public class OrderController {
    @Autowired
    private ProductOrderService productOrderService;

    @RequestMapping("save")
    public Object save(@RequestParam("user_id") int userId, @RequestParam("product_id") int productId) {
        return productOrderService.save(userId, productId);
    }
}
3.4 调用服务
http://localhost:8781/api/v1/order/save?product_id=6&user_id=4
4、Ribbon源码分析之@LoadBalanced
- 首先从注册中心获取provider的列表
- 通过一定的策略选择其中的一个节点
- 将选中的节点返回给restTemplate调用
5、自定义负载均衡策略(默认是轮询)
5.1在服务调用方(order-service)的application.yml里配置
server:
  port: 8781

#指定注册中心地址
eureka:
  client:
    serviceUrl:
      defaultZone: http://localhost:8761/eureka/

#服务名称
spring:
  application:
    name: order-service

#自定义负载均衡策略(这里设置为随机,product-service是服务提供者的服务名字)
product-service:
  ribbon:
    NFLoadBalancerRuleClassName: com.netflix.loadbalancer.RandomRule
5.2、策略的选择
- 如果是几台机器配置一样,则不建议修改策略
- 如果部分机器配置强,则策略可以改为:WeightedResponseTimeRule(这个策略每30秒计算一次服务器响应时间,以响应时间作为权重,响应时间越短的服务器被选中的概率越大)
6、Feign(本质还是http)方式调用服务
6.1在服务调用方加入feign依赖(注意新旧版本依赖不一样)
 <dependency>
      <groupId>org.springframework.cloud</groupId>
      <artifactId>spring-cloud-starter-openfeign</artifactId>
 </dependency>
6.2启动类里加注解@EnableFeignClients
@SpringBootApplication
@EnableFeignClients
public class OrderServiceApplication {

    public static void main(String[] args) {
        SpringApplication.run(OrderServiceApplication.class, args);
    }
    //使用Ribbon需要加下边的RestTemplate
    @Bean
    @LoadBalanced
    public RestTemplate restTemplate() {
        return new RestTemplate();
    }
}
6.3、新增接口,并在接口上加注解:@FeignClient(name = “product-service”)
/**
 * Author: sgw
 * Date 2019/3/28
 * Description:商品服务客户端 @FeignClient的name值是服务提供者的服务名字
 **/
@FeignClient(name = "product-service")
public interface ProductClient {
    /**
     * 注意:api/v1/product/find是服务提供者的controller的地址
     * 注意:服务提供方使用requestBody的话,这里不能用@GetMapping,应该用@PostMapping
     * 注意:具体传参可以直接百度:Feign调用传参
     * @param id
     * @return
     */
    @GetMapping("api/v1/product/find")
    String findById(@RequestParam(value = "id") int id);
}
6.4、新建json工具类
import com.fasterxml.jackson.databind.JsonNode;
import com.fasterxml.jackson.databind.ObjectMapper;

import java.io.IOException;
/**
 * Author: sgw
 * Date 2019/3/28
 * Description:Json工具类
 **/
public class JsonUtils {
    private static final ObjectMapper objectMappper = new ObjectMapper();
    /**
     * json字符串转JsonNode对象的方法
     */
    public static JsonNode str2JsonNode(String str){
        try {
            return  objectMappper.readTree(str);
        } catch (IOException e) {
            return null;
        }
    }
}
6.4、开始使用Feign(Feign包含Ribbon,以后使用Fegin)
/**
 * Author: sgw
 * Date 2019/3/26
 * Description:
 **/
@Service
public class ProductOrderServiceImpl implements ProductOrderService {

    @Autowired
    private ProductClient productClient;
    @Override
    public ProductOrder save(int user_id, int product_id) {
        String response = productClient.findById(product_id);
        JsonNode jsonNode = JsonUtils.str2JsonNode(response);

        ProductOrder productOrder=new ProductOrder();
        productOrder.setCreateTime(new Date());
        productOrder.setUserId(user_id);
        productOrder.setTradeNo(UUID.randomUUID().toString());
        productOrder.setProductName(jsonNode.get("name").toString());
        productOrder.setPrice(Integer.parseInt(jsonNode.get("price").toString()));
        return productOrder;

    }
}
6.5 Feign源码分析以及Feign与Ribbon之间的选择(二者都是用来调用远程服务)
模拟服务提供者出现bug的情况(使用TimeUnit来指定当前线程睡眠10秒)
    /**
     * 根据id查询商品
     * @param id
     * @return
     */
    @RequestMapping("find")
    public Object findById(@RequestParam("id") int id) {
        //import java.util.concurrent.TimeUnit;
        try {
            //TimeUnit包:import java.util.concurrent.TimeUnit;
            TimeUnit.SECONDS.sleep(10);
        } catch (InterruptedException e) {
            e.printStackTrace();
        }
        return productService.findById(id);
    }
服务调用者(这里使用Fegin调用)来调用服务会报错:

报错日志: Read timed out
},Server stats: [[Server:localhost:8772;	Zone:defaultZone;	Total Requests:0;	Successive connection failure:0;	Total blackout seconds:0;	Last connection made:Thu Jan 01 08:00:00 CST 1970;	First connection made: Thu Jan 01 08:00:00 CST 1970;	Active Connections:0;	total failure count in last (1000) msecs:0;	average resp time:0.0;	90 percentile resp time:0.0;	95 percentile resp time:0.0;	min resp time:0.0;	max resp time:0.0;	stddev resp time:0.0]
, [Server:192.168.237.1:8773;	Zone:defaultZone;	Total Requests:0;	Successive connection failure:0;	Total blackout seconds:0;	Last connection made:Thu Jan 01 08:00:00 CST 1970;	First connection made: Thu Jan 01 08:00:00 CST 1970;	Active Connections:0;	total failure count in last (1000) msecs:0;	average resp time:0.0;	90 percentile resp time:0.0;	95 percentile resp time:0.0;	min resp time:0.0;	max resp time:0.0;	stddev resp time:0.0]
]}ServerList:org.springframework.cloud.netflix.ribbon.eureka.DomainExtractingServerList@175e4d3d
2019-03-30 13:36:30.598 ERROR 13328 --- [nio-8781-exec-1] o.a.c.c.C.[.[.[/].[dispatcherServlet]    : Servlet.service() for servlet [dispatcherServlet] in context with path [] threw exception [Request processing failed; nested exception is feign.RetryableException: Read timed out executing GET http://product-service/api/v1/product/find?id=6] with root cause

java.net.SocketTimeoutException: Read timed out
	at java.net.SocketInputStream.socketRead0(Native Method) ~[na:1.8.0_181]
	at java.net.SocketInputStream.socketRead(SocketInputStream.java:116) ~[na:1.8.0_181]
	at java.net.SocketInputStream.read(SocketInputStream.java:171) ~[na:1.8.0_181]
	at java.net.SocketInputStream.read(SocketInputStream.java:141) ~[na:1.8.0_181]
	at java.io.BufferedInputStream.fill(BufferedInputStream.java:246) ~[na:1.8.0_181]
	at java.io.BufferedInputStream.read1(BufferedInputStream.java:286) ~[na:1.8.0_181]
	at java.io.BufferedInputStream.read(BufferedInputStream.java:345) ~[na:1.8.0_181]
	at sun.net.www.http.HttpClient.parseHTTPHeader(HttpClient.java:735) ~[na:1.8.0_181]
	at sun.net.www.http.HttpClient.parseHTTP(HttpClient.java:678) ~[na:1.8.0_181]
	at sun.net.www.protocol.http.HttpURLConnection.getInputStream0(HttpURLConnection.java:1587) ~[na:1.8.0_181]
在服务调用方application.yml里设置时间值,超出这个时间值取不到服务提供方的数据的话再报错
feign:
  client:
    config:
      default:
        connectTimeout: 5000
        #超出11秒获取不到远程服务的数据的话报错,一般这里设置为2秒:12000,默认超出1秒没反应就报错
        readTimeout: 11000
Fegin与Ribbon总结
以后开发选择Fegin
 - Fegin默认集成了Ribbon
 - Fegin采用注解方式进行配置,配置熔断等方式更加方便
六、互联网架构服务熔断降级Hystrix
6.1简介
系统负载过高,突发流量或网络等各种异常情况介绍,常用的解决方案
熔断:
类似保险丝,熔断服务,为了防止整个系统故障,包含自己和下游服务;
降级:
抛弃一些非核心的接口和数据,等有条件的时候再去携带它;比如淘宝双十一的时候,把相关推荐,评论等非核心的接口抛弃掉,双十一以后再把这些接口调出来;
熔断与降级的交集:
相同点:
    1、从可用性与可靠性出发,防止系统奔溃;
    2、最终让用户体会到是某些功能暂时不能用;
 不同点:
    1、熔断一般是由下游服务故障导致的,而服务降级一般是从整体系统负载考虑,由于服务调用者导致的;
6.2Netflix开源组件断路器Hystrix
6.2.1 为什么要用Hystrix:
在一个分布式系统里,一个服务依赖多个服务,可能存在某个服务调用失败(比如异常、超时等);
如何保证在一个依赖出现问题的情况下,不会导致整体服务失败,通过Hystrix就可以解决;
6.2.2 Hystrix开发
服务调用者引入Hystrix依赖
<!--Hytrix依赖-->
<dependency>
      <groupId>org.springframework.cloud</groupId>
      <artifactId>spring-cloud-starter-netflix-hystrix</artifactId>
</dependency>
在启动类里加注解
@EnableCircuitBreaker
注解越来越多,可以使用下边的注解来代替之前的那些注解
@SpringCloudApplication
在服务调用者的Controller的方法上加如下注解
@HystrixCommand(fallbackMethod = "saveOrderFail")
新增saveOrderFail方法,注意:saveOrderFail方法参数列表一定要与save方法的参数列表一致
/**
 * Author: sgw
 * Date 2019/3/26
 * Description:
 **/
@RestController
@RequestMapping("api/v1/order")
public class OrderController {
    @Autowired
    private ProductOrderService productOrderService;

    @RequestMapping("save")
    @HystrixCommand(fallbackMethod = "saveOrderFail")
    public Object save(@RequestParam("user_id") int userId, @RequestParam("product_id") int productId) {
        Map<String,Object> data=new HashMap<>();
        data.put("code",0);
        data.put("data",productOrderService.save(userId, productId));
        return data;
    }

    /**
     * 注意,参数列表一定要与save方法的参数列表一致
     * @param userId
     * @param productId
     * @return
     */
    private Object saveOrderFail( int userId, int productId){
        Map<String,Object> msg=new HashMap<>();
        msg.put("code",-1);
        msg.put("msg","抢购人数太多,稍后重试");
        return msg;
    }
}
将服务提供者停掉,来模拟服务提供者出现bug的情况,此时服务调用者调用服务的话出现下边提示

6.2.3使用Feign与Hystrix结合,针对商品服务,做降级处理
在服务调用者配置文件里添加配置,用来将Fegin和Hystrix结合起来(旧版本默认开启,旧版本默认关闭,需手动开启)
feign:
  hystrix:
    enabled: true
配置文件即:
feign:
  hystrix:
    enabled: true
  client:
    config:
      default:
        connectTimeout: 5000
        #超出11秒获取不到远程服务的数据再报错
        readTimeout: 11000
在ProductClient接口上的注解里加fallback,即异常时的降级处理类
/**
 * Author: sgw
 * Date 2019/3/28
 * Description:商品服务客户端
 * fallback:出现异常时的降级处理类
 **/
@FeignClient(name = "product-service",fallback = ProductClientFallback.class)
public interface ProductClient {
    /**
     * 注意:api/v1/product/find是服务提供者的controller的地址
     * @param id
     * @return
     */
    @GetMapping("api/v1/product/find")
    String findById(@RequestParam(value = "id") int id);
}
新增ProductClientFallback类,实现之前自定义的接口ProductClient
/**
 * Author: sgw
 * Date 2019/3/30
 * Description:@Component交给spring去扫描
 **/
@Component
public class ProductClientFallback implements ProductClient {
    @Override
    public String findById(int id) {
        System.out.println("feign 调用商品服务异常");
        return null;
    }
}
此时将服务提供者停掉来模拟提供者出bug,服务调用方去调用,控制台会报错:
feign 调用商品服务异常
6.2.4熔断降级服务异常报警(短信)通知
报警可以加在Service层,也可以加在Controller层(API层),这里加在了Controller层

在项目里引入Redis依赖(linux-Centos7下安装Redis5.0.3)
<!--Redis依赖-->
<dependency>
   <groupId>org.springframework.boot</groupId>
   <artifactId>spring-boot-starter-data-redis</artifactId>
</dependency>
在application.yml里配置redis信息:
redis:
    database: 0
    host: 192.168.237.128
    port: 6379
    timeout: 2000
即:
spring:
  application:
    name: order-service
  redis:
    database: 0
    host: 192.168.237.128
    port: 6379
    timeout: 2000
在Controller使用Redis做预警
package com.maltose.order_service.controller;

import com.maltose.order_service.service.ProductOrderService;
import com.netflix.hystrix.contrib.javanica.annotation.HystrixCommand;
import org.apache.commons.lang.StringUtils;
import org.springframework.beans.factory.annotation.Autowired;
import org.springframework.data.redis.core.StringRedisTemplate;
import org.springframework.web.bind.annotation.RequestMapping;
import org.springframework.web.bind.annotation.RequestParam;
import org.springframework.web.bind.annotation.RestController;

import javax.servlet.http.HttpServletRequest;
import java.util.HashMap;
import java.util.Map;
import java.util.concurrent.TimeUnit;

/**
 * Author: sgw
 * Date 2019/3/26
 * Description:
 **/
@RestController
@RequestMapping("api/v1/order")
public class OrderController {

    @Autowired
    private ProductOrderService productOrderService;

    @Autowired
    private StringRedisTemplate redisTemplate;

    @RequestMapping("save")
    @HystrixCommand(fallbackMethod = "saveOrderFail")
    public Object save(@RequestParam("user_id") int userId, @RequestParam("product_id") int productId, HttpServletRequest request) {
        Map<String,Object> data=new HashMap<>();
        data.put("code",0);
        data.put("data",productOrderService.save(userId, productId));
        return data;
    }

    /**
     * 注意,参数列表一定要与save方法的参数列表一致
     * @param userId
     * @param productId
     * @return
     */
    private Object saveOrderFail(int userId, int productId, HttpServletRequest request){
        //监控报警 start
        String saveOrderKey="save-order";
        String sendValue = redisTemplate.opsForValue().get(saveOrderKey);
        String ip=request.getRemoteAddr();
        //注意,这里需要异步,不能同步,不然此处阻塞的话(发短息耗时的话)不会继续向下走
        new Thread(()->{
            if(StringUtils.isBlank(sendValue)){
                System.out.println("调用发短信接口去发送短信;用户下单失败,请马上处理;"+ip);
                //此时调用发短信接口去发送短信,略过

                /**
                 * 在Redis里放入数据,防止一直不停的发短信
                 * 间隔时间20秒(正常比这个数据久,这里为了测试先设置20秒)
                 */
                redisTemplate.opsForValue().set(saveOrderKey,"save-order-fail",20, TimeUnit.SECONDS);
            }else{
                System.out.println("已经发生过短信了,20秒内不要发了");
            }
        }).start();

        //监控报警 end
        Map<String,Object> msg=new HashMap<>();
        msg.put("code",-1);
        msg.put("msg","抢购人数太多,稍后重试");
        return msg;
    }
}
小总结:
在每个节点设置一个localCatch(本地缓存),即标识位,就可以监控到哪个节点(ip)发生了异常;
6.2.5 Hystrix降级策略调整
禁用Hystrix的超时时间(不建议这样做)
#禁用Hystrix的超时时间,没有提示,需要手写(一般不要禁用)
hystrix:
  command:
    default:
      execution:
        timeout:
          enabled: false
设置超时时间为4秒
#设置Hystrix的超时时间为4秒
hystrix:
  command:
    default:
      execution:
        isolation:
          thread:
            timeoutInMilliseconds: 4000
即整体配置文件:
server:
  port: 8781

eureka:
  client:
    serviceUrl:
      defaultZone: http://localhost:8761/eureka/

spring:
  application:
    name: order-service
  redis:
    database: 0
    host: 192.168.237.128
    port: 6379
    timeout: 2000
#自定义负载均衡策略
product-service:
  ribbon:
    NFLoadBalancerRuleClassName: com.netflix.loadbalancer.RandomRule

feign:
  hystrix:
    enabled: true
  client:
    config:
      default:
        connectTimeout: 4000
        #Fegin集成Ribbon的超时时间:超出11秒获取不到远程服务的数据再报错
        readTimeout: 4000
#禁用Hystrix的超时时间 不建议禁用
#hystrix:
#  command:
#    default:
#      execution:
#        timeout:
#          enabled: false

#设置Hystrix的超时时间为4秒
hystrix:
  command:
    default:
      execution:
        isolation:
          thread:
            timeoutInMilliseconds: 4000
6.3断路器Dashboard监控仪表盘
简介:作为了解,一般在生产环境不会部署Dashboard这个东西
加入依赖:
 <!--Dashboard监控仪表盘之web界面-->
        <dependency>
            <groupId>org.springframework.cloud</groupId>
            <artifactId>spring-cloud-starter-netflix-hystrix-dashboard</artifactId>
        </dependency>
        <!--Dashboard监控仪表盘之springboot监控-->
        <dependency>
            <groupId>org.springframework.boot</groupId>
            <artifactId>spring-boot-starter-actuator</artifactId>
        </dependency>
在启动类里加注解:
@EnableHystrixDashboard
在配置文件里加endpoint
#Dashboard监控,*代表暴露全部监控信息
management:
  endpoints:
    web:
      exposure:
        include: "*"
访问入口:
http://localhost:8781/hystrix
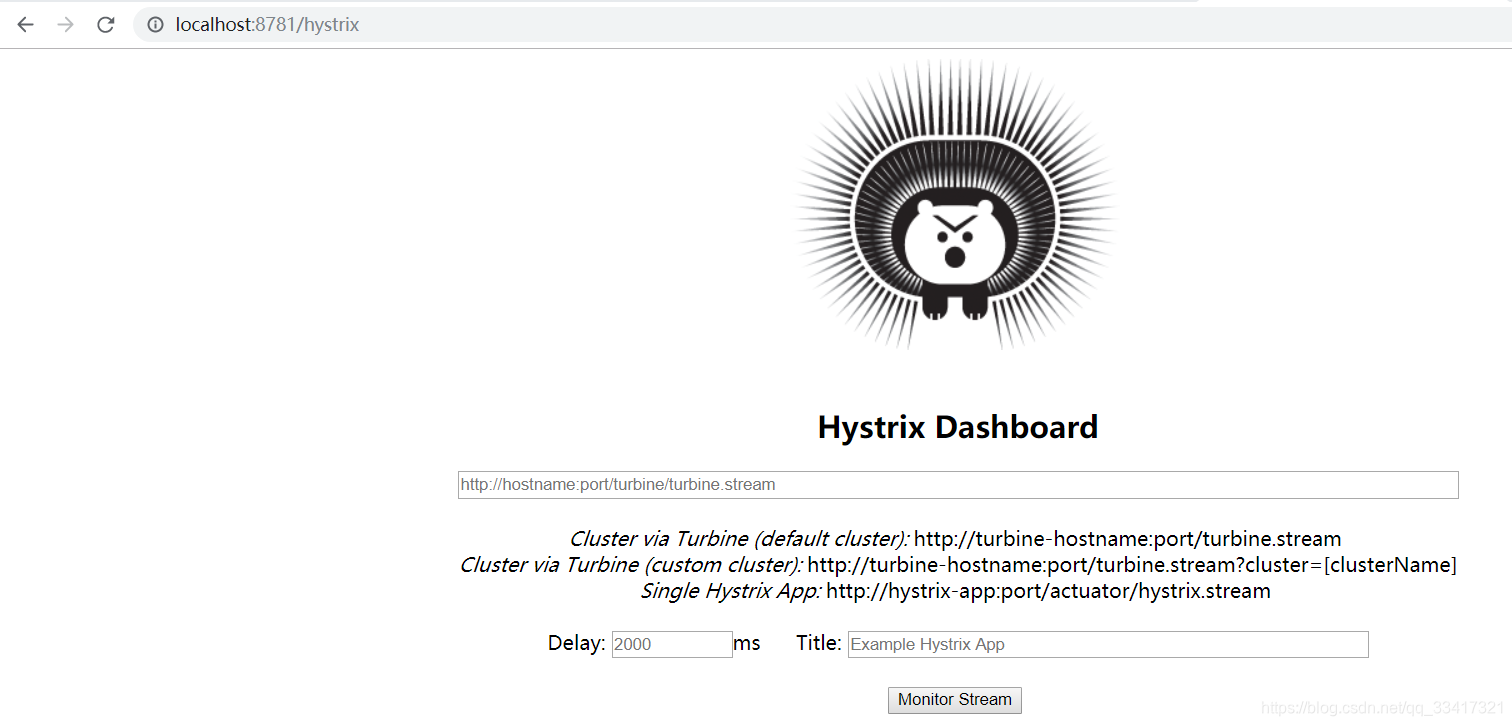
在上边的输入框里输入:
http://localhost:8781/actuator/hystrix.stream
点击下边的按钮 Monitor Stream
此时,当我们调用服务的时候(即刷新http://localhost:8781/api/v1/order/save?product_id=6&user_id=4这个地址),在监控的web页面就会有数据:

断路器仪表参数讲解以及模拟熔断

微服务网关zuul