Jetson-Nano开箱配置及Tensorflow安装使用
简介
最近老黄发布了新的硬件,号称Nvidia良心之作的99美元AI硬件Jetson-Nano:
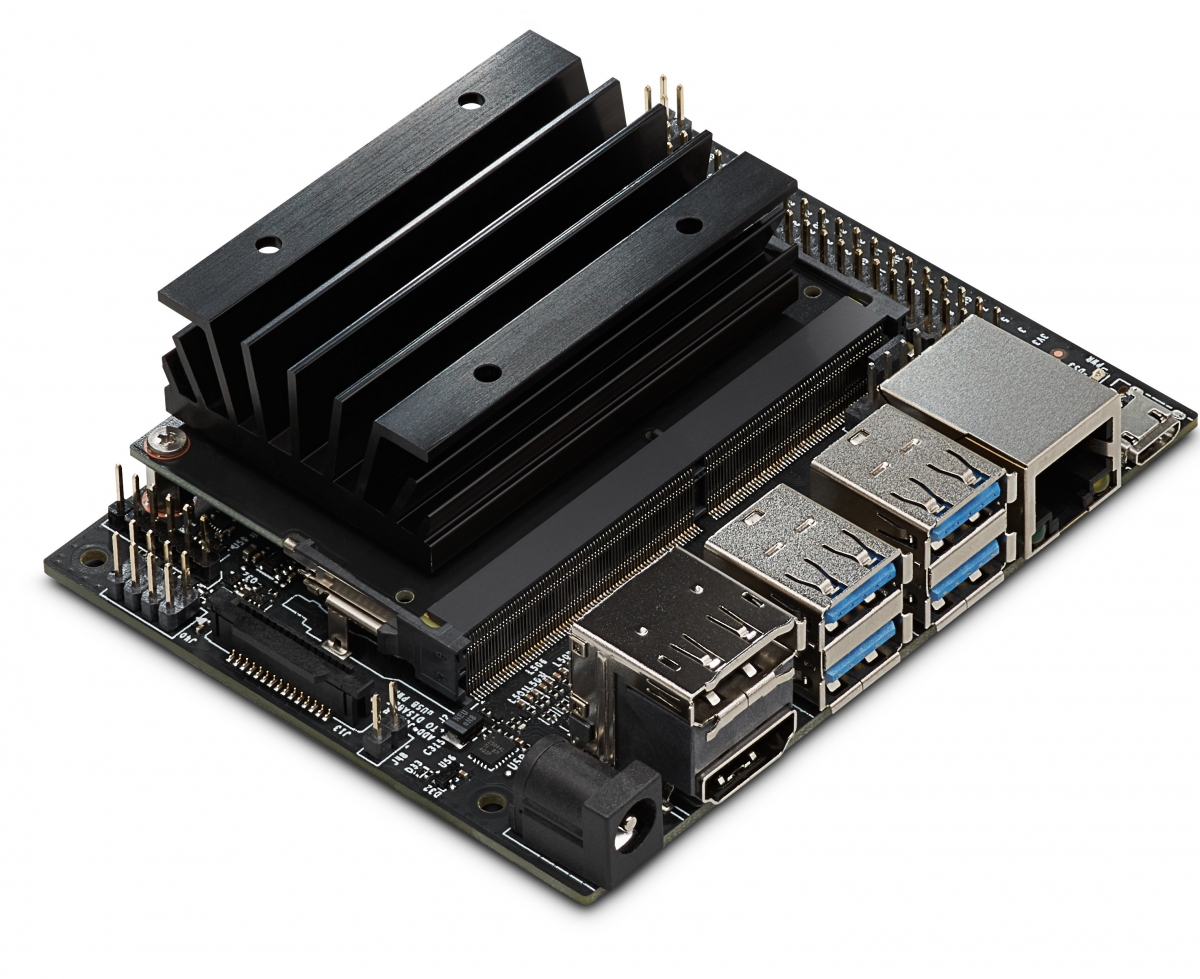
该设备使用的是Maxwell(比pascal古老一点)架构的GPU,有128个Cuda核心,运算能力472G,看数值似乎一般般,但是考虑这是一个只有5W的嵌入式设备,这种运算能力已经相当可观了,足够部署一些小模型在终端设备上。
同时,Jetson-nano还有一个4核心A57处理器,运行Linux for Tegra,其实就是一个Ubuntu的ARM定制版本,可玩性相当高了。
设备发布之后,dwSun正在淘宝上犹豫要不要下单折腾一下,鲁朗软件的大佬碰巧在这个时候问我有有没有兴趣,他们准备搞几个玩玩,dwSun当然是两眼冒金星啦。
鲁朗软件官网:http://www.robusoft.com.cn

安装配置
准备工作
首先你得有一个Jetson-nano的开发板,像下面这样:

这里dwSun要感谢鲁朗软件的大佬们赞助的Jetson-nano硬件。
配件
光有一个开发板还不够,你还需要至少如下配件:
-
(必需)能提供电源的电源插座一个
扫描二维码关注公众号,回复: 5752840 查看本文章
-
(必需)TF卡一个,至少16GB,注意一定要至少16GB的,Jetson-nano的os image解压之后就有12G,太小的TF卡根本装不下。
-
(必需)USB供电装置,Jetson-nano虽然支持DC5V和micro-usb5V两种供电方式,但是谁家正好有DC5V的接头,反而是USB谁家都有,所以USB是首选供电方式。这里需要注意,虽然官方文档指出,Jetson-nano只需要5V2A的供电设备就可以工作,但是很多人手里的USB充电头可能是三无产品,有虚标的现象,同时,USB线材的质量也会影响供电效果。dwSun用的是小米家的USB充电头,支持快充,标称5V2.5A功率18W,目前看使用没啥问题。USB线则是一个20cm长的短线。
-
(选配)usb网卡,因为Jetson-nano有一个RJ45的插口,所以可以直接插网线用,但是多一根线总是看着心烦不是。用树梅派的时候,dwSun注意到,usb网卡偶尔不是很稳定,rpi3代以后的板载wifi也是。倒是在jetson-nano上,开机几天了,usb网卡还算好用,也没出啥问题。
-
(选配)网线,这个没啥好说的,随便找一个就行了,5类6类都行。嵌入式设备,网络通信量不至于很大。
有上述配件,就足够jetson-nano的日常使用了。不过初次安装的时候,还需要做一些配置,所以需要一些额外的配件,这里列举如下:
- hdmi的显示器和相应的数据线,或者DP接口也可以
- usb键鼠
OS
Jetson-nano的OS,跟树梅派等一些小型开发板卡一样,都是放在TF卡里面,插到板子上面的。
跟普通PC的安装光盘镜像(ISO)不同,这些嵌入式设备的OS安装镜像一般是一个img文件,直接写入TF卡。
从这里下载安装镜像。得到jetson-nano-sd-r32.1-2019-03-18.zip文件,解压后得到jetson-nano-sd-r32.1-2019-03-18.img文件。
文件比较大,zip文件都有5G多,下载真的要点时间。
OS写入
Nvidia官方推荐使用Etcher将下载的img文件写入TF卡。
Etcher支持Mac,Linux,Win三个平台,鼠标操作,确实值得一试。
不过平时就用Linux做日常使用系统的dwSun个人更倾向于原始的命令行方式,现将命令行的操作方式介绍如下:
-
插入TF卡
-
通过fdisk命令,查找到对应的tf卡分区,
-
sudo fdisk -l -
dwSun电脑上的输出部分如下:
-
Disk /dev/sdb: 29.8 GiB, 31981568000 bytes, 62464000 sectors Disk model: Flash Disk Units: sectors of 1 * 512 = 512 bytes Sector size (logical/physical): 512 bytes / 512 bytes I/O size (minimum/optimal): 512 bytes / 512 bytes Disklabel type: dos Disk identifier: 0x1aad8646 Device Boot Start End Sectors Size Id Type /dev/sdb1 * 0 1464319 1464320 715M 0 Empty /dev/sdb2 334968 339639 4672 2.3M ef EFI (FAT-12/16/32) -
简单根据容量就可以简单判断哪个是你的TF卡,因为写入OS镜像是个破坏性操作,会抹掉TF卡上面的所有数据,所以一定要慎重操作。
-
-
卸载TF卡的对应分区,dwSun这里是sdb1/sdb2两个分区。
-
sudo umount /dev/sdb1
sudo umount /dev/sdb2
-
-
使用dd命令写入OS的img文件。
-
sudo dd if=jetson-nano-sd-r32.1-2019-03-18.img of=/dev/sdb bs=10MB -
bs是blocksize,一次读写的块大小。
-
-
等待写入完成即可
OS初始配置
TF卡制作完成之后,将TF卡插入jetson-nano,官方给了一个非常形象的示意图,这里不再赘述。

插上USB键鼠,显示器,最后插上USB电源之后,系统会直接开始启动。系统启动过程中,会看到NVIDIA的logo和经典的linux文本滚动启动界面。
首次启动完成后,Jetson-nano的OS会引导用户进行语言,键盘,时区,用户名密码等的配置,与Ubuntu的首次安装配置如出一辙,按照引导程序的指示操作即可,这里不再赘述。
OS设置
系统首次启动配置之后,重启完成即可使用。这里做一些简单的易用性设置。
更换apt源
Jetson设备默认的apt镜像源在海外,速度蛋疼的紧,这里用一个国内的源代替海外源。
这里用的是中科大的源,内容如下:
deb http://mirrors.ustc.edu.cn/ubuntu-ports/ bionic-updates main restricted
deb http://mirrors.ustc.edu.cn/ubuntu-ports/ bionic universe
deb http://mirrors.ustc.edu.cn/ubuntu-ports/ bionic-updates universe
deb http://mirrors.ustc.edu.cn/ubuntu-ports/ bionic multiverse
deb http://mirrors.ustc.edu.cn/ubuntu-ports/ bionic-updates multiverse

deb http://mirrors.ustc.edu.cn/ubuntu-ports/ bionic-backports main restricted universe multiverse

deb http://mirrors.ustc.edu.cn/ubuntu-ports/ bionic-security main restricted
deb http://mirrors.ustc.edu.cn/ubuntu-ports/ bionic-security universe
deb http://mirrors.ustc.edu.cn/ubuntu-ports/ bionic-security multiverse
bionic是Ubuntu的版本,这里jetson官方提供的OS镜像是以18.04.2 LTS (Bionic Beaver)为基础制作的,查看/etc/os-release文件可以得到系统的版本信息。
替换apt源
sudo mv /etc/apt/sources.list /etc/apt/sources.list.bak # 将原镜像源文件做一个备份
sudo vi /etc/apt/sources.list # 用文本编辑器打开源文件进行编辑,将上述中科大的apt源内容写入这个文件中。
将文件保存之后,推荐执行一次系统全面升级:
sudo apt update
sudo apt full-upgrade
安装需要的工具
可以根据自己的需要安装一些工具。
这里dwSun装了htop,screen,nano
sudo apt install htop screen nano
简单测试
Jetson-nano的OS镜像已经自带了JetPack,cuda,cudnn,opencv等都已经安装好,不再需要额外的配置,这里简单测试一下。
系统里面自带了cudnn的测试程序,在**/usr/src/cudnn_samples_v7/目录下,这里用mnistCUDNN**程序进行测试。
cp -rvf /usr/src/cudnn_samples_v7/mnistCUDNN ~ # 将mnistCUDNN复制到home目录
cd ~/mnistCUDNN
make # 编译源代码
chmod a+x mnistCUDNN # 为可执行文件添加执行权限
./mnistCUDNN # 执行
上述步骤执行后,应该可以看到如下的输出:
cudnnGetVersion() : 7301 , CUDNN_VERSION from cudnn.h : 7301 (7.3.1)
Host compiler version : GCC 6.4.1
There are 1 CUDA capable devices on your machine :
device 0 : sms  1  Capabilities 5.3, SmClock 921.6 Mhz, MemSize (Mb) 3964, MemClock 12.8 Mhz, Ecc=0, boardGroupID=0
Using device 0

Testing single precision
Loading image data/one_28x28.pgm
Performing forward propagation ...
Testing cudnnGetConvolutionForwardAlgorithm ...
Fastest algorithm is Algo 1
Testing cudnnFindConvolutionForwardAlgorithm ...
^^^^ CUDNN_STATUS_SUCCESS for Algo 1: 0.324636 time requiring 3464 memory
^^^^ CUDNN_STATUS_SUCCESS for Algo 0: 0.393541 time requiring 0 memory
^^^^ CUDNN_STATUS_SUCCESS for Algo 2: 0.616615 time requiring 57600 memory
^^^^ CUDNN_STATUS_SUCCESS for Algo 4: 5.011875 time requiring 207360 memory
^^^^ CUDNN_STATUS_SUCCESS for Algo 5: 25.143282 time requiring 203008 memory
Resulting weights from Softmax:
0.0000000 0.9999399 0.0000000 0.0000000 0.0000561 0.0000000 0.0000012 0.0000017 0.0000010 0.0000000
Loading image data/three_28x28.pgm
Performing forward propagation ...
Resulting weights from Softmax:
0.0000000 0.0000000 0.0000000 0.9999288 0.0000000 0.0000711 0.0000000 0.0000000 0.0000000 0.0000000
Loading image data/five_28x28.pgm
Performing forward propagation ...
Resulting weights from Softmax:
0.0000000 0.0000008 0.0000000 0.0000002 0.0000000 0.9999820 0.0000154 0.0000000 0.0000012 0.0000006

Result of classification: 1 3 5

Test passed!

Testing half precision (math in single precision)
Loading image data/one_28x28.pgm
Performing forward propagation ...
Testing cudnnGetConvolutionForwardAlgorithm ...
Fastest algorithm is Algo 1
Testing cudnnFindConvolutionForwardAlgorithm ...
^^^^ CUDNN_STATUS_SUCCESS for Algo 0: 0.137136 time requiring 0 memory
^^^^ CUDNN_STATUS_SUCCESS for Algo 1: 0.157031 time requiring 3464 memory
^^^^ CUDNN_STATUS_SUCCESS for Algo 2: 0.293541 time requiring 28800 memory
^^^^ CUDNN_STATUS_SUCCESS for Algo 4: 1.024427 time requiring 207360 memory
^^^^ CUDNN_STATUS_SUCCESS for Algo 5: 5.061406 time requiring 203008 memory
Resulting weights from Softmax:
0.0000001 1.0000000 0.0000001 0.0000000 0.0000563 0.0000001 0.0000012 0.0000017 0.0000010 0.0000001
Loading image data/three_28x28.pgm
Performing forward propagation ...
Resulting weights from Softmax:
0.0000000 0.0000000 0.0000000 1.0000000 0.0000000 0.0000714 0.0000000 0.0000000 0.0000000 0.0000000
Loading image data/five_28x28.pgm
Performing forward propagation ...
Resulting weights from Softmax:
0.0000000 0.0000008 0.0000000 0.0000002 0.0000000 1.0000000 0.0000154 0.0000000 0.0000012 0.0000006

Result of classification: 1 3 5

Test passed!
从这个结果可以看到,jetson nano有一个显卡,cudnn版本为7.3.1。
TensorFlow的安装
直接用C/C++来做部署无疑是有最高运行效率的,但是开发起来就有点蛋疼,一般的做法是用python直接做模型的开发调试,到最终部署的时候,视需求决定是否用C/C++来部署最终的模型。
所以,如果在Jetson nano上有一个Python版本的深度框架,无疑可以极大的提高开发的效率。
目前,Nvidia官方只给除了Tensorflow在Jetson设备上的安装指南,甚至还提供了一个Nvidia编译版本的Tensorflow可以直接安装,dwSun也是寻寻觅觅了一段时间才发现。
安装相关的依赖库和工具
sudo apt-get install libhdf5-serial-dev hdf5-tools zlib1g-dev zip libjpeg8-dev libhdf5-dev python3-pip
系统里面默认是没有python3-pip的,所以需要自己安装。
pip的配置
默认pip是直接从pypi服务器下载这些库的,但是pypi也是在海外的,所以为了下载更快,这里进行一些简单的配置,使用国内pip源,这里使用的是ali的pip源,配置文件如下:
[global]

trusted-host = mirrors.aliyun.com
index-url = http://mirrors.aliyun.com/pypi/simple
修改配置文件
cd ~
mkdir .pip
nano .pip/pip.conf # 将上述配置内容写入配置文件即可
安装相关的python库
pip3 install -U numpy  # 需要编译安装,用时很长,所以单独安装
pip3 install -U h5py # 需要编译安装,用时非常长,我的板子装这个20多分钟才装完
pip3 install -U grpcio absl-py py-cpuinfo psutil portpicker grpcio six mock requests gast h5py astor termcolor
安装过程可能会出现一些错误,如网络错误等,所以需要仔细看一下最终安装的结果,确认安装确实完成了。
安装TensorFlow
pip3 install --pre --extra-index-url https://developer.download.nvidia.com/compute/redist/jp/v42 tensorflow-gpu
这么安装是直接从网站上下载wheel文件的,也可以用下载工具先去https://developer.download.nvidia.com/compute/redist/jp/v42下载好,再用pip执行本地安装。
这个过程同样很漫长,而且还要装一些额外的东西。
TensorFlow的测试
这里用一个mnist的cnn模型训练来测试一下,代码文件如下:
#!/usr/bin/env python
# -*- coding: utf-8 -*-

# Copyright 2015 The TensorFlow Authors. All Rights Reserved.
#
# Licensed under the Apache License, Version 2.0 (the "License");
# you may not use this file except in compliance with the License.
# You may obtain a copy of the License at
#
#         http://www.apache.org/licenses/LICENSE-2.0
#
# Unless required by applicable law or agreed to in writing, software
# distributed under the License is distributed on an "AS IS" BASIS,
# WITHOUT WARRANTIES OR CONDITIONS OF ANY KIND, either express or implied.
# See the License for the specific language governing permissions and
# limitations under the License.
# ==============================================================================

"""A very simple MNIST classifier.

See extensive documentation at
https://www.tensorflow.org/get_started/mnist/beginners
"""
from __future__ import absolute_import
from __future__ import division
from __future__ import print_function

import argparse
import sys

from tensorflow.examples.tutorials.mnist import input_data

import tensorflow as tf

FLAGS = None

def weight_variable(shape):
    initial = tf.truncated_normal(shape, stddev=0.1)
    return tf.Variable(initial)

def bias_variable(shape):
    initial = tf.constant(0.1, shape=shape)
    return tf.Variable(initial)

def conv2d(x, W):
    return tf.nn.conv2d(x, W, strides=[1, 1, 1, 1], padding='SAME')

def max_pool_2x2(x):
    return tf.nn.max_pool(x, ksize=[1, 2, 2, 1],
                        strides=[1, 2, 2, 1], padding='SAME')

def main(_):
    # Import data
    mnist = input_data.read_data_sets(FLAGS.data_dir, one_hot=True)

    # Create the model
    x = tf.placeholder(tf.float32, shape=[None, 784])
    y_ = tf.placeholder(tf.float32, shape=[None, 10])

    x_image = tf.reshape(x, [-1, 28, 28, 1])

    W_conv1 = weight_variable([3, 3, 1, 32])
    b_conv1 = bias_variable([32])

    h_conv1 = tf.nn.relu(conv2d(x_image, W_conv1) + b_conv1)
    h_pool1 = max_pool_2x2(h_conv1)

    W_conv2 = weight_variable([3, 3, 32, 32])
    b_conv2 = bias_variable([32])

    h_conv2 = tf.nn.relu(conv2d(h_pool1, W_conv2) + b_conv2)
    h_pool2 = max_pool_2x2(h_conv2)

    W_fc1 = weight_variable([7 * 7 * 32, 1024])
    b_fc1 = bias_variable([1024])

    h_pool2_flat = tf.reshape(h_pool2, [-1, 7*7*32])
    h_fc1 = tf.nn.relu(tf.matmul(h_pool2_flat, W_fc1) + b_fc1)

    keep_prob = tf.placeholder(tf.float32)
    h_fc1_drop = tf.nn.dropout(h_fc1, keep_prob)

    W_fc2 = weight_variable([1024, 10])
    b_fc2 = bias_variable([10])

    y_conv = tf.matmul(h_fc1_drop, W_fc2) + b_fc2

    cross_entropy = tf.reduce_mean(
    tf.nn.softmax_cross_entropy_with_logits(labels=y_, logits=y_conv))

    train_step = tf.train.AdamOptimizer(1e-4).minimize(cross_entropy)

    correct_prediction = tf.equal(tf.argmax(y_conv,1), tf.argmax(y_,1))

    accuracy = tf.reduce_mean(tf.cast(correct_prediction, tf.float32))
    sess = tf.InteractiveSession()
    sess.run(tf.global_variables_initializer())
    for i in range(1000): ## 这里只执行了1000步,原始的脚本是执行了2W步的,太久了
        batch = mnist.train.next_batch(50)
        if i%100 == 0:
            train_accuracy = accuracy.eval(feed_dict={
                x:batch[0], y_: batch[1], keep_prob: 1.0})
            print("step %d, training accuracy %.4f"%(i, train_accuracy))
        train_step.run(feed_dict={x: batch[0], y_: batch[1], keep_prob: 0.5})

    #print("test accuracy %g"%accuracy.eval(feed_dict={
    #       x: mnist.test.images, y_: mnist.test.labels, keep_prob: 1.0}))
    # 因为Jetson nano的内存有限,执行这一行的时候,内存会溢出
    # dwSun懒得改代码,最简单的办法是直接注释掉这一行

if __name__ == '__main__':
    parser = argparse.ArgumentParser()
    parser.add_argument('--data_dir',
                        type=str,
                        default='/home/user', # 注意,这里是保存mnist数据集的目录,根据需要设定
                        help='Directory for storing input data')
    FLAGS, unparsed = parser.parse_known_args()
    tf.app.run(main=main, argv=[sys.argv[0]] + unparsed)
这里使用的是比较低级的tf api,写法很罗嗦,不过肯定是好用的。
注意,这个脚本执行的时候,会去google的服务器上下载mnist数据集,但是google的服务器还是在国外,所以。。。
推荐去LeCun的个人官网先下载好这个数据集,一共四个文件,http://yann.lecun.com/exdb/mnist/index.html,放在数据目录里面。
python3 cnn.py # cnn.py内容即是上述代码文件
如果一切OK,你将看到如下输出:
/usr/lib/python3/dist-packages/h5py/__init__.py:36: FutureWarning: Conversion of the second argument of issubdtype from `float` to `np.floating` is deprecated. In future, it will be treated as `np.float64 == np.dtype(float).type`.
  from ._conv import register_converters as _register_converters
WARNING:tensorflow:From cnn.py:54: read_data_sets (from tensorflow.contrib.learn.python.learn.datasets.mnist) is deprecated and will be removed in a future version.
Instructions for updating:
Please use alternatives such as official/mnist/dataset.py from tensorflow/models.
WARNING:tensorflow:From /home/david/.local/lib/python3.6/site-packages/tensorflow/contrib/learn/python/learn/datasets/mnist.py:260: maybe_download (from tensorflow.contrib.learn.python.learn.datasets.base) is deprecated and will be removed in a future version.
Instructions for updating:
Please write your own downloading logic.
WARNING:tensorflow:From /home/david/.local/lib/python3.6/site-packages/tensorflow/contrib/learn/python/learn/datasets/mnist.py:262: extract_images (from tensorflow.contrib.learn.python.learn.datasets.mnist) is deprecated and will be removed in a future version.
Instructions for updating:
Please use tf.data to implement this functionality.
Extracting /home/david/train-images-idx3-ubyte.gz
WARNING:tensorflow:From /home/david/.local/lib/python3.6/site-packages/tensorflow/contrib/learn/python/learn/datasets/mnist.py:267: extract_labels (from tensorflow.contrib.learn.python.learn.datasets.mnist) is deprecated and will be removed in a future version.
Instructions for updating:
Please use tf.data to implement this functionality.
Extracting /home/david/train-labels-idx1-ubyte.gz
WARNING:tensorflow:From /home/david/.local/lib/python3.6/site-packages/tensorflow/contrib/learn/python/learn/datasets/mnist.py:110: dense_to_one_hot (from tensorflow.contrib.learn.python.learn.datasets.mnist) is deprecated and will be removed in a future version.
Instructions for updating:
Please use tf.one_hot on tensors.
Extracting /home/david/t10k-images-idx3-ubyte.gz
Extracting /home/david/t10k-labels-idx1-ubyte.gz
WARNING:tensorflow:From /home/david/.local/lib/python3.6/site-packages/tensorflow/contrib/learn/python/learn/datasets/mnist.py:290: DataSet.__init__ (from tensorflow.contrib.learn.python.learn.datasets.mnist) is deprecated and will be removed in a future version.
Instructions for updating:
Please use alternatives such as official/mnist/dataset.py from tensorflow/models.
WARNING:tensorflow:From /home/david/.local/lib/python3.6/site-packages/tensorflow/python/framework/op_def_library.py:263: colocate_with (from tensorflow.python.framework.ops) is deprecated and will be removed in a future version.
Instructions for updating:
Colocations handled automatically by placer.
WARNING:tensorflow:From cnn.py:81: calling dropout (from tensorflow.python.ops.nn_ops) with keep_prob is deprecated and will be removed in a future version.
Instructions for updating:
Please use `rate` instead of `keep_prob`. Rate should be set to `rate = 1 - keep_prob`.
WARNING:tensorflow:From cnn.py:89: softmax_cross_entropy_with_logits (from tensorflow.python.ops.nn_ops) is deprecated and will be removed in a future version.
Instructions for updating:

Future major versions of TensorFlow will allow gradients to flow
into the labels input on backprop by default.

See `tf.nn.softmax_cross_entropy_with_logits_v2`.

2019-04-02 16:11:11.855119: W tensorflow/core/platform/profile_utils/cpu_utils.cc:98] Failed to find bogomips in /proc/cpuinfo; cannot determine CPU frequency
2019-04-02 16:11:11.855943: I tensorflow/compiler/xla/service/service.cc:161] XLA service 0x33c54690 executing computations on platform Host. Devices:
2019-04-02 16:11:11.856014: I tensorflow/compiler/xla/service/service.cc:168]   StreamExecutor device (0): <undefined>, <undefined>
2019-04-02 16:11:12.037380: I tensorflow/stream_executor/cuda/cuda_gpu_executor.cc:965] ARM64 does not support NUMA - returning NUMA node zero
2019-04-02 16:11:12.037707: I tensorflow/compiler/xla/service/service.cc:161] XLA service 0x33c57660 executing computations on platform CUDA. Devices:
2019-04-02 16:11:12.037773: I tensorflow/compiler/xla/service/service.cc:168]   StreamExecutor device (0): NVIDIA Tegra X1, Compute Capability 5.3
2019-04-02 16:11:12.039057: I tensorflow/core/common_runtime/gpu/gpu_device.cc:1433] Found device 0 with properties:
name: NVIDIA Tegra X1 major: 5 minor: 3 memoryClockRate(GHz): 0.9216
pciBusID: 0000:00:00.0
totalMemory: 3.87GiB freeMemory: 2.30GiB
2019-04-02 16:11:12.039146: I tensorflow/core/common_runtime/gpu/gpu_device.cc:1512] Adding visible gpu devices: 0
2019-04-02 16:11:19.301075: I tensorflow/core/common_runtime/gpu/gpu_device.cc:984] Device interconnect StreamExecutor with strength 1 edge matrix:
2019-04-02 16:11:19.301165: I tensorflow/core/common_runtime/gpu/gpu_device.cc:990]      0
2019-04-02 16:11:19.301207: I tensorflow/core/common_runtime/gpu/gpu_device.cc:1003] 0:   N
2019-04-02 16:11:19.301540: I tensorflow/core/common_runtime/gpu/gpu_device.cc:1115] Created TensorFlow device (/job:localhost/replica:0/task:0/device:GPU:0 with 1509 MB memory) -> physical GPU (device: 0, name: NVIDIA Tegra X1, pci bus id: 0000:00:00.0, compute capability: 5.3)
2019-04-02 16:11:19.843917: I tensorflow/stream_executor/dso_loader.cc:153] successfully opened CUDA library libcublas.so.10.0 locally
step 0, training accuracy 0.1000
step 100, training accuracy 0.7200
step 200, training accuracy 0.9200
step 300, training accuracy 0.9400
step 400, training accuracy 0.9600
step 500, training accuracy 0.9000
step 600, training accuracy 0.9400
step 700, training accuracy 0.9400
step 800, training accuracy 0.9600
step 900, training accuracy 0.9600
可以看到,因为我们使用的是老式api,所以有一大堆的warning,但是这里肯定是调用了Jetson nano的显卡进行的训练。
总结及注意事项
- 训练速度其实还是挺慢的,比我的笔记本电脑略慢一点,但是考虑这个开发板5W的功耗,还要啥自行车。
- jetson的显存和内存是共享的,一共只有4G,还是需要小心些使用的。
- tf卡寿命有限,所以如果拿来做正式产品,一定考虑如何保护tf卡以及tf卡损坏的预案。
- 虽然开发板功耗不是很高,但是对电源的要求还是略苛刻的,如果有任何使用异常,请先考虑是不是电源输出功率不够。
- mxnet我试着装过,但是编译失败了,给社区报了个issue,正在等社区修复中,有任何进展随时更新。
- pytorch,不熟悉,有人搞定了请告诉我一声。
- 其他的,暂时没想起来,等我想起来了更新吧。。。
参考
Jetson nano get started : https://developer.nvidia.com/embedded/learn/get-started-jetson-nano-devkit
Deep Learning Frameworks Documentation: https://docs.nvidia.com/deeplearning/dgx/install-tf-xavier/index.html