欢迎大家吐槽
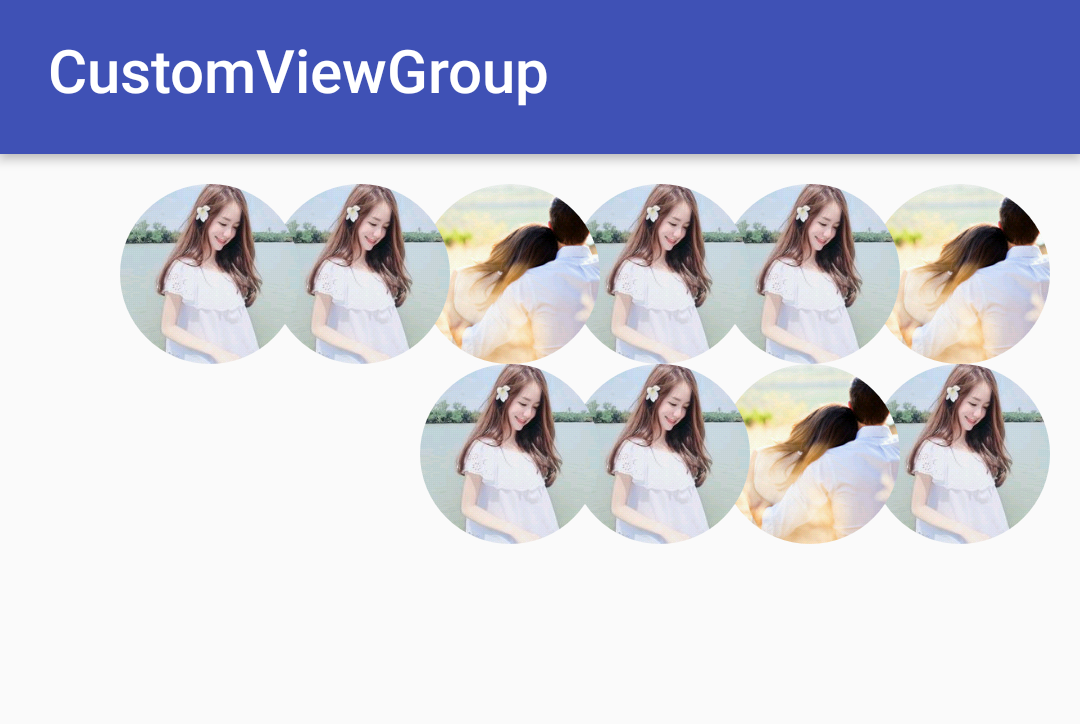
效果展示:
一 需求分析
当接到这个需求的时候,不妨坐下来喝杯茶想想怎么去实现这种效果.首先呢产品说了左边的要压着右边的这样以此排列,一行不够了就自动换行.之前写过那种自动换行的标签控件,感觉思路是一样的.想到就要去动手试一试,万一可以了呢~
二 需要了解的知识点
MeasureSpec
MeasureSpec代表一个32位int值,高2位代表SpecMode,低30位代表SpecSize,SpecMode是指测量模式,而specSize是指在某种测量模式下的规格大小。MeasureSpec通过SpecMode和SpecSize打包成int值来避免过多对象内存分配,为了方便操作,其提供了打包和解包的方法。SpecModel和SpecSize也是一个int值,一组SpecMode和SpecSize可以打包为一个MeasureSpec,而一个MeasureSpec可以通过解包的形式来得出其原始的SpecMode和SpecSize,需要注意的是这里提到的MeasureSpec是指MeasureSpec所代表的int值,而并非MeasureSpec本身。SPecMode有三类,每一类都表示特殊的含义,如下所示
UNSPECIFIED
父容器不对View有任何限制,要多大给多大,这种情况一般用于系统内部,表示一种测量的状态。
EXACTLY
父容器已经测量出View所需要的精确大小,这个时候View的最终大小就是SpecSize所指定的值。它对应于LayoutParams中的match_parent和具体的数值这两种模式。
AT_MOST
父容器指定了一个可用大小即SpecSize,View大小不能大于这个值,具体是什么值要看不同View的具体实现。它对应于LayoutParams中的Wrap_content.
自定义属性
第一步呢我们要在res->values文件夹下创建attrs.xml文件,文字一定要是attrs的.具体的内容看代码:<resources> <!--自定义图文混排--> //name:我们在自定义View里面用来查找属性的集合; <declare-styleable name="CustomImageView"> //name:属性的名称. format:属性值的属性. <attr name="titleText" format="string"/> <attr name="titleTextSize" format="dimension"/> <attr name="titleTextColor" format="color"/> <attr name="image" format="reference"/> <attr name="imageScaleType" format="integer" /> </declare-styleable> </resources> //支持一下几种属性 reference 表示引用,参考某一资源ID string 表示字符串 color 表示颜色值 dimension 表示尺寸值 boolean 表示布尔值 integer 表示整型值 float 表示浮点值 fraction 表示百分数 enum 表示枚举值 flag 表示位运算使用的时候就很简单了
//这句话是必须要写的 要不然无法使用自定义的属性,"zhy"这个名称是随意的只要在使用属性的时候一致就可以了.
xmlns:zhy="http://schemas.android.com/apk/res-auto"
<com.wang.customviewgroup.custom.CustomImageView
    android:layout_width="wrap_content"
    android:layout_height="wrap_content"
    android:layout_margin="10dp"
    android:padding="10dp"
    zhy:imageScaleType="1"
    zhy:titleText="hello andorid ! "
    zhy:titleTextColor="#ff0000"
    zhy:titleTextSize="30sp" />
然后就是再自定义View里面去查找这些自定义的属性.
//这里的R.styleable.CustomImageView,就是找到我们定义的那个属性的集合.
TypedArray typedArray=context.obtainStyledAttributes(attrs,R.styleable.CustomImageView);
//获取Color
//这里面查找我们定义的属性的名称,以及设置默认值.       color=typedArray.getColor(R.styleable.CustomImageView_titleTextColor, Color.parseColor("#333333"));
//获取字符串        text=typedArray.getString(R.styleable.CustomImageView_titleText);
//获取Dimension     textSize=typedArray.getDimension(R.styleable.CustomImageView_titleTextSize,14);
//获取Integer       scalleType=typedArray.getInteger(R.styleable.CustomImageView_imageScaleType,1);
//获取Bitmap        iamge=BitmapFactory.decodeResource(getResources(),R.mipmap.timg);
//这一个一定要记得,就跟哪些流要关闭是一样的,回收资源.
typedArray.recycle();
准备工作到这了,接下来看我们的自定义重叠换行控件.
CustomGroup实现的原理跟流式布局的实现查不了多少直接上代码:
onMeasure
重写onMeasure方法计算自定义布局的宽高,再自定义的View中你直接再xml中设置布局的width和height为wrap_content的时候默认还是充满整个父布局的.我们必须重新计算布局的真实宽高.//子view排成一行的宽度 int width = 0; //子view排成一行的高度 int height = 0; int rawHeight =0; int rawWidth = 0; //有几个子view int count = getChildCount(); //记录一行的view数量 int index = 0; for (int i = 0; i <count ; i++) { View childAt = getChildAt(i); if(childAt.getVisibility() == GONE){ if(index < count-1) { width = Math.max(width, rawWidth); height += rawHeight; } continue; } measureChildWithMargins(childAt,widthMeasureSpec,0,heightMeasureSpec,0); MarginLayoutParams lp = (MarginLayoutParams) childAt.getLayoutParams(); int childWidth = lp.leftMargin +lp.rightMargin+childAt.getMeasuredWidth(); int childHeight = lp.topMargin + lp.bottomMargin + childAt.getMeasuredHeight(); //到下一个组件的时候做出判断,还要减去最后一个View折叠的部分 if(rawWidth+childWidth-(index >0 ? scaleWidth : 0) > parentWidth - getPaddingLeft()-getPaddingRight()){ //换行 width = Math.max(width,rawWidth); height += rawHeight; rawWidth = childWidth; rawHeight = childHeight; index= 0; }else { rawHeight = Math.max(childHeight,rawHeight); rawWidth+=childWidth; //每个子View都要减去重叠的那部分 if(index >0){ rawWidth -= scaleWidth; } } //最后一个还没计算 if(i == count -1){ width = Math.max(rawWidth,width); height +=rawHeight; } index++; } setMeasuredDimension( widthMode == MeasureSpec.EXACTLY ? parentWidth : width + getPaddingLeft() + getPaddingRight(), heightMode == MeasureSpec.EXACTLY ? parentHeight : height + getPaddingTop() + getPaddingBottom() );onLayout
再自定义的ViewGroup中如果你不重新布局它的子View的话它默认是在左上角一次排列的也不会自动的换行.所以我们还需要重写把该ViewGroup的所有子View拿出来给他们设定自己的位置.int count = getChildCount(); //父view的总宽度 int viewWidth = getWidth() -getPaddingRight()-getPaddingLeft(); //子view的右边界 int maxWidth =viewWidth; //子view距离顶部的高度 int maxHeight = 0; //父组件的padingTop int topOfset =getPaddingTop(); //记录 第几个字view int index = 0; for (int i = 0; i <count ; i++) { View childAt = getChildAt(i); if(childAt.getVisibility() == GONE){ continue; } MarginLayoutParams lp = (MarginLayoutParams) childAt.getLayoutParams(); int childWidth = lp.leftMargin +lp.rightMargin +childAt.getMeasuredWidth(); int childHeight = lp.topMargin+lp.bottomMargin +childAt.getMeasuredHeight(); //从右往左排,view的右边距小于view的宽度时换行 if(childWidth > maxWidth){ //换行 topOfset+=maxHeight; maxHeight =0; index = 0; maxWidth =viewWidth; } int left = maxWidth - childWidth; int top = topOfset+lp.topMargin; int right = maxWidth; int bottom = topOfset +lp.topMargin+ childAt.getMeasuredHeight(); childAt.layout(left,top,right,bottom); maxWidth -=childWidth; if(index != count -1){ maxWidth += scaleWidth; } maxHeight = Math.max(maxHeight,childHeight); index++; }这样就好了我们就完成了文章开始时展示的效果,如果要处理点击事件的话我们一可以这里面去处理掉,外面直接用就可以了.
源码连接 https://github.com/WangcWj/CustomGroup 欢迎start!
欢迎大家的吐槽~觉得有用呢就给个赞吧!