林炳文Evankaka原创作品。转自https://blog.csdn.net/Evankaka/article/details/45647031
本文要以一个例子来说明SpringMVC访问静态资源
<mvc:resources 的使用方法:
<!--对静态资源文件的访问-->
<mvc:resources mapping="/images/**" location="/images/" />
如果出现下面的错误,可能是没有配置 <mvc:annotation-driven /> 的原因。
报错WARNING: No mapping found for HTTP request with URI [/mvc/user/findUser/lisi/770] in DispatcherServlet with name 'springMVC'
使用 <mvc:resources/> 元素,把 mapping 的 URI 注册到 SimpleUrlHandlerMapping的urlMap 中,key 为 mapping 的 URI pattern值,而 value为 ResourceHttpRequestHandler,
这样就巧妙的把对静态资源的访问由 HandlerMapping 转到 ResourceHttpRequestHandler 处理并返回,所以就支持 classpath 目录, jar 包内静态资源的访问.
另外需要注意的一点是,不要对 SimpleUrlHandlerMapping 设置 defaultHandler. 因为对 static uri 的 defaultHandler 就是ResourceHttpRequestHandler,
否则无法处理static resources request.
下面用一个例子来说明用法
1、在eclipse中新建一个web工程、
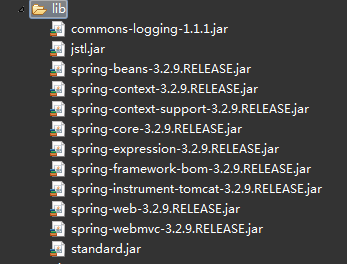
然后导入如下包:
2、配置web.xml
-
<?xml version="1.0" encoding="UTF-8"?>
-
<web-app xmlns:xsi="http://www.w3.org/2001/XMLSchema-instance"
-
xmlns=
"http://java.sun.com/xml/ns/javaee"
xmlns:web=
"http://java.sun.com/xml/ns/javaee/web-app_3_0.xsd"
-
xsi:schemaLocation=
"http://java.sun.com/xml/ns/javaee http://java.sun.com/xml/ns/javaee/web-app_3_0.xsd"
-
id=
"WebApp_ID"
version=
"3.0">
-
<!-- <welcome-file-list>
-
<welcome-file>index.html</welcome-file>
-
<welcome-file>index.htm</welcome-file>
-
<welcome-file>index.jsp</welcome-file>
-
<welcome-file>default.html</welcome-file>
-
<welcome-file>default.htm</welcome-file>
-
<welcome-file>default.jsp</welcome-file>
-
</welcome-file-list> -->
-
<!-- SpringMVC的前端控制器 -->
-
<servlet>
-
<servlet-name>MyDispatcher
</servlet-name>
-
<servlet-class>org.springframework.web.servlet.DispatcherServlet
</servlet-class>
-
<!-- 加载配置文件路径 -->
-
<init-param>
-
<param-name>contextConfigLocation
</param-name>
-
<param-value>/WEB-INF/spring-servlet.xml
</param-value>
-
</init-param>
-
<!-- 何时启动 大于0的值表示容器启动时初始化此servlet,正值越小优先级越高-->
-
<load-on-startup>1
</load-on-startup>
-
</servlet>
-
<!-- Spring MVC配置文件结束 -->
-
-
<!-- SpringMVC拦截设置 -->
-
<servlet-mapping>
-
<servlet-name>MyDispatcher
</servlet-name>
-
<!-- 由SpringMVC拦截所有请求 -->
-
<url-pattern>/
</url-pattern>
-
</servlet-mapping>
-
<!-- SpringMVC拦截设置结束 -->
-
-
</web-app>
3、然后是控制器:
-
package com.mucfc;
-
-
import javax.servlet.http.HttpServletRequest;
-
import javax.servlet.http.HttpServletResponse;
-
-
import org.springframework.stereotype.Controller;
-
import org.springframework.ui.ModelMap;
-
import org.springframework.web.bind.annotation.RequestMapping;
-
import org.springframework.web.servlet.ModelAndView;
-
-
@Controller
-
public
class StaticFileController {
-
@RequestMapping(value=
"/image/test")
-
public ModelAndView img(HttpServletRequest request,HttpServletResponse response){
-
System.out.println(
"-----img-------");
-
return
new ModelAndView(
"image");
-
}
-
@RequestMapping(value={
"/index",
"/"})
//相对于根目录的路径
-
public String test2() {
-
return
"index";
//指定页面要跳转的view视图路径
-
}
-
}
4、启动注解:
-
<beans xmlns="http://www.springframework.org/schema/beans"
-
xmlns:context=
"http://www.springframework.org/schema/context"
-
xmlns:xsi=
"http://www.w3.org/2001/XMLSchema-instance"
xmlns:p=
"http://www.springframework.org/schema/p"
-
xmlns:mvc=
"http://www.springframework.org/schema/mvc"
-
xsi:schemaLocation=
"
-
http://www.springframework.org/schema/mvc
-
http://www.springframework.org/schema/mvc/spring-mvc-3.0.xsd
-
http://www.springframework.org/schema/beans
-
http://www.springframework.org/schema/beans/spring-beans-3.0.xsd
-
http://www.springframework.org/schema/mvc
-
http://www.springframework.org/schema/mvc/spring-mvc-3.0.xsd
-
http://www.springframework.org/schema/context
-
http://www.springframework.org/schema/context/spring-context-3.0.xsd">
-
<!-- 把标记了@Controller注解的类转换为bean -->
-
<context:component-scan base-package="com.mucfc"/>
-
<!-- 启动Spring MVC的注解功能,完成请求和注解POJO的映射 -->
-
<bean class="org.springframework.web.servlet.mvc.annotation.AnnotationMethodHandlerAdapter" />
-
-
<!-- 静态资源访问(不拦截此目录下的东西的访问) -->
-
<mvc:annotation-driven />
-
<mvc:resources location="/img/" mapping="/img/**" />
-
-
<!-- 对模型视图名称的解析,即在模型视图名称添加前后缀 -->
-
<bean class="org.springframework.web.servlet.view.InternalResourceViewResolver"
-
p:prefix=
"/WEB-INF/views/"
p:suffix=
".jsp"/>
-
-
</beans>
其中index.jsp:
-
<%@ page language="java" contentType="text/html; charset=gb2312"
-
pageEncoding=
"gb2312"%>
-
<!-- 这段代码的意思是获取当前项目的路径,如:http://localhost:8080/项目名称。 -->
-
<%
-
String path = request.getContextPath();
-
String basePath = request.getScheme()+"://"+request.getServerName()+":"+request.getServerPort()+path+"/";
-
%>
-
<!DOCTYPE html PUBLIC "-//W3C//DTD HTML 4.01 Transitional//EN" "http://www.w3.org/TR/html4/loose.dtd">
-
<html>
-
<head>
-
<base href="<%=basePath%>">
-
<meta http-equiv="Content-Type" content="text/html; charset=gb2312">
-
<title>Insert title here
</title>
-
</head>
-
<body>
-
采用String返回视图:
-
<a href="image/test">访问图片
</a>
-
</body>
-
</html>
和image.jsp如下内容:
-
<%@ page language="java" contentType="text/html; charset=UTF-8"
-
pageEncoding=
"UTF-8"%>
-
<%@taglib prefix="c" uri="http://java.sun.com/jsp/jstl/core"%>
-
<%
-
String path = request.getContextPath();
-
String basePath = request.getScheme()+"://"+request.getServerName()+":"+request.getServerPort()+path+"/";
-
%>
-
<!DOCTYPE html PUBLIC "-//W3C//DTD HTML 4.01 Transitional//EN" "http://www.w3.org/TR/html4/loose.dtd">
-
<html>
-
<head>
-
<base href="<%=basePath%>">
-
<meta http-equiv="Content-Type" content="text/html; charset=UTF-8">
-
<title>Insert title here
</title>
-
</head>
-
<body>
-
<h>图片
</h>
-
<br/>
-
<div>
-
<img alt="图片" src="img/Koala.jpg">
-
</div>
-
</body>
-
</html>
6、在WebContent新建一个目录,取名img,专门用来存放图片:
把图片考进去。
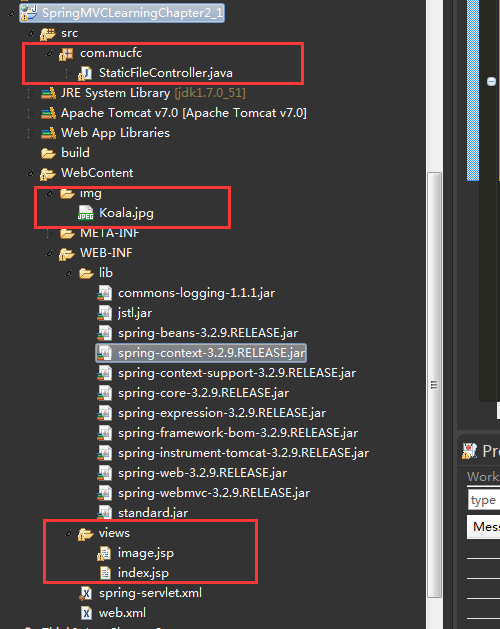
整个工程目录 如下:
8、接下来就运行了:
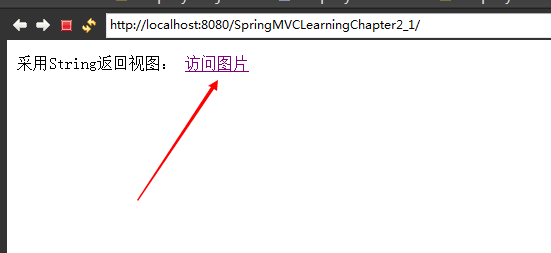
可以通过这里点击进去看图片,也可以直接输入http://localhost:8080/SpringMVCLearningChapter2_1/image/test
林炳文Evankaka原创作品。转自https://blog.csdn.net/Evankaka/article/details/45647031
本文要以一个例子来说明SpringMVC访问静态资源
<mvc:resources 的使用方法:
<!--对静态资源文件的访问-->
<mvc:resources mapping="/images/**" location="/images/" />
如果出现下面的错误,可能是没有配置 <mvc:annotation-driven /> 的原因。
报错WARNING: No mapping found for HTTP request with URI [/mvc/user/findUser/lisi/770] in DispatcherServlet with name 'springMVC'
使用 <mvc:resources/> 元素,把 mapping 的 URI 注册到 SimpleUrlHandlerMapping的urlMap 中,key 为 mapping 的 URI pattern值,而 value为 ResourceHttpRequestHandler,
这样就巧妙的把对静态资源的访问由 HandlerMapping 转到 ResourceHttpRequestHandler 处理并返回,所以就支持 classpath 目录, jar 包内静态资源的访问.
另外需要注意的一点是,不要对 SimpleUrlHandlerMapping 设置 defaultHandler. 因为对 static uri 的 defaultHandler 就是ResourceHttpRequestHandler,
否则无法处理static resources request.
下面用一个例子来说明用法
1、在eclipse中新建一个web工程、
然后导入如下包:
2、配置web.xml
-
<?xml version="1.0" encoding="UTF-8"?>
-
<web-app xmlns:xsi="http://www.w3.org/2001/XMLSchema-instance"
-
xmlns=
"http://java.sun.com/xml/ns/javaee"
xmlns:web=
"http://java.sun.com/xml/ns/javaee/web-app_3_0.xsd"
-
xsi:schemaLocation=
"http://java.sun.com/xml/ns/javaee http://java.sun.com/xml/ns/javaee/web-app_3_0.xsd"
-
id=
"WebApp_ID"
version=
"3.0">
-
<!-- <welcome-file-list>
-
<welcome-file>index.html</welcome-file>
-
<welcome-file>index.htm</welcome-file>
-
<welcome-file>index.jsp</welcome-file>
-
<welcome-file>default.html</welcome-file>
-
<welcome-file>default.htm</welcome-file>
-
<welcome-file>default.jsp</welcome-file>
-
</welcome-file-list> -->
-
<!-- SpringMVC的前端控制器 -->
-
<servlet>
-
<servlet-name>MyDispatcher
</servlet-name>
-
<servlet-class>org.springframework.web.servlet.DispatcherServlet
</servlet-class>
-
<!-- 加载配置文件路径 -->
-
<init-param>
-
<param-name>contextConfigLocation
</param-name>
-
<param-value>/WEB-INF/spring-servlet.xml
</param-value>
-
</init-param>
-
<!-- 何时启动 大于0的值表示容器启动时初始化此servlet,正值越小优先级越高-->
-
<load-on-startup>1
</load-on-startup>
-
</servlet>
-
<!-- Spring MVC配置文件结束 -->
-
-
<!-- SpringMVC拦截设置 -->
-
<servlet-mapping>
-
<servlet-name>MyDispatcher
</servlet-name>
-
<!-- 由SpringMVC拦截所有请求 -->
-
<url-pattern>/
</url-pattern>
-
</servlet-mapping>
-
<!-- SpringMVC拦截设置结束 -->
-
-
</web-app>
3、然后是控制器:
-
package com.mucfc;
-
-
import javax.servlet.http.HttpServletRequest;
-
import javax.servlet.http.HttpServletResponse;
-
-
import org.springframework.stereotype.Controller;
-
import org.springframework.ui.ModelMap;
-
import org.springframework.web.bind.annotation.RequestMapping;
-
import org.springframework.web.servlet.ModelAndView;
-
-
@Controller
-
public
class StaticFileController {
-
@RequestMapping(value=
"/image/test")
-
public ModelAndView img(HttpServletRequest request,HttpServletResponse response){
-
System.out.println(
"-----img-------");
-
return
new ModelAndView(
"image");
-
}
-
@RequestMapping(value={
"/index",
"/"})
//相对于根目录的路径
-
public String test2() {
-
return
"index";
//指定页面要跳转的view视图路径
-
}
-
}
4、启动注解:
-
<beans xmlns="http://www.springframework.org/schema/beans"
-
xmlns:context=
"http://www.springframework.org/schema/context"
-
xmlns:xsi=
"http://www.w3.org/2001/XMLSchema-instance"
xmlns:p=
"http://www.springframework.org/schema/p"
-
xmlns:mvc=
"http://www.springframework.org/schema/mvc"
-
xsi:schemaLocation=
"
-
http://www.springframework.org/schema/mvc
-
http://www.springframework.org/schema/mvc/spring-mvc-3.0.xsd
-
http://www.springframework.org/schema/beans
-
http://www.springframework.org/schema/beans/spring-beans-3.0.xsd
-
http://www.springframework.org/schema/mvc
-
http://www.springframework.org/schema/mvc/spring-mvc-3.0.xsd
-
http://www.springframework.org/schema/context
-
http://www.springframework.org/schema/context/spring-context-3.0.xsd">
-
<!-- 把标记了@Controller注解的类转换为bean -->
-
<context:component-scan base-package="com.mucfc"/>
-
<!-- 启动Spring MVC的注解功能,完成请求和注解POJO的映射 -->
-
<bean class="org.springframework.web.servlet.mvc.annotation.AnnotationMethodHandlerAdapter" />
-
-
<!-- 静态资源访问(不拦截此目录下的东西的访问) -->
-
<mvc:annotation-driven />
-
<mvc:resources location="/img/" mapping="/img/**" />
-
-
<!-- 对模型视图名称的解析,即在模型视图名称添加前后缀 -->
-
<bean class="org.springframework.web.servlet.view.InternalResourceViewResolver"
-
p:prefix=
"/WEB-INF/views/"
p:suffix=
".jsp"/>
-
-
</beans>
其中index.jsp:
-
<%@ page language="java" contentType="text/html; charset=gb2312"
-
pageEncoding=
"gb2312"%>
-
<!-- 这段代码的意思是获取当前项目的路径,如:http://localhost:8080/项目名称。 -->
-
<%
-
String path = request.getContextPath();
-
String basePath = request.getScheme()+"://"+request.getServerName()+":"+request.getServerPort()+path+"/";
-
%>
-
<!DOCTYPE html PUBLIC "-//W3C//DTD HTML 4.01 Transitional//EN" "http://www.w3.org/TR/html4/loose.dtd">
-
<html>
-
<head>
-
<base href="<%=basePath%>">
-
<meta http-equiv="Content-Type" content="text/html; charset=gb2312">
-
<title>Insert title here
</title>
-
</head>
-
<body>
-
采用String返回视图:
-
<a href="image/test">访问图片
</a>
-
</body>
-
</html>
和image.jsp如下内容:
-
<%@ page language="java" contentType="text/html; charset=UTF-8"
-
pageEncoding=
"UTF-8"%>
-
<%@taglib prefix="c" uri="http://java.sun.com/jsp/jstl/core"%>
-
<%
-
String path = request.getContextPath();
-
String basePath = request.getScheme()+"://"+request.getServerName()+":"+request.getServerPort()+path+"/";
-
%>
-
<!DOCTYPE html PUBLIC "-//W3C//DTD HTML 4.01 Transitional//EN" "http://www.w3.org/TR/html4/loose.dtd">
-
<html>
-
<head>
-
<base href="<%=basePath%>">
-
<meta http-equiv="Content-Type" content="text/html; charset=UTF-8">
-
<title>Insert title here
</title>
-
</head>
-
<body>
-
<h>图片
</h>
-
<br/>
-
<div>
-
<img alt="图片" src="img/Koala.jpg">
-
</div>
-
</body>
-
</html>
6、在WebContent新建一个目录,取名img,专门用来存放图片:
把图片考进去。
整个工程目录 如下:
8、接下来就运行了:
可以通过这里点击进去看图片,也可以直接输入http://localhost:8080/SpringMVCLearningChapter2_1/image/test