目录
1)在Activity中调用setContentView()
2)mDecor、mContentParent的创建之PhoneWindow的 installDecor()
最近疯狂的喜欢看Android的源码,看着看着就到了DecorView,那就进到源码中去看下这里面的一些东西。
1、几个概念
1)Window
抽象类。是屏幕上绘制各种UI以及响应用户的输入事件。主要包括三部分内容
- mWindowAttributes :WindowManager.LayoutParams
- Callback
- ViewTree
public abstract class Window {
//。。。。省略代码

    // The current window attributes.
    private final WindowManager.LayoutParams mWindowAttributes =
        new WindowManager.LayoutParams();

    private Window mContainer;
    private Window mActiveChild;
//。。。。省略代码

    public interface Callback {
        //。。。。省略代码
    }
//。。。。省略代码

}
2)PhoneWindow
继承于Window,用来提供绘制窗口。含有窗口的顶级DectorView。
public class PhoneWindow extends Window implements MenuBuilder.Callback {
    //顶级view,包括statusbar actionbar 以及content
    private DecorView mDecor;
    //对应的content。对应com.android.internal.R.id.content
    ViewGroup mContentParent;
    //标题栏的一些属性设置
    private TextView mTitleView;
    //R.id.left_icon
    private ImageView mLeftIconView;
//R.id.right_icon
    private ImageView mRightIconView;

}
mDecor:为顶级的DectorView,包括statusbar actionbar 以及content;
mContentParent:对应的窗口栏。对应的id为com.android.internal.R.id.content;
其它的几个控件对应的就是标题栏里面的几个控件的设置。
3)DecorView
是包含在标题栏、Activity设置的contentView,底部导航栏大小的View、状态栏大小的View。
其中底部导航栏大小的View、状态栏大小的View这两个view在运行时添加到底部导航栏和状态栏区域的下面。
public class DecorView extends FrameLayout implements RootViewSurfaceTaker, WindowCallbacks {
}
从API21(Android 5.x)之后,可以通过getWindow().setStatusBarColor()/getWindow().setNavigationBarColor()来设置状态栏和底部导航栏的颜色。
2、创建DecorView
1)在Activity中调用setContentView()
    @Override
    protected void onCreate(Bundle savedInstanceState) {
        super.onCreate(savedInstanceState);
        setContentView(R.layout.activity_main);
    }
跟进Activity.java的源代码
    public void setContentView(@LayoutRes int layoutResID) {
        getWindow().setContentView(layoutResID);
        initWindowDecorActionBar();
    }
可以看到调用的是PhoneWinow.java 中的setContentView()
@Override
    public void setContentView(int layoutResID) {
       //如果mContentParent为null,则调用installDecor()进行生成
        if (mContentParent == null) {
            installDecor();
        } else if (!hasFeature(FEATURE_CONTENT_TRANSITIONS)) {
        //如果不为null,需要将里面的view移除
            mContentParent.removeAllViews();
        }
        if (hasFeature(FEATURE_CONTENT_TRANSITIONS)) {
        //。。。省略代码
        } else {
        //将该layout插入到mContentParent
            mLayoutInflater.inflate(layoutResID, mContentParent);
        }
        mContentParent.requestApplyInsets();
       // 。。。省略代码,回调Activity
    }
这个流程就是如果 mContentParent还没有创建出来,则去创建mContentParent;如果已经创建过,则移除上面所有的view,然后通过inflate添加到mContentParent中。
也就是如果调用一次setContentView(),mContentParent则创建出来了,以后在调用的时候,就直接移除view,在执行inflater就可以了。
mContentParent创建在第一次调用setContentView()
我们跟进到 installDecor()来看下这个mContentParent是怎么创建出来的。
2)mDecor、mContentParent的创建之PhoneWindow的 installDecor()
private void installDecor() {
        mForceDecorInstall = false;
        if (mDecor == null) {
//生成mDecor
            mDecor = generateDecor(-1);
     //。。。。省略代码
        } else {
            mDecor.setWindow(this);
        }
        if (mContentParent == null) {
    //生成mContentParent
            mContentParent = generateLayout(mDecor);
          //。。。。省略代码
            final DecorContentParent decorContentParent = (DecorContentParent) mDecor.findViewById(
                    R.id.decor_content_parent);
            if (decorContentParent != null) {
                mDecorContentParent = decorContentParent;
//设置mDecorContentParent的一些属性setWindowCallback setIcon/setLogo
                mDecorContentParent.setUiOptions(mUiOptions);
                //。。。。省略代码
            } else {
                mTitleView = findViewById(R.id.title);
                if (mTitleView != null) {
//如果FEATURE_NO_TITLE,则隐藏mTitleView,否则设置mTitleView
         //。。。。省略代码
                }
            }
//FEATURE_ACTIVITY_TRANSITIONS
            if (hasFeature(FEATURE_ACTIVITY_TRANSITIONS)) {
 //。。。。省略代码
            }
        }
    }
该方法中主要就是得到mDecor、mContentParent。看下是怎么生成的
- 得到mDecor ->generateDecor()
 protected DecorView generateDecor(int featureId) {
      //通过不同的情况获取context
        Context context;
       //。。。。省略代码
        return new DecorView(context, featureId, this, getAttributes());
    }
根据不同情况获取Context,最后new DecorView
- 得到mContentParent->generateLayout()
 protected ViewGroup generateLayout(DecorView decor) {
        // Apply data from current theme.
        TypedArray a = getWindowStyle();
       //根据TypedArray来获取设置的Window_windowIsFloating、Window_windowNoTitle、Window_windowActionBarOverlay、Window_statusBarColor、Window_navigationBarColor等style从而设置decor的各个属性
//。。。。省略代码

        // Inflate the window decor.
        int layoutResource;
        int features = getLocalFeatures();
        // 根据设置的不同样式来决定decor对应的布局文件
        // 具体可以参照下面表格
    //。。。。省略代码
     //这个将该布局文件设置到mDecor中
        mDecor.onResourcesLoaded(mLayoutInflater, layoutResource);

        ViewGroup contentParent = (ViewGroup)findViewById(ID_ANDROID_CONTENT);
        //。。。。省略代码 设置decor的属性
        return contentParent;
    }
主要是根据设置的style对mDecor设置各个属性,并且根据不同的情况设置mDecor的布局文件。
该表格就是根据设置的不同theme来匹配mDecor的不同的布局文件:
| 样式 | mIsFloating:true |
false |
| FEATURE_SWIPE_TO_DISMISS |
R.layout.screen_swipe_dismiss |
|
| FEATURE_LEFT_ICON FEATURE_RIGHT_ICON |
TypedValue res = new TypedValue(); getContext().getTheme().resolveAttribute( R.attr.dialogTitleIconsDecorLayout, res, true); layoutResource = res.resourceId; |
R.layout.screen_title_icons |
| FEATURE_PROGRESS FEATURE_INDETERMINATE_PROGRESS |
API 21之后废弃 | |
| FEATURE_CUSTOM_TITLE | R.attr.dialogCustomTitleDecorLayout | R.layout.screen_custom_title |
| FEATURE_NO_TITLE/无标题栏,最常用的 | true:R.attr.dialogTitleDecorLayout FEATURE_ACTION_BAR: layoutResource = a.getResourceId( R.styleable.Window_windowActionBarFullscreenDecorLayout, R.layout.screen_action_bar) |
R.layout.screen_title |
| FEATURE_ACTION_MODE_OVERLAY | R.layout.screen_simple_overlay_action_mode | |
| 其它/全屏 | R.layout.screen_simple | |
上面得到对应的layoutResource,然后通过mDecor.onResourcesLoaded(mLayoutInflater, layoutResource),将layoutResource设置到mDecor中。
theme就是我们通过下面两种方式设置的:
a)在Activity中调用requestWindowFeature(),
b)在AndroidManifest.xml文件中设置Activity或者Application的android:theme。
所以我们在调用requestWindowFeature()的时候要在setContentView()之前,因为这个创建mDecor的时候要去选择对应的布局文件。
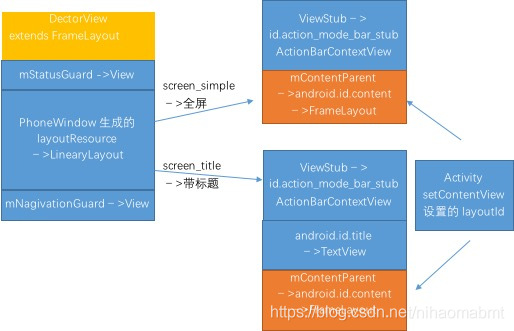
我们重点看下标记的两个常用的布局文件R.layout.screen_title和R.layout.screen_simple。这两个文件位于framework/base/core/res/layout/
(1)R.layout.screen_simple
<LinearLayout xmlns:android="http://schemas.android.com/apk/res/android"
    android:layout_width="match_parent"
    android:layout_height="match_parent"
    android:fitsSystemWindows="true"
    android:orientation="vertical">
    <ViewStub android:id="@+id/action_mode_bar_stub"
              android:inflatedId="@+id/action_mode_bar"
              android:layout="@layout/action_mode_bar"
              android:layout_width="match_parent"
              android:layout_height="wrap_content" />
    <FrameLayout
         android:id="@android:id/content"
         android:layout_width="match_parent"
         android:layout_height="match_parent"
         android:foregroundInsidePadding="false"
         android:foregroundGravity="fill_horizontal|top"
         android:foreground="?android:attr/windowContentOverlay" />
</LinearLayout>
(2) R.layout.screen_title
<LinearLayout xmlns:android="http://schemas.android.com/apk/res/android"
    android:orientation="vertical"
    android:fitsSystemWindows="true">
    <!-- Popout bar for action modes -->
    <ViewStub android:id="@+id/action_mode_bar_stub"
              android:inflatedId="@+id/action_mode_bar"
              android:layout="@layout/action_mode_bar"
              android:layout_width="match_parent"
              android:layout_height="wrap_content"
              android:theme="?attr/actionBarTheme" />
    <FrameLayout
        android:layout_width="match_parent"
        android:layout_height="?android:attr/windowTitleSize"
        style="?android:attr/windowTitleBackgroundStyle">
        <TextView android:id="@android:id/title"
            style="?android:attr/windowTitleStyle"
            android:background="@null"
            android:fadingEdge="horizontal"
            android:gravity="center_vertical"
            android:layout_width="match_parent"
            android:layout_height="match_parent" />
    </FrameLayout>
    <FrameLayout android:id="@android:id/content"
        android:layout_width="match_parent"
        android:layout_height="0dip"
        android:layout_weight="1"
        android:foregroundGravity="fill_horizontal|top"
        android:foreground="?android:attr/windowContentOverlay" />
</LinearLayout>
从generateLayout()里面的代码中可以看出来 mContentParent就是取得这些布局文件中的@android:id/content下对应的这个FrameLayout。
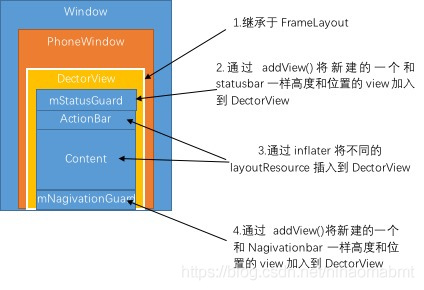
下面这个图是DectorView上的ViewTree结构:
下面这个图是Window、PhoneWindow、DectorView之间的关系,以及DectorView上面的各部分的UI是怎么添加到DectorView
上的。
3、ViewRoot完成对DectorView的绘制
每一个DectorView对应一个ViewRoot,ViewRoot完成对DectorView的measure、layout、draw。
当Acitivity执行到onResume(),用户可见窗口的时候,在ActivityThread.handleResumeActivity()中将ViewRootImpl和decorView进行关联起来
    final void handleResumeActivity(IBinder token,
            boolean clearHide, boolean isForward, boolean reallyResume, int seq, String reason) {
  //。。。。。省略代码

      if (r.window == null && !a.mFinished && willBeVisible) {
                r.window = r.activity.getWindow();
                View decor = r.window.getDecorView();
                decor.setVisibility(View.INVISIBLE);
              //。。。。。省略代码
                if (r.mPreserveWindow) {
                    a.mWindowAdded = true;
                    r.mPreserveWindow = false;
        //每一个DecorView都有一个对应的ViewRoot
                    ViewRootImpl impl = decor.getViewRootImpl();
                    if (impl != null) {
                        impl.notifyChildRebuilt();
                    }
                }
    //。。。。。省略代码
     }
    //。。。。。省略代码
 }
通过调用impl.notifyChildRebuilt()来完成DectorView的measure、layout、draw