input标签文件上传
带有input标签并且type属性的值为file可直接使用send_keys方法上传文件
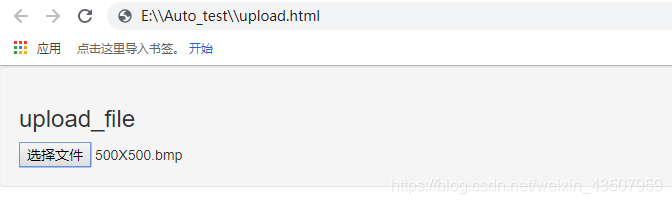
upload.html文件
<html>
<head>
<meta http-equiv="content-type" content="text/html;charset=utf-8" />
<title>upload_file</title>
<link href="http://cdn.bootcss.com/bootstrap/3.3.0/css/bootstrap.min.css" rel="stylesheet" />
</head>
<body>
  <div class="row-fluid">
    <div class="span6 well">
    <h3>upload_file</h3>
      <input type="file" name="file" />
    </div>
  </div>
</body> <script src="http://cdn.bootcss.com/bootstrap/3.3.0/css/bootstrap.min.js"></script>
</html>
上传前截图

上传文件代码:
#!/usr/bin/python3
# coding=utf-8
# author: Ven
from selenium import webdriver
from time import sleep
driver = webdriver.Chrome()
driver.maximize_window()
driver.get("E:\\Auto_test\\upload.html")
driver.find_element_by_xpath("//input[@type='file']").send_keys("E:\500x500.bmp")
sleep(3)
driver.quit()
上传结果截图
非input标签AutoIt上传文件
对于非input标签的文件上传我们使用AutoIT3,借助外力,最后测试用例去调用其生成的au3或exe文件
开始菜单栏AutoIt3目录:
AutoIt Window Info : 用于帮助识别Windows控件信息
Compile Script to.exe : 用于将AutoIt生成 exe 执行文件
SciTE Script Editor: 用于编写AutoIt脚本
Run Script : 用于执行AutoIt脚本
实现步骤:
1.打开upload.html,点击“选择文件”弹出Windows弹框
2.打开AutoIt Windows Info工具,鼠标点击Finder Tool,鼠标将变成一个小风扇形状的图标,按住鼠标左键拖动到需要识别的控件上
3.根据AutoIt Windows Info 所识别到的控件信息打开SciTE Script Editor编辑器,编写脚本
4.脚本转换为exe程序,通过自动化测试脚本调用upfile.exe程序实现上传
第1-2两步通过AutoIt Windows Info获取windows弹框信息:
窗口的title为“打开”,标题的Class为“#32770”。
文件名输入框的class 为“Edit”,Instance为“1” ,所以ClassnameNN为“Edit1”。
打开按钮的class 为“Button”,Instance为“1” ,所以ClassnameNN为“Button1”

第3步打开SciTE Script Editor编辑器编写脚本

ControlFocus()方法用于识别Window窗口
WinWait()设置10秒钟用于等待窗口的显示,用法与webdriver的implicitly_wait()类似
ControlSetText()用于向“文件名”输入框内输入本地文件的路径
Sleep(2000)表示固定休眠2000毫秒
ControlClick()用于点击上传窗口中的“打开”按钮
AutoIt的脚本已经写好了将其保存为upfile.au3文件,可以通过菜单栏“Tools”-->“Go”(或按键盘F5)来运行一个脚本!注意在运行时上传窗口当前处于打开状态
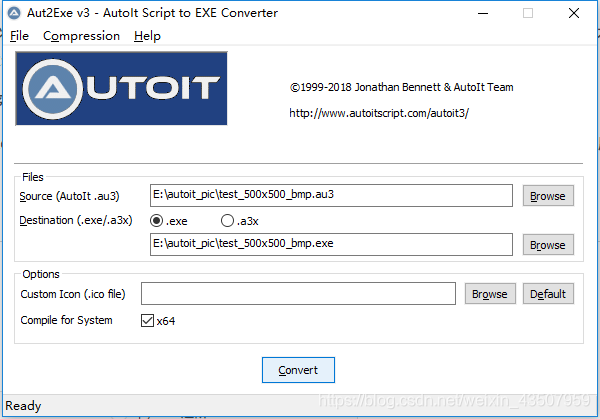
第4步将脚本生成exe程序通过自动化脚本调用实现上传
打开Compile Script to.exe工具,点击“Browse”选择upfile.au3文件,点击“Convert”按钮将其生成为upfile.exe程序
#!/usr/bin/python3
# coding=utf-8
# author: Ven
from selenium import webdriver
import os
driver = webdriver.Chrome()
driver.maximize_window()
driver.get("E:\\Auto_test\\upload.html")                        # 打开upload.html文件
driver.find_element_by_xpath("//input[@type='file']").click()
os.system("E:\\test_500x500_bmp.exe")                           # 上传文件
driver.quit()
下载弹窗处理
通过PyUserInput提供的PyMouse和PyKeyboard类模拟键盘和鼠标操作
安装PyUserInput的依赖包,然后通过pip安装PyUserInput
#!/usr/bin/python3
# coding=utf-8
# author:Ven

from selenium import webdriver
from pykeyboard import PyKeyboard
from time import sleep

driver = webdriver.Firefox()
driver.get('https://im.qq.com/pcqq/')
driver.find_element_by_xpath("//div[@class='btn-mask']").click()
sleep(1)
k = PyKeyboard()
# 默认在取消按钮上,先切换到保存文件上
k.press_key(k.tab_key)          # 按住tab键盘
k.release_key(k.tab_key)        # 释放tab键盘
sleep(1)
k.press_key(k.tab_key)          # 按住tab键盘
k.release_key(k.tab_key)        # 释放tab键盘
sleep(2)
# 按回车键下载
k.press_key(k.enter_key)        # 按住enter键
k.release_key(k.enter_key)      # 释放enter键
sleep(8)
driver.quit()