1、先安装tomcat和jdk,保证tomcat可以部署后服务能正常访问
2、再安装nginx,nginx的安装具体如下,
1)准备安装软件
[root@localhost src]# yum install zlib zlib-devel pcre pcre-devel openssl openssl-devel
2)创建nginx用户和组
[root@localhost src]# groupadd nginx
[root@localhost src]# useradd -r -g nginx -s /sbin/nologin -M nginx
3)下载解压nginx的源码
[root@localhost src]# wget http://nginx.org/download/nginx-1.8.1.tar.gz
[root@localhost src]# tar zxvf nginx-1.8.1.tar.gz
4)编译安装
[root@localhost src]# cd nginx-1.8.1
[root@localhost nginx-1.6.3]# ./configure \
–prefix=/etc/nginx \
–sbin-path=/usr/sbin/nginx \
–conf-path=/etc/nginx/nginx.conf \
–error-log-path=/var/log/nginx/error.log \
–http-log-path=/var/log/nginx/access.log \
–pid-path=/var/run/nginx.pid \
–lock-path=/var/run/nginx.lock \
–http-client-body-temp-path=/var/cache/nginx/client_temp \
–http-proxy-temp-path=/var/cache/nginx/proxy_temp \
–http-fastcgi-temp-path=/var/cache/nginx/fastcgi_temp \
–http-uwsgi-temp-path=/var/cache/nginx/uwsgi_temp \
–http-scgi-temp-path=/var/cache/nginx/scgi_temp \
–user=nginx \
–group=nginx \
–with-http_ssl_module \
–with-http_realip_module \
–with-http_addition_module \
–with-http_sub_module \
–with-http_dav_module \
–with-http_flv_module \
–with-http_mp4_module \
–with-http_gunzip_module \
–with-http_gzip_static_module \
–with-http_random_index_module \
–with-http_secure_link_module \
–with-http_stub_status_module \
–with-http_auth_request_module \
–with-file-aio \
–with-http_spdy_module \
–with-ipv6 \
–with-pcre
[root@localhost nginx-1.6.3]# make
[root@localhost nginx-1.6.3]# make install
5)nginx操作
[root@localhost nginx-1.6.3]# /usr/sbin/nginx
[root@localhost nginx-1.6.3]# /usr/sbin/nginx -s reload
[root@localhost nginx-1.6.3]# /usr/sbin/nginx -s stop
3、nginx+tomcat的配置动静分离
user nginx nginx;
worker_processes 4;
events {
use epoll;
worker_connections 65535;
}
http {
include mime.types;
default_type application/octet-stream;
charset utf-8;
server_names_hash_bucket_size 128;
client_header_buffer_size 32k;
large_client_header_buffers 4 32k;
client_max_body_size 300m;
sendfile on;
tcp_nopush on;
keepalive_timeout 60;
tcp_nodelay on;
client_body_buffer_size 512k;
proxy_connect_timeout 5;
proxy_read_timeout 60;
proxy_send_timeout 5;
proxy_buffer_size 16k;
proxy_buffers 4 64k;
proxy_busy_buffers_size 128k;
proxy_temp_file_write_size 128k;
gzip on;
gzip_min_length 1k;
gzip_buffers 4 16k;
gzip_http_version 1.1;
gzip_comp_level 2;
gzip_types text/plain application/x-javascript text/css application/xml;
gzip_vary on;
upstream tomcat_server {
server 127.0.0.1:8080;
}
server
{
listen 80;
server_name 172.19.10.199;
root /home/www/ictf; (文件的部署路径)
location / {
proxy_set_header Host $host;
proxy_set_header X-Forwarded-For $remote_addr;
proxy_pass http://tomcat_server;
}
location ~ .*\.(gif|jpg|png|bmp|swf|ico)$ {
expires 1h;
}
location ~ .*\.(js|css)?$ {
expires 1h;
}
}
#new server
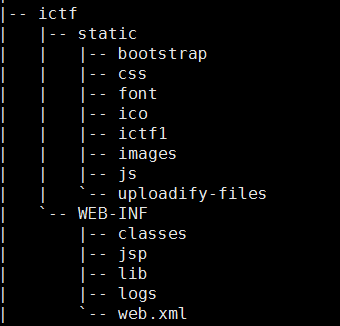
}附上部署文件结构图/home/www/
最后通过监控nginx和tomcat的访问日志,可以看出静态文件已经没有经过tomcat处理了,全部由nginx来处理,只有jsp相关的访问才是tomcat处理的。
tail -f /opt/tomcat/logs/localhost_access_log.2016-07-07.txt
tail -f /var/log/nginx/access.log