1.grep命令
1.Global search regular expression and print out the line(全面搜索研究正则表达示并显示出来)
2.grep 命令是一种强大的文本搜索工具,根据用户指定的“模式”对目标文本进行匹配检查,打印匹配到的行
3.由正则表达示或者字符及基本文本字符所编写的过滤条件
4.grep 的格式
grep 匹配条件 处理文件
例如:
grep root passwd
grep ^root passwd
grep root$ passwd
grep -i root passwd
grep -E “root|ROOT” passwd
5.grep中的正则表达示
^westos
westos$
‘w…s’
'w…
'…s
6.grep正则表达示与扩展正则表达示
正规的grep不支持扩展的正则表达式,竖线是用于表示“或”的扩展正则表达式元字符,正规的grep无法识别,加上反斜杠,这个字就被翻译成扩展正则表达式,就像egrep和grep -E一样
-1-实验:
前提(复制/etc/passwd文件并进行修改):
[root@localhost mnt]# cp /etc/passwd .
[root@localhost mnt]# vim passwd
[root@localhost mnt]# cat passwd

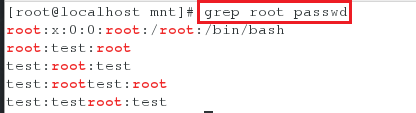
<1>##过滤passwd文件中的“root”
[root@localhost mnt]# grep root passwd
<2>##过滤passed文件中不论大小写的“root”
[root@localhost mnt]# grep -i root passwd

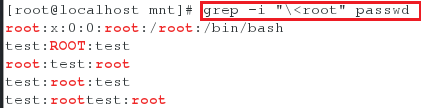
<3>##过滤passwd文件中root前没有内容的文本
[root@localhost mnt]# grep -i "\<root" passwd
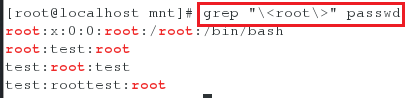
<4>##过滤passwd文件”root“前后都没有内容的文本
[root@localhost mnt]# grep -i "\<root\>" passwd
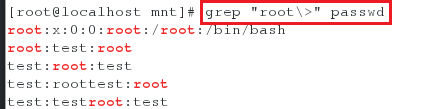
<5>##过滤passwd文件中“root”后没有内容的文本
[root@localhost mnt]# grep -i "root\>" passwd
<6>##过滤passwd文件中以“root”开头且“root”后没有内容的文件
[root@localhost mnt]# grep -i "^root\>" passwd

<7>##过滤passwd文件中以“root”结尾且“root”前没有内容的文件
[root@localhost mnt]# grep -i "\<root$" passwd

<8>##过滤passwd文件中以“root”开头或以“root”为结尾的文本
[root@localhost mnt]# egrep -i "^root\>|\<root$" passwd

<9>##过滤passwd文件中以“root”开头或以“root”为结尾的文本
[root@localhost mnt]# grep -iE "^root\>|\<root$" passwd

<10>##过滤passwd文件中”root”在中间的文本
[root@localhost mnt]# grep -iE "^root\>|\<root$" passwd -v | grep "root"

注意:
由结果可知test:roottest:root并没有被过滤出来,原因是因为符合条件的roottest后还有一个root,前者符合条件,后者不符合条件,所以只要有不符合条件的内容,直接会被忽略
<11>##过滤passwd文件中”root”在中间并且前后没有内容的文本
[root@localhost mnt]# grep -iE “^root>|<root$” passwd -v | grep “<root>”

<12>##显示出passwd文件中的需要的几个字符
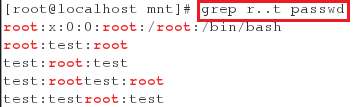
[root@localhost mnt]# grep r..t passwd ##过滤passwd文件中以r开头以t结尾的四个字符的内容
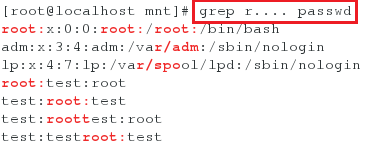
[root@localhost mnt]# grep r.... passwd ##过滤passwd文件中以r开头共5个字符的内容
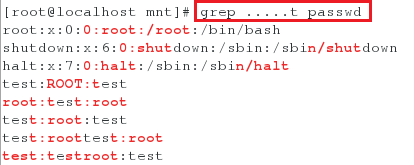
[root@localhost mnt]# grep ....t passwd ##过滤passwd文件中以t结尾共5个字符的内容
注意:
1.<指前面不能有扩展的,>指后面不能有扩展
2.^指以什么开头
3.管道符是扩展正则表达式,过滤符是过滤多个条件(egrep=iE)
4.-v表示不符合条件的一切
补充:
过滤出命令ifconfig eth0的结果中的ip地址
[root@localhost mnt]# ifconfig eth0 | awk -F " " '/inet\>/{print $2}'

-2-.grep中字符的匹配次数设定
* 字符出现0-任意次
\? 字符出现0-1次
\+ 字符出现1-任意次
\{n\} 字符出现n次
\{m,n\} 字符出现m-n次
\{0,n\}	字符揣按0-n次
\{m,\} 字符出现至少m次
\{(xy\)\{n\}xy} xy关键字出现n次
.* 关键字之间匹配任意字符
实验:
前提:
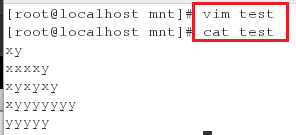
[root@localhost mnt]# vim test
[root@localhost mnt]# cat test
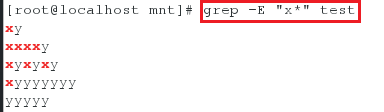
<1>test的中字符x出现0-任意次
[root@localhost mnt]# grep -E "x*" test
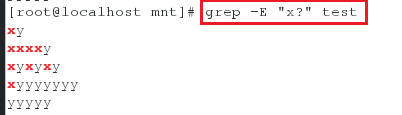
<2>test的中字符x出现0-1次
[root@localhost mnt]# grep -E "x?" test
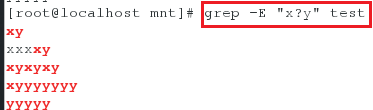
<3>test的中字符x出现0-1次,y出现1次
[root@localhost mnt]# grep -E "x?y" test
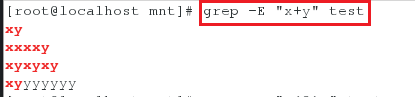
<4>test的中字符x出现1-任意次,y出现一次
[root@localhost mnt]# grep -E "x+y" test
<5>test的中字符x出现3次,y出现1次
[root@localhost mnt]# grep -E "x{3}y" test

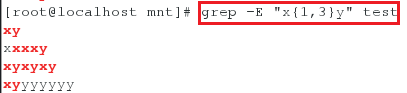
<6>test的中字符x出现1-3次,y出现1次
[root@localhost mnt]# grep -E "x{1,3}y" test
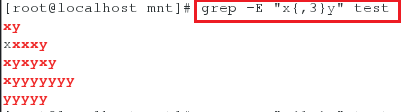
<7>test的中字符x出现0-3次,y出现1次
[root@localhost mnt]# grep -E "x{,3}y" test
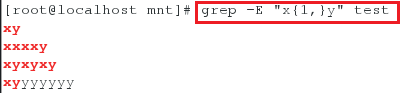
<8>test的中字符x出现1-任意次,y出现1次
[root@localhost mnt]# grep -E "x{1,}y" test
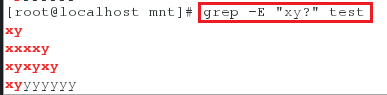
<9>test的中字符x出现1次,y出现0-1次
[root@localhost mnt]# grep -E "xy?" test
<10>test的中字符x出现0-任意次
[root@localhost mnt]# grep -E "(xy)?" test
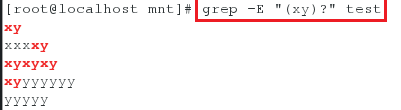
<11>test的中字符xy出现2到任意次
[root@localhost mnt]# grep -E "(xy){2,}" test

2.sed 行编辑器
1.stream editor , 用来操作纯ASCII码的文本
2.处理时,把当前处理的行存储在临时缓冲区中,称为“模式空间”(pattern space)可以指定仅仅处理哪些行
3.sed符合模式条件的处理,不符合条件的不予处理,处理完成之后把缓冲区的内容送往屏幕,接着处理下一行,这样不断重复,直到文件末尾
4.sed 命令格式
调用sed命令有两种格式:
sed[options]'command’file(s)
sed[options] -f scriptfile file(s)
5.sed对字符的处理
p 显示
= 打印被匹配的行号
d 删除
a 添加
c 替换
w 写入
i 插入
r 将内容读入文件
6.p模式操作
sed -n ‘/:/p’ fstab
sed -n ‘/UUID$/p’ fstab
sed -n '/^UUID/p’fstab
sed -n ‘2,6p’ fstab
sed -n ‘2,6!p’ fstab
7.Sed命令格式:
调用sed命令有两种形式:
sed [options]'command’file(s)
sed [options] -f scriptfile file(s)
8.sed的常用选项
-e:它告诉sed将下一个参数解释为一个sed指令,只有当命令行上给出多个sed指令时才需要用-e选项
-f:后跟保存了sed指令的文件(相当于将指令放在了文件中)
-i:直接对内容进行修改,不加-i时默认只是预览,不会对文件做实际修改
-n:取消默认输出,sed默认会输出所有文本内容,使用-n参数后只显示处理过的行
9.-N
N命令简单来说就是追加下一行到模式空间,同时将两行看作一行,但是两行只见依然含有\n换行符,如果命令未执行成功(不是跳过,只是因为前端条件不匹配),则放弃之后的命令,并对新读取的内容,重头执行sed
-1-sed各种模式的操作:
== (1)p模式操作==
<1>前提:
[root@localhost mnt]# cp /etc/fstab .
[root@localhost mnt]# cat fstab

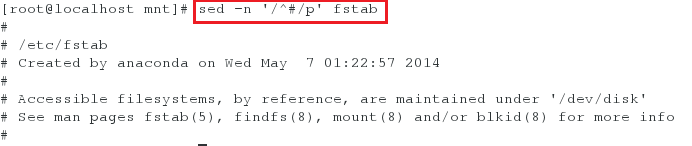
<2>显示fstab中以“#”开头的
[root@localhost mnt]# sed -n '/^#/p' fstab
<3>显示fstab中不以“#”开头的
[root@localhost mnt]# sed -n '/^#/!'p fstab

<4>显示fstab中的内容并有行号(-b会忽略空行)
[root@localhost mnt]# cat -b fstab

<5>显示fstab中的内容并有行号(-n不会忽略空行)
[root@localhost mnt]# cat -n fstab

<6>会显示fstab的第二行到第六行的内容
[root@localhost mnt]# cat -n fstab | sed -n '2,6p'

<7>会显示第六行的内容
[root@localhost mnt]# cat -n fstab | sed -n '6p'

<8>会显示第六行的内容
[root@localhost mnt]# cat -n fstab | sed -n -e '6p'

<9>会显示第二行和第六行的内容
[root@localhost mnt]# cat -n fstab | sed -n -e '6p' -e '2p'

<10>会显示第二行和第六行的内容
[root@localhost mnt]# cat -n fstab | sed -n -e '6p;2p'

<11>会显示除了第二行到第六行以外的所有内容
[root@localhost mnt]# cat -n fstab | sed -n -e '2,6!p'

注意:
1.-b会忽略空行
2.e表示里面的动作都会执行
3.p打印当前模式空间所有内容,追加到默认输出之后,P打印当前模式空间开端至\n的内容,并追加到默认输出之后
(2)d模式操作:
<1>删除fstab中所有以#开头的
[root@localhost mnt]# sed '/^#/d' fstab

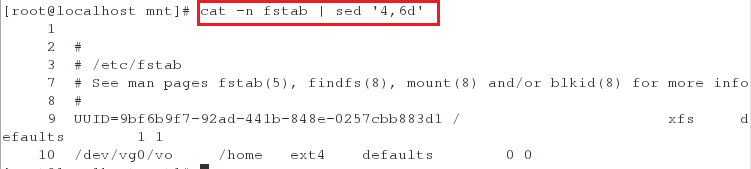
<2>删除fstab中第四行内容
[root@localhost mnt]# cat -n fstab | sed '4d'

<3>删除fstab中第四行到第六行的内容
[root@localhost mnt]# cat -n fstab | sed '4,6d'
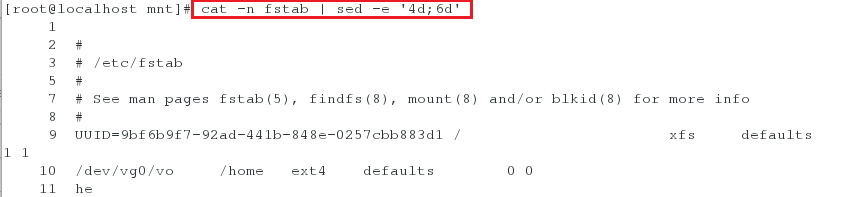
<4>删除fstab中第四行和第六行的内容
[root@dlocalhost mnt]# cat -n fstab | sed -e '4d;6d'
<5>删除fstab中以UUID开头的内容
[root@localhost mnt]# sed '/^UUID/d' fstab

<6>删除fstab中不以UUID开头的内容
[root@localhost mnt]# sed '/^UUID/!d' fstab

<7>删除fstab中的空行
[root@localhost mnt]# sed -e '/^$/d' fstab

注意:
1-i表示输入到文件中
2.^$开头就是结尾
3.-n表示把做操作的行隐藏起来,抑制模式空间里的输出
(3)a模式操作:
<1>添加hello至UUID那一行的内容后
[root@localhost mnt]# sed '/^UUID/ahello' fstab

<2>添加hello在每行的下一行
[root@localhost mnt]# sed 'ahello' fstab

<3>添加两行内容到fstab中
[root@localhost mnt]# sed '/^UUID/ahello\nwestos' fstab

<4>追加内容到fstab文件最后
[root@localhost mnt]# cat >> fstab <<EOF
> he
> EOF
[root@localhost mnt]# cat fstab

(4)i模式操作:
<1>添加hello至UUID那一行的内容后
[root@localhost mnt]# sed '/^UUID/iwestos' fstab

<2>添加两行内容到fstab中:
[root@localhost mnt]# sed '/^UUID/iwestos\nredhat' fstab

(5) c模式操作:
更改以“#”开头的内容为hello和westos两行内容:
[root@localhost mnt]# sed '/^#/chello\nwestos' fstab

(6) w模式操作:
<1>将指定的文件添加到某个文件中
[root@localhost mnt]# sed '/^#/w /mnt/testfile' fstab	##将以“#”开头的内容都复制到/mnt/testfile文件中
[root@localhost mnt]# ls
[root@localhost mnt]# cat testfile

注意:
如果不想在输入命令后显示内容,可以添加以下命令:[root@desktop mnt]# sed -n ‘/^#/w /mnt/testfile’ fstab
<2>将某个文件中的内容添加到指定文件中的某一行
[root@localhost mnt]# vim file
[root@localhost mnt]# cat file
[root@localhost mnt]# sed '6r/mnt/file' /mnt/fstab	##将/mnt/file中的内容添加到了/mnt/fstab中的第六行
[root@localhost mnt]# sed '1r/mnt/file' /mnt/fstab	##将/mnt/file中的内容添加到了/mnt/fstab中的第一行
[root@localhost mnt]# sed 'r/mnt/file' /mnt/fstab	##将/mnt/file中的内容添加到了/mnt/fstab中的下一行


-2-sed的其他用法
<1>只显示以UUID开头的内容的行数
[root@localhost mnt]# sed -n '/^UUID/=' fstab

<2>在同一行输出以UUID开头的内容行数并在同一行输出(分别通过,而是合并到一起输出)
[root@localhost mnt]# sed -ne '/^UUID/=;/^UUID/p' fstab | sed 'N;s/\n/ /g' ##-n只显示处理过的输出,-e当命令行上给出多个sed指令时才需要-e选项,加“;”的原因是因为这里是两个sed指令,N表示提前提取下一行命令的输出,将全文中的换行都换成空格

<3>将rule中的内容输出到fstab中
[root@localhost mnt]# vim rule
[root@localhost mnt]# sed -nf rule fstab

rule中写的内容为:
/^UUID/=
/^UUID/p

注意:
1.N提前提取下一行命令的输出
2.模式空间:内存中的文件的内容
<4>给fstab中的文件添加行号
[root@localhost mnt]# sed "=" -i fstab
[root@localhost mnt]# sed 'N;s/\n/ /g' -i fstab
[root@localhost mnt]# cat fstab


注意:s表示全文
<5>给passwd中的文件添加行号
[root@localhost mnt]# sed "=" -i passwd
[root@localhost mnt]# sed 'N;s/\n/ /g' -i passwd
[root@localhost mnt]# cat passwd

<6>将passwd文件中全文的nologin都更改成bash(注意:为了更加直观的看到效果,将passwd文件中的内容被删除了一些)
[root@localhost mnt]# sed 's/nologin/bash/g' passwd

<7>将passwd文件中第1行和第5行的nologin更改成bash
[root@localhost mnt]# sed '1,5s/nologin/bash/g' passwd

<8>将passwd文件中第5行的nologin更改成bash
[root@localhost mnt]# sed '5s/nologin/bash/g' passwd

<9>将passwd文件中第5行和第3行的nologin更改成bash
[root@localhost mnt]# sed -e '5s/nologin/bash/g;3s/nologin/bash/g' passwd

<10>将passwd文件中的从daemon到shutdown用户的nologin都更改成bash
[root@localhost mnt]# sed '/daemon/,/shutdown/s/nologin/bash/g' passwd

<11>将passwd文件中的“/”都更改成空格(s/ “/” /“空格”/)
[root@localhost mnt]# sed 's/\// /g' passwd

<12>将passwd文件中的“/”都更改成空格(此方法将“/”换成了“@”)
[root@localhost mnt]# sed 's@/@ @g' passwd

<13>将passwd文件中的nologin更改成bash
[root@localhost mnt]# sed 's@nologin@bash@g' passwd

<14>在passwd文件的每一行后都加上空行
[root@localhost mnt]# sed 'G' passwd

<15>在passwd文件的每一行后都加上空行,但最后一行后没有空行
[root@localhost mnt]# sed '$!G' passwd

<16>显示passwd文件中最后一行内容
[root@localhost mnt]# sed -n '$p' passwd

注意:
单引号是强引用,双引号中特殊符号不会显示