1.使用shell脚本判断文件的类型:
当没有给文件时,输出“Please show me a file after script",当文件不存在时,输出"文件名称 is not exist",当文件的类型是其他类型时,输出每个文件的文件类型名称
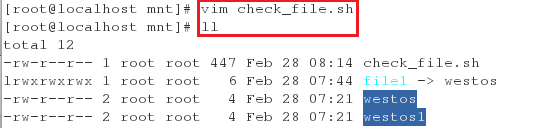
<1>建立一个shell脚本(幻数是sh),查看/mnt目录下的文件
[root@localhost mnt]# vim check_file.sh
[root@localhost mnt]# ll
shell脚本中写入的内容是:
#!/bin/bash
[ -z "$1" ] && {
        echo "Error: Please show me a file after script"
        exit
}
[ -e "$1" ] || {
        echo "$1 is not exist"
        exit
}
[ -L "$1" ] && {
        echo "$1 is a link file"
        exit
}
[ -f "$1" ] && {
        echo "$1 is a common file"
        exit
}
[ -d "$1" ] && {
        echo "$1 is a directory"
        exit
}
[ -c "$1" ] && {
        echo "$1 is a char file"
        exit
}
[ -b "$1" ] && {
        echo "$1 is a block file"
        exit
}
[ -S "$1" ] && {
        echo "$1 is a socket file"
        exit
}

<2>测试:判断文件的类型
[root@localhost mnt]# sh check_file.sh	##当没有输入任何文件时
[root@localhost mnt]# sh check_file.sh file1	##当输入的文件是链接文件时(file1文件也是文本文件,但是因为在脚本中判断是链接文件比判断是文本文件更前,所以只显示是链接文件)
[root@localhost mnt]# sh check_file.sh /mnt	##当输入的是一个目录时
[root@localhost mnt]# sh check_file.sh file2	##当输入的文件不存在时
[root@localhost mnt]# sh check_file.sh /dev/vda	##当输入的文件是一个块设备文件时
[root@localhost mnt]# sh check_file.sh /dev/pts/0	##当输入的文件是一个字符设备文件时
[root@localhost mnt]# sh check_file.sh /var/lib/mysql/	##当输入的文件是一个套接字文件时

注意:
1.在脚本中当输入的文件符合某一条时,便不再继续查看
2.要注意脚本的书写格式
3.应当注意使脚本运行的程序立刻关闭,不然可能会影响
补充:
让一个文件中所有的内容都变为大写或者小写
-1-进入westos文件进行编写并查看其内容
[root@localhost mnt]# vim westos
[root@localhost mnt]# cat westos

-2-将westos文件中的内容都变为大写
[root@localhost mnt]# tr 'a-z' 'A-Z' < westos

-3-将westos文件中的内容都变为小写
[root@localhost mnt]# tr 'A-Z' 'a-z' < westos

2.更改字体或背景的颜色
2.echo -e “\033[背景颜色代码;字体颜色代码m内容\033[0m”
字背景颜色:(40黑)(41深红)(42绿)(43黄)(44蓝)(45紫)(46深绿)(47白)
字颜色:(30黑)(31红)(32绿)(33黄)(34蓝)(35紫)(36深绿)(37白)

<1>显示字体的颜色为红色
[root@localhost mnt]# echo -e "\033[31mhello\033[0m"

<2>显示背景颜色为黑色,字体颜色为红色
[root@localhost mnt]# echo -e "\033[40;31mhello\033[0m"

3.更改http服务的端口
<1>新建一个shell脚本进行编写
[root@localhost mnt]# vim file.sh

编写的内容为:
#!/bin/bash
[ -z "$1" ] && {
        echo -e "\033[31mError: Please input port number Apache Server\033[0m"
        exit
}
sed "/^Listen/cListen $1" -i /etc/httpd/conf/httpd.conf
systemctl restart httpd &>/dev/null
port=`netstat -antlupe | grep httpd | awk '{print $4}' | cut -d : -f 4`
[ "$1" -eq "$port" ] && {
        echo -e "\033[32mPort has change to $1 \033[0m"
}||{
        echo -e "\033[31mError:Change port failed\033[0m"
}

注意:
eq两边一定是纯数字
<2>测试:
当不输入任何内容时:
[root@localhost mnt]# sh file.sh
当输入非法内容时:
[root@localhost mnt]# sh file.sh pp
当输入其他的端口号时:
[root@localhost mnt]# sh file.sh 8080
检测端口号是否与设置的相同:
[root@localhost mnt]# netstat -antlupe | grep httpd
[root@localhost mnt]# netstat -antlupe | grep httpd | awk '{print $4}'
[root@localhost mnt]# netstat -antlupe | grep httpd | awk '{print $4}' | cut -d : -f 4

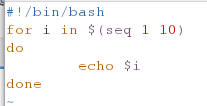
4.编写一个shell脚本使其使用for循环,从1输出到10
<1>编辑一个新的shell脚本
[root@localhost mnt]# vim file1.sh

编写的内容如下:
#!/bin/bash
for i in $(seq 1 10)
do
        echo $i
done
<2>测试(运行shell脚本):
[root@localhost mnt]# sh file1.sh

注意:
for i in seq 1 2 10让i=1到10,可以设置步长为2
5.建立一个shell脚本,使其可以读取user_file(三个已经给了的用户)和pass_file(三个已经给了的密码)中的内容,将没有创建的用户进行创建,密码进行修改,如果用户已存在,则显示用户已经存在
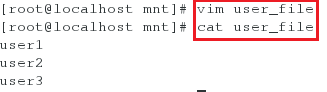
<1>建立一个user_file文件,在其写入三个用户
[root@localhost mnt]# vim user_file
[root@localhost mnt]# cat user_file
<2>建立一个pass_file文件,在其写入三个密码
[root@localhost mnt]# vim pass_file
[root@localhost mnt]# cat pass_file

<3>新建一个shell脚本
[root@localhost mnt]# vim file2.sh
[root@localhost mnt]# cat file2.sh

编写的内容如下:
#!/bin/bash
Max_Line=`sed -n '$=' $1`
for i in $(seq 1 $Max_Line)
do
        USERNAME=`sed -n "${i}p" $1`
        PASSWORD=`sed -n "${i}p" $2`
        id $USERNAME &> /dev/null && {
                echo "$USERNAME is exist"
        }||{
                useradd $USERNAME
                echo $PASSWORD | passwd --stdin $USERNAME &>/dev/null && echo $USERNAME CREATE
}
done

<4>测试
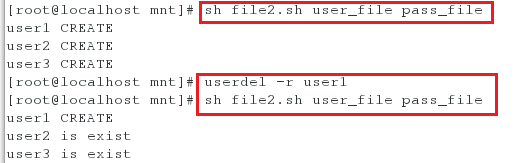
[root@localhost mnt]# sh file2.sh user_file pass_file
[root@localhost mnt]# userdel -r user1	##删除一个用户user1
[root@localhost mnt]# sh file2.sh user_file pass_file	##再次运行三个文件,会发现user1再次被创建,user,user3因为已经建立,所以先时已经存在
注意:
这里的$1(第一个变量)代表的是一个文件(会依次执行文件每一行的内容)
6.使用shell脚本将所有的/etc/中以.conf结尾的文件都移动到/mnt/baskup下,并将名字都更改成.conf加时间
<1>先编写一个shell脚本,在里面写入内容并查看文件
[root@desktop mnt]# vim file.sh
[root@desktop mnt]# sh file.sh
[root@desktop mnt]# cat file.sh
[root@desktop mnt]# ls

<2>在shell脚本(file.sh)中写入以下内容:
#!/bin/bash
find /etc -name "*.conf" -exec cp -rp {} /mnt \;
find /mnt -name "*.conf" -exec mv {} {}.`date +%m-%d` \;
