新手学习webpack 打包工具的时候,在runoob上找到了3.0的教程,但是自己的系统装的是4.x的,出现了很多意想不到的问题,以下做一个记录和改进:
OS:Ubuntu 18.04 LTS;Version: webpack 4.29.6;
参考:http://www.runoob.com/w3cnote/webpack-tutorial.html
webpack工作原理:

一、安装Webpack:
提前安装好最新版本node.js和国内淘宝的cnpm,然后再执行下面命令:
cnpm install webpack -g全局安装:cnpm install webpack-cli -g 因为4.x版本,webpack和webpack-cli 分开了。
二、创建项目:
创建目录
mkdir app
在app下面创建 test1.js文件:
document.write("It works.");
在 app 目录下添加 index.html 文件,代码如下:
<html>
    <head>
        <meta charset="utf-8">
    </head>
    <body>
        <script type="text/javascript" src="bundle.js" charset="utf-8"></script>
    </body>
</html>
三、使用webpack 打包
如果是使用webpack 3.x 的话,使用 webpack test1.js bundle.js 就可以了,但是webpack更新迭代很快,现在已经到4.x了,如果是4.x版本使用webpack test1.js bundle.js 打包的话会报错如下:

原因:webpack4的语法问题,出现这个错误提示并不是我们环境装错了,而是webpack4 更新后对webpack语法进行了更严格的要求,之前的命令被修订为 npx webpack a.js –output-filename bundle.js –output-path . –mode development
这样就可以成功对文件进行打包了
解决方法:指定打包文件之外还要进行严格的语法规范,如下所示:
$ webpack test1.js --output-filename bundle.js --output-path . --mode development
打包成功之后就会显示如下信息:

浏览器访问:显示成功!

创建第二个test.js文件,内容如下:
$ cat > test2.js
module.exports = "It works from test2.js";
更改第一个文件,内容如下:
$ cat > test1.js
document.write(require("./test2.js"));
重新打包:

浏览器访问:显示成功!
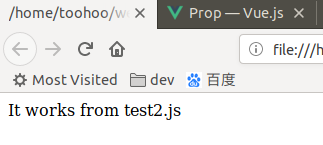
说明:webpack 根据模块的依赖关系进行静态分析,这些文件(模块)会被包含到 bundle.js 文件中。Webpack 会给每个模块分配一个唯一的 id 并通过这个 id 索引和访问模块。 在页面启动时,会先执行 test1.js 中的代码,其它模块会在运行 require 的时候再执行。bundle.js文件如下:
$ cat bundle.js
/******/ (function(modules) { // webpackBootstrap
/******/ 	// The module cache
/******/ 	var installedModules = {};
/******/
/******/ 	// The require function
/******/ 	function __webpack_require__(moduleId) {
/******/
/******/ 		// Check if module is in cache
/******/ 		if(installedModules[moduleId]) {
/******/ 			return installedModules[moduleId].exports;
/******/ 		}
/******/ 		// Create a new module (and put it into the cache)
/******/ 		var module = installedModules[moduleId] = {
/******/ 			i: moduleId,
/******/ 			l: false,
/******/ 			exports: {}
/******/ 		};
/******/
/******/ 		// Execute the module function
/******/ 		modules[moduleId].call(module.exports, module, module.exports, __webpack_require__);
/******/
/******/ 		// Flag the module as loaded
/******/ 		module.l = true;
/******/
/******/ 		// Return the exports of the module
/******/ 		return module.exports;
/******/ 	}
/******/
/******/
/******/ 	// expose the modules object (__webpack_modules__)
/******/ 	__webpack_require__.m = modules;
/******/
/******/ 	// expose the module cache
/******/ 	__webpack_require__.c = installedModules;
/******/
/******/ 	// define getter function for harmony exports
/******/ 	__webpack_require__.d = function(exports, name, getter) {
/******/ 		if(!__webpack_require__.o(exports, name)) {
/******/ 			Object.defineProperty(exports, name, { enumerable: true, get: getter });
/******/ 		}
/******/ 	};
/******/
/******/ 	// define __esModule on exports
/******/ 	__webpack_require__.r = function(exports) {
/******/ 		if(typeof Symbol !== 'undefined' && Symbol.toStringTag) {
/******/ 			Object.defineProperty(exports, Symbol.toStringTag, { value: 'Module' });
/******/ 		}
/******/ 		Object.defineProperty(exports, '__esModule', { value: true });
/******/ 	};
/******/
/******/ 	// create a fake namespace object
/******/ 	// mode & 1: value is a module id, require it
/******/ 	// mode & 2: merge all properties of value into the ns
/******/ 	// mode & 4: return value when already ns object
/******/ 	// mode & 8|1: behave like require
/******/ 	__webpack_require__.t = function(value, mode) {
/******/ 		if(mode & 1) value = __webpack_require__(value);
/******/ 		if(mode & 8) return value;
/******/ 		if((mode & 4) && typeof value === 'object' && value && value.__esModule) return value;
/******/ 		var ns = Object.create(null);
/******/ 		__webpack_require__.r(ns);
/******/ 		Object.defineProperty(ns, 'default', { enumerable: true, value: value });
/******/ 		if(mode & 2 && typeof value != 'string') for(var key in value) __webpack_require__.d(ns, key, function(key) { return value[key]; }.bind(null, key));
/******/ 		return ns;
/******/ 	};
/******/
/******/ 	// getDefaultExport function for compatibility with non-harmony modules
/******/ 	__webpack_require__.n = function(module) {
/******/ 		var getter = module && module.__esModule ?
/******/ 			function getDefault() { return module['default']; } :
/******/ 			function getModuleExports() { return module; };
/******/ 		__webpack_require__.d(getter, 'a', getter);
/******/ 		return getter;
/******/ 	};
/******/
/******/ 	// Object.prototype.hasOwnProperty.call
/******/ 	__webpack_require__.o = function(object, property) { return Object.prototype.hasOwnProperty.call(object, property); };
/******/
/******/ 	// __webpack_public_path__
/******/ 	__webpack_require__.p = "";
/******/
/******/
/******/ 	// Load entry module and return exports
/******/ 	return __webpack_require__(__webpack_require__.s = "./test1.js");
/******/ })
/************************************************************************/
/******/ ({

/***/ "./test1.js":
/*!******************!*\
  !*** ./test1.js ***!
  \******************/
/*! no static exports found */
/***/ (function(module, exports, __webpack_require__) {

eval("document.write(__webpack_require__(/*! ./test2.js */ \"./test2.js\"));\n\n\n//# sourceURL=webpack:///./test1.js?");

/***/ }),

/***/ "./test2.js":
/*!******************!*\
  !*** ./test2.js ***!
  \******************/
/*! no static exports found */
/***/ (function(module, exports) {

eval("module.exports = \"It works from test2.js\";\n\n\n//# sourceURL=webpack:///./test2.js?");

/***/ })

/******/ });
LOADER
Webpack 本身只能处理 JavaScript 模块,如果要处理其他类型的文件,就需要使用 loader 进行转换。
所以如果我们需要在应用中添加 css 文件,就需要使用到 css-loader 和 style-loader,他们做两件不同的事情,css-loader 会遍历 CSS 文件,然后找到 url() 表达式然后处理他们,style-loader 会把原来的 CSS 代码插入页面中的一个 style 标签中。
接下来我们使用以下命令来安装 css-loader 和 style-loader(全局安装需要参数 -g)。
cnpm install css-loader style-loader
执行以上命令后,会再当前目录生成 node_modules 目录,它就是 css-loader 和 style-loader 的安装目录。
![]()
接下来创建一个 style.css 文件,代码如下:
$ cat > style.css
body{
    background:green;
}
修改 test1.js 文件,代码如下:
$ cat > test1.js
require("!style-loader!css-loader!./style.css");
document.write(require("./test2.js"));
使用 webpack 命令来打包:

刷新页面可以得到:
require CSS 文件的时候都要写 loader 前缀 !style-loader!css-loader!,当然我们可以根据模块类型(扩展名)来自动绑定需要的 loader。 将 test1.js 中的 require("!style-loader!css-loader!./style.css") 修改为 require("./style.css") :
更改test.js文件为:
$ cat  test1.js
require("./style.css");
document.write(require("./test2.js"));
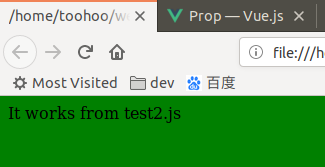
然后再次打包:

刷新页面可以得到一样的页面:
显然,这两种使用 loader 的方式,效果是一样的。
配置:
我们可以将一些编译选项放在配置文件中,以便于统一管理:
创建 webpack.config.js 文件,代码如下所示:
module.exports = {
    entry: "./test1.js",
    output: {
        path: __dirname,
        filename: "bundle.js"
    },
    module: {
        rules: [
            { test: /\.css$/, loader: "style-loader!css-loader" }
        ]
    }
};
将之前目录下面的bundle.js删除之后,执行webpack --mode development 命令,会重新生成bundle.js文件,如下所示:

webpack 命令执行后,会默认载入当前目录的 webpack.config.js 文件。
注意:记得添加--mode development 模式,当然也可以是生产模式,如果是将上面的rules: [ ... ] 换成loaders: [...] 的话,会报错如下:
$ webpack
Invalid configuration object. Webpack has been initialised using a configuration object that does not match the API schema.
 - configuration.module has an unknown property 'loaders'. These properties are valid:
   object { defaultRules?, exprContextCritical?, exprContextRecursive?, exprContextRegExp?, exprContextRequest?, noParse?, rules?, strictExportPresence?, strictThisContextOnImports?, unknownContextCritical?, unknownContextRecursive?, unknownContextRegExp?, unknownContextRequest?, unsafeCache?, wrappedContextCritical?, wrappedContextRecursive?, wrappedContextRegExp? }
   -> Options affecting the normal modules (`NormalModuleFactory`).
原因:从报错信息中已经可以知道,webpack版本迭代快,4.x已经不支持当前的loaders: [...] 属性了,可以参考官网解析:官网文档,推荐到官方文档学习。
插件:
插件在 webpack 的配置信息 plugins 选项中指定,用于完成一些 loader 不能完成的工。webpack 自带一些插件,你可以通过 cnpm 安装一些插件。
使用内置插件需要通过以下命令来安装:
cnpm install webpack --save-dev
比如我们可以安装内置的 BannerPlugin 插件,用于在文件头部输出一些注释信息。
修改 webpack.config.js,代码如下:
$ cat webpack.config.js
var webpack=require('webpack');

module.exports = {
    entry: "./test1.js",
    output: {
        path: __dirname,
        filename: "bundle.js"
    },
    module: {
        rules: [
            { test: /\.css$/, loader: "style-loader!css-loader" }
        ]
    },
    plugins:[
    new webpack.BannerPlugin("webpack 入门实例")
    ]
};
然后运行 webpack --mode development ,就可以在bundle.js文件开头出现了我们指定的注释信息。
开发环境:
当项目逐渐变大,webpack 的编译时间会变长,可以通过参数让编译的输出内容带有进度和颜色。
webpack --mode development --progress --colors
如果不想每次修改模块后都重新编译,那么可以启动监听模式。开启监听模式后,没有变化的模块会在编译后缓存到内存中,而不会每次都被重新编译,所以监听模式的整体速度是很快的。
webpack --mode development --progress --colors --watch
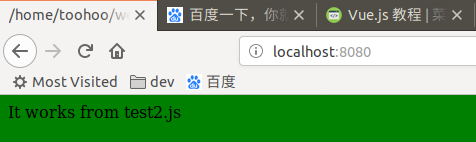
当然,我们可以使用 webpack-dev-server 开发服务,这样我们就能通过 localhost:8080 启动一个 express 静态资源 web 服务器,并且会以监听模式自动运行 webpack,在浏览器打开 http://localhost:8080/ 或 http://localhost:8080/webpack-dev-server/ 可以浏览项目中的页面和编译后的资源输出,并且通过一个 socket.io 服务实时监听它们的变化并自动刷新页面。
# 安装
cnpm install webpack-dev-server -g

# 运行
webpack-dev-server --progress --colors
在浏览器打开 http://localhost:8080/ 输出结果如下: