1.apache
企业中常用的web服务,用来提供http://(超文本传输协议)
2.apache的安装部署
yum install httpd -y            ##apache软件
yum install httpd-manual        ##apache的手册
systemctl start httpd
systemctl enable httpd
firewall-cmd --list-all                         ##列出火墙信息
firewall-cmd --permanent --add-service=http     ##永久允许http
firewall-cmd --reload                           ##火墙重新加载

/var/www/html                   ##apache的/目录
/var/www/html/index.html             ##apache的默认发布文件
vim /var/www/html/index.html
<h1> hello world </h1>
:wq


3.apache的基础信息
| 信息 | 位置 |
|---|---|
| 主配置目录: | /etc/httpd/conf |
| 主配置文件: | /etc/httpd/conf/httpd.conf |
| 子配置目录: | /etc/httpd/conf.d |
| 子配置文件: | /etc/httpd/conf.d/*.conf |
| 默认发布目录: | /var/www/html |
| 默认发布文件: | index.html |
| 默认端口: | 80 |
| 默认安全上下文: | httpd_sys_content_t |
| 程序开启默认用户: | apache |
| apache日志: | /etc/httpd/logs/* |
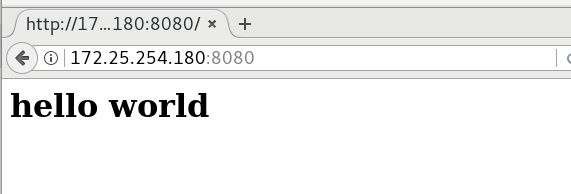
修改默认端口
vim /etc/httpd/conf/httpd.conf
43 Listen 8080          ##修改默认端口为8080
firewall-cmd --permanent --add-port=8080/tcp
firewall-cmd --reload


测试:

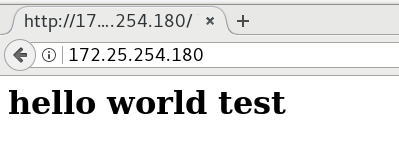
修改默认发布文件:
默认发布文件就是访问apache时没有指定文件名称时默认访问的文件
这个文件可以指定多个,有访问顺序
vim /etc/httpd/conf/httpd.conf
164     DirectoryIndex index.html test.html     #当index.html不存在时访问test.html


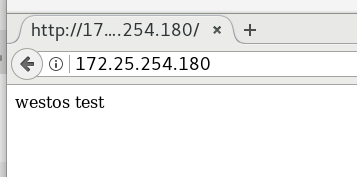
修改默认发布目录:
vim /etc/httpd/conf/httpd.conf
120 DocumentRoot "/westos/html"
121 <Directory "/westos">
122         Require all granted
123 </Directory>
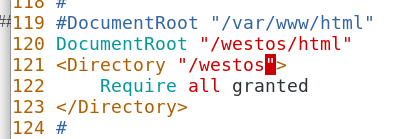
semanage fcontext -a -t httpd_sys_content_t '/westos(/.*)?'	##更改安全上下文
restorecon -RvvF /westos/					##刷新安全上下文

4.apache的虚拟主机
mkdir /var/www/virtual/westos.com/news -p
mkdir /var/www/virtual/westos.com/music -p
cd /var/www/virtual/westos.com/news/
vim index.html
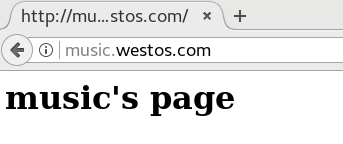
cd /var/www/virtual/westos.com/music
/vim index.html


cd /etc/httpd/conf.d/
vim adefault.conf
vim news.conf
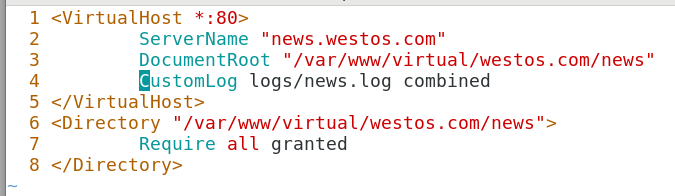
1 <VirtualHost *:80>
2 ServerName "news.westos.com" ##指定站点名称
3 DocumentRoot "/var/www/virtual/westos.com/news" ##站点默认发布目录
4 CustomLog logs/news.log combined ##站点日志combined表示四种日志的集合
5 </VirtualHost>
6 <Directory "/var/www/virtual/westos.com/news">
7 Require all granted ##允许任何人通过浏览器查看
8 </Directory>
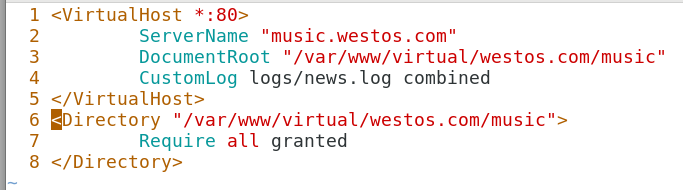
vim music.conf
systemctl restart httpd
测试:
在开浏览器的主机
vim /etc/hosts
  4 172.25.254.180 www.westos.com news.westos.com music.westos.com

打开浏览器
www.westos.com
news.wetos.com
music.westos.com

5.apache内部的访问控制
1.针对与主机的访问控制
mkdir /var/www/html/admin
vim /var/www/html/admin/index.html
  1 <h1>hello admin</h1>
  htpasswd -cm /etc/httpd/htuser admin
  htpasswd -m /etc/httpd/htuser admin1

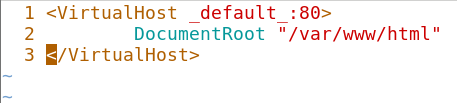
vim /etc/httpd/conf.d/adefault.conf
  1 <VirtualHost _default_:80>
  2         DocumentRoot "/var/www/html"
  3 </VirtualHost>
  4 <Directory "/var/www/html">
  5         Require all granted
  6         Order Deny,Allow
  7         Allow from 172.25.254.80
  8	    Deny from all		##白名单,只允许172.25.254.32查看
  9 </Directory>


  6         Order Allow,Deny
  7         Allow from all
  8	    Deny from 172.25.254.32	##黑名单,不允许172.25.254.80查看


白名单测试:
80的浏览器输入172.25.254.180

100的浏览器输入172.25.254.180

黑名单测试:
180的浏览器输入172.25.254.180


2.用户方式的访问控制
htpasswd -cm /etc/httpd/htuser admin		##添加用户admin及密码(c--creat新建,m--modify修改)
cat /etc/httpd/htuser
admin:$apr1$7r44WEyz$nZiAX8PxboYdDbqWj9gYe.	##生成加密字符

htpasswd -m /etc/httpd/htuser admin1		##添加用户admin1并设置密码

vim adefault.conf
  1 <VirtualHost _default_:80>
  2         DocumentRoot "/var/www/html"
  3 </VirtualHost>
  4 <Directory "/var/www/html">
  5         Require all granted
  6         Order Deny,Allow
  7         Allow from all
  8 </Directory>
  9 <Directory "/var/www/html/admin">		##要进入默认目录中/admin
 10         AuthUserFile    "/etc/httpd/htuser"	##要验证通过此文件
 11         Authname        "Please input username and password"	##需要输入用户名及密码
 12         AuthType        Basic		##验证类型为简单验证,只验证用户名与密码
 13         Require         valid-user		##允许名单中存在的用户通过验证的登陆
 14 #       Require user    admin		##只允许admin通过验证登陆(与上一个两个只能存在一个)
 15 </Directory>

测试:
在客户机,浏览器:172.25.254.132/admin
使用admin 登陆

成功!
使用admin1登陆


失败!
6.apache支持的语言
1.html
2.php
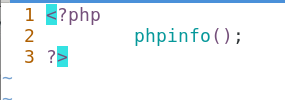
vim /var/www/html/index.php
  1 <?php
  2         phpinfo();
  3 ?>

yum install php -y
systemctl restart httpd
测试:
172.25.254.132/index.php

3.cgi
mkdir /var/www/html/cgi
semanage fcontext -a -t httpd_sys_script_exec_t '/var/www/html/cgi(/.*)?'
restorecon -RvvF /var/www/html/cgi/
cd /var/www/html/cgi/
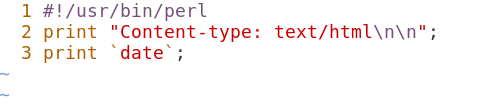
vim index.cgi
1 #!/usr/bin/perl
2 print "Content-type: text/html\n\n";
3 print `date`;
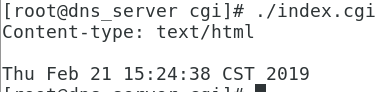
chmod +x index.cgi
./index.cgi 				##执行脚本确定脚本运行正常
cd /etc/httpd/conf.d/
vim adefault.conf
 16 <Directory "/var/www/html/cgi">
 17         Options +ExecCGI
 18         AddHandler cgi-script .cgi
 19 </Directory>

systemctl restart httpd.service
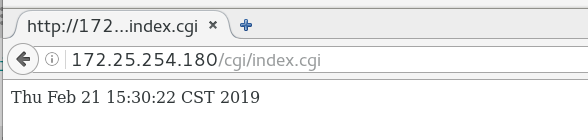
测试:
172.25.254.132/cgi/index.cgi
4.wsgi
yum install mod_wsgi -y
vim /var/www/html/cgi/script.wsgi			##显示本机硬件时间
  1 #!/usr/bin/env python
  2 import time
  3
  4 def application (environ, start_response):
  5   response_body = 'UNIX EPOCH time is now: %s\n' % time.time()
  6   status = '200 OK'
  7   response_headers = [('Content-Type', 'text/plain'),
  8                       ('Content-Length', '1'),
  9                       ('Content-Length', str(len(response_body)))]
 10   start_response(status, response_headers)
 11   return [response_body]

vim /etc/httpd/conf.d/adefault.conf
  1 <VirtualHost _default_:80>
  2         DocumentRoot "/var/www/html"
  3         WSGIScriptAlias /WSGI /var/www/html/cgi/script.wsgi

systemctl restart httpd
测试
172.25.254.132/WSGI

7.https
全称:Hyper Text Transfer Protocol over Secure Socket Layer 或 Hypertext Transfer Protocol Secure,超文本传输安全协议
主要作用可以分为两种:
一种是建立一个信息安全通道,来保证数据传输的安全;
另一种就是确认网站的真实性,凡是使用了 https 的网站,都可以通过点击浏览器地址栏的锁头标志来查看网站认证之后的真实信息,也可以通过 CA 机构颁发的安全签章来查询
yum install mod_ssl -y
yum install crypto-utils -y
genkey www.westos.com
Next–>1024…Tab…Next–>等…动鼠标键盘–>No–>不选…Next–>填写信息…Next–>完成

vim /etc/httpd/conf.d/ssl.conf
101 SSLCertificateFile /etc/pki/tls/certs/www.westos.com.crt
109 SSLCertificateKeyFile /etc/pki/tls/private/www.westos.com.key

systemctl restart httpd.service
测试:
客户机浏览器
https://172.25.254.132
https://www.westos.com


8.设定https虚拟主机并设定网页重写
当我们访问www.baidu.com,浏览器会自动在前面加上https://
vim login.conf
  1 <VirtualHost *:443>
  2         ServerName "login.westos.com"
  3         DocumentRoot "/var/www/virtual/westos.com/login"
  4         CustomLog "logs/login.log" combined
  5         SSLEngine on
  6         SSLCertificateFile /etc/pki/tls/certs/www.westos.com.crt
  7         SSLCertificateKeyFile /etc/pki/tls/private/www.westos.com.key
  8 </VirtualHost>
  9
 10 <Directory "/var/www/virtual/westos.com/login">
 11         Require all granted
 12 </Directory>
 13
 14 <VirtualHost *:80>
 15         ServerName login.westos.com
 16         RewriteEngine On
 17         RewriteRule ^(/.*)$ https://%{HTTP_HOST}$1 [redirect=301]
 18 </VirtualHost>

测试:
在浏览器输入login.westos.com

自动在前面补上了https://

^(/.*)$         ##客户在浏览器地址栏中输入的所有字符
https://        ##强制客户加密访问
%{HTTP_HOST}    ##客户请求主机
$1              ##“$1”表示^(/.*)$的值
[redirect=301]  ##永久重写  302临时