注:本文分析的内容,针对的是Spring 2.5.6的版本
ApplicationContext是spring IoC容器的顶级接口,其类结构图如下:
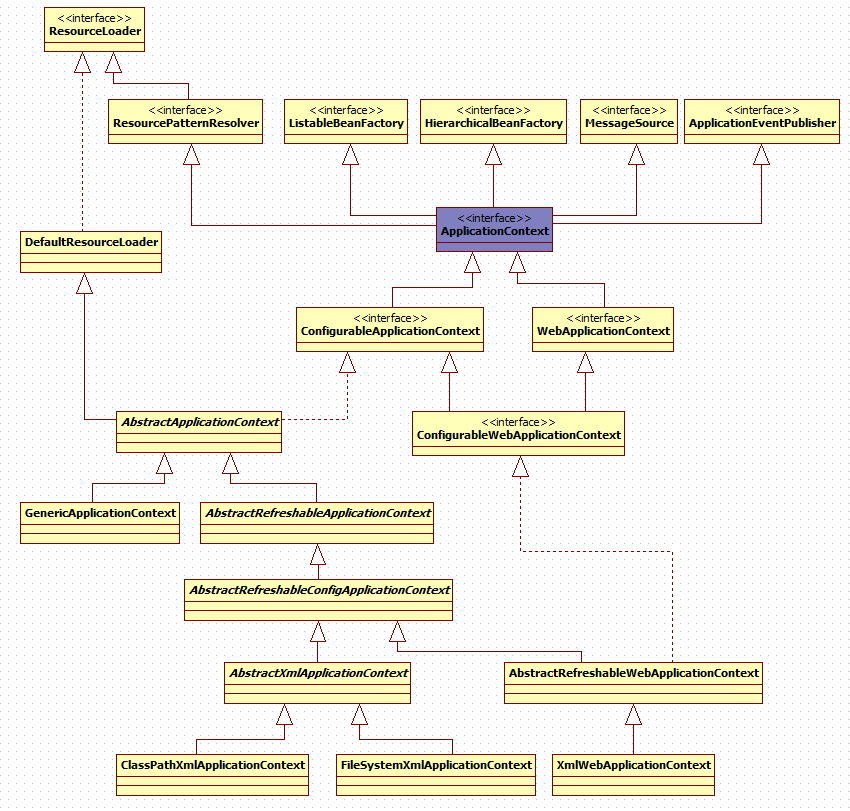
从上面的类图中可以看出, ApplicationContext继承了ResourceLoader接口,便于获取外部资源;也间接继承了 BeanFactory接口,这样可以在Spring容器中创建Bean对象;同时也继承了ApplicationEventPublisher接口,用于发送一些事件消息。
通常我们使用这样的一行代码来创建并启动Spring容器:
1、prepareRefresh()
该方法所做的事情相对比较简单:记录容器启动的时间,并设置容器处于活跃状态。
2、obtainFreshBeanFactory()
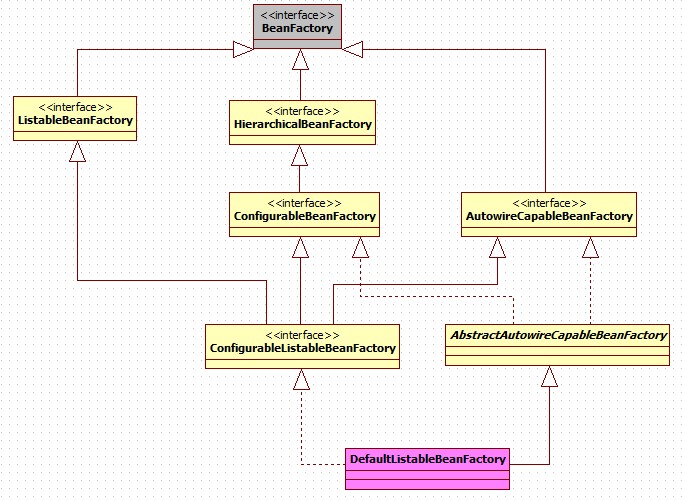
该方法的作用:创建BeanFactory实例,并解析Spring的xml配置文件。beanFactory的实现类是:ConfigurableListableBeanFactory。方法的实现如下:
创建了beanFactory之后,通过调用AbstractXmlApplicationContext.loadBeanDefinitions方法,加载spring的xml配置文件,把用户通过配置文件定义的bean,解析成容器中以特定的数据结构描述的bean定义。AbstractXmlApplicationContext.loadBeanDefinitions方法的实现如下:

第二步, 创建ResourceEntityResolver,设置用于XML配置文件验证的实体分解器。该类的resolveEntity方法,实现对文档验证实体的转换:根据spring定义bean的xml配置文件中的“http://www.springframework.org/schema/beans”形式的url,从spring.jar包中的META-INF\spring.schema文件中,找到对应的DTD或XSD文件在本地的路径。
第三步,调用initBeanDefinitionReader方法,该方法是一个空实现,允许子类去覆盖,可以用来设置自定义的EntityResolver实现类,以及NamespaceHandlerResolver实现类。这也是spring的一个扩展点。
第四步,调用loadBeanDefinitions方法,该方法最终调用XmlBeanDefinitionReader.loadBeanDefinitions(EncodedResource)方法实现xml配置文件的加载及bean的注册,方法的实现如下:
至此,完成了BeanFactory实例的创建和Spring的xml配置文件的解析。
3、prepareBeanFactory
创建好 BeanFactory 后,接着调用prepareBeanFactory方法,添加一些 Spring 本身需要的一些工具类:
第一步,设置类加载器;
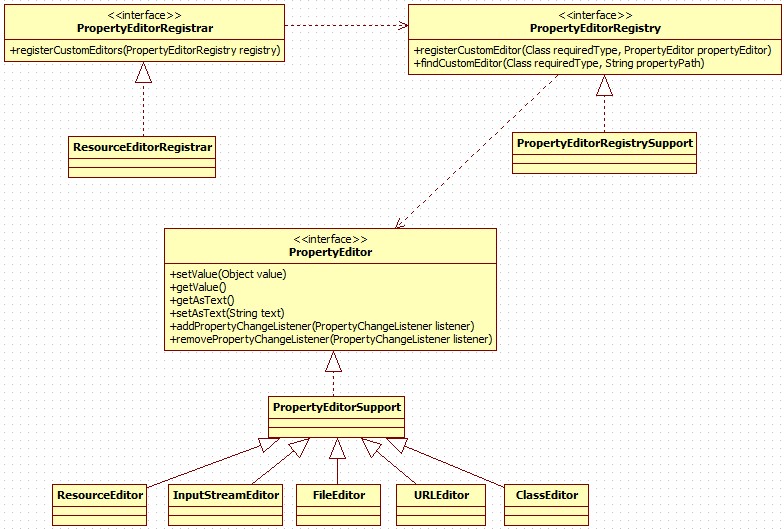
第二步,设置属性编辑器注册类,用来注册相关的属性编辑器。ResourceEditorRegistrar类,注册的属性编辑器如下:
第三步:设置内置的BeanPostProcessor:ApplicationContextAwareProcessor。该BeanPostProcessor的作用是,为实现特殊接口的bean,注入容器类(例如为实现ApplicationContextAware接口的类,注入ApplicationContext对象实例),如下:
第五步:调用registerResolvableDependency,注入特殊的对象。
4、postProcessBeanFactory
该方法是spring的一个扩展点之一,是一个空方法,留给子类去扩展。子类可以重写该方法,对已经构建的 BeanFactory 的配置根据需要进行修改。例如调用beanFactory.registerResolvableDependency,注入特殊的类。
ApplicationContext是spring IoC容器的顶级接口,其类结构图如下:
从上面的类图中可以看出, ApplicationContext继承了ResourceLoader接口,便于获取外部资源;也间接继承了 BeanFactory接口,这样可以在Spring容器中创建Bean对象;同时也继承了ApplicationEventPublisher接口,用于发送一些事件消息。
通常我们使用这样的一行代码来创建并启动Spring容器:
ApplicationContext context = new ClassPathXmlApplicationContext("applicationContext.xml"); public ClassPathXmlApplicationContext(String configLocation) throws BeansException {
this(new String[] {configLocation}, true, null);
}
public ClassPathXmlApplicationContext(String[] configLocations, boolean refresh, ApplicationContext parent)
throws BeansException {
super(parent);
setConfigLocations(configLocations);
if (refresh) {
refresh();
}
}public void refresh() throws BeansException, IllegalStateException {
synchronized (this.startupShutdownMonitor) {
//1、 Prepare this context for refreshing.
prepareRefresh();
//2、 Tell the subclass to refresh the internal bean factory.
ConfigurableListableBeanFactory beanFactory = obtainFreshBeanFactory();
//3、 Prepare the bean factory for use in this context.
prepareBeanFactory(beanFactory);
try {
//4、 Allows post-processing of the bean factory in context subclasses.
postProcessBeanFactory(beanFactory);
//5、 Invoke factory processors registered as beans in the context.
invokeBeanFactoryPostProcessors(beanFactory);
//6、 Register bean processors that intercept bean creation.
registerBeanPostProcessors(beanFactory);
//7、 Initialize message source for this context.
initMessageSource();
//8、 Initialize event multicaster for this context.
initApplicationEventMulticaster();
//9、 Initialize other special beans in specific context subclasses.
onRefresh();
//10、 Check for listener beans and register them.
registerListeners();
//11、 Instantiate all remaining (non-lazy-init) singletons.
finishBeanFactoryInitialization(beanFactory);
//12、 Last step: publish corresponding event.
finishRefresh();
}
catch (BeansException ex) {
// Destroy already created singletons to avoid dangling resources.
beanFactory.destroySingletons();
// Reset 'active' flag.
cancelRefresh(ex);
// Propagate exception to caller.
throw ex;
}
}
}1、prepareRefresh()
该方法所做的事情相对比较简单:记录容器启动的时间,并设置容器处于活跃状态。
2、obtainFreshBeanFactory()
该方法的作用:创建BeanFactory实例,并解析Spring的xml配置文件。beanFactory的实现类是:ConfigurableListableBeanFactory。方法的实现如下:
	protected ConfigurableListableBeanFactory obtainFreshBeanFactory() {
		refreshBeanFactory();
		ConfigurableListableBeanFactory beanFactory = getBeanFactory();

		if (logger.isInfoEnabled()) {
			logger.info("Bean factory for application context [" + getId() + "]: " +
					ObjectUtils.identityToString(beanFactory));
		}
		if (logger.isDebugEnabled()) {
			logger.debug(beanFactory.getBeanDefinitionCount() + " beans defined in " + this);
		}

		return beanFactory;
} protected final void refreshBeanFactory() throws BeansException {
if (hasBeanFactory()) {
destroyBeans();
closeBeanFactory();
}
try {
DefaultListableBeanFactory beanFactory = createBeanFactory(); //1、创建beanFactory对象
customizeBeanFactory(beanFactory);
loadBeanDefinitions(beanFactory);//2、解析spring的xml配置文件,加载bean定义信息
synchronized (this.beanFactoryMonitor) {
this.beanFactory = beanFactory;
}
}
catch (IOException ex) {
throw new ApplicationContextException(
"I/O error parsing XML document for application context [" + getDisplayName() + "]", ex);
}
}创建了beanFactory之后,通过调用AbstractXmlApplicationContext.loadBeanDefinitions方法,加载spring的xml配置文件,把用户通过配置文件定义的bean,解析成容器中以特定的数据结构描述的bean定义。AbstractXmlApplicationContext.loadBeanDefinitions方法的实现如下:
	protected void loadBeanDefinitions(DefaultListableBeanFactory beanFactory) throws IOException {
		// Create a new XmlBeanDefinitionReader for the given BeanFactory.
		XmlBeanDefinitionReader beanDefinitionReader = new XmlBeanDefinitionReader(beanFactory); //1、创建BeanDefinitionReader对象

		// Configure the bean definition reader with this context's
		// resource loading environment.
		beanDefinitionReader.setResourceLoader(this);
		beanDefinitionReader.setEntityResolver(new ResourceEntityResolver(this)); // 2、设置xml文件schema的解析器,获取xsd文件。

		// Allow a subclass to provide custom initialization of the reader,
		// then proceed with actually loading the bean definitions.
		initBeanDefinitionReader(beanDefinitionReader);
		loadBeanDefinitions(beanDefinitionReader); //3、加载spring的xml配置文件,并解析。
}第二步, 创建ResourceEntityResolver,设置用于XML配置文件验证的实体分解器。该类的resolveEntity方法,实现对文档验证实体的转换:根据spring定义bean的xml配置文件中的“http://www.springframework.org/schema/beans”形式的url,从spring.jar包中的META-INF\spring.schema文件中,找到对应的DTD或XSD文件在本地的路径。
第三步,调用initBeanDefinitionReader方法,该方法是一个空实现,允许子类去覆盖,可以用来设置自定义的EntityResolver实现类,以及NamespaceHandlerResolver实现类。这也是spring的一个扩展点。
第四步,调用loadBeanDefinitions方法,该方法最终调用XmlBeanDefinitionReader.loadBeanDefinitions(EncodedResource)方法实现xml配置文件的加载及bean的注册,方法的实现如下:
public int loadBeanDefinitions(EncodedResource encodedResource) throws BeanDefinitionStoreException {
		Assert.notNull(encodedResource, "EncodedResource must not be null");
		if (logger.isInfoEnabled()) {
			logger.info("Loading XML bean definitions from " + encodedResource.getResource());
		}

		Set currentResources = (Set) this.resourcesCurrentlyBeingLoaded.get();
		if (currentResources == null) {
			currentResources = new HashSet(4);
			this.resourcesCurrentlyBeingLoaded.set(currentResources);
		}
		if (!currentResources.add(encodedResource)) {
			throw new BeanDefinitionStoreException(
					"Detected recursive loading of " + encodedResource + " - check your import definitions!");
		}
		try {
			InputStream inputStream = encodedResource.getResource().getInputStream();
			try {
				InputSource inputSource = new InputSource(inputStream);
				if (encodedResource.getEncoding() != null) {
					inputSource.setEncoding(encodedResource.getEncoding());
				}
				return doLoadBeanDefinitions(inputSource, encodedResource.getResource());
			}
			finally {
				inputStream.close();
			}
		}
		catch (IOException ex) {
			throw new BeanDefinitionStoreException(
					"IOException parsing XML document from " + encodedResource.getResource(), ex);
		}
		finally {
			currentResources.remove(encodedResource);
			if (currentResources.isEmpty()) {
				this.resourcesCurrentlyBeingLoaded.set(null);
			}
		}
	}
protected int doLoadBeanDefinitions(InputSource inputSource, Resource resource)
            throws BeanDefinitionStoreException {
        try {
            int validationMode = getValidationModeForResource(resource);
            Document doc = this.documentLoader.loadDocument(
                    inputSource, getEntityResolver(), this.errorHandler, validationMode, isNamespaceAware());
            return registerBeanDefinitions(doc, resource);
        }
        catch (BeanDefinitionStoreException ex) {
            throw ex;
        }
        catch (SAXParseException ex) {
            throw new XmlBeanDefinitionStoreException(resource.getDescription(),
                    "Line " + ex.getLineNumber() + " in XML document from " + resource + " is invalid", ex);
        }
        catch (SAXException ex) {
            throw new XmlBeanDefinitionStoreException(resource.getDescription(),
                    "XML document from " + resource + " is invalid", ex);
        }
        catch (ParserConfigurationException ex) {
            throw new BeanDefinitionStoreException(resource.getDescription(),
                    "Parser configuration exception parsing XML from " + resource, ex);
        }
        catch (IOException ex) {
            throw new BeanDefinitionStoreException(resource.getDescription(),
                    "IOException parsing XML document from " + resource, ex);
        }
        catch (Throwable ex) {
            throw new BeanDefinitionStoreException(resource.getDescription(),
                    "Unexpected exception parsing XML document from " + resource, ex);
        }
    }
public void registerBeanDefinitions(Document doc, XmlReaderContext readerContext) {
		this.readerContext = readerContext;

		logger.debug("Loading bean definitions");
		Element root = doc.getDocumentElement();

		BeanDefinitionParserDelegate delegate = createHelper(readerContext, root);

		preProcessXml(root);// 前置处理方法,是一个空实现
		parseBeanDefinitions(root, delegate);<span><span class="comment">// 解析整个文档,循环处理各个子节点</span></span>
		postProcessXml(root);// 后置处理方法,也是一个空实现
	}
    protected void parseBeanDefinitions(Element root, BeanDefinitionParserDelegate delegate) {
        if (delegate.isDefaultNamespace(root.getNamespaceURI())) {
            NodeList nl = root.getChildNodes();
            for (int i = 0; i < nl.getLength(); i++) {
                Node node = nl.item(i);
                if (node instanceof Element) {
                    Element ele = (Element) node;
                    String namespaceUri = ele.getNamespaceURI();
                    if (delegate.isDefaultNamespace(namespaceUri)) {//<span><span class="comment">如果是默认名字空间(beans),则直接使用解析</span><span></span></span>
                        parseDefaultElement(ele, delegate);
                    }
                    else {
                        delegate.parseCustomElement(ele);//对于非默认名字空间,如util,使用对应的NamespaceHandlerResolver实现类的parse方法进行解析。
                    }
                }
            }
        }
        else {
            delegate.parseCustomElement(root);
        }
    }
至此,完成了BeanFactory实例的创建和Spring的xml配置文件的解析。
3、prepareBeanFactory
创建好 BeanFactory 后,接着调用prepareBeanFactory方法,添加一些 Spring 本身需要的一些工具类:
protected void prepareBeanFactory(ConfigurableListableBeanFactory beanFactory) {
		// Tell the internal bean factory to use the context's class loader.
		beanFactory.setBeanClassLoader(getClassLoader());

		// Populate the bean factory with context-specific resource editors.
		beanFactory.addPropertyEditorRegistrar(new ResourceEditorRegistrar(this));

		// Configure the bean factory with context callbacks.
		beanFactory.addBeanPostProcessor(new ApplicationContextAwareProcessor(this));
		beanFactory.ignoreDependencyInterface(ResourceLoaderAware.class);
		beanFactory.ignoreDependencyInterface(ApplicationEventPublisherAware.class);
		beanFactory.ignoreDependencyInterface(MessageSourceAware.class);
		beanFactory.ignoreDependencyInterface(ApplicationContextAware.class);

		// BeanFactory interface not registered as resolvable type in a plain factory.
		// MessageSource registered (and found for autowiring) as a bean.
		beanFactory.registerResolvableDependency(BeanFactory.class, beanFactory);
		beanFactory.registerResolvableDependency(ResourceLoader.class, this);
		beanFactory.registerResolvableDependency(ApplicationEventPublisher.class, this);
		beanFactory.registerResolvableDependency(ApplicationContext.class, this);

		// Detect a LoadTimeWeaver and prepare for weaving, if found.
		if (beanFactory.containsBean(LOAD_TIME_WEAVER_BEAN_NAME) && JdkVersion.isAtLeastJava15()) {
			// Register the (JDK 1.5 specific) LoadTimeWeaverAwareProcessor.
			try {
				Class ltwapClass = ClassUtils.forName(
						"org.springframework.context.weaving.LoadTimeWeaverAwareProcessor",
						AbstractApplicationContext.class.getClassLoader());
				BeanPostProcessor ltwap = (BeanPostProcessor) BeanUtils.instantiateClass(ltwapClass);
				((BeanFactoryAware) ltwap).setBeanFactory(beanFactory);
				beanFactory.addBeanPostProcessor(ltwap);
			}
			catch (ClassNotFoundException ex) {
				throw new IllegalStateException("Spring's LoadTimeWeaverAwareProcessor class is not available");
			}
			// Set a temporary ClassLoader for type matching.
			beanFactory.setTempClassLoader(new ContextTypeMatchClassLoader(beanFactory.getBeanClassLoader()));
		}
}第一步,设置类加载器;
第二步,设置属性编辑器注册类,用来注册相关的属性编辑器。ResourceEditorRegistrar类,注册的属性编辑器如下:
public void registerCustomEditors(PropertyEditorRegistry registry) {
		ResourceEditor baseEditor = new ResourceEditor(this.resourceLoader);
		registry.registerCustomEditor(Resource.class, baseEditor);
		registry.registerCustomEditor(InputStream.class, new InputStreamEditor(baseEditor));
		registry.registerCustomEditor(File.class, new FileEditor(baseEditor));
		registry.registerCustomEditor(URL.class, new URLEditor(baseEditor));

		ClassLoader classLoader = this.resourceLoader.getClassLoader();
		registry.registerCustomEditor(Class.class, new ClassEditor(classLoader));
		registry.registerCustomEditor(URI.class, new URIEditor(classLoader));

		if (this.resourceLoader instanceof ResourcePatternResolver) {
			registry.registerCustomEditor(Resource[].class,
					new ResourceArrayPropertyEditor((ResourcePatternResolver) this.resourceLoader));
		}
}第三步:设置内置的BeanPostProcessor:ApplicationContextAwareProcessor。该BeanPostProcessor的作用是,为实现特殊接口的bean,注入容器类(例如为实现ApplicationContextAware接口的类,注入ApplicationContext对象实例),如下:
	public Object postProcessBeforeInitialization(Object bean, String beanName) throws BeansException {
		if (bean instanceof ResourceLoaderAware) {
			((ResourceLoaderAware) bean).setResourceLoader(this.applicationContext);
		}
		if (bean instanceof ApplicationEventPublisherAware) {
			((ApplicationEventPublisherAware) bean).setApplicationEventPublisher(this.applicationContext);
		}
		if (bean instanceof MessageSourceAware) {
			((MessageSourceAware) bean).setMessageSource(this.applicationContext);
		}
		if (bean instanceof ApplicationContextAware) {
			((ApplicationContextAware) bean).setApplicationContext(this.applicationContext);
		}
		return bean;
}第五步:调用registerResolvableDependency,注入特殊的对象。
4、postProcessBeanFactory
该方法是spring的一个扩展点之一,是一个空方法,留给子类去扩展。子类可以重写该方法,对已经构建的 BeanFactory 的配置根据需要进行修改。例如调用beanFactory.registerResolvableDependency,注入特殊的类。