一、AOP概念
AOP为Aspect Oriented Programming的缩写,意为:面向切面编程,通过预编译方式和运行期动态代理实现程序功能的统一维护的一种技术。
利用AOP可以对业务逻辑的各个部分进行隔离,从而使得业务逻辑各部分之间的耦合度降低,AOP采取横向抽取机制,取代了传统纵向继承体系重复性代码.
Spring AOP使用纯Java实现,不需要专门的编译过程和类加载器,在运行期通过代理方式向目标类织入增强代码。
二、AOP中常用的术语
- 连接点(Joinpoint): 所谓连接点是指那些被拦截到的点。在spring中,这些点指的是方法,因为spring只支持方法类型的连接点,也可以理解连接点为:目标类上哪些有可能被增强的方法。
- 切点(Pointcut):可以理解为查询条件。一个target(目标类)的所有方法都是连接点,切点可以通过查询条件定位特定的连接点。
- 增强(Advice):织入目标类连接点上的一段程序代码。既包含连接点上的执行逻辑(横切逻辑、增强逻辑)又包含定位连接点的方位信息,before、after、around等。增强默认织入目标类的所有方法中。
- 目标对象(Target):增强逻辑织入的目标类。
- 代理(Proxy):一个类被AOP植入增强后,被产生一个结果代理类。
- 织入(Weaving):将通知(增强)应用到连接点上,生成代理的过程。
- 切面(Aspect):由切点和增强组成。
- 引介(Introduction):引介是一种特殊的通知在不修改类代码的前提下, Introduction可以在运行期为类动态地添加一些方法或Field。
三、常见增强类型
前置增强
BeforeAdvice 代表前置增强,因为spring只支持方法级的增强,所以MethodBeforeAdvice 是目前可用前置增强,表示在目标方法执行前实施增强。
后置增强
AfterAdvice 代表后增强,表示目标方法在执行后实施增强
环绕增强
MethodInterceptor 代表环绕增强,表示目标方法执行前后实施增强
异常抛出增强
ThrowsAdvice 代表抛出异常增强,表示目标方法抛出异常后实施增强
引介增强
IntroductionInterceptor 代表引介增强,表示在目标类中添加一些新的方法和属性
四、支撑Spring AOP的底层Java技术:动态代理(JDK,CGLIB)
概念:
当一个对象(客户端)不能或者不想直接引用另一个对象(目标对象),这时可以应用代理模式在这两者之间构建一个桥梁--代理对象。按照代理对象的创建时期不同,可以分为两种:
静态代理:程序员事先写好代理对象类,在程序发布前就已经存在了;(继承了接口,重新实现新的类xxxproxy)
动态代理:应用程序发布后,通过动态创建代理对象。
其中动态代理又可分为:JDK/Cglib 动态代理。
静态代理、动态代理等概念参考:https://www.cnblogs.com/boboxing/p/8126046.html
4.1 JDK动态代理
此时代理对象和目标对象实现了相同的接口,目标对象作为代理对象的一个属性,具体接口实现中,可以在调用目标对象相应方法前后加上其他业务处理逻辑。
代理模式在实际使用时需要指定具体的目标对象,如果为每个类都添加一个代理类的话,会导致类很多,同时如果不知道具体类的话,怎样实现代理模式呢?这就引出动态代理。
JDK动态代理只能针对实现了接口的类生成代理。

代码实例:
UserService.java:

public interface UserService {
    public void save();

    public void update();

    public void delete();

    public void find();
}
UserServiceImpl.java:
public class UserServiceImpl implements UserService {

    @Override
    public void save() {
        System.out.println("保存用户...");
    }

    @Override
    public void update() {
        System.out.println("修改用户...");
    }

    @Override
    public void delete() {
        System.out.println("删除用户...");
    }

    @Override
    public void find() {
        System.out.println("查询用户...");
    }

}
MyJdbProxy.java:
/**
 * 使用JDK的动态代理实现代理机制
 *
 */
public class MyJdbProxy implements InvocationHandler{

    private UserService userService;

    public MyJdbProxy(UserService userService){
        this.userService = userService;
    }

    public UserService createProxy(){
        // 生成UserSErvice的代理:
        UserService userServiceProxy = (UserService) Proxy.newProxyInstance(
                userService.getClass().getClassLoader(), userService.getClass()
                        .getInterfaces(), this);
        return userServiceProxy;
    }

    @Override
    public Object invoke(Object proxy, Method method, Object[] args)
            throws Throwable {
        // 判断是否是save方法:
        if("save".equals(method.getName())){
            // 增强:
            System.out.println("权限校验===========");
            return method.invoke(userService, args);
        }
        return method.invoke(userService, args);
    }

}
SpringDemo.java 测试类:
public class SpringDemo1 {

    @Test
    // 没有代理的时候的调用方式
    public void demo1() {
        // 创建目标对象
        UserService userService = new UserServiceImpl();

        userService.save();
        userService.update();
        userService.delete();
        userService.find();
    }

    @Test
    // 使用代理
    public void demo2() {
        // 创建目标对象
        UserService userService = new UserServiceImpl();
        UserService proxy = new MyJdbProxy(userService).createProxy();

        proxy.save();
        proxy.update();
        proxy.delete();
        proxy.find();
    }
}
4.2 CGLib动态代理
CGLIB(CODE GENERLIZE LIBRARY)代理是针对类实现代理,主要是对指定的类生成一个子类,覆盖其中的所有方法,所以该类或方法不能声明称final的。CGLib采用底层的字节码技术,可以为一个类创建子类,在子类中采用方法拦截的技术拦截所以弗雷方法的调用并顺势织入横切逻辑。
如果目标对象没有实现接口,则默认会采用CGLIB代理;
如果目标对象实现了接口,可以强制使用CGLIB实现代理(添加CGLIB库,并在spring配置中加入<aop:aspectj-autoproxy proxy-target-class="true"/>
代码实例:
CustomerService.java:
public class CustomerService {
    public void save(){
        System.out.println("保存客户...");
    }
    public void update(){
        System.out.println("修改客户...");
    }
    public void delete(){
        System.out.println("删除客户...");
    }
    public void find(){
        System.out.println("查询客户...");
    }
}
MyCglibProxy.java:
/**
 * 使用Cglib产生代理
 *
 */
public class MyCglibProxy implements MethodInterceptor{

    private CustomerService customerService;

    public MyCglibProxy(CustomerService customerService){
        this.customerService = customerService;
    }

    public CustomerService createProxy(){
        // 创建核心类:
        Enhancer enhancer = new Enhancer();
        // 设置父类:
        enhancer.setSuperclass(customerService.getClass());
        // 设置回调:
        enhancer.setCallback(this);
        // 创建代理:
        CustomerService customerServiceProxy = (CustomerService) enhancer.create();
        return customerServiceProxy;
    }

    @Override
    public Object intercept(Object proxy, Method method, Object[] arg,
            MethodProxy methodProxy) throws Throwable {
        if("delete".equals(method.getName())){
            Object obj = methodProxy.invokeSuper(proxy, arg);
            System.out.println("日志记录==========");
            return obj;
        }
        return methodProxy.invokeSuper(proxy, arg);
    }
}
SpringDemo.java 测试类:
public class SpringDemo2 {

    @Test
    public void demo1(){
        CustomerService customerService = new CustomerService();
        customerService.save();
        customerService.update();
        customerService.delete();
        customerService.find();
    }

    @Test
    public void demo2(){
        CustomerService customerService = new CustomerService();
        // 产生代理:
        CustomerService proxy = new MyCglibProxy(customerService).createProxy();
        proxy.save();
        proxy.update();
        proxy.delete();
        proxy.find();
    }
}
五、Spring的传统的AOP:基于ProxyFactoryBean的方式的代理与BeanPostProcesser自动代理
5.1 使用ProxyFactoryBean配置代理
需要描述Advice、target、以及代理类的信息(增强、target-ref)
根据Advice代理,采用了JDK动态代理(对接口代理)
<bean id="greetingAdvice" class="com.smart.advice.GreetingBeforeAdvice" />
<bean id="target" class="com.smart.advice.NaiveWaiter" />
<bean id="waiter"
    class="org.springframework.aop.framework.ProxyFactoryBean"
    p:proxyInterfaces="com.smart.advice.Waiter"
    p:target-ref="target"
    p:interceptorNames="greetingAdvice"
    />
<bean id="waiterTarget" class="com.smart.advisor.Waiter" />
<bean id="sellerTarget" class="com.smart.advisor.Seller" />
<bean id="greetingAdvice" class="com.smart.advisor.GreetingBeforeAdvice" />
<!-- 正则表达式方法名匹配切面 -->
<bean id="regexpAdvisor"
    class="org.springframework.aop.support.RegexpMethodPointcutAdvisor"
    p:advice-ref="greetingAdvice">
    <property name="patterns">
        <list>
            <value>.*greet.*</value>
        </list>
    </property>
</bean>
<bean id="waiter1" class="org.springframework.aop.framework.ProxyFactoryBean"
        p:interceptorNames="regexpAdvisor" p:target-ref="waiterTarget"
        p:proxyTargetClass="true" />
基于ProxyFactoryBean的方式生成代理的过程中不是特别理想:
* 配置繁琐,不利为维护.
* 需要为每个需要增强的类都配置一个ProxyFactoryBean.
5.2 使用BeanPostProcessor自动创建代理
自动代理基于BeanPostProcessor完成的代理.
* 在类的生成过程中就已经是代理对象.
基于ProxyFactoryBean方式代理:
* 先有目标对象,根据目标对象产生代理.
<bean id="waiter" class="com.smart.advisor.Waiter" />
<bean id="seller" class="com.smart.advisor.Seller" />
<bean id="greetingAdvice" class="com.smart.advisor.GreetingBeforeAdvice" />
<bean id="regexpAdvisor"
    class="org.springframework.aop.support.RegexpMethodPointcutAdvisor"
    p:patterns=".*greet.*" p:advice-ref="greetingAdvice" />
<bean
 class="org.springframework.aop.framework.autoproxy.DefaultAdvisorAutoProxyCreator" p:proxyTargetClass="true" />
六、AspectJ概述
AspectJ是一个面向切面的框架,它扩展了Java语言。AspectJ定义了AOP语法所以它有一个专门的编译器用来生成遵守Java字节编码规范的Class文件。
Spring为了简化自身的AOP的开发,将AspectJ拿过来作为Spring自身一个AOP的开发.
AspectJ支持的增强类型在第三部分中已经提到。AspectJ切点表达式函数为该框架的核心部分,在这就不对语法进行详细说明,需要使用的时候现查即可。
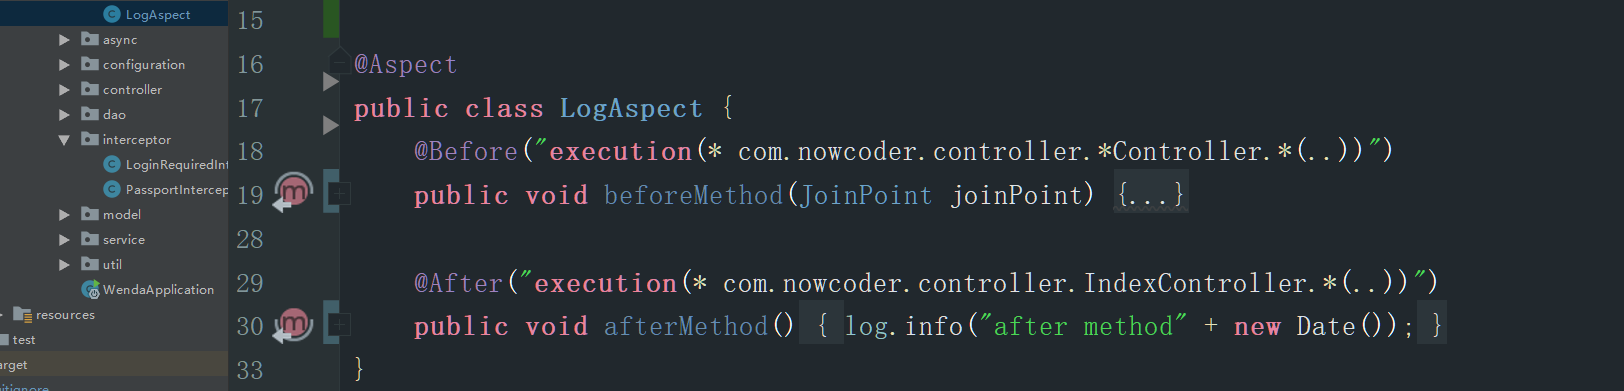
如上图所示,首先在一个类上面声明@Aspect 通过该注解将类标识为一个切面类。
@Before部分是增的强类型。后面execution是目标切点表达式。beforeGreeting是增强所使用的横切逻辑函数。
package com.smart.aspectj.example;

import org.aspectj.lang.annotation.Aspect;
import org.aspectj.lang.annotation.Before;
@Aspect
public class PreGreetingAspect{
    @Before("execution(* greetTo(..))")
    public void beforeGreeting(){
        System.out.println("How are you");
    }
}
<?xml version="1.0" encoding="UTF-8" ?>
<beans xmlns="http://www.springframework.org/schema/beans"
    xmlns:xsi="http://www.w3.org/2001/XMLSchema-instance"
    xmlns:aop="http://www.springframework.org/schema/aop"
    xsi:schemaLocation="http://www.springframework.org/schema/beans http://www.springframework.org/schema/beans/spring-beans-4.0.xsd
http://www.springframework.org/schema/aop http://www.springframework.org/schema/aop/spring-aop-4.0.xsd">
<aop:aspectj-autoproxy/>
<!--bean class="org.springframework.aop.aspectj.annotation.AnnotationAwareAspectJAutoProxyCreator"/-->
    <bean id="waiter" class="com.smart.NaiveWaiter" />
    <bean class="com.smart.aspectj.example.PreGreetingAspect" />
</beans>
七、在Spring Boot中使用AOP
在spring boot中使用aop就不用再xml文件中配置了代理bean等信息了,在pom.xml添加好aop的依赖。直接在切面类前声明Configuration或Component如下图:
import org.aspectj.lang.ProceedingJoinPoint;
import org.aspectj.lang.annotation.Around;
import org.aspectj.lang.annotation.Aspect;
import org.springframework.context.annotation.Configuration;

@Configuration
//证明是一个切面
@Aspect
public class ControllerAOP {
    //环绕aop
    //execution表达式 此表达式表示扫描controller下所有类的所有方法都执行此aop
    @Around("execution (* com.beyondli.controller..*.*(..))")
    public Object testAop(ProceedingJoinPoint pro) throws Throwable {
        //获取request请求提(需要时备用)
        //HttpServletRequest request = ((ServletRequestAttributes) RequestContextHolder.getRequestAttributes()).getRequest();
        //进入方法前执行的代码
        System.out.println("beginAround");
        //执行调用的方法
        Object proceed = pro.proceed();
        //方法执行完成后执行的方法
        System.out.println("endAround");
        return proceed;
    }

}
由AspectJ定义的切面会自动扫描满足切点表达式的目标类并代理。
参考:
1:https://www.cnblogs.com/boboxing/p/8126046.html
2:https://blog.csdn.net/hehexiaoyou/article/details/23430357
3:https://baike.baidu.com/item/Aspectj/4830848
AOP为Aspect Oriented Programming的缩写,意为:面向切面编程,通过预编译方式和运行期动态代理实现程序功能的统一维护的一种技术。
利用AOP可以对业务逻辑的各个部分进行隔离,从而使得业务逻辑各部分之间的耦合度降低,AOP采取横向抽取机制,取代了传统纵向继承体系重复性代码.
Spring AOP使用纯Java实现,不需要专门的编译过程和类加载器,在运行期通过代理方式向目标类织入增强代码。
二、AOP中常用的术语
- 连接点(Joinpoint): 所谓连接点是指那些被拦截到的点。在spring中,这些点指的是方法,因为spring只支持方法类型的连接点,也可以理解连接点为:目标类上哪些有可能被增强的方法。
- 切点(Pointcut):可以理解为查询条件。一个target(目标类)的所有方法都是连接点,切点可以通过查询条件定位特定的连接点。
- 增强(Advice):织入目标类连接点上的一段程序代码。既包含连接点上的执行逻辑(横切逻辑、增强逻辑)又包含定位连接点的方位信息,before、after、around等。增强默认织入目标类的所有方法中。
- 目标对象(Target):增强逻辑织入的目标类。
- 代理(Proxy):一个类被AOP植入增强后,被产生一个结果代理类。
- 织入(Weaving):将通知(增强)应用到连接点上,生成代理的过程。
- 切面(Aspect):由切点和增强组成。
- 引介(Introduction):引介是一种特殊的通知在不修改类代码的前提下, Introduction可以在运行期为类动态地添加一些方法或Field。
三、常见增强类型
前置增强
BeforeAdvice 代表前置增强,因为spring只支持方法级的增强,所以MethodBeforeAdvice 是目前可用前置增强,表示在目标方法执行前实施增强。
后置增强
AfterAdvice 代表后增强,表示目标方法在执行后实施增强
环绕增强
MethodInterceptor 代表环绕增强,表示目标方法执行前后实施增强
异常抛出增强
ThrowsAdvice 代表抛出异常增强,表示目标方法抛出异常后实施增强
引介增强
IntroductionInterceptor 代表引介增强,表示在目标类中添加一些新的方法和属性
四、支撑Spring AOP的底层Java技术:动态代理(JDK,CGLIB)
概念:
当一个对象(客户端)不能或者不想直接引用另一个对象(目标对象),这时可以应用代理模式在这两者之间构建一个桥梁--代理对象。按照代理对象的创建时期不同,可以分为两种:
静态代理:程序员事先写好代理对象类,在程序发布前就已经存在了;(继承了接口,重新实现新的类xxxproxy)
动态代理:应用程序发布后,通过动态创建代理对象。
其中动态代理又可分为:JDK/Cglib 动态代理。
静态代理、动态代理等概念参考:https://www.cnblogs.com/boboxing/p/8126046.html
4.1 JDK动态代理
此时代理对象和目标对象实现了相同的接口,目标对象作为代理对象的一个属性,具体接口实现中,可以在调用目标对象相应方法前后加上其他业务处理逻辑。
代理模式在实际使用时需要指定具体的目标对象,如果为每个类都添加一个代理类的话,会导致类很多,同时如果不知道具体类的话,怎样实现代理模式呢?这就引出动态代理。
JDK动态代理只能针对实现了接口的类生成代理。
代码实例:
UserService.java:
public interface UserService {
    public void save();

    public void update();

    public void delete();

    public void find();
}
UserServiceImpl.java:
public class UserServiceImpl implements UserService {

    @Override
    public void save() {
        System.out.println("保存用户...");
    }

    @Override
    public void update() {
        System.out.println("修改用户...");
    }

    @Override
    public void delete() {
        System.out.println("删除用户...");
    }

    @Override
    public void find() {
        System.out.println("查询用户...");
    }

}
MyJdbProxy.java:
/**
 * 使用JDK的动态代理实现代理机制
 *
 */
public class MyJdbProxy implements InvocationHandler{

    private UserService userService;

    public MyJdbProxy(UserService userService){
        this.userService = userService;
    }

    public UserService createProxy(){
        // 生成UserSErvice的代理:
        UserService userServiceProxy = (UserService) Proxy.newProxyInstance(
                userService.getClass().getClassLoader(), userService.getClass()
                        .getInterfaces(), this);
        return userServiceProxy;
    }

    @Override
    public Object invoke(Object proxy, Method method, Object[] args)
            throws Throwable {
        // 判断是否是save方法:
        if("save".equals(method.getName())){
            // 增强:
            System.out.println("权限校验===========");
            return method.invoke(userService, args);
        }
        return method.invoke(userService, args);
    }

}
SpringDemo.java 测试类:
public class SpringDemo1 {

    @Test
    // 没有代理的时候的调用方式
    public void demo1() {
        // 创建目标对象
        UserService userService = new UserServiceImpl();

        userService.save();
        userService.update();
        userService.delete();
        userService.find();
    }

    @Test
    // 使用代理
    public void demo2() {
        // 创建目标对象
        UserService userService = new UserServiceImpl();
        UserService proxy = new MyJdbProxy(userService).createProxy();

        proxy.save();
        proxy.update();
        proxy.delete();
        proxy.find();
    }
}
4.2 CGLib动态代理
CGLIB(CODE GENERLIZE LIBRARY)代理是针对类实现代理,主要是对指定的类生成一个子类,覆盖其中的所有方法,所以该类或方法不能声明称final的。CGLib采用底层的字节码技术,可以为一个类创建子类,在子类中采用方法拦截的技术拦截所以弗雷方法的调用并顺势织入横切逻辑。
如果目标对象没有实现接口,则默认会采用CGLIB代理;
如果目标对象实现了接口,可以强制使用CGLIB实现代理(添加CGLIB库,并在spring配置中加入<aop:aspectj-autoproxy proxy-target-class="true"/>
代码实例:
CustomerService.java:
public class CustomerService {
    public void save(){
        System.out.println("保存客户...");
    }
    public void update(){
        System.out.println("修改客户...");
    }
    public void delete(){
        System.out.println("删除客户...");
    }
    public void find(){
        System.out.println("查询客户...");
    }
}
MyCglibProxy.java:
/**
 * 使用Cglib产生代理
 *
 */
public class MyCglibProxy implements MethodInterceptor{

    private CustomerService customerService;

    public MyCglibProxy(CustomerService customerService){
        this.customerService = customerService;
    }

    public CustomerService createProxy(){
        // 创建核心类:
        Enhancer enhancer = new Enhancer();
        // 设置父类:
        enhancer.setSuperclass(customerService.getClass());
        // 设置回调:
        enhancer.setCallback(this);
        // 创建代理:
        CustomerService customerServiceProxy = (CustomerService) enhancer.create();
        return customerServiceProxy;
    }

    @Override
    public Object intercept(Object proxy, Method method, Object[] arg,
            MethodProxy methodProxy) throws Throwable {
        if("delete".equals(method.getName())){
            Object obj = methodProxy.invokeSuper(proxy, arg);
            System.out.println("日志记录==========");
            return obj;
        }
        return methodProxy.invokeSuper(proxy, arg);
    }
}
SpringDemo.java 测试类:
public class SpringDemo2 {

    @Test
    public void demo1(){
        CustomerService customerService = new CustomerService();
        customerService.save();
        customerService.update();
        customerService.delete();
        customerService.find();
    }

    @Test
    public void demo2(){
        CustomerService customerService = new CustomerService();
        // 产生代理:
        CustomerService proxy = new MyCglibProxy(customerService).createProxy();
        proxy.save();
        proxy.update();
        proxy.delete();
        proxy.find();
    }
}
五、Spring的传统的AOP:基于ProxyFactoryBean的方式的代理与BeanPostProcesser自动代理
5.1 使用ProxyFactoryBean配置代理
需要描述Advice、target、以及代理类的信息(增强、target-ref)
根据Advice代理,采用了JDK动态代理(对接口代理)
<bean id="greetingAdvice" class="com.smart.advice.GreetingBeforeAdvice" />
<bean id="target" class="com.smart.advice.NaiveWaiter" />
<bean id="waiter"
    class="org.springframework.aop.framework.ProxyFactoryBean"
    p:proxyInterfaces="com.smart.advice.Waiter"
    p:target-ref="target"
    p:interceptorNames="greetingAdvice"
    />
<bean id="waiterTarget" class="com.smart.advisor.Waiter" />
<bean id="sellerTarget" class="com.smart.advisor.Seller" />
<bean id="greetingAdvice" class="com.smart.advisor.GreetingBeforeAdvice" />
<!-- 正则表达式方法名匹配切面 -->
<bean id="regexpAdvisor"
    class="org.springframework.aop.support.RegexpMethodPointcutAdvisor"
    p:advice-ref="greetingAdvice">
    <property name="patterns">
        <list>
            <value>.*greet.*</value>
        </list>
    </property>
</bean>
<bean id="waiter1" class="org.springframework.aop.framework.ProxyFactoryBean"
        p:interceptorNames="regexpAdvisor" p:target-ref="waiterTarget"
        p:proxyTargetClass="true" />
基于ProxyFactoryBean的方式生成代理的过程中不是特别理想:
* 配置繁琐,不利为维护.
* 需要为每个需要增强的类都配置一个ProxyFactoryBean.
5.2 使用BeanPostProcessor自动创建代理
自动代理基于BeanPostProcessor完成的代理.
* 在类的生成过程中就已经是代理对象.
基于ProxyFactoryBean方式代理:
* 先有目标对象,根据目标对象产生代理.
<bean id="waiter" class="com.smart.advisor.Waiter" />
<bean id="seller" class="com.smart.advisor.Seller" />
<bean id="greetingAdvice" class="com.smart.advisor.GreetingBeforeAdvice" />
<bean id="regexpAdvisor"
    class="org.springframework.aop.support.RegexpMethodPointcutAdvisor"
    p:patterns=".*greet.*" p:advice-ref="greetingAdvice" />
<bean
 class="org.springframework.aop.framework.autoproxy.DefaultAdvisorAutoProxyCreator" p:proxyTargetClass="true" />
六、AspectJ概述
AspectJ是一个面向切面的框架,它扩展了Java语言。AspectJ定义了AOP语法所以它有一个专门的编译器用来生成遵守Java字节编码规范的Class文件。
Spring为了简化自身的AOP的开发,将AspectJ拿过来作为Spring自身一个AOP的开发.
AspectJ支持的增强类型在第三部分中已经提到。AspectJ切点表达式函数为该框架的核心部分,在这就不对语法进行详细说明,需要使用的时候现查即可。
如上图所示,首先在一个类上面声明@Aspect 通过该注解将类标识为一个切面类。
@Before部分是增的强类型。后面execution是目标切点表达式。beforeGreeting是增强所使用的横切逻辑函数。
package com.smart.aspectj.example;

import org.aspectj.lang.annotation.Aspect;
import org.aspectj.lang.annotation.Before;
@Aspect
public class PreGreetingAspect{
    @Before("execution(* greetTo(..))")
    public void beforeGreeting(){
        System.out.println("How are you");
    }
}
<?xml version="1.0" encoding="UTF-8" ?>
<beans xmlns="http://www.springframework.org/schema/beans"
    xmlns:xsi="http://www.w3.org/2001/XMLSchema-instance"
    xmlns:aop="http://www.springframework.org/schema/aop"
    xsi:schemaLocation="http://www.springframework.org/schema/beans http://www.springframework.org/schema/beans/spring-beans-4.0.xsd
http://www.springframework.org/schema/aop http://www.springframework.org/schema/aop/spring-aop-4.0.xsd">
<aop:aspectj-autoproxy/>
<!--bean class="org.springframework.aop.aspectj.annotation.AnnotationAwareAspectJAutoProxyCreator"/-->
    <bean id="waiter" class="com.smart.NaiveWaiter" />
    <bean class="com.smart.aspectj.example.PreGreetingAspect" />
</beans>
七、在Spring Boot中使用AOP
在spring boot中使用aop就不用再xml文件中配置了代理bean等信息了,在pom.xml添加好aop的依赖。直接在切面类前声明Configuration或Component如下图:
import org.aspectj.lang.ProceedingJoinPoint;
import org.aspectj.lang.annotation.Around;
import org.aspectj.lang.annotation.Aspect;
import org.springframework.context.annotation.Configuration;

@Configuration
//证明是一个切面
@Aspect
public class ControllerAOP {
    //环绕aop
    //execution表达式 此表达式表示扫描controller下所有类的所有方法都执行此aop
    @Around("execution (* com.beyondli.controller..*.*(..))")
    public Object testAop(ProceedingJoinPoint pro) throws Throwable {
        //获取request请求提(需要时备用)
        //HttpServletRequest request = ((ServletRequestAttributes) RequestContextHolder.getRequestAttributes()).getRequest();
        //进入方法前执行的代码
        System.out.println("beginAround");
        //执行调用的方法
        Object proceed = pro.proceed();
        //方法执行完成后执行的方法
        System.out.println("endAround");
        return proceed;
    }

}
由AspectJ定义的切面会自动扫描满足切点表达式的目标类并代理。