一、部署环境:VMware Workstation Ubuntu16.04 系统(4G内存,80G硬盘)注意:网络模式选择桥接
二、Devstack版本:ocata
三、部署过程:(所有命令都是在Ubuntu系统终端中输入)
1、安装git:sudo apt-get install git
2、修改apt的源为国内的源:(1)打开文件:vim /etc/apt/sources.list
(2)修改内容为:
deb http://mirrors.aliyun.com/ubuntu/ xenial main restricted universe multiverse
deb http://mirrors.aliyun.com/ubuntu/ xenial-updates main restricted universe multiverse
deb http://mirrors.aliyun.com/ubuntu/ xenial-security main restricted universe multiverse
deb http://mirrors.aliyun.com/ubuntu/ xenial-proposed main restricted universe multiverse
deb http://mirrors.aliyun.com/ubuntu/ xenial-backports main restricted universe multiverse
2、下载Devstack源码:git clone https://git.openstack.org/openstack-dev/devstack -b stable/ocata
3、创建stack用户:devstack/tools/create-stack-user.sh
4、查看pip:(1)输入命令:pip
(2)如果提示没有,请安装:sudo apt-get install python-pip
5、修改root和stack用户的pip源
(1)在root用户下:1.创建.pip目录:mkdir ~/.pip
2.修改pip的源:vim ~/.pip/pip.conf
3.修改内容为:
[global]
(2)切换到stack用户:su - stack
1.创建.pip目录:mkdir ~/.pip
2.修改pip的源:vim ~/.pip/pip.conf
3.修改内容为:
[global]
6、在devstack目录下创建local.conf文件
(1)vim devstack/local.conf
(2)内容为:(有些参数需要修改一下,见下一小节)
[[local|localrc]]
# use TryStack git mirror
#OFFLINE=True
RECLONE=True
# Define images to be automatically downloaded during the DevStack built process
# DOWNLOAD_DEFAULT_IMAGES=False
HOST_IP=192.168.1.141
# Credentials
DATABASE_PASSWORD=12345
ADMIN_PASSWORD=12345
SERVICE_PASSWORD=12345
SERVICE_TOKEN=12345
RABBIT_PASSWORD=12345
HORIZON_BRANCH=stable/ocata
KEYSTONE_BRANCH=stable/ocata
NOVA_BRANCH=stable/ocata
NEUTRON_BRANCH=stable/ocata
GLANCE_BRANCH=stable/ocata
CINDER_BRANCH=stable/ocata
#keystone
KEYSTONE_TOKEN_FORMAT=UUID
##Heat
HEAT_BRANCH=stable/ocata
enable_service h-eng h-api h-api-cfn h-api-cw
## Swift
SWIFT_BRANCH=stable/ocata
ENABLED_SERVICES+=,s-proxy,s-object,s-container,s-account
SWIFT_REPLICAS=1
SWIFT_HASH=011688b44136573e209e
# Enabling Neutron (network) Service
disable_service n-net
enable_service q-svc
enable_service q-agt
enable_service q-dhcp
enable_service q-l3
enable_service q-meta
enable_service q-metering
enable_service neutron
## Neutron options
Q_USE_SECGROUP=True
FLOATING_RANGE="192.168.1.0/24"
FIXED_RANGE="10.0.0.0/24"
Q_FLOATING_ALLOCATION_POOL=start=192.168.1.102,end=192.168.1.110
PUBLIC_NETWORK_GATEWAY="192.168.1.2"
Q_L3_ENABLED=True
PUBLIC_INTERFACE=ens33
Q_USE_PROVIDERNET_FOR_PUBLIC=True
OVS_PHYSICAL_BRIDGE=br-ex
PUBLIC_BRIDGE=br-ex
OVS_BRIDGE_MAPPINGS=public:br-ex
# VLAN configuration.
Q_PLUGIN=ml2
ENABLE_TENANT_VLANS=True
# Logging
LOGFILE=/opt/stack/logs/stack.sh.log
VERBOSE=True
LOG_COLOR=True
SCREEN_LOGDIR=/opt/stack/logs
LIBVIRT_TYPE=qemu
enable_service placement-api
enable_service placement-client
(3)参数修改
1.HOST_IP=192.168.1.141——这个IP地址需要修改为你Ubuntu系统的IP地址
2.DATABASE_PASSWORD=12345
ADMIN_PASSWORD=12345
SERVICE_PASSWORD=12345
SERVICE_TOKEN=12345
RABBIT_PASSWORD=12345
这些可以自定义,ADMIN_PASSWORD的密码可以用来登录OpenStack的horizon
3.HORIZON_BRANCH=stable/ocata
KEYSTONE_BRANCH=stable/ocata
NOVA_BRANCH=stable/ocata
NEUTRON_BRANCH=stable/ocata
GLANCE_BRANCH=stable/ocata
CINDER_BRANCH=stable/ocata
HEAT_BRANCH=stable/ocata
SWIFT_BRANCH=stable/ocata
这些组件的分支要和你下载的Devstack版本分支一致
4.FLOATING_RANGE="192.168.1.0/24"
Q_FLOATING_ALLOCATION_POOL=start=192.168.1.102,end=192.168.1.110
PUBLIC_NETWORK_GATEWAY="192.168.1.2"
这些要和你HOST_IP的地址段一致
5.PUBLIC_INTERFACE=ens33——这一个要和你Ubuntu系统的网卡一致,可以在Ubuntu中使用ifconfig查看
6.其他参数可以不用修改
7、运行脚本部署
(1)切换到stack用户:su - stack
(2)进入devstack目录:./stack.sh
(3)等待系统自己运行脚本
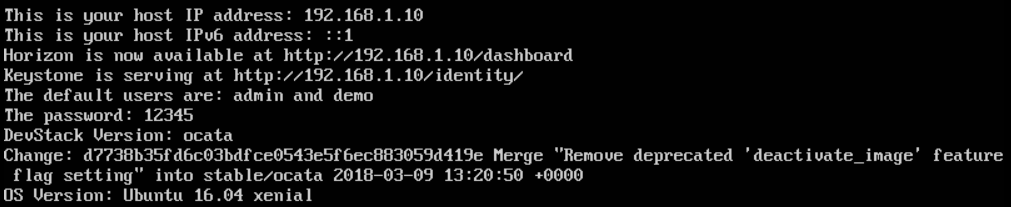
出现如上图所示内容即部署成功,可以在浏览器上输入:http://HOST_IP/dashboard,就可以访问了。
8、执行stack.sh脚本一般不会一帆风顺,中间会有一些错误,要耐心,有问题可以留言一起交流。