Content
0. 序
1. 内存池结构
1.1 ngx_pool_t结构
1.2 其他相关结构
1.3 ngx_pool_t的逻辑结构
2. 内存池操作
2.1 创建内存池
2.2 销毁内存池
2.3 重置内存池
2.4 分配内存
2.4.1 ngx_palloc()函数分析
2.4.2 ngx_palloc_block()函数分析
2.5 释放内存
2.6 注册cleanup
2.7 内存池的物理结构
3. 一个例子
3.1 代码
3.2 如何编译
3.3 运行结果
4. 小结
5. 致谢
0. 序
nginx对内存的管理由其自己实现的内存池结构ngx_pool_t来完成,本文重点叙述nginx的内存管理。
nginx内存管理相关文件:
(1) ./src/os/unix/ngx_alloc.h/.c
内存相关的操作,封装了最基本的内存分配函数
如free/malloc/memalign/posix_memalign,分别被封装为ngx_free,ngx_alloc/ngx_calloc, ngx_memalign
ngx_alloc:封装malloc分配内存
ngx_calloc:封装malloc分配内存,并初始化空间内容为0
ngx_memalign:返回基于一个指定alignment的大小为size的内存空间,且其地址为alignment的整数倍,alignment为2的幂。
(2) ./src/core/ngx_palloc.h/.c
封装创建/销毁内存池,从内存池分配空间等函数
.表示nginx-1.0.4代码目录,本文为/usr/src/nginx-1.0.4。
1. 内存池结构
nginx对内存的管理均统一完成,例如,在特定的生命周期统一建立内存池(如main函数系统启动初期即分配1024B大小的内存池),需要内存时统一分配内存池中的内存,在适当的时候释放内存池的内存(如关闭http链接时调用ngx_destroy_pool进行销毁)。
因此,开发者只需在需要内存时进行申请即可,不用过多考虑内存的释放等问题,大大提高了开发的效率。先看一下内存池结构。
1.1 ngx_pool_t结构
此处统一一下概念,内存池的数据块:即分配内存在这些数据块中进行,一个内存池可以有多一个内存池数据块。nginx的内存池结构如下。
00048: typedef struct {
00049:   u_char      *last;  //当前内存池分配到此处,即下一次分配从此处开始
00050:   u_char      *end;   //内存池结束位置
00051:   ngx_pool_t  *next;  //内存池里面有很多块内存,这些内存块就是通过该指针连成链表的
00052:   ngx_uint_t  failed; //内存池分配失败次数
00053: } ngx_pool_data_t;    //内存池的数据块位置信息
00054:
00055:
00056: struct ngx_pool_s{    //内存池头部结构
00057:    ngx_pool_data_t     d;       //内存池的数据块
00058:    size_t              max;     //内存池数据块的最大值
00059:    ngx_pool_t         *current; //指向当前内存池
00060:    ngx_chain_t        *chain;   //该指针挂接一个ngx_chain_t结构
00061:    ngx_pool_large_t   *large;   //大块内存链表,即分配空间超过max的内存
00062:    ngx_pool_cleanup_t *cleanup; //释放内存池的callback
00063:    ngx_log_t          *log;     //日志信息
00064: };
其中,sizeof(ngx_pool_data_t)=16B,sizeof(ngx_pool_t)=40B。
nginx将几乎所有的结构体放在ngx_core.h文件中重新进行了申明,如下。
typedef struct ngx_module_s      ngx_module_t;
typedef struct ngx_conf_s        ngx_conf_t;
typedef struct ngx_cycle_s       ngx_cycle_t;
typedef struct ngx_pool_s        ngx_pool_t;
typedef struct ngx_chain_s       ngx_chain_t;
typedef struct ngx_log_s         ngx_log_t;
typedef struct ngx_array_s       ngx_array_t;
typedef struct ngx_open_file_s   ngx_open_file_t;
typedef struct ngx_command_s     ngx_command_t;
typedef struct ngx_file_s        ngx_file_t;
typedef struct ngx_event_s       ngx_event_t;
typedef struct ngx_event_aio_s   ngx_event_aio_t;
typedef struct ngx_connection_s  ngx_connection_t;
1.2 其他相关结构
其他与内存池相干的数据结构,如清除资源的cleanup链表,分配的大块内存链表等,如下。
00015: /*
00016: * NGX_MAX_ALLOC_FROM_POOL should be (ngx_pagesize - 1), i.e. 4095 on x86.
00017: * On Windows NT it decreases a number of locked pages in a kernel.
00018: */
00019: #define NGX_MAX_ALLOC_FROM_POOL (ngx_pagesize - 1)  //在x86体系结构下,该值一般为4096B,即4K
00020:
00021: #define NGX_DEFAULT_POOL_SIZE    (16* 1024)
00022:
00023: #define NGX_POOL_ALIGNMENT    16
00024: #define NGX_MIN_POOL_SIZE    \
00025:    ngx_align((sizeof(ngx_pool_t) + 2 * sizeof(ngx_pool_large_t)),    \
00026:    NGX_POOL_ALIGNMENT)
00027:
00028:
00029: typedef void (*ngx_pool_cleanup_pt)(void *data);    //cleanup的callback类型
00030:
00031: typedef struct ngx_pool_cleanup_s ngx_pool_cleanup_t;
00032:
00033: struct ngx_pool_cleanup_s{
00034:    ngx_pool_cleanup_pt handler;
00035:    void    *data;              //指向要清除的数据
00036:    ngx_pool_cleanup_t *next;   //下一个cleanup callback
00037: };
00038:
00039:
00040: typedef struct ngx_pool_large_s ngx_pool_large_t;
00041:
00042: struct ngx_pool_large_s{
00043:    ngx_pool_large_t  *next;    //指向下一块大块内存
00044:    void    *alloc;             //指向分配的大块内存
00045: };
...
...
00067: typedef struct {
00068:    ngx_fd_t   fd;
00069:    u_char    *name;
00070:    ngx_log_t *log;
00071: } ngx_pool_cleanup_file_t;
(gdb) p getpagesize()
$18 = 4096
全局变量ngx_pagesize的初始化是在如下函数中完成的。./src/os/unix/ngx_posix_init.c
ngx_int_t
ngx_os_init(ngx_log_t *log)
{
    ngx_uint_t  n;

#if (NGX_HAVE_OS_SPECIFIC_INIT)
    if (ngx_os_specific_init(log) != NGX_OK) {
        return NGX_ERROR;
    }
#endif

    ngx_init_setproctitle(log);

    /** 该函数为glibc的库函数,由系统调用实现,返回内核中的PAGE_SIZE,该值依赖体系结构*/
    ngx_pagesize = getpagesize();
    ngx_cacheline_size = NGX_CPU_CACHE_LINE;
    ...
}
这些数据结构之间的关系,请参考后面的图。
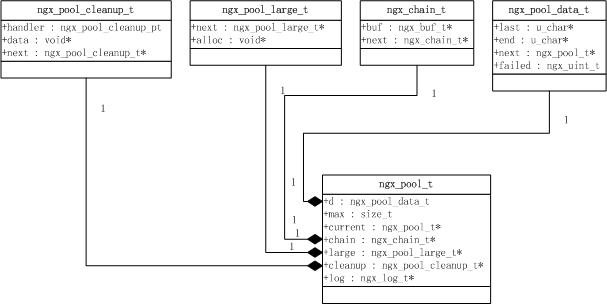
1.3 ngx_pool_t的逻辑结构
这些数据结构逻辑结构图如下。注:本文采用UML的方式画出该图。
2. 内存池操作
2.1 创建内存池
创建内存池有ngx_create_pool()函数完成,代码如下。
00015: ngx_pool_t *
00016: ngx_create_pool(size_t size, ngx_log_t *log)
00017: {
00018:    ngx_pool_t *p;
00019:
00020:    p = ngx_memalign(NGX_POOL_ALIGNMENT, size, log);
00021:    if (p == NULL) {
00022:       return NULL;
00023:    }
00024:
00025:    p->d.last = (u_char *) p + sizeof(ngx_pool_t);  //last指向ngx_pool_t结构体之后数据取起始位置
00026:    p->d.end = (u_char *) p + size;  //end指向分配的整个size大小的内存的末尾
00027:    p->d.next = NULL;
00028:    p->d.failed = 0;
00029:
00030:    size = size - sizeof(ngx_pool_t);
00031:    p->max = (size < NGX_MAX_ALLOC_FROM_POOL) ? size : NGX_MAX_ALLOC_FROM_POOL;  //最大不超过4095B
00032:
00033:    p->current = p;
00034:    p->chain = NULL;
00035:    p->large = NULL;
00036:    p->cleanup = NULL;
00037:    p->log = log;
00038:
00039:    return p;
00040: }
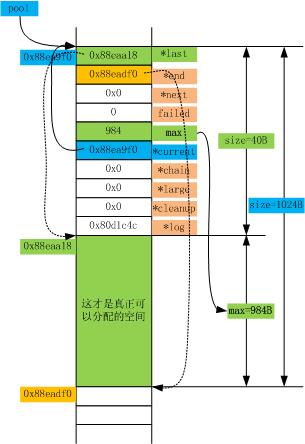
例如,调用ngx_create_pool(1024, 0x80d1c4c)后,创建的内存池物理结构如下图。
2.2 销毁内存池
销毁内存池由如下函数完成。
void ngx_destroy_pool(ngx_pool_t *pool)
该函数将遍历内存池链表,所有释放内存,如果注册了clenup(也是一个链表结构),亦将遍历该cleanup链表结构依次调用clenup的handler清理。同时,还将遍历large链表,释放大块内存。
2.3 重置内存池
重置内存池由下面的函数完成。
void ngx_reset_pool(ngx_pool_t *pool);
该函数将释放所有large内存,并且将d->last指针重新指向ngx_pool_t结构之后数据区的开始位置,同刚创建后的位置相同。
2.4 分配内存
内存分配的函数如下。
void *ngx_palloc(ngx_pool_t *pool, size_t size);
void *ngx_pnalloc(ngx_pool_t *pool, size_t size);
void *ngx_pcalloc(ngx_pool_t *pool, size_t size);
void *ngx_pmemalign(ngx_pool_t *pool, size_t size, size_t alignment);
返回值为分配的内存起始地址。选择其中的两个函数进行分析,其他的也很好理解,省略。
2.4.1 ngx_palloc()函数分析
ngx_palloc()代码如下,分析请参考笔者所加的注释。
00115: void *
00116: ngx_palloc(ngx_pool_t *pool, size_t size)
00117: {
00118: u_char *m;
00119: ngx_pool_t *p;
00120:
00121: if (size <= pool->max) {//判断待分配内存与max值
00122:
00123: p = pool->current; //小于max值,则从current节点开始遍历pool链表
00124:
00125: do {
00126: m = ngx_align_ptr(p->d.last, NGX_ALIGNMENT);
00127:
00128: if ((size_t) (p->d.end - m) >= size) {
00129: p->d.last = m + size; //在该节点指向的内存块中分配size大小的内存
00130:
00131: return m;
00132: }
00133:
00134: p = p->d.next;
00135:
00136: } while (p);
00137:
00138: return ngx_palloc_block(pool, size); //链表里没有能分配size大小内存的节点,则生成一个新的节点并在其中分配内存
00139: }
00140:
00141: return ngx_palloc_large(pool, size); //大于max值,则在large链表里分配内存
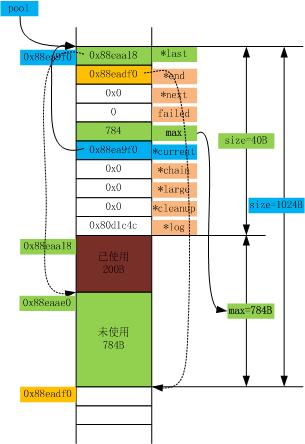
00142: }例如,在2.1节中创建的内存池中分配200B的内存,调用ngx_palloc(pool, 200)后,该内存池物理结构如下图。
2.4.2 ngx_palloc_block()函数分析
ngx_palloc_block函数代码如下,分析请参考笔者所加的注释。
00175: static void *
00176: ngx_palloc_block(ngx_pool_t *pool, size_t size)
00177: {
00178:    u_char    *m;
00179:    size_t    psize;
00180:    ngx_pool_t *p, *new, *current;
00181:
00182:    psize = (size_t) (pool->d.end - (u_char *) pool);      //计算pool的大小
00183:
00184:    m = ngx_memalign(NGX_POOL_ALIGNMENT, psize, pool->log);//分配一块与pool大小相同的内存
00185:    if (m == NULL) {
00186:       return NULL;
00187:    }
00188:
00189:    new = (ngx_pool_t *) m;
00190:
00191:    new->d.end = m + psize; //设置end指针
00192:    new->d.next = NULL;
00193:    new->d.failed = 0;
00194:
00195:    m += sizeof(ngx_pool_data_t); //让m指向该块内存ngx_pool_data_t结构体之后数据区起始位置
00196:    m = ngx_align_ptr(m, NGX_ALIGNMENT); //按4字节对齐
00197:    new->d.last = m + size;       //在数据区分配size大小的内存并设置last指针
00198:
00199:    current = pool->current;
00200:
00201:    for (p = current; p->d.next; p = p->d.next) {
00202:       if (p->d.failed++ > 4) {   //failed的值只在此处被修改
00203:          current = p->d.next;    //失败4次以上移动current指针
00204:       }
00205:    }
00206:
00207:    p->d.next = new;  //将这次分配的内存块new加入该内存池
00208:
00209:    pool->current = current ? current : new;
00210:
00211:    return m;
00212: }
注意:该函数分配一块内存后,last指针指向的是ngx_pool_data_t结构体(大小16B)之后数据区的起始位置。而创建内存池时时,last指针指向的是ngx_pool_t结构体(大小40B)之后数据区的起始位置。
结合2.7节的内存池的物理结构,更容易理解。
2.5 释放内存
请参考如下函数,不再赘述。
ngx_int_t ngx_pfree(ngx_pool_t *pool, void *p)
需要注意的是该函数只释放large链表中注册的内存,普通内存在ngx_destroy_pool中统一释放。
2.6 注册cleanup
请参考如下函数,该函数实现也很简单,此处不再赘述。
ngx_pool_cleanup_t *ngx_pool_cleanup_add(ngx_pool_t *p, size_t size)
2.7 内存池的物理结构
针对本文第3节的例子,画出的内存池的物理结构如下图。
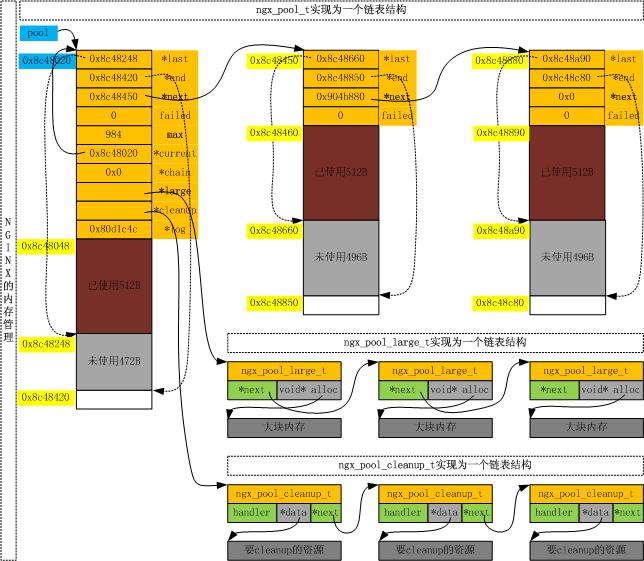
从该图也能看出2.4节的结论,即内存池第一块内存前40字节为ngx_pool_t结构,后续加入的内存块前16个字节为ngx_pool_data_t结构,这两个结构之后便是真正可以分配内存区域。
因此,本文Reference中的内存分配相关中的图是有一点点小问题的,并不是每一个节点的前面都是ngx_pool_t结构。
3. 一个例子
理解并掌握开源软件的最好方式莫过于自己写一些测试代码,或者改写软件本身,并进行调试来进一步理解开源软件的原理和设计方法。本节给出一个创建内存池并从中分配内存的简单例子。
3.1 代码
/**
 * ngx_pool_t test, to test ngx_palloc, ngx_palloc_block, ngx_palloc_large
 */

#include <stdio.h>
#include "ngx_config.h"
#include "ngx_conf_file.h"
#include "nginx.h"
#include "ngx_core.h"
#include "ngx_string.h"
#include "ngx_palloc.h"

volatile ngx_cycle_t  *ngx_cycle;

void ngx_log_error_core(ngx_uint_t level, ngx_log_t *log, ngx_err_t err,
            const char *fmt, ...)
{
}

void dump_pool(ngx_pool_t* pool)
{
    while (pool)
    {
        printf("pool = 0x%x\n", pool);
        printf("  .d\n");
        printf("    .last = 0x%x\n", pool->d.last);
        printf("    .end = 0x%x\n", pool->d.end);
        printf("    .next = 0x%x\n", pool->d.next);
        printf("    .failed = %d\n", pool->d.failed);
        printf("  .max = %d\n", pool->max);
        printf("  .current = 0x%x\n", pool->current);
        printf("  .chain = 0x%x\n", pool->chain);
        printf("  .large = 0x%x\n", pool->large);
        printf("  .cleanup = 0x%x\n", pool->cleanup);
        printf("  .log = 0x%x\n", pool->log);
        printf("available pool memory = %d\n\n", pool->d.end - pool->d.last);
        pool = pool->d.next;
    }
}

int main()
{
    ngx_pool_t *pool;

    printf("--------------------------------\n");
    printf("create a new pool:\n");
    printf("--------------------------------\n");
    pool = ngx_create_pool(1024, NULL);
    dump_pool(pool);

    printf("--------------------------------\n");
    printf("alloc block 1 from the pool:\n");
    printf("--------------------------------\n");
    ngx_palloc(pool, 512);
    dump_pool(pool);

    printf("--------------------------------\n");
    printf("alloc block 2 from the pool:\n");
    printf("--------------------------------\n");
    ngx_palloc(pool, 512);
    dump_pool(pool);

    printf("--------------------------------\n");
    printf("alloc block 3 from the pool :\n");
    printf("--------------------------------\n");
    ngx_palloc(pool, 512);
    dump_pool(pool);

    ngx_destroy_pool(pool);
    return 0;
}
3.2 如何编译
这个问题是编写测试代码或者改写软件本身最迫切需要解决的问题,否则,编写的代码无从编译或运行,那也无从进行调试并理解软件了。
如何对自己编写的测试代码进行编译,可参考Linux平台代码覆盖率测试-编译过程自动化及对链接的解释、Linux平台如何编译使用Google test写的单元测试?。我们要做的是学习这种编译工程的方法,针对该例子,笔者编写的makefile文件如下。——这便是本节的主要目的。
CXX = gcc
CXXFLAGS += -g -Wall -Wextra
NGX_ROOT = /usr/src/nginx-1.0.4
TARGETS = ngx_pool_t_test
TARGETS_C_FILE = $(TARGETS).c
CLEANUP = rm -f $(TARGETS) *.o
all: $(TARGETS)
clean:
$(CLEANUP)
CORE_INCS = -I. \
-I$(NGX_ROOT)/src/core \
-I$(NGX_ROOT)/src/event \
-I$(NGX_ROOT)/src/event/modules \
-I$(NGX_ROOT)/src/os/unix \
-I$(NGX_ROOT)/objs \
NGX_PALLOC = $(NGX_ROOT)/objs/src/core/ngx_palloc.o
NGX_STRING = $(NGX_ROOT)/objs/src/core/ngx_string.o
NGX_ALLOC = $(NGX_ROOT)/objs/src/os/unix/ngx_alloc.o
$(TARGETS): $(TARGETS_C_FILE)
$(CXX) $(CXXFLAGS) $(CORE_INCS) $(NGX_PALLOC) $(NGX_STRING) $(NGX_ALLOC) $^ -o $@
3.3 运行运行结果
# ./ngx_pool_t_test
--------------------------------
create a new pool:
--------------------------------
pool = 0x8922020
.d
.last = 0x8922048
.end = 0x8922420
.next = 0x0
.failed = 0
.max = 984
.current = 0x8922020
.chain = 0x0
.large = 0x0
.cleanup = 0x0
.log = 0x0
available pool memory = 984
--------------------------------
alloc block 1 from the pool:
--------------------------------
pool = 0x8922020
.d
.last = 0x8922248
.end = 0x8922420
.next = 0x0
.failed = 0
.max = 984
.current = 0x8922020
.chain = 0x0
.large = 0x0
.cleanup = 0x0
.log = 0x0
available pool memory = 472
--------------------------------
alloc block 2 from the pool:
--------------------------------
pool = 0x8922020
.d
.last = 0x8922248
.end = 0x8922420
.next = 0x8922450
.failed = 0
.max = 984
.current = 0x8922020
.chain = 0x0
.large = 0x0
.cleanup = 0x0
.log = 0x0
available pool memory = 472
pool = 0x8922450
.d
.last = 0x8922660
.end = 0x8922850
.next = 0x0
.failed = 0
.max = 0
.current = 0x0
.chain = 0x0
.large = 0x0
.cleanup = 0x0
.log = 0x0
available pool memory = 496
--------------------------------
alloc block 3 from the pool :
--------------------------------
pool = 0x8922020
.d
.last = 0x8922248
.end = 0x8922420
.next = 0x8922450
.failed = 1
.max = 984
.current = 0x8922020
.chain = 0x0
.large = 0x0
.cleanup = 0x0
.log = 0x0
available pool memory = 472
pool = 0x8922450
.d
.last = 0x8922660
.end = 0x8922850
.next = 0x8922880
.failed = 0
.max = 0
.current = 0x0
.chain = 0x0
.large = 0x0
.cleanup = 0x0
.log = 0x0
available pool memory = 496
pool = 0x8922880
.d
.last = 0x8922a90
.end = 0x8922c80
.next = 0x0
.failed = 0
.max = 0
.current = 0x0
.chain = 0x0
.large = 0x0
.cleanup = 0x0
.log = 0x0
available pool memory = 496
4. 小结
本文针对nginx-1.0.4的内存管理进行了较为全面的分析,包括相关内存池数据结构,内存池的创建、销毁,以及从内存池中分配内存等。最后通过一个简单例子向读者展示nginx内存池的创建和分配操作,同时借此向读者展示编译测试代码的方法。
分析完nginx的内存管理,你一定惊叹于nginx作者的聪明才智。这种内存管理的设计方法小巧、快捷,值得借鉴!
5. 致谢
写作本文,笔者参考了Reference里yixiao的Nginx源码分析-内存池和RainX1982的Nginx代码研究计划。在此给予他们诚挚的感谢!
Reference
man posix_memalign (manual页)(Allocate aligned memory)
man getpagesize (manual页)(Get memory page size)
Nginx源码分析-内存池 (yixiao)
Nginx代码研究计划 (RainX1982)
Appendix: posix_memalign
The function posix_memalign() allocates size bytes and places theaddress of the allocated memory in*memptr. The address of the allocated memory will be a multiple of alignment, which must be a power oftwo and a multiple of sizeof(void *).
the memory is not zeroed.
posix_memalign() returns zero on success, or one of the error values listed in the next section on failure. Note that errno is not set.