实现的功能包括 关联数据库,可以增加记事本 、 查看记事本、 修改记事本内容 , 每个记事本的详情页面可以显示保存记事本的当前时间 。使用到UICollectionView组件。
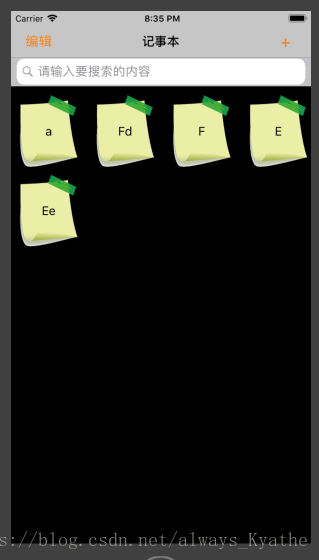
界面如下。
因为用到了数据库,所以需要导入fmdb文件,这里采取的是手动导入的方式。
UIcollectionview的使用有几个注意点。首先需要引用UICollectionViewDelegate,UICollectionViewDataSource,UICollectionViewDelegateFlowLayout协议。 然后是layout,创建UIcollectionview需要使用到这个layout ,然后和UItableview类似的 delegate 、dataSource 也是不能少的
UICollectionViewFlowLayout *layout=[[UICollectionViewFlowLayout alloc]init];
    self.collectionView=[[UICollectionView alloc]initWithFrame:CGRectMake(0, 40, self.view.bounds.size.width, self.view.bounds.size.height-30)  collectionViewLayout:layout];  //刚开始没有UICollectionViewFlowLayout *layout=[[UICollectionViewFlowLayout alloc]init]; 和collectionViewLayout:layout  报错“UICollectionView must be initialized with a non-nil layout parameter”
然后需要通过registerClass 注册cell
[self.collectionView registerClass:[NoteCollectionViewCell class] forCellWithReuseIdentifier:@"identifier"];   //注册cell
    //没有这一句也会报错 “could not dequeue a view of kind: UICollectionElementKindCell with identifie”
在cellForItemAtIndexPath中 dequeueReusableCell 重用
NoteCollectionViewCell *cell=[collectionView dequeueReusableCellWithReuseIdentifier:@"identifier" forIndexPath:indexPath];下面就是正式的开发了。
viewcontroller文件的viewdidLoad方法定义如下。
- (void)viewDidLoad {
    [super viewDidLoad];
    self.view.backgroundColor=[UIColor darkGrayColor];
    self.edgesForExtendedLayout=UIRectEdgeNone;
    self.title=@"记事本";

    UIButton *addBtn=[[UIButton alloc]initWithFrame:CGRectMake(0, 0, 30, 30)];
    [addBtn addTarget:self action:@selector(addnew) forControlEvents:UIControlEventTouchUpInside];
    [addBtn setTitle:@"+" forState:UIControlStateNormal];
    addBtn.titleLabel.font=[UIFont systemFontOfSize:24];
    [addBtn setTitleColor:[UIColor orangeColor] forState:UIControlStateNormal];
    UIBarButtonItem *rightBtn=[[UIBarButtonItem alloc]initWithCustomView:addBtn];
    self.navigationItem.rightBarButtonItem=rightBtn;

    UICollectionViewFlowLayout *layout=[[UICollectionViewFlowLayout alloc]init];
    self.collectionView=[[UICollectionView alloc]initWithFrame:CGRectMake(0, 40, self.view.bounds.size.width, self.view.bounds.size.height-30)  collectionViewLayout:layout];  //刚开始没有UICollectionViewFlowLayout *layout=[[UICollectionViewFlowLayout alloc]init]; 和collectionViewLayout:layout  报错“UICollectionView must be initialized with a non-nil layout parameter”
    self.collectionView.delegate=self;
    self.collectionView.dataSource=self;
    [self.view addSubview:self.collectionView];

    [self.collectionView registerClass:[NoteCollectionViewCell class] forCellWithReuseIdentifier:@"identifier"];   //注册cell
    //没有这一句也会报错 “could not dequeue a view of kind: UICollectionElementKindCell with identifie”
    layout.minimumLineSpacing=10;

    self.ediBtn=[[UIButton alloc]initWithFrame:CGRectMake(0, 0, 30, 30)];
    [self.ediBtn addTarget:self action:@selector(edit:) forControlEvents:UIControlEventTouchUpInside];
    [self.ediBtn setTitle:@"编辑" forState:UIControlStateNormal];
    [self.ediBtn setTitleColor:[UIColor orangeColor] forState:UIControlStateNormal];
    UIBarButtonItem *leftBtn=[[UIBarButtonItem alloc]initWithCustomView:self.ediBtn];
    self.navigationItem.leftBarButtonItem=leftBtn;

    //搜索栏
    self.searchController=[[UISearchController alloc]initWithSearchResultsController:nil];
    //设置代理
    self.searchController.delegate=self;
    self.searchController.searchResultsUpdater=self;
    self.searchController.searchBar.placeholder=@"请输入要搜索的内容";
    self.searchController.searchBar.frame=CGRectMake(0, 0, self.view.bounds.size.width, 40);
    self.definesPresentationContext=YES;   //搜索栏的偏移问题还没解决???
    self.searchController.dimsBackgroundDuringPresentation=NO;   //搜索时,背景变暗
    self.searchController.obscuresBackgroundDuringPresentation=NO;   //搜索时,背景变模糊
    [self.view addSubview:self.searchController.searchBar];

    self.dataArray=[[NSMutableArray alloc]init];  //创建数组
    self.searchArray=[[NSMutableArray alloc]init];
    manager = [FMDBManager sharedDBManager];
    [manager creatTable];
}
下面是viewcontroller文件的viewWillAppear方法, 可以获取数据库中存储的数据,以及collectionview的代理方法。
- (void)viewWillAppear:(BOOL)animated {
    [super viewWillAppear:animated];
    NSArray *array = [manager selectNotes];
    self.dataArray=(NSMutableArray *)array;  //获取数据库中保存的数据
}
-(NSInteger)collectionView:(UICollectionView *)collectionView numberOfItemsInSection:(NSInteger)section{
if(self.searchController.active){
return self.searchArray.count;
}else{
return self.dataArray.count;
}
}
-(NSInteger)numberOfSectionsInCollectionView:(UICollectionView *)collectionView{
return 1;
}
-(UICollectionViewCell *)collectionView:(UICollectionView *)collectionView cellForItemAtIndexPath:(nonnull NSIndexPath *)indexPath{
NoteCollectionViewCell *cell=[collectionView dequeueReusableCellWithReuseIdentifier:@"identifier" forIndexPath:indexPath];
if(self.searchController.active){
cell.tex.text=self.searchArray[indexPath.row];
}else{
CellModel *tempNote=nil;
tempNote = self.dataArray[indexPath.row];
cell.tex.text=tempNote.content;
}
if([self.ediBtn.titleLabel.text isEqualToString: @"编辑"]) {
cell.deleteBtn.hidden = YES;
}else {
cell.deleteBtn.hidden = NO;
}
cell.delegate=self; //设置代理
return cell;
}
-(CGSize)collectionView:(UICollectionView *) collectionView layout:(nonnull UICollectionViewLayout *)collectionViewLayout sizeForItemAtIndexPath:(nonnull NSIndexPath *)indexPath{
return CGSizeMake(80, 100);
}
-(UIEdgeInsets)collectionView:(UICollectionView *)collectionView layout:(UICollectionViewLayout *)collectionViewLayout insetForSectionAtIndex:(NSInteger)section{
return UIEdgeInsetsMake(12, 12, 5, 5);
}接下来定义cell,NoteCollectionViewCell.h文件如下。
#import <UIKit/UIKit.h>

@class NoteCollectionViewCell;
@protocol NoteCollectionViewCellDelegate <NSObject>
@optional
-(void)deleteNote:(NoteCollectionViewCell *)noteCollectionViewCell;
@end

@interface NoteCollectionViewCell : UICollectionViewCell

@property (nonatomic,strong) UIButton *deleteBtn;
@property (nonatomic,strong) UIButton *ediBtn;
@property (nonatomic,strong) UILabel *tex;
@property (nonatomic,weak) id <NoteCollectionViewCellDelegate> delegate;
-(void)shake;
-(void)shakeOff;

@end
NoteCollectionViewCell.m文件中声明下列方法。
-(void)createUI{

    self.backgroundView=[[UIImageView alloc]initWithImage:[UIImage imageNamed:@"note"]];
    self.deleteBtn=[[UIButton alloc]init];
    self.deleteBtn.frame=CGRectMake(0, 10, 35, 35);
    [self.deleteBtn setImage:[UIImage imageNamed:@"delete"] forState:UIControlStateNormal];
    [self.deleteBtn addTarget:self action:@selector(deleteClick) forControlEvents:UIControlEventTouchUpInside];
    [self.contentView addSubview:self.deleteBtn];
    self.tex=[[UILabel alloc]initWithFrame:self.bounds];
    self.tex.textAlignment=NSTextAlignmentCenter;
    [self.contentView addSubview:self.tex];
}
关于删除记事本功能,我的想法是,往每个cell添加一个deleteBtn ,默认为隐藏状态,即hidden=yes 。点击左上角的“编辑”按键之后,跳转至edit方法,显示删除按键,方法如下。
-(void)edit:(UIButton *)sender{

    if([self.ediBtn.titleLabel.text isEqualToString: @"编辑"]){  //编辑时cell抖动,显示删除按键
        self.navigationItem.rightBarButtonItem.enabled=NO;  //使右边的增加按键无效
        [self.ediBtn setTitle:@"完成" forState:UIControlStateNormal];
        NSArray *cellArray=[self.collectionView visibleCells];
        for(NoteCollectionViewCell *cell in cellArray){
            [cell shake];
            cell.deleteBtn.hidden=NO;
        }
    }else{   //停止抖动,隐藏删除按键
        self.navigationItem.rightBarButtonItem.enabled=YES;   //使右边的增加按键有效
        [self.ediBtn setTitle:@"编辑" forState:UIControlStateNormal];
        NSArray *cellArray=[self.collectionView visibleCells];
        for(NoteCollectionViewCell *cell in cellArray){
            [cell shakeOff];
        }
        [self.collectionView reloadData];
    }
}
因为每次删除记事本之后会跳转至reloadData方法,刷新界面就会进入cellforItem方法,所以在cellforItem方法里加上editBtn“编辑”按键的判断语句,如果当前显示“编辑”,则隐藏删除按键hidden = YES,如果当前显示“完成”,则显示删除按键hidden = NO。
删除具体记事本则是通过代理方法,获取当前点击项,使得点击哪个按键删除哪个记事本。
点击删除按键deleteBtn , 跳转至删除方法deleteClick 。
-(void)deleteClick{
    if([self.delegate respondsToSelector:@selector(deleteNote:)]){  //respondsToSelector方法判断该方法是否被响应
        [self.delegate deleteNote:self];  //如果方法被响应,调用代理的方法
    }
}
声明协议以及代理方法, 这个代理方法的作用是点击删除按键时,可以删除具体的cell。所以想让这个cell返回值为self,从而获取具体的cell。viewcontroller中实现代理方法。
-(void)deleteNote:(NoteCollectionViewCell *)noteCollectionViewCell{  //实现代理的方法
    NSIndexPath *indexPath=[self.collectionView indexPathForCell:noteCollectionViewCell];   //获取当前cell所在位置
    [manager deleteNote:self.dataArray[indexPath.row]];   //数据库中内容发生相应改变
    [self.dataArray removeObjectAtIndex:indexPath.row];   //删除数据源中具体项

    NSArray *cellArray=[self.collectionView visibleCells];
    for(NoteCollectionViewCell *cell in cellArray){
        [cell shake];  //加上这语句删除了一个cell之后可以继续抖动了
    }
    [self.collectionView reloadData];
    NSLog(@"点击删除第%ld个",(long)indexPath.row+1);
}
因为删除cell的时候想要实现动画效果,所以在cell里声明动画方法如下。
-(void)shake{
        srand([[NSDate date] timeIntervalSince1970]);
        float rand=(float)random();
        CFTimeInterval t=rand*0.0000000001;
        [UIView animateWithDuration:0.1 delay:t options:0  animations:^ {
            self.transform=CGAffineTransformMakeRotation(-0.05);
        } completion:^(BOOL finished) {
            [UIView animateWithDuration:0.1 delay:0 options:UIViewAnimationOptionRepeat|UIViewAnimationOptionAutoreverse|UIViewAnimationOptionAllowUserInteraction  animations:^ {
                self.transform=CGAffineTransformMakeRotation(0.05);
            } completion:nil];
        }];
}

-(void)shakeOff{
       [UIView animateWithDuration:0.1 delay:0 options:UIViewAnimationOptionAllowUserInteraction|UIViewAnimationOptionBeginFromCurrentState animations:^ {
        self.transform=CGAffineTransformIdentity;
       } completion:nil];

}
点击“+”按键,增加新的记事本,跳转至addnew方法,定义如下。增加事件跳转至AddNoteViewController类。ViewController中添加AddProtocol协议。
-(void) addnew{
    self.addVC=[[AddNoteViewController alloc]init];
    self.addVC.delegate=self;   //记得声明代理
    [self.navigationController pushViewController:self.addVC animated:YES];
}
(一定要记得加上delegate)
AddNoteViewController.h文件定义如下。
@class AddNoteViewController;
@protocol AddProtocol <NSObject>  //创建协议
-(void) addNote:(AddNoteViewController *) addVC;   //声明方法
@end

@interface AddNoteViewController : UIViewController
@property UITextView *tex;
@property (nonatomic,strong) UILabel *timeLabel;
@property (nonatomic,weak) id<AddProtocol>delegate;  //声明协议变量
@end
AddNoteViewController.m文件具体组成如下。进入增加记事本页面时,界面底部的时间标签中,时间在不停的走。
- (void)viewDidLoad {
    [super viewDidLoad];
    self.title=@"添加新事件";
    self.view.backgroundColor=[UIColor whiteColor];
    self.edgesForExtendedLayout=UIRectEdgeNone;
    UIImageView *imgV=[[UIImageView alloc]initWithFrame:CGRectMake(0, 0, self.view.bounds.size.width, self.view.bounds.size.height-64)];
    imgV.image=[UIImage imageNamed: @"note.png"];
    imgV.userInteractionEnabled=YES;   //起初imageView上的textview不能输入文字,百度之后发现是因为imageView默认是不响应事件的,所以要加上这句语句
    [self.view addSubview:imgV];

    self.tex=[[UITextView alloc]initWithFrame:CGRectMake(40,110, self.view.bounds.size.width-80, self.view.bounds.size.height-80)];
    self.tex.backgroundColor=[UIColor clearColor];
    [self.tex setFont:[UIFont systemFontOfSize:20]];
    [imgV addSubview:self.tex];

   self.timeLabel=[[UILabel alloc]initWithFrame:CGRectMake((self.view.bounds.size.width-200)/2, self.view.bounds.size.height-64-30, 200, 30)];
    self.timeLabel.textAlignment=NSTextAlignmentCenter;
    [imgV addSubview:self.timeLabel];
    timeNow=[NSTimer scheduledTimerWithTimeInterval:1.0f target:self selector:@selector(getTime) userInfo:nil repeats:YES];   //加入计时器并且时间在走

    UIButton *saveBtn=[[UIButton alloc]initWithFrame:CGRectMake(0, 0, 30, 30)];
    [saveBtn setTitle:@"保存" forState:UIControlStateNormal];
    [saveBtn setTitleColor:[UIColor orangeColor] forState:UIControlStateNormal];
    [saveBtn addTarget:self action:@selector(save) forControlEvents:UIControlEventTouchUpInside];
    UIBarButtonItem *rightBtn=[[UIBarButtonItem alloc]initWithCustomView:saveBtn];


    [self.navigationItem setRightBarButtonItems:[NSArray arrayWithObjects: rightBtn,nil] ];

    UIButton *backBtn=[[UIButton alloc]initWithFrame:CGRectMake(0, 0, 30, 30)];
    [backBtn setTitle:@"返回" forState:UIControlStateNormal];
    [backBtn setTitleColor:[UIColor orangeColor] forState:UIControlStateNormal];
    [backBtn addTarget:self action:@selector(back) forControlEvents:UIControlEventTouchUpInside];
    UIBarButtonItem *leftBtn=[[UIBarButtonItem alloc]initWithCustomView:backBtn];
    self.navigationItem.leftBarButtonItem=leftBtn;

}

-(void)getTime{
    NSString *currentTime=nil;
    NSDate *date=[NSDate date];
    NSDateFormatter *formatter=[[NSDateFormatter alloc]init];
    formatter.dateFormat=@"MM/dd/YYYY HH:mm:ss";
    currentTime=[formatter stringFromDate:date];
    self.timeLabel.text= currentTime;
}
在viewDidLoad方法中,需要注意的是 起初往imageView上添加的textview不能输入文字,百度之后发现是因为imageView默认是不响应事件的,所以要加上imgV.userInteractionEnabled=YES;语句 。
点击保存按键,跳转至save方法。
-(void)save{
    [self.delegate addNote:self];   //代理方法中传的是输入文本值
    [self.navigationController popViewControllerAnimated:YES];
}
然后在viewcontroller中实现代理方法 addNote,将AddNoteViewController类回传回来,定义如下
-(void)addNote:(AddNoteViewController *)addVC{   //增加新的记事本 ,实现协议定义的方法
    CellModel *tempNote=[[CellModel alloc] init];   //加入新的model
    tempNote.date = addVC.timeLabel.text;
    tempNote.content = addVC.tex.text;

    [manager addNewNote:tempNote];     //数据库中内容发生相应改变
    [self.dataArray addObject:tempNote];   //往数据源中添加model
    [self.collectionView reloadData];  //刷新界面
}
至此,生成新的记事本这一功能可以实现。
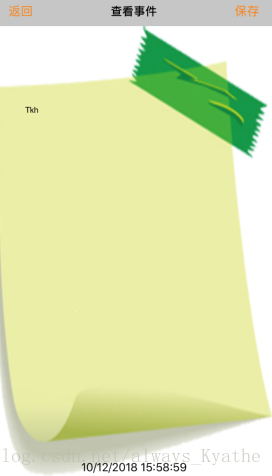
点击cell,可以查看并修改保存记事本内容。点击cell跳转至DetailViewController类。将model中存储的记事本内容以及时间传递给下一界面。
-(void)collectionView:(UICollectionView *)collectionView didSelectItemAtIndexPath:(NSIndexPath *)indexPath{
    self.detailVC=[[DetailViewController alloc]init];
    deleteIndexPath=indexPath.row;   //声明一个全局变量,用于存储选中的当前行行数
    self.detailVC.delegate=self;  //记得写delegate
    CellModel *tmpNote = nil;
    tmpNote = self.dataArray[indexPath.row];
    self.detailVC.detailText=tmpNote.content;
    self.detailVC.time=tmpNote.date;
    [self.navigationController pushViewController:self.detailVC animated:YES];

}
需要注意的是,界面间的跳转只能传递值,不能直接给下一界面的组件赋值。比如一开始用的是self.detailVC.texi.text=tmpNote.content; 语句,发现下一界面无法显示内容。
DetailViewController.h文件定义如下 。 依然需要用到delegate方法,将DetailViewController类存储的内容和时间回传回来。
@protocol SaveProtocol <NSObject>  //创建协议
-(void) saveNote:(NSString *)time and:(NSString *)content;   //声明方法
@end

@interface DetailViewController : UIViewController

@property (nonatomic,strong) NSString *detailText;
@property UITextView *texi;
@property UILabel *timeLabel;
@property (nonatomic,strong)  NSString *time;
@property (nonatomic,strong)  NSString *currentTime;
@property (nonatomic,weak) id<SaveProtocol>delegate;  //声明协议变量
@end
DetailViewController.m文件定义如下
@implementation DetailViewController

{
    NSTimer *timeNow;

}
- (void)viewDidLoad {
    [super viewDidLoad];
    self.title=@"查看事件";
    self.view.backgroundColor=[UIColor whiteColor];
    self.edgesForExtendedLayout=UIRectEdgeNone;
    UIImageView *imgV=[[UIImageView alloc]initWithFrame:CGRectMake(0, 0, self.view.bounds.size.width, self.view.bounds.size.height-64)];
    imgV.image=[UIImage imageNamed: @"note.png"];
    imgV.userInteractionEnabled=YES;
    [self.view addSubview:imgV];

    self.texi=[[UITextView alloc]initWithFrame:CGRectMake(40,110, self.view.bounds.size.width-80, self.view.bounds.size.height-80)];
    self.texi.backgroundColor=[UIColor clearColor];
    [self.texi setFont:[UIFont systemFontOfSize:20]];
    self.texi.text=self.detailText;
    [imgV addSubview:self.texi];

    self.timeLabel=[[UILabel alloc]initWithFrame:CGRectMake((self.view.bounds.size.width-200)/2, self.view.bounds.size.height-64-30, 200, 30)];
    self.timeLabel.textAlignment=NSTextAlignmentCenter;
    self.timeLabel.text=self.time;
    [imgV addSubview:self.timeLabel];
    timeNow=[NSTimer scheduledTimerWithTimeInterval:1.0f target:self selector:@selector(getTime) userInfo:nil repeats:YES];   //加入计时器并且时间在走

    UIButton *saveBtn=[[UIButton alloc]initWithFrame:CGRectMake(0, 0, 30, 30)];
    [saveBtn setTitle:@"保存" forState:UIControlStateNormal];
    [saveBtn setTitleColor:[UIColor orangeColor] forState:UIControlStateNormal];
    [saveBtn addTarget:self action:@selector(save) forControlEvents:UIControlEventTouchUpInside];
    UIBarButtonItem *rightBtn=[[UIBarButtonItem alloc]initWithCustomView:saveBtn];

    [self.navigationItem setRightBarButtonItems:[NSArray arrayWithObjects: rightBtn,nil] ];

    //自定义返回按键的值
    UIButton *backBtn=[[UIButton alloc]initWithFrame:CGRectMake(0, 0, 30, 30)];
    [backBtn setTitle:@"返回" forState:UIControlStateNormal];
    [backBtn setTitleColor:[UIColor orangeColor] forState:UIControlStateNormal];
    [backBtn addTarget:self action:@selector(back) forControlEvents:UIControlEventTouchUpInside];
    UIBarButtonItem *leftBtn=[[UIBarButtonItem alloc]initWithCustomView:backBtn];
    self.navigationItem.leftBarButtonItem=leftBtn;


    // Do any additional setup after loading the view.
}

-(void)getTime{
    self.currentTime=nil;
    NSDate *date=[NSDate date];
    NSDateFormatter *formatter=[[NSDateFormatter alloc]init];
    formatter.dateFormat=@"MM/dd/YYYY HH:mm:ss";
    self.currentTime=[formatter stringFromDate:date];

}

-(void)save{
    [self.delegate saveNote:_currentTime and:self.texi.text];
    [self.navigationController popViewControllerAnimated:YES];
}

-(void)back{
    [self.navigationController popViewControllerAnimated:YES];
}

-(void)touchesBegan:(NSSet<UITouch *> *)touches withEvent:(UIEvent *)event{
    [self.view endEditing:YES];
}

- (void)didReceiveMemoryWarning {
    [super didReceiveMemoryWarning];
    // Dispose of any resources that can be recreated.
}
点击保存按键之后,跳转至save方法,save方法将UItextview中的最新值以及currentTime当前时间通过delegate回传。
在viewcontroller类中引用SaveProtocol协议,并实现代理方法saveNote
-(void)saveNote:(NSString *)time and:(NSString *)content{
    CellModel *tempNote=self.dataArray[deleteIndexPath];  //取出当前被修改的model
//    CellModel *tempNote = [[CellModel alloc] init];   //新建model错误,因为可能存在赋值不完整、数据缺失的情况,所以还是选择修改model ,而不是新建model并赋值
    tempNote.date = time;
    tempNote.content = content;
    [self.dataArray replaceObjectAtIndex:deleteIndexPath withObject:tempNote];
    [manager updateNote:tempNote];   //数据库中内容发生相应改变
//    [self.dataArray addObject:note];  //错误写法,因为是更新cell值,所以是用replaceObjectAtIndex,修改当前项数据

    [self.collectionView reloadData];
}
这里也有需要注意的地方,比如一开始选择新建一个cellModel,然后重新对其赋值,然后替换之前的model,发现也存在问题,调试之后发现,新建model然后对参数赋值可能存在赋值不完整、数据缺失的情况,所以还是选择修改model的参数值。
至此,查看并修改记事本的功能基本完成。
加入了搜索栏,可以实现搜索功能。搜索栏的使用如下,需要引用UISearchResultsUpdating,UISearchControllerDelegate协议
//搜索栏
    self.searchController=[[UISearchController alloc]initWithSearchResultsController:nil];
    //设置代理
    self.searchController.delegate=self;
    self.searchController.searchResultsUpdater=self;
    self.searchController.searchBar.placeholder=@"请输入要搜索的内容";
    self.searchController.searchBar.frame=CGRectMake(0, 0, self.view.bounds.size.width, 40);
    self.definesPresentationContext=YES;
    self.searchController.dimsBackgroundDuringPresentation=NO;   //搜索时,背景变暗
    self.searchController.obscuresBackgroundDuringPresentation=NO;   //搜索时,背景变模糊
    [self.view addSubview:self.searchController.searchBar];
声明全局变量 dataArray (存储所有数据, 数据源。存储model ,model里面保存了记事本的内容以及时间)和 searchArray (存储搜索后的数据,即过滤后数据)和textArray (存储所有数据,仅包含内容,不包含时间)
-(NSMutableArray *)textArray {   //重写textarray的get方法
   self.textArray=[[NSMutableArray alloc]init];
    NSUInteger count= self.dataArray.count;
    for(int i=0; i<count; i++){
        CellModel *tempNote=self.dataArray[i];
        [_textArray addObject:tempNote.content];
    }
    return _textArray;
}
过滤方法如下
-(void)updateSearchResultsForSearchController:(UISearchController *)searchController{   //搜索过滤
    NSString *searchString=self.searchController.searchBar.text;
    if(self.searchArray.count >0){
        [self.searchArray removeAllObjects];
    }

    NSPredicate *predicate=[NSPredicate predicateWithFormat:@"SELF CONTAINS[c] %@",searchString];
    self.searchArray=[NSMutableArray arrayWithArray:[self.textArray filteredArrayUsingPredicate:predicate]];  //过滤数据
    [self.collectionView reloadData];   //刷新表格
}
记事本大概就是这样了,这个记事本功能简单,但是为了实现这个demo还是花了不少时间遇上不少错误。