前言
Docker 简化了容器中应用程序进程的管理过程。容器允许您在资源隔离的进程中运行应用程序。容器与虚拟机类似,但容器更便携、更资源友好,并且更依赖于主机操作系统。
本文将介绍如何用滴滴云服务器在 Ubuntu 16.04 上安装和使用 Docker Community Edition(CE),我们将安装 Docker、使用镜像和容器,并将镜像上传到 Docker 仓库。
目前,滴滴云提供了容器镜像服务,支持镜像托管、镜像安全扫描、镜像加速等功能,我们还将上传镜像到滴滴云 Docker 仓库。
准备
在开始之前,我们需要做以下准备工作:
-
登录滴滴云控制台创建一个云服务器 DC2。配置为:Ubuntu 16.04,4 核 8G 内存,40G SSD 云盘存储,5Mbps 带宽。

-
如果您希望创建自己的镜像并将其推送到 Docker Hub,则需要 Docker Hub 的帐户,具体操作如步骤 7 和 8 所示。
-
跳转到滴滴云控制台-计算-容器镜像服务设置仓库账户,具体操作如步骤 9 所示。
第 1 步 - 安装 Docker
为了确保获得最新版本,我们从 Docker 官网镜像仓库来安装 Docker。为此,我们添加一个新的软件包源,从 Docker 添加 GPG 密钥以确保下载有效,然后安装该软件包。
1.更新现有的软件包列表::
$ sudo apt update
2.安装 apt-transport-https 等软件包支持 HTTP 协议的源:
$ sudo apt install apt-transport-https ca-certificates curl software-properties-common
3.添加 Docker 官方的 GPG 密钥到您的系统:
$ curl -fsSL https://download.docker.com/linux/ubuntu/gpg | sudo apt-key add -
4.将 Docker 添加到 APT 源:
$ sudo add-apt-repository "deb [arch=amd64] https://download.docker.com/linux/ubuntu xenial stable"
5.再次更新 APT 软件包缓存:
$ sudo apt update
6.确保您要从 Docker 仓库而不是默认的 Ubuntu 仓库安装:
$ apt-cache policy docker-ce
虽然 Docker 的版本号可能不同,但您会看到这样的输出:
Output

docker-ce:
  Installed: (none)
  Candidate: 5:18.09.0~3-0~ubuntu-xenial
  Version table:
5:18.09.0~3-0~ubuntu-xenial 500
500 https://download.docker.com/linux/ubuntu xenial/stable amd64 Packages
18.06.1~ce~3-0~ubuntu 500
500 https://download.docker.com/linux/ubuntu xenial/stable amd64 Packages
18.06.0~ce~3-0~ubuntu 500
500 https://download.docker.com/linux/ubuntu xenial/stable amd64 Packages
18.03.1~ce-0~ubuntu 500
500 https://download.docker.com/linux/ubuntu xenial/stable amd64 Packages
18.03.0~ce-0~ubuntu 500
500 https://download.docker.com/linux/ubuntu xenial/stable amd64 Packages
17.12.1~ce-0~ubuntu 500
500 https://download.docker.com/linux/ubuntu xenial/stable amd64 Packages
17.12.0~ce-0~ubuntu 500
500 https://download.docker.com/linux/ubuntu xenial/stable amd64 Packages
17.09.1~ce-0~ubuntu 500
500 https://download.docker.com/linux/ubuntu xenial/stable amd64 Packages
17.09.0~ce-0~ubuntu 500
500 https://download.docker.com/linux/ubuntu xenial/stable amd64 Packages
17.06.2~ce-0~ubuntu 500
500 https://download.docker.com/linux/ubuntu xenial/stable amd64 Packages
17.06.1~ce-0~ubuntu 500
500 https://download.docker.com/linux/ubuntu xenial/stable amd64 Packages
17.06.0~ce-0~ubuntu 500
500 https://download.docker.com/linux/ubuntu xenial/stable amd64 Packages
17.03.3~ce-0~ubuntu-xenial 500
500 https://download.docker.com/linux/ubuntu xenial/stable amd64 Packages
17.03.2~ce-0~ubuntu-xenial 500
500 https://download.docker.com/linux/ubuntu xenial/stable amd64 Packages
17.03.1~ce-0~ubuntu-xenial 500
500 https://download.docker.com/linux/ubuntu xenial/stable amd64 Packages
17.03.0~ce-0~ubuntu-xenial 500
500 https://download.docker.com/linux/ubuntu xenial/stable amd64 Packages
请注意,docker-ce 未安装,但安装候选项来自 Ubuntu16.04(xenial)的 Docker 仓库。
7.安装 Docker CE:
$ sudo apt install docker-ce
8.此时,Docker 安装已完成,守护进程已启动。通过 systemctl 命令来启动 Docker 服务,检查它是否正在运行:
$ sudo systemctl status docker
输出应类似于以下内容,表明该服务处于活动状态并正在运行:
Output

● docker.service - Docker Application Container Engine
Loaded: loaded (/lib/systemd/system/docker.service; enabled; vendor preset: enabled)
Active: active (running) since Sun 2018-12-09 22:38:11 CST; 1min 50s ago
Docs: https://docs.docker.com
Main PID: 22003 (dockerd)
CGroup: /system.slice/docker.service
└─22003 /usr/bin/dockerd -H unix://
现在安装 Docker 不仅可以为您提供 Docker 服务(守护进程),还可以为您提供 Docker 命令行工具或 Docker 客户端。我们将在后文探讨如何使用 docker 命令。
第 2 步 - 不加 Sudo 前缀执行 Docker 命令(可选)
默认情况下,docker 命令只能由 root 用户或 Docker 组中的用户运行,Docker 用户组在 Docker 的安装过程中自动创建。如果您不使用 sudo 作为前缀或不在 Docker 组中,尝试运行 docker 命令,将获得如下输出:
Output

docker: Cannot connect to the Docker daemon. Is the docker daemon running on this host?.
See 'docker run --help'.
1.如果希望在每次运行 docker 命令时避免键入 sudo,请将当前用户添加到安装中自动创建的 Docker 用户组中:
$ sudo usermod -aG docker ${USER}
2.要应用新的组成员身份,请注销服务器并重新登录,或键入以下命令:
$ su - ${USER}
系统将提示您输入用户密码以继续。
3.通过键入以下命令确认您的用户现已添加到 Docker 组:
$ id -nG
Output

dc2-user docker
4.如果您需要将用户添加到您未登录的 Docker 组中,请使用以下方式输入确切的用户名:
$ sudo usermod -aG docker username
本文接下来的内容将假定您以 Docker 组中的用户身份运行 dokcer 命令。如果您没有选择这样做,请在命令前面添加 sudo。
接下来让我们探讨 docker 命令。
第 3 步 - 使用 Docker 命令
1.使用 docker 命令,包括传递一系列选项和参数。语法采用以下形式:
$ docker [option] [command] [arguments]
2.要查看所有可用的子命令,请键入:
$ docker
Output

Usage: docker [OPTIONS] COMMAND

A self-sufficient runtime for containers

Options:
   --config string Location of client config files (default "/home/dc2-user/.docker")
-D, --debug Enable debug mode
-H, --host list Daemon socket(s) to connect to
-l, --log-level string Set the logging level ("debug"|"info"|"warn"|"error"|"fatal") (default "info")
   --tls Use TLS; implied by --tlsverify
   --tlscacert string Trust certs signed only by this CA (default "/home/dc2-user/.docker/ca.pem")
   --tlscert string Path to TLS certificate file (default "/home/dc2-user/.docker/cert.pem")
   --tlskey string Path to TLS key file (default "/home/dc2-user/.docker/key.pem")
   --tlsverify Use TLS and verify the remote
-v, --version Print version information and quit

Management Commands:
builder      Manage builds
config       Manage Docker configs
container    Manage containers
engine       Manage the docker engine
image        Manage images
network      Manage networks
node         Manage Swarm nodes
plugin       Manage plugins
secret       Manage Docker secrets
service      Manage services
stack        Manage Docker stacks
swarm        Manage Swarm
system       Manage Docker
trust        Manage trust on Docker images
volume       Manage volumes

Commands:
attach       Attach local standard input, output, and error streams to a running container
build        Build an image from a Dockerfile
commit       Create a new image from a container's changes
cp           Copy files/folders between a container and the local filesystem
create       Create a new container
deploy       Deploy a new stack or update an existing stack
diff         Inspect changes to files or directories on a container's filesystem
events       Get real time events from the server
exec         Run a command in a running container
export       Export a container's filesystem as a tar archive
history      Show the history of an image
images       List images
import       Import the contents from a tarball to create a filesystem image
info         Display system-wide information
inspect      Return low-level information on Docker objects
kill         Kill one or more running containers
load         Load an image from a tar archive or STDIN
login        Log in to a Docker registry
logout       Log out from a Docker registry
logs         Fetch the logs of a container
pause        Pause all processes within one or more containers
port         List port mappings or a specific mapping for the container
ps           List containers
pull         Pull an image or a repository from a registry
push         Push an image or a repository to a registry
rename       Rename a container
restart      Restart one or more containers
rm           Remove one or more containers
rmi          Remove one or more images
run          Run a command in a new container
save         Save one or more images to a tar archive (streamed to STDOUT by default)
search       Search the Docker Hub for images
start        Start one or more stopped containers
stats        Display a live stream of container(s) resource usage statistics
stop         Stop one or more running containers
tag          Create a tag TARGET_IMAGE that refers to SOURCE_IMAGE
top          Display the running processes of a container
unpause      Unpause all processes within one or more containers
update       Update configuration of one or more containers
version      Show the Docker version information
wait         Block until one or more containers stop, then print their exit codes

Run 'docker COMMAND --help' for more information on a command.
3.要查看特定命令的可用选项,请键入:
$ docker docker-subcommand --help
4.要查看有关Docker的系统信息,请使用以下命令:
$ docker info
下面让我们探讨其中的一些命令,从使用镜像开始。
第 4 步 - 使用 Docker 镜像
Docker 容器是用 Docker 镜像创建的。默认情况下, Docker 会尝试从默认镜像仓库(Docker Hub 公共注册服务器中的仓库)获取这些镜像。
Docker Hub 是 Docker 项目背后的公司,任何人都可以在 Docker Hub 上托管他们的 Docker 镜像,您需要的大多数应用程序和 Linux 发行版都会有镜像托管在那里。
1.要检查您是否可以从 Docker Hub 访问和下载镜像,请键入:
$ docker run hello-world
输出将显示 Docker 正常工作:
Output

Unable to find image 'hello-world:latest' locally
latest: Pulling from library/hello-world
d1725b59e92d: Pull complete
Digest: sha256:0add3ace90ecb4adbf7777e9aacf18357296e799f81cabc9fde470971e499788
Status: Downloaded newer image for hello-world:latest

Hello from Docker!
This message shows that your installation appears to be working correctly.

To generate this message, Docker took the following steps:
1. The Docker client contacted the Docker daemon.
2. The Docker daemon pulled the "hello-world" image from the Docker Hub.
(amd64)
3. The Docker daemon created a new container from that image which runs the
executable that produces the output you are currently reading.
4. The Docker daemon streamed that output to the Docker client, which sent it
to your terminal.

To try something more ambitious, you can run an Ubuntu container with:
$ docker run -it ubuntu bash

Share images, automate workflows, and more with a free Docker ID:
https://hub.docker.com/

For more examples and ideas, visit:
https://docs.docker.com/get-started/
Docker最初无法在本地找到 hello-world 镜像,因此它从默认镜像仓库下载了镜像。下载镜像后,Docker 用镜像创建了一个容器,并在容器中执行了应用程序,显示消息。
2.您可以使用 docker 命令的 search 子命令搜索 Docker Hub 官方仓库中可用的镜像。例如,要搜索 Ubuntu 镜像,请键入:
$ docker search ubuntu
该脚本将爬取 Docker Hub,并返回名称与搜索字符串匹配的所有镜像的列表。这种情况下的输出将类似于:
Output

NAME                                                   DESCRIPTION                                     STARS               OFFICIAL            AUTOMATED
ubuntu                                                 Ubuntu is a Debian-based Linux operating sys…   8910                [OK]
dorowu/ubuntu-desktop-lxde-vnc                         Ubuntu with openssh-server and NoVNC            253                                     [OK]
rastasheep/ubuntu-sshd                                 Dockerized SSH service, built on top of offi…   187                                     [OK]
consol/ubuntu-xfce-vnc                                 Ubuntu container with "headless" VNC session…   137                                     [OK]
ansible/ubuntu14.04-ansible                            Ubuntu 14.04 LTS with ansible                   95                                      [OK]
ubuntu-upstart                                         Upstart is an event-based replacement for th…   93                  [OK]
neurodebian                                            NeuroDebian provides neuroscience research s…   55                  [OK]
1and1internet/ubuntu-16-nginx-php-phpmyadmin-mysql-5   ubuntu-16-nginx-php-phpmyadmin-mysql-5          47                                      [OK]
ubuntu-debootstrap                                     debootstrap --variant=minbase --components=m…   40                  [OK]
nuagebec/ubuntu                                        Simple always updated Ubuntu docker images w…   23                                      [OK]
tutum/ubuntu                                           Simple Ubuntu docker images with SSH access     18
i386/ubuntu                                            Ubuntu is a Debian-based Linux operating sys…   16
1and1internet/ubuntu-16-apache-php-7.0                 ubuntu-16-apache-php-7.0                        13                                      [OK]
ppc64le/ubuntu                                         Ubuntu is a Debian-based Linux operating sys…   12
1and1internet/ubuntu-16-nginx-php-5.6-wordpress-4      ubuntu-16-nginx-php-5.6-wordpress-4             7                                       [OK]
eclipse/ubuntu_jdk8                                    Ubuntu, JDK8, Maven 3, git, curl, nmap, mc, …   6                                       [OK]
codenvy/ubuntu_jdk8                                    Ubuntu, JDK8, Maven 3, git, curl, nmap, mc, …   5                                       [OK]
darksheer/ubuntu                                       Base Ubuntu Image -- Updated hourly             5                                       [OK]
pivotaldata/ubuntu                                     A quick freshening-up of the base Ubuntu doc…   2
1and1internet/ubuntu-16-sshd                           ubuntu-16-sshd                                  1                                       [OK]
smartentry/ubuntu                                      ubuntu with smartentry                          1                                       [OK]
ossobv/ubuntu                                          Custom ubuntu image from scratch (based on o…   0
paasmule/bosh-tools-ubuntu                             Ubuntu based bosh-cli                           0                                       [OK]
1and1internet/ubuntu-16-healthcheck                    ubuntu-16-healthcheck                           0                                       [OK]
pivotaldata/ubuntu-gpdb-dev                            Ubuntu images for GPDB development              0
在 OFFICIAL 列中,OK 表示由官方创建。确定要使用的镜像后,可以使用 pull 子命令将其拉取到本地。
3.执行以下命令将官方 Ubuntu 镜像拉取到您的计算机:
$ docker pull ubuntu
您将看到以下输出:
Output

Using default tag: latest
latest: Pulling from library/ubuntu
32802c0cfa4d: Pull complete
da1315cffa03: Pull complete
fa83472a3562: Pull complete
f85999a86bef: Pull complete
Digest: sha256:6d0e0c26489e33f5a6f0020edface2727db9489744ecc9b4f50c7fa671f23c49
Status: Downloaded newer image for ubuntu:latest
拉取镜像后,可以使用 run 子命令用镜像创建并运行一个容器。正如您在 hello-world 示例中看到的,如果在执行 docker 命令的 run 子命令时未下载镜像,则 Docker 客户端将先下载镜像,然后使用它创建并运行容器。
4.要查看已下载到本地的镜像,请键入:
$ docker images
应输出类似于以下内容:
Output

REPOSITORY          TAG                 IMAGE ID            CREATED             SIZE
ubuntu              latest              93fd78260bd1        2 weeks ago         86.2MB
hello-world         latest              4ab4c602aa5e        3 months ago        1.84kB
后文将介绍,用于运行容器的镜像可以被修改并用于生成新镜像,然后可以将其推送到 Docker Hub 或其他 Docker 注册服务器。
让我们更详细地来看看如何运行容器。
第 5 步 - 运行 Docker 容器
在上一步中运行的 hello-world 容器是一个运行并在执行完命令后退出容器的例子。容器还有更多用处,它们是可交互的。毕竟它们类似于虚拟机,只是更加资源友好。
1.举个例子,让我们使用 Ubuntu 的最新镜像运行一个容器,-i 和 -t 选项的组合为您提供了对容器的交互式 shell 访问:
$ docker run -it ubuntu
您的命令提示符应该更改以反映您现在容器内工作的是实际情况,并应采用以下形式:
Output

root@c04385adddac:/#
请注意命令提示符中的容器 ID。在这个例子中,它是 c04385adddac。稍后您将在要删除容器时用该容器 ID 来标识容器。
2.现在您可以在容器内运行任何命令。例如,让我们更新容器内的 APT 软件包缓存。您不需要在任何命令前添加 sudo,因为您是以 root 用户的身份在容器内操作:
root@c04385adddac:/# apt update
然后在里面安装应用程序。我们安装Node.js:
root@c04385adddac:/# apt install nodejs
这将从官方 Ubuntu 镜像仓库安装 Node.js 在容器中。安装完成后,验证是否已安装 Node.js:
node -v
您将看到终端显示的版本号:
Output

v8.10.0
您在容器内进行的任何更改仅适用于该容器。
要退出容器,请在提示符处键入 exit。
下一步让我们看看如何管理我们系统上的容器。
第 6 步 - 管理 Docker 容器
1.使用 Docker 一段时间后,您的本地将有许多活动(运行)和非活动的容器。要查看活动的,请键入:
$ docker ps
您将看到类似于以下内容的输出:
Output

CONTAINER ID        IMAGE               COMMAND             CREATED
在本文中,您启动了两个容器:一个来自 hello-world 镜像,另一个来自 Ubuntu 镜像。现在,两个容器都不再运行,但它们仍然存在于您的系统上。
2.要查看所有容器(活动和非活动),请使用 docker ps 命令并添加 -a 选项:
$ docker ps -a
您将看到类似于此的输出:
Output

CONTAINER ID        IMAGE               COMMAND             CREATED             STATUS                          PORTS               NAMES
c04385adddac        ubuntu              "/bin/bash"         4 minutes ago       Exited (0) About a minute ago                       agitated_elion
8f910927170e        hello-world         "/hello"            10 minutes ago      Exited (0) 10 minutes ago                           goofy_joliot
3.要查看您创建的最新容器,请通过 -l 选项:
$ docker ps -l
Output

CONTAINER ID        IMAGE               COMMAND             CREATED             STATUS                          PORTS               NAMES
c04385adddac        ubuntu              "/bin/bash"         5 minutes ago       Exited (0) 2 minutes ago                            agitated_elion
4.要启动已停止的容器,请使用 docker start,后跟容器 ID 或容器名称。让我们启动基于 Ubuntu 的容器,其 ID 为 c04385adddac:
$ docker start c04385adddac
容器已启动,您可以使用 docker ps 来查看其状态:
Output

CONTAINER ID        IMAGE               COMMAND             CREATED             STATUS                          PORTS               NAMES
c04385adddac        ubuntu              "/bin/bash"         8 minutes ago       Up 53 seconds                                       agitated_elion
5.要终止正在运行的容器,请使用 docker stop,后跟容器 ID 或容器名称。这次,我们将使用 Docker 自动分配的容器名称来终止基于 Ubuntu 的容器,即 agitated_elion:
$ docker stop agitated_elion
6.一旦您决定不再需要某个容器,请使用该 docker rm 命令将其删除,后跟容器 ID 或容器名称。我们将使用 docker ps -a 命令查看与 hello-world 镜像关联的容器的 ID 或名称,然后将其删除:
$ docker rm goofy_joliot
7.您可以通过 --name 选项启动一个新容器并为其命名,您还可以通过 --rm 选项创建一个容器,让其在停止时自行删除。有关这些选项和其他选项的更多信息,请使用 docker run help 命令查阅。
我们还可以使用已有容器来创建镜像。让我们来看看是如何实现的。
第 7 步 - 提交容器中的更改来创建 Docker 镜像
当您启动 Docker 镜像时,您可以像使用虚拟机一样创建、修改和删除文件。您所做的更改仅适用于该容器。您可以启动和停止它,但是一旦使用 docker rm 命令销毁它,更改将永久丢失。
本步骤介绍如何保存容器的某个状态来创建新的 Docker 镜像。
在 Ubuntu 容器中安装 Node.js 后,您有了一个正在运行镜像的容器,不过这个容器与用来创建它的镜像不同。但是您可能希望基于 Node.js 容器构建一个新镜像。
1.使用以下命令来提交为一个新的 Docker 镜像:
$ docker commit -m "What you did to the image" -a "Author Name" container_id repository/new_image_name
-m 选项是提交信息,可以帮助你和其他人知道你所做的修改,而 -a 用于指定作者。container_id 是本文前面启动 Docker 交互式会话时提到的那个。除非您在 Docker Hub 上创建了其他仓库,否则 repository 通常是您的 Docker Hub 用户名。
例如,对于用户 lune,使用容器 ID d9b100f2f636,命令将是:
$ docker commit -m "added Node.js" -a "lune" c04385adddac lune/ubuntu-nodejs
当您提交镜像后,新的镜像保存在本地。在本文后面,将介绍如何将镜像推送到 Docker Hub 之类的 Docker 注册服务器,以便其他人可以访问它。
2.再次列出 Docker 镜像,将显示旧镜像以及从中派生的新镜像:
$ docker images
您会看到这样的输出:
Output

REPOSITORY           TAG                 IMAGE ID            CREATED             SIZE
lune/ubuntu-nodejs   latest              ba9744a7dad2        13 seconds ago      170MB
ubuntu               latest              93fd78260bd1        2 weeks ago         86.2MB
hello-world          latest              4ab4c602aa5e        3 months ago        1.84kB
在此示例中,ubuntu-nodejs 是新镜像,它是从 Docker Hub 下载的现有 Ubuntu 镜像中派生的,其尺寸差异反映了所做的变化。在此示例中,更改是安装 Node.js。因此,下次需要使用预先安装了 Node.js 的 Ubuntu 镜像来运行容器时,您便可以使用新镜像。
您还可以基于 Dockerfile 构建镜像,这样可以在新镜像中自动安装软件。但是,这超出了本文的介绍范围。
现在让我们看看如何与他人分享新镜像,以便他们可以用来创建容器。
第 8 步 - 将 Docker 镜像上传到 Docker 仓库
从现有镜像创建新镜像后,往往会想要共享到朋友、Docker Hub 的所有用户,或者其他您可以访问的 Docker 注册服务器。要将镜像上传到 Docker Hub 或任何其他 Docker 注册服务器,您必须拥有一个它的帐户。
本步骤介绍如何将 Docker 镜像上传到 Docker Hub。
1.登录Docker Hub:
$ docker login -u docker-registry-username
示例(接下来的操作指令均基于该示例,您根据实际情况替换内容即可):
$ docker login -u docker-registry-huyuyu
系统将提示您使用 Docker Hub 密码进行身份验证。如果您输入了正确的密码,则身份验证成功。
2.如果 Docker 注册服务器用户名与用于创建镜像的本地用户名不同,则必须使用注册服务器用户名来标记镜像。基于上一步中给出的示例,您可以键入:
$ docker tag lune/ubuntu-nodejs huyuyu/ubuntu-nodejs
3.然后您可以使用以下方法上传自己的镜像:
$ docker push docker-registry-username/docker-image-name
要将 ubuntu-nodejs 镜像上传到 huyuyu 仓库,命令是:
$ docker push huyuyu/ubuntu-nodejs
上传镜像的过程可能需要一些时间才能完成,完成后的输出将如下所示:
Output

The push refers to repository [docker.io/huyuyu/ubuntu-nodejs]
f5dfb799816d: Pushed
b9b7103af585: Mounted from library/ubuntu
ca2991e4676c: Mounted from library/ubuntu
a768c3f3878e: Mounted from library/ubuntu
bc7f4b25d0ae: Mounted from library/ubuntu
latest: digest: sha256:6f4aafc0500bc7065c11ba5aa7b0cf72f356a4121827867d7ab06632a6434c7d size: 1362
4.将镜像上传到注册服务器后,它应该列在您帐户的仪表板上,如下图所示:

5.如果上传操作导致以下输出,那么您可能没有登录:
Output

The push refers to a repository [docker.io/huyuyu/ubuntu-nodejs]
f5dfb799816d: Preparing
b9b7103af585: Preparing
ca2991e4676c: Preparing
a768c3f3878e: Preparing
bc7f4b25d0ae: Preparing
unauthorized: authentication required
请登录 docker login 并重复尝试上传操作,然后验证它是否存在于 Docker Hub 仓库页面上。
您现在可以将该镜像拉取到新计算机并使用它来运行新容器 docker pull huyuyu/ubuntu-nodejs 。
第 9 步 - 上传镜像到滴滴云 Docker 仓库
滴滴云容器镜像服务是面向企业和开发者提供的容器镜像生命周期管理服务。容器镜像服务简化了镜像仓库的搭建运维工作,支持镜像托管、镜像安全扫描、镜像加速等功能,提供海量镜像资源,满足不同业务的需求。
我们将使用滴滴云容器镜像服务创建自己的命名空间,再上传镜像到该命名空间下。
1.设置仓库账户
第一次使用容器镜像服务时,需通过“我的仓库”页面的“设置仓库账户”功能,来设置在 Docker 客户端登录时使用的用户名和密码,设置后不可更改用户名。

也可先创建仓库再设置账户。
2.创建命名空间
进入 滴滴云 控制台,依次点击计算—>容器镜像服务—>命名空间—>创建命名空间。
命名空间名称在 滴滴云 容器镜像服务中全局唯一,用于生成仓库地址的前缀。
命名空间也可以在第一次创建仓库时创建。(如果是滴滴云的团队账户,只有团队的管理员才能创建命名空间)


3.在 Docker 客户端登录
在 Docker 客户端登录时的用户名和密码,是您在容器镜像服务控制台通过“设置仓库账户”按钮设置的用户名和密码。
登录成功后,客户端会保存登录信息,下次登录该账户,无需输入密码即可自动登录。如需切换账户,必须重新按以下命令进行登录:
$ sudo docker login --username=*** hub.didiyun.com

password:
4.根据要上传的本地镜像的信息填写 [镜像名称:Tag] 或 [镜像 ID],并填写对应的 [命名空间],以及用 [仓库名称] 和新的 [版本号(Tag)] 对它进行标记:
$ sudo docker tag [镜像名称:Tag]或[镜像ID] hub.didiyun.com/[命名空间]/[仓库名称]:[版本号(Tag)]
示例:
$ sudo docker tag python:3 hub.didiyun.com/ns/py:latest
5.上传标记好的本地镜像到镜像仓库:
sudo docker push hub.didiyun.com/[命名空间]/[仓库名称]:[版本号(Tag)]
示例:
$ sudo docker push hub.didiyun.com/ns/py:latest
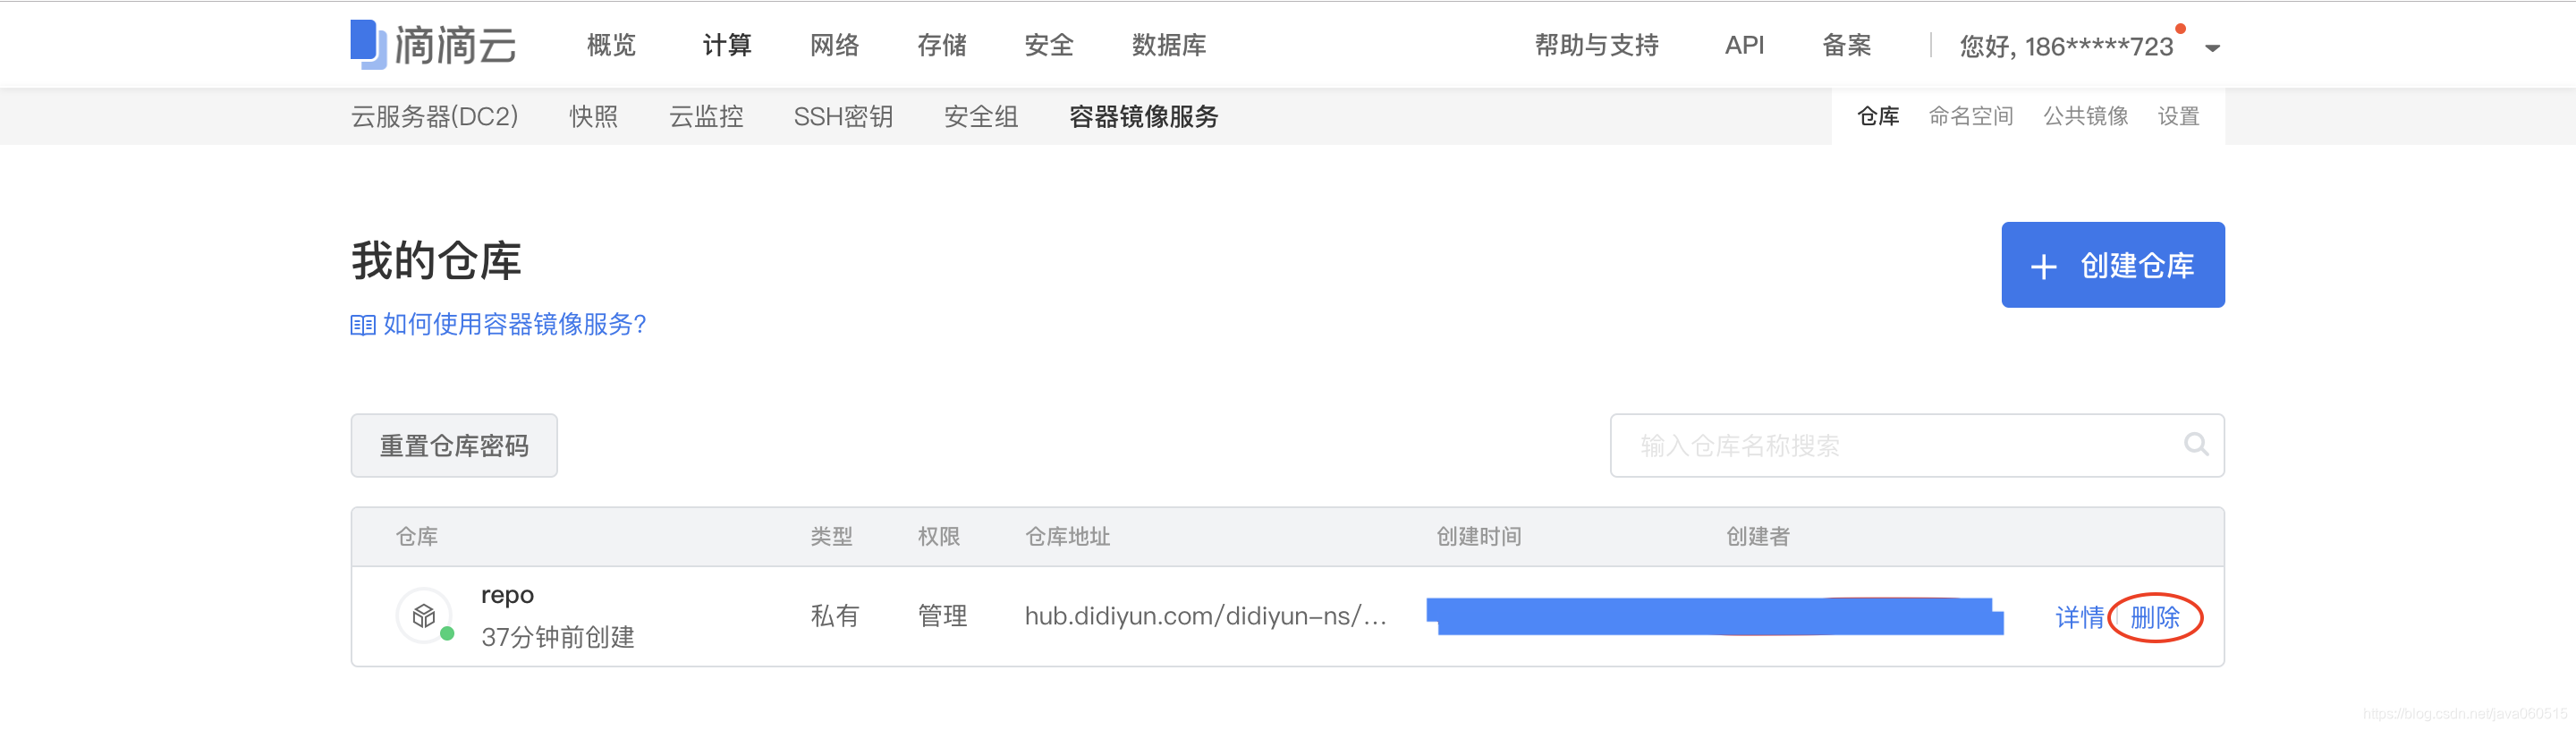
6.完成上传后,在滴滴云容器镜像服务的“我的仓库”页面,查看该镜像(删除该仓库,将同时删除该仓库下所有镜像版本,请谨慎操作):
您也可以通过点击“详情”按钮,对该镜像进行版本管理和安全扫描等操作:
