之前介绍了如何录制音视频,以及相关的多媒体的概念。对于已经录制的多媒体进行“就地”播放(参考前文),就是回放,除了“回放”这个流程,还有一个流程也会经常遇到,那就是“直播”。
本文介绍直播的实现。
“直播”的特点是边录制边播放。如果想完成直播的流程,需要有支持直播功能的服务器(也叫流媒体服务器)。有了直播服务器后,就可以把录制的数据推送到服务器,然后再从服务器拉取数据进行播放。
那么怎么实现这个有直播功能的服务器呢,在这里,小程介绍具备这个功能的服务器程序:nginx。
nginx是一个http服务器,但通过扩展(比如加入rtmp模块等),可以变身为流媒体服务器,并且支持rtmp与hls协议,也就具备了“直播”的功能。如果读者对于rtmp或hls协议不了解,也没有关系,只需要知道它是一个传输的约定就可以了,在特定的场景再作深入了解。
nginx是一个完整的程序,读者只需要做一些安装与配置的工作,就可以弄出一个支持直播(或点播)的原型出来,甚至可以投入使用。
(一)安装nginx
以编译nginx源码的方式来安装nginx,因为要让它支持rtmp模块。
nginx源码的目录结构是这样的: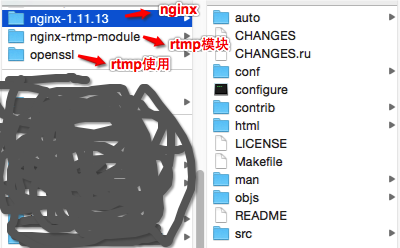
小程列一些具体的安装操作,读者可以按需参考:
nginx×××
到nginx官网下载最新版本的nginx源码,官网的地址:
http://nginx.org/en/download.htmlrtmp模块,也就是nginx-rtmp-module的×××,让它跟nginx项目在同一个目录下面:
git clone https://github.com/arut/nginx-rtmp-module.git。openssl模块的×××(这个被rtmp使用,其实也可以不用,但小程这里还是加上了),同样与nginx项目在一个目录下面:
git clone https://github.com/openssl/openssl.git编译nginx并安装
下载完源码后,就可以开始编译了:
(注意:如果之前用brew安装过nginx,那要先卸载:sudo brew uninstall nginx,因为要支持rtmp,须通过源码来编译安装。)
cd nginx-1.11.13/
./configure --add-module=../nginx-rtmp-module --with-openssl=../openssl
make
sudo make install最终的安装目录应该是/usr/local/nginx/sbin/,
在~/.bash_profile中指定搜索路径:
export PATH="${PATH}:/usr/local/nginx/sbin/"
安装好nginx后,可以尝试使用它:
查看nginx配置文件路径等信息:
nginx -h启动nginx:
sudo nginx
如果有提示端口已经被占用,那可能已经启动了,可以重新启动:
sudo nginx -s reload测试nginx:
curl 127.0.0.1
或者浏览器访问localhost:8080,
能看到welcome信息即表示安装成功而且已经运行,占用8080端口。
最终可以看到nginx的welcome: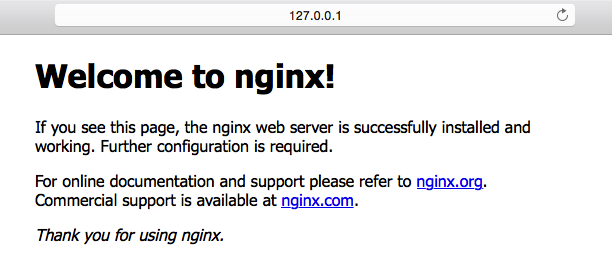
(二)实现点播
因为实现点播的功能会更简单一点,所以小程先介绍使用nginx来实现点播的操作,读者也可以直接跳至“直播”的内容来阅读。
做到点播(回放),只需要改下配置,让nginx关联一个本地的文件即可。
具体操作是这样的:
查看配置文件的路径:
nginx -h配置文件为/usr/local/nginx/conf/nginx.conf,
也可以通过nginx -c来指定一个新的配置文件。在配置文件中,增加rtmp项:
rtmp {
server {
listen 1935; # port
chunk_size 4096; # data chunk size
application playback {
play /opt/show; # target file path
}
}
}
1935为端口,chunk_size为块大小。
playback为应用的名称,可以任意改。
play为关键字,不能改。
play对应的值为本地文件所在目录,把要播放的文件放在这个目录内。配置完毕后,重启nginx:
sudo nginx -s reload测试,使用ffplay来播放nginx服务器的点播(对于ffplay的使用读者可以参考小程之前的介绍):
ffplay rtmp://localhost/playback/Movie-1.mp4Movie-1.mp4是放在目录/opt/show/下面的文件。
按测试的示例,可以想到,如果把localhost换成某个ip就可以对不同机子上面的文件进行点播。
(三)实现直播
实现直播,也很简单,同样修改一下配置,就可以做到。
具体的操作是这样的:
在配置文件中,增加rtmp项:
rtmp {
server {
listen 1935; # port
chunk_size 4096; # data chunk size
application rtmpdemo {
live on;
}
}
}
同样,1935为端口,chunk_size为块大小。
rtmpdemo是应用名称,可以随意改。重启nginx:
sudo nginx -s reload用ffmpeg来模拟推流:
sudo ffmpeg -re -i Movie-1.mp4 -vcodec copy -f flv rtmp://localhost/rtmpdemo/test1
-re 表示按帧率来推;
-f 为推送时封装的格式,对于rtmp都应该使用flv。这时,服务器nginx已经有多媒体流了,客户端拉流播放:
ffplay "rtmp://localhost/rtmpdemo/test1 live=1"
上面的演示,是把一个本地的文件推到了nginx,实际的直播场景中,是边录制边推流,读者可以结合小程以前介绍的录制视频的办法,来做到录制。
至此,已经把“使用nginx来实现直播”的主体操作介绍完了,但这毕竟只是一个原型,直播的难点分落在服务器与客户端,比如服务器如何高性能低延迟,客户端如何实时(与协议选择、服务器分布也有关)并处理好声画质量的问题,等等。
以上介绍了通过nginx实现直播的流程,其中一个环节是通过ffmpeg的命令来推流的,那如果想写代码来实现,可以怎么做呢?
这里涉及到FFmpeg的调用,而它的使用应该有更多的前提,比如FFmpeg的编译、引用、调用等等,如果读者想在了解这些前置环节之后再作深入了解也是可以的,那就不必阅读下面的内容。但是,为了保持内容的完整性,小程还是加上这部分内容。
使用ffmpeg命令来推流,控制度不够高,现在以代码的方式来实现,可灵活控制。
最终的效果是这样的(一边推流到服务器,一边从服务器拉流播放):
演示推流的代码:
#include <stdio.h>
#include "ffmpeg/include/libavformat/avformat.h"
#include "ffmpeg/include/libavcodec/avcodec.h"

void publishstream() {
    const char* srcfile = "t.mp4";
    const char* streamseverurl = "rtmp://localhost/rtmpdemo/test1";
    av_register_all();
    avformat_network_init();
    av_log_set_level(AV_LOG_DEBUG);
    int status = 0;
    AVFormatContext* formatcontext = avformat_alloc_context();
    status = avformat_open_input(&formatcontext, srcfile, NULL, NULL);
    if (status >= 0) {
        status = avformat_find_stream_info(formatcontext, NULL);
        if (status >= 0) {
            int videoindex = -1;
            for (int i = 0; i < formatcontext->nb_streams; i ++) {
                if (formatcontext->streams[i]->codec->codec_type == AVMEDIA_TYPE_VIDEO) {
                    videoindex = i;
                    break;
                }
            }
            if (videoindex >= 0) {
                AVFormatContext* outformatcontext;
                avformat_alloc_output_context2(&outformatcontext, NULL, "flv", streamseverurl);
                if (outformatcontext) {
                    status = -1;
                    for (int i = 0; i < formatcontext->nb_streams; i ++) {
                        AVStream* onestream = formatcontext->streams[i];
                        AVStream* newstream = avformat_new_stream(outformatcontext, onestream->codec->codec);
                        status = newstream ? 0 : -1;
                        if (status == 0) {
                            status = avcodec_copy_context(newstream->codec, onestream->codec);
                            if (status >= 0) {
                                newstream->codec->codec_tag = 0;
                                if (outformatcontext->oformat->flags & AVFMT_GLOBALHEADER) {
                                    newstream->codec->flags |= CODEC_FLAG_GLOBAL_HEADER;
                                }
                            }
                        }
                    }
                    if (status >= 0) {
                        AVOutputFormat* outformat = outformatcontext->oformat;
                        av_usleep(5*1000*1000); // 故意等一下再开始推流,让拉流的客户端有时间启动,以拿到视频的pps/sps
                        if (!(outformat->flags & AVFMT_NOFILE)) {
                            av_dump_format(outformatcontext, 0, streamseverurl, 1);
                            status = avio_open(&outformatcontext->pb, streamseverurl, AVIO_FLAG_WRITE);
                            if (status >= 0) {
                                status = avformat_write_header(outformatcontext, NULL);
                                if (status >= 0) {
                                    AVPacket packet;
                                    int videoframeidx = 0;
                                    int64_t starttime = av_gettime();
                                    while (1) {
                                        status = av_read_frame(formatcontext, &packet);
                                        if (status < 0) {
                                            break;
                                        }
                                        if (packet.pts == AV_NOPTS_VALUE) {
                                            av_log(NULL, AV_LOG_DEBUG, "set pakcet.pts\n");
                                            AVRational video_time_base = formatcontext->streams[videoindex]->time_base;
                                            int64_t frameduration = (double)AV_TIME_BASE / av_q2d(formatcontext->streams[videoindex]->r_frame_rate);
                                            packet.pts = (double)(videoframeidx * frameduration) / (double)(av_q2d(video_time_base) * AV_TIME_BASE);
                                            packet.dts = packet.pts;
                                            packet.duration = (double)frameduration / (double)(av_q2d(video_time_base) * AV_TIME_BASE);
                                        }
                                        if (packet.stream_index == videoindex) {
                                            AVRational video_time_base = formatcontext->streams[videoindex]->time_base;
                                            AVRational time_base_q = {1, AV_TIME_BASE};
                                            int64_t cur_pts = av_rescale_q(packet.dts, video_time_base, time_base_q);
                                            int64_t curtime = av_gettime() - starttime;
                                            av_log(NULL, AV_LOG_DEBUG, "on video frame curpts=%lld curtime=%lld\n", cur_pts, curtime);
                                            if (cur_pts > curtime) {
                                                av_usleep(cur_pts - curtime);
                                            }
                                        }
                                        AVStream* instream = formatcontext->streams[packet.stream_index];
                                        AVStream* outstream = outformatcontext->streams[packet.stream_index];
                                        packet.pts = av_rescale_q_rnd(packet.pts, instream->time_base, outstream->time_base, AV_ROUND_NEAR_INF | AV_ROUND_PASS_MINMAX);
                                        packet.dts = av_rescale_q_rnd(packet.dts, instream->time_base, outstream->time_base, AV_ROUND_NEAR_INF | AV_ROUND_PASS_MINMAX);
                                        packet.duration = av_rescale_q(packet.duration, instream->time_base, outstream->time_base);
                                        packet.pos = -1;
                                        if (packet.stream_index == videoindex) {
                                            videoframeidx ++;
                                        }
                                        status = av_interleaved_write_frame(outformatcontext, &packet);
                                        if (status < 0) {
                                            break;
                                        }
                                    }
                                    av_write_trailer(outformatcontext);
                                }
                                avio_close(outformatcontext->pb);
                            }
                        }
                    }
                    avformat_free_context(outformatcontext);
                }
            }
        }
        avformat_close_input(&formatcontext);
    }
    avformat_free_context(formatcontext);
}

int main(int argc, char *argv[])
{
    publishstream();
    return 0;
}
这里以本地的视频文件作为内容,模拟了直播推流(推到nginx),功能上相当于直接调用ffmpeg命令:
sudo ffmpeg -re -i Movie-1.mp4 -vcodec copy -f flv rtmp://localhost/rtmpdemo/test1
当然也可以边录制边推送,也可以在不同的电脑或手机上,拉流播放。
直播开始后,这里的流媒体服务器并没有给中途拉流的客户端发送视频解码所必须的参数(pps/sps),所以在测试的时候,要保证拉流端能拿到第一帧数据,比如演示代码中故意sleep几秒后才开始推流,让拉流端有时间开启并拿到推上去的所有数据(包括关键参数)。
总结一下,本文介绍了使用nginx来实现多媒体的直播。