1、背景
最近在搞ESP32的音乐播放,对ESP32软件体系之一ADF开始学习。记录些东西。水平有限,求路过者不吝赐教。
1.1 参考资料
ADF文档 https://docs.espressif.com/projects/esp-adf/en/latest/get-started/index.html
2、play_mp3例程出发理解ADF的一般步骤和概念
音频播放的一般流程:获取音频流(音频输入流)-->音频流加工处理---->音频输出流
2.1 概念自解
Element(元素):ADF API提供的一种方法便于开发音频应用。将音频的一般流程对象化。如Codecs,Streams或Filters。
Pipeline(管道):通过组合Elements加入到Pipeline来开发应用程序。
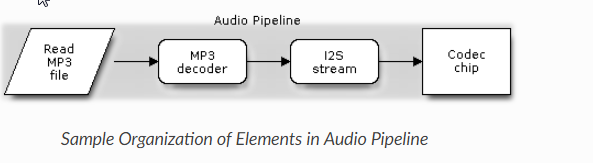
这就是play_mp3这个例程中组成音频管道的元素。
通常音频数据通过输入流(Stream)来获取,由Codec和Filter来处理,最后也是由输出流(Stream)来输出。
音频管道的作用是控制音频数据流以及把音频元素Elements和各自的ringbuffer连接起来。不管是连接还是启动元素都是按顺序来进行的,从前一个元素那里检索数据并把它传给下一个元素。当然也要获取各个元素的事件,处理事件或发送给更高层。
Event: 通过Event来建立管道Pipeline中各音频元素Elements之间的通信。这是围绕FreeRtos的队列来建立的。Event通过listeners来监视传入的msg并通过回调函数来通知。
2.2 音频播放一般步骤
[ 1 ] Start audio codec chip //启动音频编解码芯片
[ 2 ] Create audio pipeline, add all elements to pipeline, and subscribe pipeline event
      //创建音频pipeline,将所有elements添加入pipeline,并订阅pipeline事件
    [2.1] Create mp3 decoder to decode mp3 file and set custom read callback
      //创建mp3解码器去解码MP3文件并设置用户读文件回调函数
    [2.2] Create i2s stream to write data to codec chip
      //创建写入到编解码芯片的i2s数据流
    [2.3] Register all elements to audio pipeline
      //注册所有元素elements到音频管道pipeline
    [2.4] Link it together [mp3_music_read_cb]-->mp3_decoder-->i2s_stream-->[codec_chip]
      //将所有元素链接起来,ringbuffer创建了
[ 3 ] Setup event listener
      //设置事件监听器
    [3.1] Listening event from all elements of pipeline
      //监听来自管道中所有元素的事件
[ 4 ] Start audio_pipeline
      //启动音频管道
[ 5 ] Stop audio_pipeline
      //关闭音频管道
接下去就应该具体步骤具体分析了。
2.2.1启动音频编解码芯片
每个人板子上的音频编解码芯片可能各有不同,但ADF提供的抽象接口层API<components/audio_hal.c>提供应用程序与特定音频板子硬件驱动之间的接口。
通过数据接口来配置ADC/DAC信号转变的采样率,以及数据宽度、I2C数据流参数以及ADC/DAC的信号通道选择。HAL接口也提供了初始化音频板子的API以及控制音量的API。
#define AUDIO_HAL_ES8388_DEFAULT(){                     \
        .adc_input  = AUDIO_HAL_ADC_INPUT_LINE1,        \
        .dac_output = AUDIO_HAL_DAC_OUTPUT_ALL,         \
        .codec_mode = AUDIO_HAL_CODEC_MODE_BOTH,        \
        .i2s_iface = {                                  \
            .mode = AUDIO_HAL_MODE_SLAVE,               \
            .fmt = AUDIO_HAL_I2S_NORMAL,                \
            .samples = AUDIO_HAL_48K_SAMPLES,           \
            .bits = AUDIO_HAL_BIT_LENGTH_16BITS,        \
        },                                              \
};

audio_hal_codec_config_t audio_hal_codec_cfg = AUDIO_HAL_ES8388_DEFAULT();
audio_hal_handle_t hal = audio_hal_init(&audio_hal_codec_cfg, 0);//初始化多媒体编解码驱动
audio_hal_ctrl_codec(hal, AUDIO_HAL_CODEC_MODE_DECODE, AUDIO_HAL_CTRL_START);//启动/停止编解码启动
上述ES8388芯片的配置包括ADC、DAC通道、编解码模式、i2s接口配置(如I2S从模式、标准模式、采样率48k、位宽16bit)。
/**
 * @brief Configure media hal for initialization of audio codec chip
 */
typedef struct {
    audio_hal_adc_input_t adc_input;       /*!< set adc channel */
    audio_hal_dac_output_t dac_output;     /*!< set dac channel */
    audio_hal_codec_mode_t codec_mode;     /*!< select codec mode: adc, dac or both */
    audio_hal_codec_i2s_iface_t i2s_iface; /*!< set I2S interface configuration */
} audio_hal_codec_config_t;关于ES8388,可看文章。水平有限,持续改进。
当然,我们在启动音频编解码芯片时也可以调用ADF提供的芯片的API来实现。
2.2.2 创建音频pipeline,将所有elements添加入pipeline,并订阅pipeline事件
2.2.2.1、创建音频管道,参数为音频管道ringbuffer的大小
struct audio_pipeline {
    audio_element_list_t        el_list;
    ringbuf_list_t              rb_list;
    audio_element_state_t       state;
    xSemaphoreHandle            lock;
    bool                        linked;
    audio_event_iface_handle_t  listener;
};

typedef struct audio_pipeline *audio_pipeline_handle_t;

audio_pipeline_handle_t audio_pipeline_init(audio_pipeline_cfg_t *config)
/**
 * @brief Audio Pipeline configurations
 */
typedef struct audio_pipeline_cfg {
    int rb_size;        /*!< Audio Pipeline ringbuffer size */
} audio_pipeline_cfg_t;

audio_pipeline_handle_t audio_pipeline_init(audio_pipeline_cfg_t *config)
{
    audio_pipeline_handle_t pipeline;
    bool _success =
        (
            (pipeline       = audio_calloc(1, sizeof(struct audio_pipeline)))   &&
            (pipeline->lock = mutex_create())
        );

    AUDIO_MEM_CHECK(TAG, _success, return NULL);
    STAILQ_INIT(&pipeline->el_list);
    STAILQ_INIT(&pipeline->rb_list);

    pipeline->state = AEL_STATE_INIT;
    return pipeline;
}
这个函数初始化了audio_pipeline_handle_t类型的对象,音频管道的主要职责是控制音频数据流stream以及用ringbuffer连接各音频元素elements。它按顺序并启动音频元素,负责从前一个元素检索数据然后传递给后面一个元素,还可从每个元素获取事件、处理事件或将其传递到更高层。
这个有个疑问这个config用在哪里了??
2.2.2.2.创建各元素Elements,且各个元素初始化有各自的API。
 mp3_decoder_cfg_t mp3_cfg = DEFAULT_MP3_DECODER_CONFIG();
 mp3_decoder = mp3_decoder_init(&mp3_cfg);
 audio_element_set_read_cb(mp3_decoder, mp3_music_read_cb, NULL);

 i2s_stream_cfg_t i2s_cfg = I2S_STREAM_CFG_DEFAULT();
 i2s_cfg.type = AUDIO_STREAM_WRITER;
 i2s_cfg.i2s_config.sample_rate = 48000;  //和编解码的采样率保持一致
 i2s_stream_writer = i2s_stream_init(&i2s_cfg);
这里用到了mp3_decoder 和 i2s_stream两个Elements,每个Element实际上是一个Task。初始化配置参数中都有对任务栈大小、任务优先级、任务运行的core、以及输出ringbuffer和Element使用的buffer的大小。
无论是哪个元素Element初始化,其中肯定包含Element的初始化,这是不用说的。看看Element的初始化过程
/**
 * @brief Audio Element configurations
 *        Each Element at startup will be a self-running task.
 *        These tasks will execute the callback open -> [loop: read -> process -> write] -> close
 *        These callback functions are provided by the user corresponding to this configuration.
 *
 */
typedef struct {
    io_func             open;             /*!< Open callback function */
    io_func             seek;             /*!< Seek callback function */
    process_func        process;          /*!< Process callback function */
    io_func             close;            /*!< Close callback function */
    io_func             destroy;          /*!< Destroy callback function */
    stream_func         read;             /*!< Read callback function */
    stream_func         write;            /*!< Write callback function */
    int                 buffer_len;       /*!< Buffer length use for an Element */
    int                 task_stack;       /*!< Element task stack */
    int                 task_prio;        /*!< Element task priority (based on freeRTOS priority) */
    int                 task_core;        /*!< Element task running in core (0 or 1) */
    int                 out_rb_size;      /*!< Output ringbuffer size */
    void                *data;            /*!< User context */
    char                *tag;             /*!< Element tag */
    bool                enable_multi_io;  /*!< Enable multi input and output ringbuffer */
} audio_element_cfg_t;
audio_element_handle_taudio_element_init(audio_element_cfg_t *config)
根据config初始化音频元素Element,在config参数中如上所述:包括open/seek/process/close/destroy/read/write的回调函数,Element的任务栈大小、优先级、运行在哪个core、用户上下文参数、输出rinbuffer的大小。
其实每个启动的Element都是一个自运行的任务,这些任务都会执行open-->loop[read-->process-->write]-->close的回调函数。回调函数由应用程序来配置。 Stream、Coder等初始化函数都是针对各自特点对Element的初始化函数的进一步封装。
audio_element_handle_ti2s_stream_init(i2s_stream_cfg_t *config)
根据confg.type 是AUDIO_STREAM_READER还是AUDIO_STREAM_WRITER,来创建一个音频元素Element来流出数据从I2S到另一个Element或者创建一个音频元素Element从另一个elements获得数据发送到I2S。
以stream的初始化源码来说,流程如下
typedef struct i2s_stream {
    audio_stream_type_t type;
    i2s_stream_cfg_t    config;
    bool                is_open;
} i2s_stream_t;

audio_element_handle_t i2s_stream_init(i2s_stream_cfg_t *config)
{

..........
el = audio_element_init(&cfg);         //元素初始化
audio_element_setdata(el, i2s);        //设置上下文参数;将i2s赋值给el中

audio_element_info_t info;
audio_element_getinfo(el, &info);      //获取音频元素信息

info.sample_rates = config->i2s_config.sample_rate;
info.channels = config->i2s_config.channel_format < I2S_CHANNEL_FMT_ONLY_RIGHT ? 2 : 1;
info.bits = config->i2s_config.bits_per_sample;
audio_element_setinfo(el, &info);      //设置音频元素信息

i2s_driver_install(i2s->config.i2s_port, &i2s->config.i2s_config, 0, NULL);    //IDF的I2S驱动安装

i2s_set_pin(i2s->config.i2s_port, &i2s->config.i2s_pin_config);
SET_PERI_REG_BITS(PIN_CTRL, CLK_OUT1, 0, CLK_OUT1_S);
PIN_FUNC_SELECT(PERIPHS_IO_MUX_GPIO0_U, FUNC_GPIO0_CLK_OUT1);
}这上面有Element的初始化以及以后的设置,以及I2S的驱动安装以及管脚设置。
/**********************************************************************************************/
以MP3_decocde元素初始化的参数结构来说
/**
 * @brief      Mp3 Decoder configuration
 */
typedef struct {
    int                     out_rb_size;    /*!< Size of output ringbuffer */
    int                     task_stack;     /*!< Task stack size */
    int                     task_core;      /*!< CPU core number (0 or 1) where decoder task in running */
    int                     task_prio;      /*!< Task priority (based on freeRTOS priority) */
} mp3_decoder_cfg_t;
mp3_decoder = mp3_decoder_init(&mp3_cfg);这句代码应该是启动了一个任务。
audio_element_set_read_cb(mp3_decoder, mp3_music_read_cb, NULL);   //读取文件
/**
 * @brief     This API allows the application to set a read callback for the first audio_element in the pipeline for
 *            allowing the pipeline to interface with other systems. The callback is invoked every time the audio
 *            element requires data to be processed.
 *
 * @param[in]  el        The audio element handle
 * @param[in]  fn        Callback read function. The callback function should return number of bytes read or -1
 *                       in case of error in reading. Note that the callback function may decide to block and
 *                       that may block the entire pipeline.
 * @param[in]  context   An optional context which will be passed to callback function on every invocation
 *
 * @return
 *     - ESP_OK
 *     - ESP_FAIL
 */
typedef enum {
    IO_TYPE_RB = 1, /* I/O through ringbuffer */
    IO_TYPE_CB,     /* I/O through callback */
} io_type_t;

esp_err_t audio_element_set_read_cb(audio_element_handle_t el, stream_func fn, void *context)
{
    if (el) {
        el->in.read_cb.cb = fn;
        el->in.read_cb.ctx = context;
        el->read_type = IO_TYPE_CB;
        return ESP_OK;
    }
    return ESP_FAIL;
}audio_element_set_read_cb()这个接口必不可少,重要******************。
这个API接口允许应用程序为管道中的第一个audio_element设置一个读回调,这个读回调提供和其他系统相联系的接口。当每次音频元素需要待处理的数据,这个函数被调用。
参数:el-需要待处理数据音频元素句柄,pipiline的第一个元素;
fn-回调函数----返回读取的字节数或-1(error)
context---每次调用可传递给回调函数的参数。
这个API内部实际对句柄结构输入成员in赋值以及读取类型时从回调函数中读取。
这里的回调函数如下所示
extern const uint8_t adf_music_mp3_start[] asm("_binary_adf_music_mp3_start");
extern const uint8_t adf_music_mp3_end[]   asm("_binary_adf_music_mp3_end");
int mp3_music_read_cb(audio_element_handle_t el, char *buf, int len, TickType_t wait_time, void *ctx)
{
    static int mp3_pos;
    int read_size = adf_music_mp3_end - adf_music_mp3_start - mp3_pos;
    if (read_size == 0) {
        return AEL_IO_DONE;
    } else if (len < read_size) {
        read_size = len;
    }
    memcpy(buf, adf_music_mp3_start + mp3_pos, read_size);
    mp3_pos += read_size;
    return read_size;
}
/**************这样就有了起始***************/
2.2.2.3注册所有Elements到Pipeline中,并把Elements给链接起来
 audio_pipeline_register(pipeline, mp3_decoder, "mp3");
 audio_pipeline_register(pipeline, i2s_stream_writer, "i2s");
audio_pipeline_link(pipeline, (const char *[]) {"mp3", "i2s"}, 2);为音频管道注册一个Element,任何一个Element可以注册多次,但是对于一个管道而言“name”是唯一的。也就是说音频管道中用name来识别element。
audio_pipeline_link()在调用这个函数前,加入到pipeline中音频参数实际还没有连接起来。调用之后确定了连接的顺序。同时也订阅了所有element的事件。在这个函数的源码中,还创建连接ringbuffer.
first Element -(set output ringbuffer)-->ringbuffer1--(set input ringbuffer)->second Element-- ----->ringbuffern- set input ringbuffer->last Element.
注册可以多种Elements组合,在连接的时候选择一种Elements组合连接起来,也可以在断开再组成其他的Elements组合,则使得使用pipeline非常灵活。
2.2.3 设置事件监听器,开始监听
/**
 * Event interface configurations
 */
typedef struct {
    int                 internal_queue_size;        /*!< It's optional, Queue size for event `internal_queue` */
    int                 external_queue_size;        /*!< It's optional, Queue size for event `external_queue` */
    int                 queue_set_size;             /*!< It's optional, QueueSet size for event `queue_set`*/
    on_event_iface_func on_cmd;                     /*!< Function callback for listener when any event arrived */
    void                *context;                   /*!< Context will pass to callback function */
    TickType_t          wait_time;                  /*!< Timeout to check for event queue */
    int                 type;                       /*!< it will pass to audio_event_iface_msg_t source_type (To know where it came from) */
} audio_event_iface_cfg_t;
#define AUDIO_EVENT_IFACE_DEFAULT_CFG() {                   \
    .internal_queue_size = DEFAULT_AUDIO_EVENT_IFACE_SIZE,  \
    .external_queue_size = DEFAULT_AUDIO_EVENT_IFACE_SIZE,  \
    .queue_set_size = DEFAULT_AUDIO_EVENT_IFACE_SIZE,       \
    .on_cmd = NULL,                                         \
    .context = NULL,                                        \
    .wait_time = portMAX_DELAY,                             \
    .type = 0,                                              \
}
audio_event_iface_cfg_t evt_cfg = AUDIO_EVENT_IFACE_DEFAULT_CFG();
audio_event_iface_handle_t evt = audio_event_iface_init(&evt_cfg);  //初始化音频事件
audio_pipeline_set_listener(pipeline, evt);//为音频管道pipeline设置事件监听器evt,所有来自pipeline的事件都可以由evt这个监听器所监听
先看看audio_event_iface_init()函数的初始化音频事件。
audio_event_iface_handle_t audio_event_iface_init(audio_event_iface_cfg_t *config)
{
    audio_event_iface_handle_t evt = calloc(1, sizeof(struct audio_event_iface));
    AUDIO_MEM_CHECK(TAG, evt, return NULL);
    evt->queue_set_size   = config->queue_set_size;
    evt->internal_queue_size = config->internal_queue_size;
    evt->external_queue_size = config->external_queue_size;
    evt->context = config->context;
    evt->on_cmd = config->on_cmd;
    evt->type = config->type;
    if (evt->queue_set_size) {
        evt->queue_set = xQueueCreateSet(evt->queue_set_size);
    }
    if (evt->internal_queue_size) {
        evt->internal_queue = xQueueCreate(evt->internal_queue_size, sizeof(audio_event_iface_msg_t));
        AUDIO_MEM_CHECK(TAG, evt->internal_queue, goto _event_iface_init_failed);
    }
    if (evt->external_queue_size) {
        evt->external_queue = xQueueCreate(evt->external_queue_size, sizeof(audio_event_iface_msg_t));
        AUDIO_MEM_CHECK(TAG, evt->external_queue, goto _event_iface_init_failed);
    } else {
        ESP_LOGD(TAG, "This emiiter have no queue set,%p", evt);
    }

    STAILQ_INIT(&evt->listening_queues);
    return evt;
_event_iface_init_failed:
    if (evt->internal_queue) {
        vQueueDelete(evt->internal_queue);
    }
    if (evt->external_queue) {
        vQueueDelete(evt->external_queue);
    }
    return NULL;
}在audio_pipeline_set_listener() 源码中做到如果当前管道pipeline已经有了监听器,则从监听器中把这管道移除。这个函数的核心还是audio_element_msg_set_listener()。就是将管道中的elements一一添加到监听器中监听事件。
/****************************************************************************************************************************/
音频事件初始化接口实际上是对audio_event_iface_handle_t结构体变量的配置,从config配置参数中获得队列集大小、内部队列大小、外部队列大小、上下文变量、on_cmd函数、类型;申请队列集、内部队列、外部队列,加入队列集。
这是on_cmd函数,run接口最终处理
static esp_err_t process_peripheral_event(audio_event_iface_msg_t *msg, void *context)
{
esp_periph_handle_t periph_evt = (esp_periph_handle_t) msg->source;
esp_periph_handle_t periph;
STAILQ_FOREACH(periph, &g_esp_periph_obj->periph_list, entries) {
if (periph->periph_id == periph_evt->periph_id
&& periph_evt->state == PERIPH_STATE_RUNNING
&& periph_evt->run
&& !periph_evt->disabled) {
return periph_evt->run(periph_evt, msg);
}
}
return ESP_OK;
}
2.2.4 启动音频管道
audio_pipeline_run(pipeline);启动音频管道。调用这个函数后,就会为管道中的所有Elements创建Tasks。
音频事件
3、事件监听处理
事件监听涉及到事件的发送和时间的接收。
3.1 发送
触发发送一个带消息的事件到内部队列中。
esp_err_t audio_event_iface_cmd(audio_event_iface_handle_t evt, audio_event_iface_msg_t *msg)
{
    if (evt->internal_queue && (xQueueSend(evt->internal_queue, (void *)msg, 0) != pdPASS)) {
        ESP_LOGD(TAG, "There are no space to dispatch queue");
        return ESP_FAIL;
    }
    return ESP_OK;
}
也可以放在中断函数中发送事件,接口如下
esp_err_t audio_event_iface_cmd_from_isr(audio_event_iface_handle_t evt, audio_event_iface_msg_t *msg)也可以把消息发送给外部队列中
esp_err_t audio_event_iface_sendout(audio_event_iface_handle_t evt, audio_event_iface_msg_t *msg)
{
    if (evt->external_queue) {
        if (xQueueSend(evt->external_queue, (void *)msg, 0) != pdPASS) {
            ESP_LOGD(TAG, "There is no space in external queue");
            return ESP_FAIL;
        }
    }
    return ESP_OK;
}
3.2 接收
等待接收内部队列事件,并on_cmd中处理,以外设为例,在外设的__run 中运行
esp_err_t audio_event_iface_waiting_cmd_msg(audio_event_iface_handle_t evt)
{
    audio_event_iface_msg_t msg;
    if (evt->internal_queue && (xQueueReceive(evt->internal_queue, (void *)&msg, evt->wait_time) == pdTRUE)) {
        if (evt->on_cmd && evt->on_cmd((void *)&msg, evt->context) != ESP_OK) {
            return ESP_FAIL;
        }
    }
    return ESP_OK;
}
另一中,接收队列集的数据,接下去处理。
esp_err_t audio_event_iface_listen(audio_event_iface_handle_t evt, audio_event_iface_msg_t *msg, TickType_t wait_time)
{
    if (!evt) {
        return ESP_FAIL;
    }
    if (audio_event_iface_read(evt, msg, wait_time) != ESP_OK) {
        return ESP_FAIL;
    }
    return ESP_OK;
}

esp_err_t audio_event_iface_read(audio_event_iface_handle_t evt, audio_event_iface_msg_t *msg, TickType_t wait_time)
{
    if (evt->queue_set) {
        QueueSetMemberHandle_t active_queue;
        active_queue = xQueueSelectFromSet(evt->queue_set, wait_time);
        if (active_queue) {
            if (xQueueReceive(active_queue, msg, 0) == pdTRUE) {
                return ESP_OK;
            }
        }
    }
    return ESP_FAIL;
}
3.3 汇总
以外设BUTTON事件收发为例:
事件初始化后,在按键中断服务程序中发送内部列队消息事件,在事件Task中等待接收内部队列消息,在button的run函数中发送外部队列消息,在外部循环中接收队列集队列数据。
在音频元素事件收发为例:
音频元素动作命令在内部队列中传输;音频元素状态报告在外部队列中传输。
4、小节
esp_image: Image length 1241280 doesn't fit in partition length 1200000[0m
实际生成的映像的大小为1241280和分区表中的额200000大小不配,因此启动失败。
1313) cpu_start: Pro cpu start user code[0m
[0;32mI (1318) spiram: Adding pool of 4096K of external SPI memory to heap allocator[0m
[0;32mI (332) cpu_start: Starting scheduler on PRO CPU.[0m
[0;32mI (0) cpu_start: Starting scheduler on APP CPU.[0m
[0;32mI (334) spiram: Reserving pool of 32K of internal memory for DMA/internal allocations[0m
[0;32mI (334) PLAY_MP3_FLASH: [ 1 ] Start audio codec chip[0m
[0;32mI (364) PLAY_MP3_FLASH: [ 2 ] Create audio pipeline, add all elements to pipeline,

[2019-02-20 19:40:38.206]# RECV ASCII>
and subscribe pipeline event[0m
[0;32mI (364) PLAY_MP3_FLASH: [2.1] Create mp3 decoder to decode mp3 file and set custom read callback[0m
[0;32mI (374) PLAY_MP3_FLASH: [2.2] Create i2s stream to write data to codec chip[0m
[0;32mI (384) PLAY_MP3_FLASH: [2.3] Register all elements to audio pipeline[0m
[0;32mI (384) PLAY_MP3_FLASH: [2.4] Link it together [mp3_music_read_cb]-->mp3_decoder-->i2s_stream-->[codec_chip][0m
[0;32mI (404) PLAY_MP3_FLASH: [ 3 ] Setup event listener[0m
[0;32mI (404)

[2019-02-20 19:40:38.264]# RECV ASCII>
PLAY_MP3_FLASH: [3.1] Listening event from all elements of pipeline[0m
[0;32mI (414) PLAY_MP3_FLASH: [ 4 ] Start audio_pipeline[0m


[2019-02-20 19:40:38.335]# RECV ASCII>
[0;32mI (494) PLAY_MP3_FLASH: [ * ] Receive music info from mp3 decoder, sample_rates=44100, bits=16, ch=2[0m


[2019-02-20 19:40:45.073]# RECV ASCII>
[0;32mI (7224) PLAY_MP3_FLASH: [ 5 ] Stop audio_pipeline[0m
[0;33mW (7224) AUDIO_PIPELINE: There are no listener registered[0m