一、安装

[root@localhost ~]# yum install -y epel-release             //安装扩展源
[root@localhost ~]# yum install -y  httpd mysql mysql-libs php php-mysql mysql-server php-bcmath php-gd php-mbstring            //安装lamp环境
[root@localhost ~]# yum install  zabbix20 zabbix20-agent zabbix20-server  zabbix20-server-mysql zabbix20-web zabbix20-web-mysql net-snmp-devel                                                        //安装zabbix服务端
[root@localhost ~]# /etc/init.d/zabbix-server start
[root@localhost ~]# /etc/init.d/zabbix-agent start
[root@localhost ~]# /etc/init.d/httpd start
//在数据库设置语言类型,避免中文乱码
[root@localhost ~]# vim /etc/my.cnf
//修改或增加
...
[mysql]
default-character-set = utf8
...
[mysqld]
character_set_server = utf8
[root@localhost ~]# /etc/init.mysqld start
[root@localhost ~]# mysql -uroot
...
mysql> create database zabbix default charset utf8;
mysql> grant all on zabbix.* to 'root'@'localhost' identified by 'zabbix';
//zabbix_proxy只需要导入一个表结构
[root@localhost ~]# mysql -uroot -p --default-character-set=utf8 zabbix < /usr/share/zabbix-mysql/schema.sql
//初始化zabbix_server
[root@localhost ~]# mysql -uroot -p --default-character-set=utf8 zabbix < /usr/share/zabbix-mysql/images.sql
[root@localhost ~]# mysql -uroot -p --default-character-set=utf8  zabbix < /usr/share/zabbix-mysql/data.sql
二、网页安装zabbix
!!!!出现404 --想想是否已经安装了什么软件与其冲突
!!!出现301 --关闭防火墙 setenforce 0 and service iptables stop
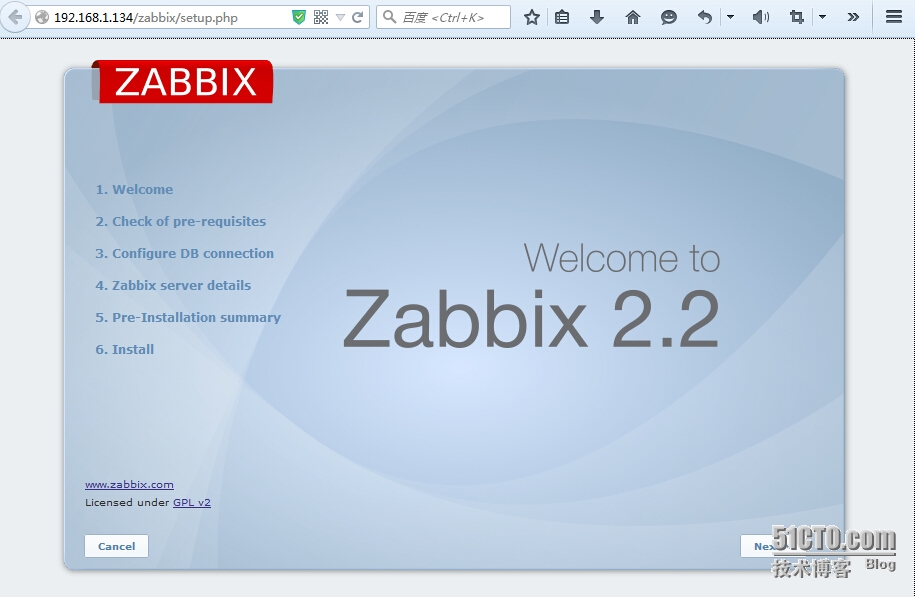
//通过 http://ip/zabbix/ 进入安装页面
点击下一步
这里出现了一些fail选项,我们需要对主机的php配置进行调试
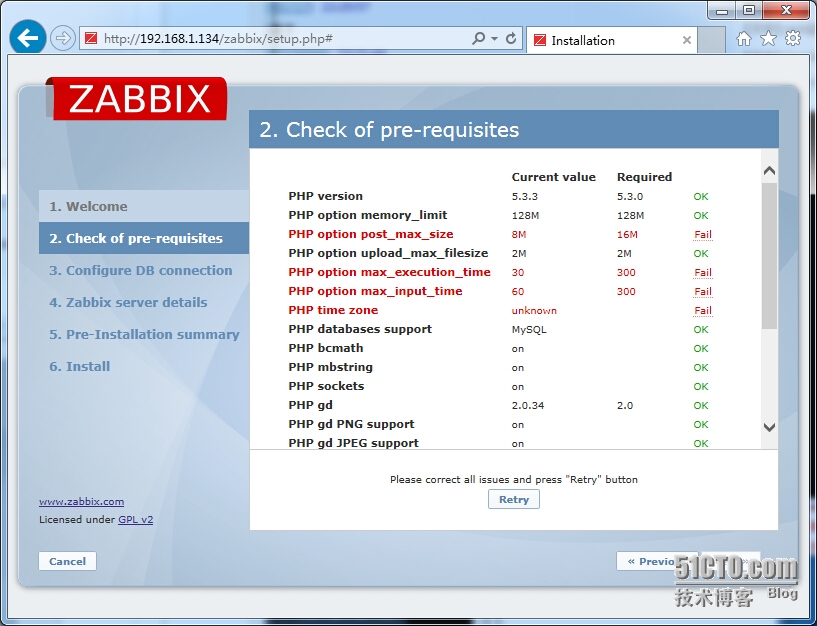
[root@zabbix ~]# vim /etc/php.ini
post_max_size = 8M    修改为      post_max_size = 16M
max_execution_time = 30     修改为      max_execution_time = 300
max_input_time = 60    修改为     max_input_time = 300
//页面出现'It is not safe to rely on the system‘s timezone settings ”这样的警告信息的解决方法
date.timezone =      修改为     date.timezone = 'Asia/Chongqing'

[root@zabbix ~]# /etc/init.d/httpd restart
停止 httpd:                                               [确定]
正在启动 httpd:                                           [确定]
点击retry,全部OK了,点击next

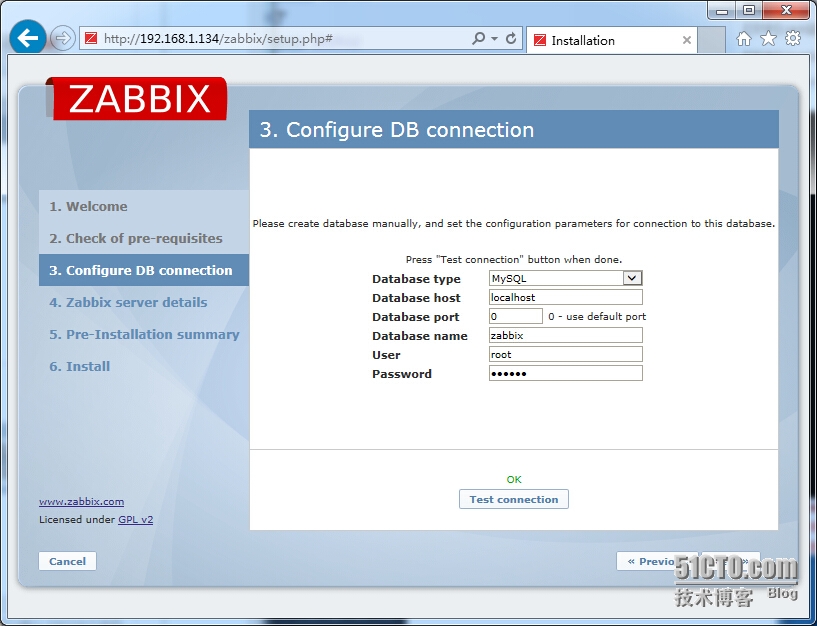
进行数据库信息配置
扫描二维码关注公众号,回复:
5440844 查看本文章


点击Test connection ,测试OK,点击下一步
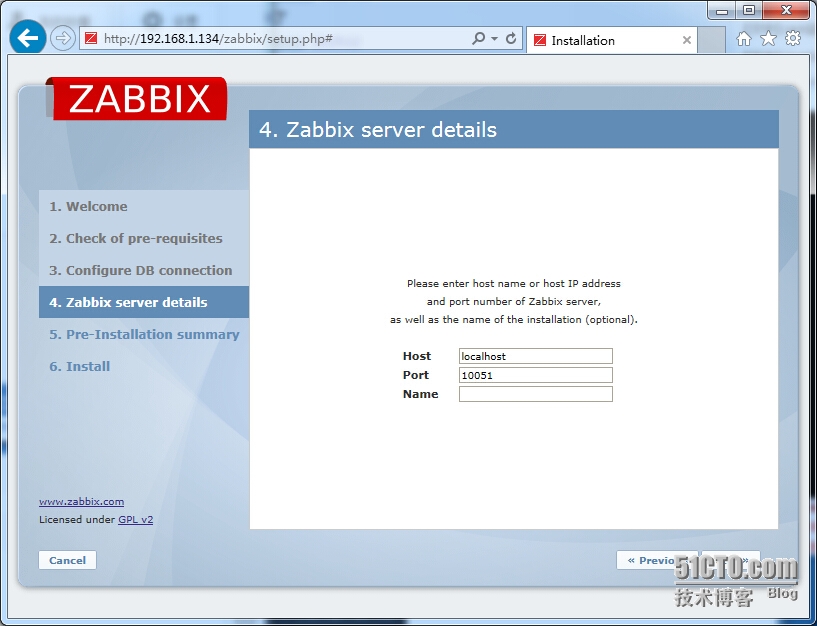
输入主机IP地址和端口号(默认值),安装的名字(可选),点击next
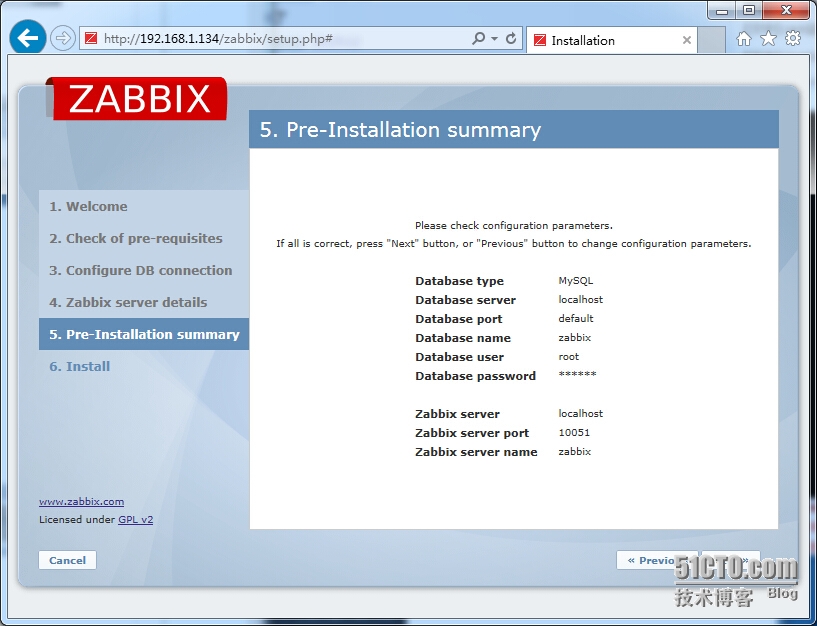
最后信息确认,点击next
安装完成,点击finish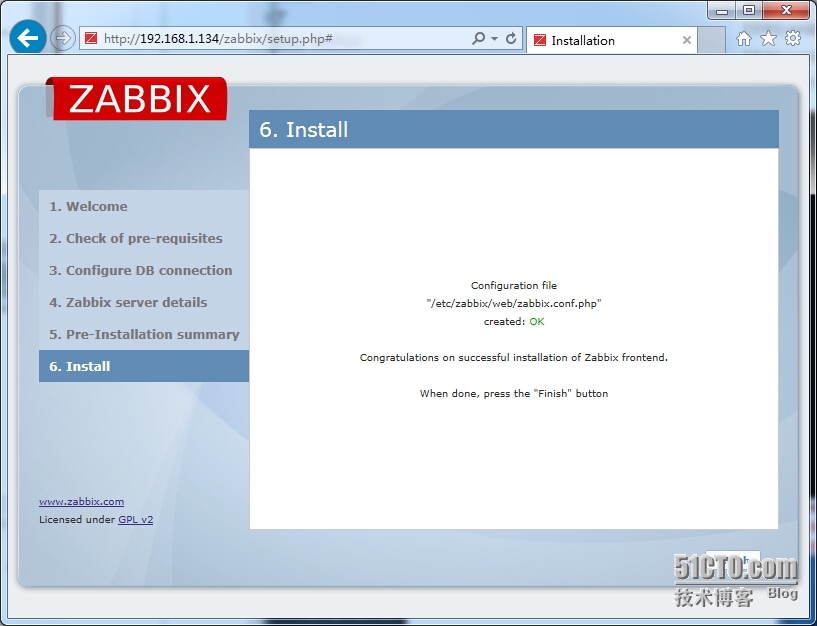
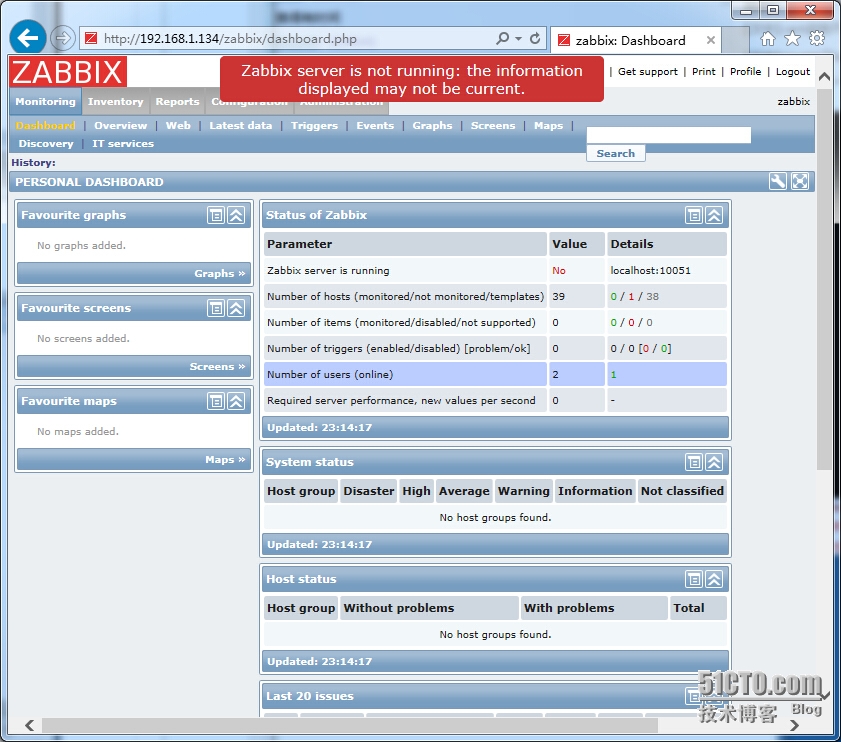
安装完成,进入登陆界面,默认账户admin,密码zabbix

第一次登陆完毕之后,会提示警告,我们需要进行修改
//修改zabbix服务器主配置
[root@zabbix ~]# vim /etc/zabbix/zabbix_server.conf
...
DBUser=root
DBPassword=zabbix
...
[root@zabbix ~]# /etc/init.d/zabbix-server start
Starting Zabbix server:                                    [确定]

//想要使页面变成中文
右上角profile-->language-->Chinese(zh_CN)
再看zabbix主界面,我们发现没有错误了
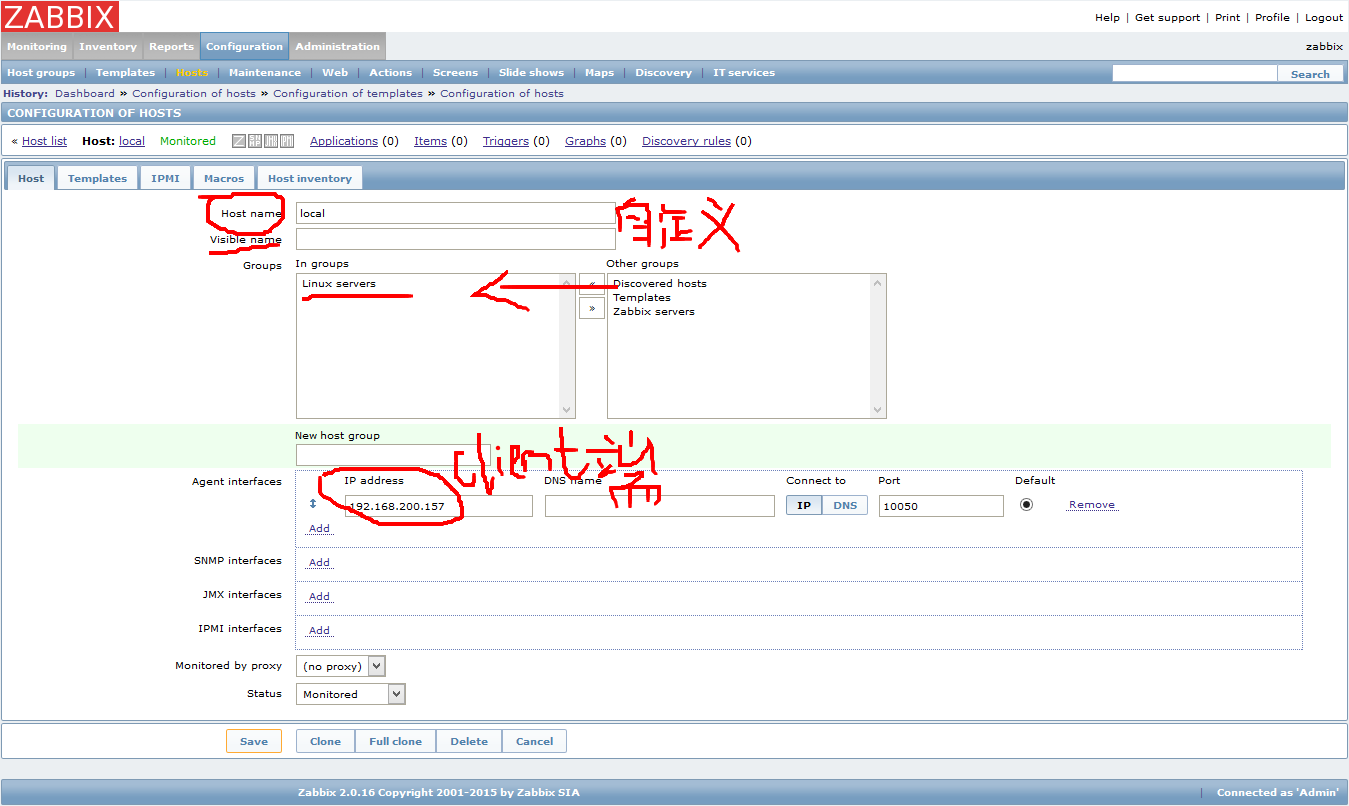
三、接入要监控的机器
//在要被监控的机器上操作
[root@localhost ~]# yum install -y zabbix20-agent

/* 这里可以用zabbix22-agent,如果出现20与22冲突{conficts with}则可使用选项 yum install -y --skip-broken zabbix22-agent */
[root@localhost ~]# vim /etc/zabbix_agentd.conf
//更改server=服务端ip
...
Server=192.168.11.10
ServerActive=0.0.0.0:10050
Hostname=aming
...
...
[root@localhost ~]# /etc/init.d/zabbix-agent start
[root@localhost ~]# zabbix_get -s 客户端ip -p10050 -k "system.hostname" //如果显示hostname,则通信正常

//!!!此处会出现的错误!!!!!!

./zabbix_get -s 192.168.1.4 -p 10050 -k "system.cpu.load[all,avg1]"
zabbix_get [7757]: Get value error: cannot connect to [[192.168.1.4]:10050]: [113] No route to host

-->
1. 服务端ping 192.168.1.4{要监控的主机ip}。没问题说明机器没问题

2.  服务端 telnet 192.168.1.4 10050 报错。
agent 上去查看  zabbix agentd 进程正常运行。
由此判断,防火墙有问题。

3。----在客户端和服务端将防火墙关掉

setenforce 0
service iptables stop
//页面操作

下一步
//配置监控项目模板
//查看数据

 左上角monitoring ---> latest data --->  graph or others
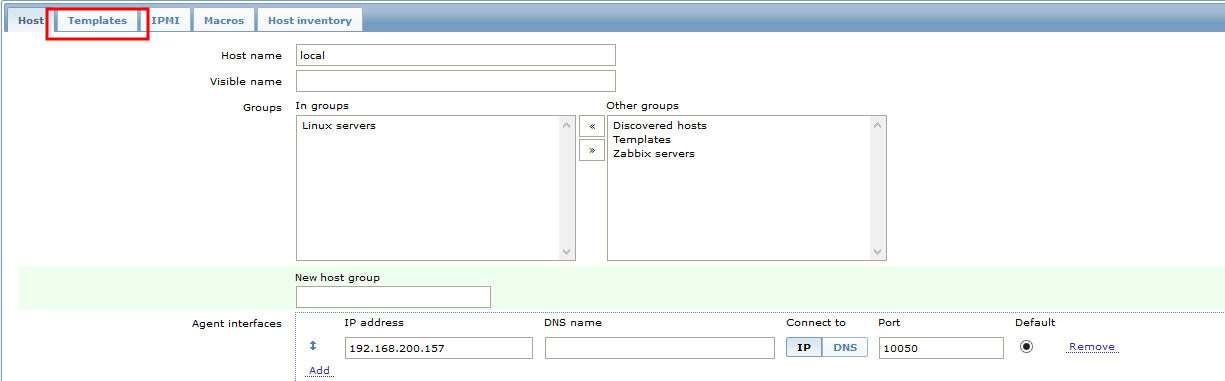
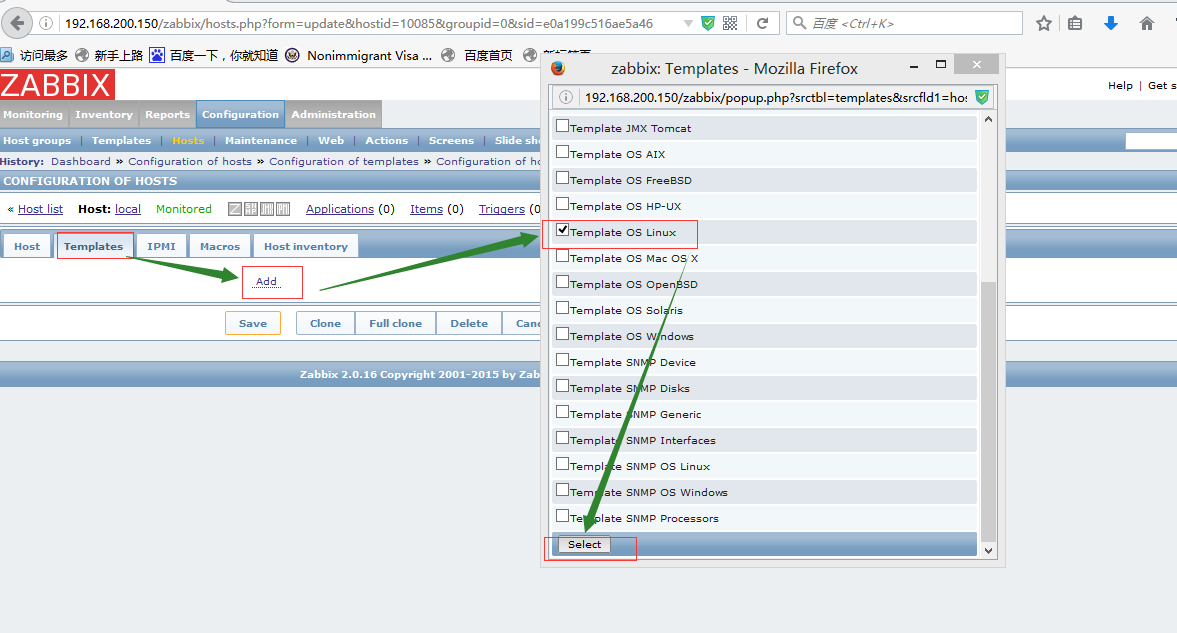
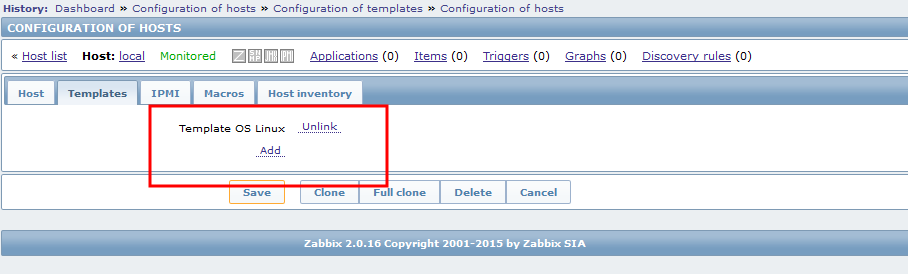
//自定义templates  ---> 模版里面包含了许多我们监控的项目,生成的主表或图片等

点configuration 选择 templates,点右上角的create template
Template name和Visible name  自定义,Groups 选择templates, 点save

//挑选我们要监控的项目拷贝

比如找到Template OS Linux 点一下items,选择我们想要的项目,然后在下面选择copy selected to … 然后点go

Group 选择templates, 找到刚才我们自定义的templates,点copy
点configuration 选择 templates可以看到新建的templates中已经有刚刚我们copy的items了

使用和上面相同的方法自定义拷贝Triggers(触发器 ),它用来设置告警的阀值,当然我们也可以自定义编辑它
四、配置报警发邮箱
[root@localhost ~]# yum install -y sendmail;
[root@localhost ~]# mkdir -p /home/zabbix/bin
[root@localhost ~]# vim /home/zabbix/bin/baojing.sh
//ADD
#! /bin/bash
echo "$3" |/bin/mail -s "$2" $1
[root@localhost ~]# chmod +x /home/zabbix/bin/baojing.sh
[root@localhost ~]# vim /usr/local/zabbix_server.conf
//修改
#用户自定义的media types脚本
AlertScriptsPath=/home/zabbix/bin/
#用户自定义的检查的脚本(item)
ExternalScripts=/home/zabbix/bin/

//创建mediea types
Administration" -->”Media types",点击右上角“Create Media Type"其中Description填"baojing” 或其它自定义名称,Type选择"Script",Script填”baojing.sh”然后点”Save”.

//创建user
Adimistration” --> “Users”在右上角,选择”Users”,点击”Create User”, alias: test1,自定义name和lastname password:123456;group 选择guest,回到上面点一下media,type 选择baojing,send to 写要发送邮件的邮箱,点add, 最后点save

//创建action
configuration” --> actions,右上角“Create Actions”, Name自定义,我这里写”baojing”,其他默认,然后点右侧的“Operations”下的“New”按钮,“Operation Type”选择“Send message”,“Send Message to”选择一个或多个要发送消息的用户组,Send to Users选择我们之前新增的test1, “Send only to”选择baojing , 点一下add
最后点save
一、安装
[root@localhost ~]# yum install -y epel-release             //安装扩展源
[root@localhost ~]# yum install -y  httpd mysql mysql-libs php php-mysql mysql-server php-bcmath php-gd php-mbstring            //安装lamp环境
[root@localhost ~]# yum install  zabbix20 zabbix20-agent zabbix20-server  zabbix20-server-mysql zabbix20-web zabbix20-web-mysql net-snmp-devel                                                        //安装zabbix服务端
[root@localhost ~]# /etc/init.d/zabbix-server start
[root@localhost ~]# /etc/init.d/zabbix-agent start
[root@localhost ~]# /etc/init.d/httpd start
//在数据库设置语言类型,避免中文乱码
[root@localhost ~]# vim /etc/my.cnf
//修改或增加
...
[mysql]
default-character-set = utf8
...
[mysqld]
character_set_server = utf8
[root@localhost ~]# /etc/init.mysqld start
[root@localhost ~]# mysql -uroot
...
mysql> create database zabbix default charset utf8;
mysql> grant all on zabbix.* to 'root'@'localhost' identified by 'zabbix';
//zabbix_proxy只需要导入一个表结构
[root@localhost ~]# mysql -uroot -p --default-character-set=utf8 zabbix < /usr/share/zabbix-mysql/schema.sql
//初始化zabbix_server
[root@localhost ~]# mysql -uroot -p --default-character-set=utf8 zabbix < /usr/share/zabbix-mysql/images.sql
[root@localhost ~]# mysql -uroot -p --default-character-set=utf8  zabbix < /usr/share/zabbix-mysql/data.sql
二、网页安装zabbix
!!!!出现404 --想想是否已经安装了什么软件与其冲突
!!!出现301 --关闭防火墙 setenforce 0 and service iptables stop
//通过 http://ip/zabbix/ 进入安装页面
点击下一步
这里出现了一些fail选项,我们需要对主机的php配置进行调试
[root@zabbix ~]# vim /etc/php.ini
post_max_size = 8M    修改为      post_max_size = 16M
max_execution_time = 30     修改为      max_execution_time = 300
max_input_time = 60    修改为     max_input_time = 300
//页面出现'It is not safe to rely on the system‘s timezone settings ”这样的警告信息的解决方法
date.timezone =      修改为     date.timezone = 'Asia/Chongqing'

[root@zabbix ~]# /etc/init.d/httpd restart
停止 httpd:                                               [确定]
正在启动 httpd:                                           [确定]
点击retry,全部OK了,点击next
进行数据库信息配置
点击Test connection ,测试OK,点击下一步
输入主机IP地址和端口号(默认值),安装的名字(可选),点击next
最后信息确认,点击next
安装完成,点击finish
安装完成,进入登陆界面,默认账户admin,密码zabbix
第一次登陆完毕之后,会提示警告,我们需要进行修改
//修改zabbix服务器主配置
[root@zabbix ~]# vim /etc/zabbix/zabbix_server.conf
...
DBUser=root
DBPassword=zabbix
...
[root@zabbix ~]# /etc/init.d/zabbix-server start
Starting Zabbix server:                                    [确定]

//想要使页面变成中文
右上角profile-->language-->Chinese(zh_CN)
再看zabbix主界面,我们发现没有错误了
三、接入要监控的机器
//在要被监控的机器上操作
[root@localhost ~]# yum install -y zabbix20-agent

/* 这里可以用zabbix22-agent,如果出现20与22冲突{conficts with}则可使用选项 yum install -y --skip-broken zabbix22-agent */
[root@localhost ~]# vim /etc/zabbix_agentd.conf
//更改server=服务端ip
...
Server=192.168.11.10
ServerActive=0.0.0.0:10050
Hostname=aming
...
...
[root@localhost ~]# /etc/init.d/zabbix-agent start
[root@localhost ~]# zabbix_get -s 客户端ip -p10050 -k "system.hostname" //如果显示hostname,则通信正常

//!!!此处会出现的错误!!!!!!

./zabbix_get -s 192.168.1.4 -p 10050 -k "system.cpu.load[all,avg1]"
zabbix_get [7757]: Get value error: cannot connect to [[192.168.1.4]:10050]: [113] No route to host

-->
1. 服务端ping 192.168.1.4{要监控的主机ip}。没问题说明机器没问题

2.  服务端 telnet 192.168.1.4 10050 报错。
agent 上去查看  zabbix agentd 进程正常运行。
由此判断,防火墙有问题。

3。----在客户端和服务端将防火墙关掉

setenforce 0
service iptables stop
//页面操作
下一步
//配置监控项目模板
//查看数据

 左上角monitoring ---> latest data --->  graph or others
//自定义templates  ---> 模版里面包含了许多我们监控的项目,生成的主表或图片等

点configuration 选择 templates,点右上角的create template
Template name和Visible name  自定义,Groups 选择templates, 点save

//挑选我们要监控的项目拷贝

比如找到Template OS Linux 点一下items,选择我们想要的项目,然后在下面选择copy selected to … 然后点go

Group 选择templates, 找到刚才我们自定义的templates,点copy
点configuration 选择 templates可以看到新建的templates中已经有刚刚我们copy的items了

使用和上面相同的方法自定义拷贝Triggers(触发器 ),它用来设置告警的阀值,当然我们也可以自定义编辑它
四、配置报警发邮箱
[root@localhost ~]# yum install -y sendmail;
[root@localhost ~]# mkdir -p /home/zabbix/bin
[root@localhost ~]# vim /home/zabbix/bin/baojing.sh
//ADD
#! /bin/bash
echo "$3" |/bin/mail -s "$2" $1
[root@localhost ~]# chmod +x /home/zabbix/bin/baojing.sh
[root@localhost ~]# vim /usr/local/zabbix_server.conf
//修改
#用户自定义的media types脚本
AlertScriptsPath=/home/zabbix/bin/
#用户自定义的检查的脚本(item)
ExternalScripts=/home/zabbix/bin/

//创建mediea types
Administration" -->”Media types",点击右上角“Create Media Type"其中Description填"baojing” 或其它自定义名称,Type选择"Script",Script填”baojing.sh”然后点”Save”.

//创建user
Adimistration” --> “Users”在右上角,选择”Users”,点击”Create User”, alias: test1,自定义name和lastname password:123456;group 选择guest,回到上面点一下media,type 选择baojing,send to 写要发送邮件的邮箱,点add, 最后点save

//创建action
configuration” --> actions,右上角“Create Actions”, Name自定义,我这里写”baojing”,其他默认,然后点右侧的“Operations”下的“New”按钮,“Operation Type”选择“Send message”,“Send Message to”选择一个或多个要发送消息的用户组,Send to Users选择我们之前新增的test1, “Send only to”选择baojing , 点一下add
最后点save