1:下载 ElasticSearch 镜像
docker pull docker.io/elasticsearch:5.6.8

2:创建 ElasticSearch 容器:
docker run -di --name=my_es -p 9200:9200 -p 9300:9300 elasticsearch:5.6.8
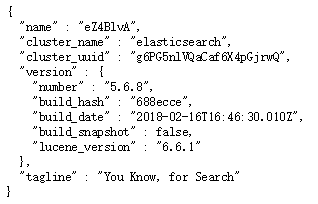
启动成功后在浏览器地址栏输入:http://宿主机ip:9200 出现如下,表示启动成功
3:但是如果 Java 使用 9300 端口连接ES 会出现如下错误
NoNodeAvailableException[None of the configured nodes are available:
[{#transport#‐1}{exvgJLR‐RlCNMJy‐hzKtnA}{192.168.184.135}{192.168.184.135:9300}]]
at org.elasticsearch.client.transport.TransportClientNodesService.ensureNodes AreAvailable
at org.elasticsearch.client.transport.TransportClientNodesService.execute
at org.elasticsearch.client.transport.TransportProxyClient.execute
4:修改docker容器中的配置文件:
docker exec -it my_es /bin/bash
进入 config 文件夹有一个 elasticsearch.yml 文件,但是发现 vim / vi 命令失效(因为是在docker容器中)
5 :首先退出容器,然后执行命令,拷贝配置文件到宿主机(必须保证容器中的ES是启动状态):
docker cp my_es:/usr/share/elasticsearch/config/elasticsearch.yml /usr/share/elasticsearch.yml
6:停止 和 删除原来创建的容器
docker stop elasticsearch:5.6.8
docker rm my_es
7:重新执行创建容器命令(重点:挂载文件)
docker run -di --name=my_es -p 9200:9200 -p 9300:9300 -v /usr/share/elasticsearch.yml:/usr/share/elasticsearch/config/elasticsearch.yml elasticsearch:5.6.8
8: 修改 /usr/share/elasticsearch.yml 将 transport.host: 0.0.0.0 前的 # 去掉后保存文件退出。 其作用是允许任何ip地址访问 elasticsearch 开发测试阶段可以这么做,生产环境下指定具体的IP
9:重启后发现重启启动失败了(纯宿主机问题),这与我们刚才修改的配置有关,因为elasticsearch在启动的时候会进行一些检查,比如最多打开的文件的个数以及虚拟内存区域数量等等
10:系统调优
(1)修改 /etc/security/limits.conf 追加内容
* soft nofile 65536
* hard nofile 65536
说明:nofile是单个进程允许打开的最大文件个数 soft nofile 是软限制 hard nofile是硬限制
(2)修改 /etc/sysctl.conf 追加内容
vm.max_map_count=655360
说明:限制一个进程可以拥有的VMA(虚拟内存区域)的数量
11: 执行下面命令 修改内核参数马上生效:sysctl ‐p 重新启动虚拟机,再次启动容器,发现已经可以启动并远程访问
使用 RestApi 操作 ElasticSearch
  (PUT)创建索引:http://localhost:9200/index_name
  (GET)查询所有:http://localhost:9200/index_name/type_name/_search
  (GET)根据id查询:http://localhost:9200/index_name/type_name/1
  (GET)条件查询:http://localhost:9200/index_name/type_name/_search?q=title:Spring
  (GET)模糊查询:http://localhost:9200/index_name/type_name/_search?q=title:*spring*
  (DELETE)删除:http://localhost:9200/index_name/type_name/1
  (POST)新增类型和文档:http://localhost:9200/index_name/type_name
    {
      "title": "Spring框架",
      "content" : "Spring框架是由于软件开发的复杂性而创建的"
    }
  (PUT)修改id不存在新增:http://localhost:9200/type_name/article/1
    {
      "title": "Spring框架",
      "content" : "Spring框架是由于软件开发的复杂性而创建的"
    }
安装IK分词器
docker cp ik my_es:/usr/share/elasticsearch/plugins
默认分词:http://127.0.0.1:9200/_analyze?analyzer=chinese&pretty=true&text=我是程序员
最少切分:http://127.0.0.1:9200/_analyze?analyzer=ik_smart&pretty=true&text=我是程序员
最细切分:http://127.0.0.1:9200/_analyze?analyzer=ik_max_word&pretty=true&text=我是程序员
定制词汇
(1):elasticsearch-5.6.8\plugins\ik\config  文件夹下创建文件名 xxx.dic
(2):修改 IKAnalyzer.cfg.xml 文件:<entry key="ext_dict">xxx.dic</entry>
使用 ElasticSearch Head 连接ES会出现跨域问题的解决方法: 在 elasticsearch.yml 文件 添加
http.cors.enabled: true
http.cors.allow-origin: "*"
使用 LogStash 实现索引库和数据库同步
(1):安装 LogStash (直接解压)

  (2):启动命令:logstash -e 'input { stdin { } } output { stdout {} }'

  (3):配置同步 创建 xxx.conf 文件:

      input {
        jdbc {
            # mysql jdbc connection string to our backup databse
            jdbc_connection_string => "jdbc:mysql://192.168.2.130:3306/article?characterEncoding=UTF8"
            # the user we wish to excute our statement as
            jdbc_user => "root"
            jdbc_password => "root"
            # the path to our downloaded jdbc driver
            jdbc_driver_library => "D:\logstash-5.6.8\mysqletc\mysql-connector-java-5.1.46.jar"
            # the name of the driver class for mysql
            jdbc_driver_class => "com.mysql.jdbc.Driver"
            jdbc_paging_enabled => "true"
            jdbc_page_size => "50"
            #以下对应着要执行的sql的绝对路径。
            #statement_filepath => ""
            statement => "select id, title, content, state FROM tb_article"
            #定时字段 各字段含义(由左至右)分、时、天、月、年,全部为*默认含义为每分钟都更新(测试结果,不同的话请留言指出)
            schedule => "* * * * *"
        }
      }

      output {
        elasticsearch {
            #ESIP地址与端口
            hosts => "127.0.0.1:9200"
            #ES索引名称(自己定义的)
            index => "tensquare_article"
            #自增ID编号
            document_id => "%{id}"
            document_type => "article"
        }
        stdout {
            #以JSON格式输出
            codec => json_lines
        }
      }

  启动 logstash:logstash -f conf.xml
ElaticSearch配套软件(安装包,Head,LogStash,Node,js):
链接:https://pan.baidu.com/s/1JhL75TGtxkVXplZqrluAWw
提取码:7a69