版权声明:本文为博主原创文章,未经博主允许不得转载。 https://blog.csdn.net/b954960630/article/details/87478829
父组件可以给子组件传递数据,但却不能传递DOM节点,为了解决这个问题,slot诞生了。
solt是Vue的内置组件,也就是我们俗称的插槽。
一、无名插槽
例:
<style type="text/css">
  li {
    list-style: none;
    width: 33%;
    height: 100px;
    background: yellowGreen;
    border: 1px solid #000;
    float:left;
  }
</style>

<div id="app"></div>

<script type="text/javascript">
  //因为各处要多次使用<li></li>,所以将其声明为全局组件,即大家的儿子
  Vue.component('my-li', {
    template:
      `<li>
        <slot></slot>
      </li>`,
      //slot其实就是父组件传递的DOM结构
  });

  let App = {
    template:
      `<ul>
        <my-li>1</my-li>
        <my-li>
          <button>click</button>
        </my-li>
        <my-li>'3'</my-li>
        <my-li>true</my-li>
        <my-li><button>click22</button></my-li>
        <my-li>6</my-li>
        <my-li>7</my-li>
        <my-li>8</my-li>
        <my-li>
          hello vue
          <span>666</span>
          <button>click消息</button>
        </my-li>
      </ul>`,
  };

  new Vue({
    el: '#app',
    components: {
      app: App
    },
    template: `<app />`,
  });
</script>

slot其实就是父组件传递的DOM结构;当组件渲染的时候,< slot></ slot> 元素将会被替换为< my-li>内容</ my-li>中的内容,这个内容可以是多个DOM节点,也可以是其他组件。
二、具名插槽
有时候我们会给子组件传多个DOM,有时甚至还会对多个DOM的顺序做出要求,为了解决以上问题,我们为每个DOM起名,即具名插槽。
例:
<div id="app"></div>
<script type="text/javascript">
Vue.component('my-li', {
template:
`<li>
<slot name="two"></slot>
<span>hello vue</span>
<slot></slot>
<slot name="one"></slot>
</li>`,
});
let App = {
template:
`<my-li>
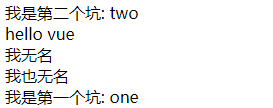
<div slot="one">我是第一个坑: one</div>
<div>我无名</div>
<div slot="two">我是第二个坑: two</div>
<span>我也无名</span>
</my-li>`,
};
new Vue({
el: '#app',
components: {
app: App
},
template: `<app />`,
});
</script>
输出:
三、插槽的默认值
我们也可以为插槽设置默认值。
例:
< submit-button> 组件按钮的默认内容是“Submit”,但是同时允许用户覆写为“Save”、“Upload”或别的内容。
<div id="app"></div>

<script type="text/javascript">
  Vue.component('submit-button', {
    template:
      `<button type="submit">
        <slot>Submit</slot>
      </button>`,
  });

  let App = {
    template: `<submit-button></submit-button>`,
  };

  new Vue({
    el: '#app',
    components: {
      app: App
    },
    template: `<app />`,
  });
</script>
输出:

若改为:
let App = {
   template: `<submit-button>Save</submit-button>`,
};
则输出:

四、编译作用域
当你想在插槽内使用数据时,例如:
<navigation-link url="/profile">
  Logged in as {{ user.name }}
</navigation-link>
该插槽可以访问跟这个模板的其它地方相同的实例属性 (也就是说“作用域”是相同的)。但这个插槽不能访问 < navigation-link> 的作用域。例如尝试访问 url 是不会工作的。
牢记一条准则:
父组件模板的所有东西都会在父级作用域内编译;子组件模板的所有东西都会在子级作用域内编译。