Update Time:2019-3-2 Author:要你命三千又三千 type:学习笔记
问题:什么是Nexus概念
答:是一个Maven的仓库管理软件
目的:帮助大家创建私服

Nexus的使用
Nexus的下载:windows版本
官方提供的三种:下载
 运行命令
运行命令
在命令行中…/nexus-3.14.0-04-win64/nexus-3.14.0-04/bin 目录下
nexus.exe /run 命令可以启动nexus服务
方法二:安装运行
nexus.exe /install 来安装nexus
net start nexus 开启服务
等待一段时间一分钟
打开网址:http://localhost:8081/
关闭服务:net stop nexus
nexus的使用方式
目录的使用理解:
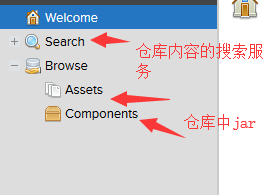
- Assets
这是能看到所有的资源,包含Jar,已经对Jar的一些描述信息。- Components
这里只能看到Jar包。
问题:如何创建仓库一个仓库
问题背景:
了解仓库类型
- hosted 类型的仓库,内部项目的发布仓库
- releases 内部的模块中release模块的发布仓库
- snapshots 发布内部的SNAPSHOT模块的仓库
- proxy 类型的仓库,从远程中央仓库中寻找数据的仓库
- group 类型的仓库,组仓库用来方便我们开发人员进行设置的仓库

创建完成。
补充问题
关于仓库组的概念

一个概念上的虚拟仓库,就是将几个具体的仓库集中在一起,形成新的仓库 概念,形成行的index。方便某些情况下的下载。
配置Maven使用neuxs搭建的私服仓库
说明
maven 配置的仓库方法又两种,central仓库的配置(默认配置),等仓库,不需要配置< pluginrepository >标签。
Pluginrepository的作用:配置Maven从什么地方下载插件构件
添加私服仓库
<project>
    ...
    <repositories>
        <repository>
            <id>nexus</id>
            <name>Nexus</name>
            <url>http://10.70.8.36:8081/nexus/content/groups/public/</url>
            <releases>
                <enabled>true</enabled>
            </releases>
            <snapshots>
                <enabled>true</enabled>
            </snapshots>
        </repository>
    </repositories>
    <pluginRepositories>
        <pluginRepository>
            <id>nexus</id>
            <name>Nexus</name>
            <url>http://10.70.8.36:8081/nexus/content/groups/public/</url>
            <releases>
                <enabled>true</enabled>
            </releases>
            <snapshots>
                <enabled>true</enabled>
            </snapshots>
        </pluginRepository><!--配置Maven从什么地方下载插件-->
    </pluginRepositories>
    ...
</project>
在个人setting.xml 中设置私服仓库
该配置中使用用一个 < id> 为 nexus 的 < profile> ,这个 profile 包含了相关的仓库配置,同时配置中又使用 < activeProfile> 将 nuxus 这个 profile 激活,这样当执行 Maven 构建的时候,激活的 profile 会将仓库配置应用到项目中去。

<settings>
    <profiles>
        <profile>
        <id>nexus</id>
        <repositories>
            <repository>
                <id>nexus</id>
                <name>Nexus</name>
                <url>http://10.70.8.36:8081/nexus/content/groups/public/</url>
                <releases>
                     <enabled>true</enabled>
                </releases>
                <snapshots>
                     <enabled>true</enabled>
                </snapshots>
            </repository>
        </repositories>
        <pluginRepositories>
            <pluginRepository>
                <id>nexus</id>
                <name>Nexus</name>
                <url>http://10.70.8.36:8081/nexus/content/groups/public/</url>
                <releases>
                     <enabled>true</enabled>
                </releases>
                <snapshots>
                     <enabled>true</enabled>
                </snapshots>
            </pluginRepository>
        </pluginRepositories>
    </profile>
    </profiles>
    <activeProfiles>
        <activeProfile>nexus</activeProfile>
    </activeProfiles>
</settings>
说明:

添加私服为所有下载地址的镜像
 <mirrors>
        <mirror>
         <id>nexus</id>
         <mirrorOf>*</mirrorOf>
       <url>http://10.70.8.36:8081/nexus/content/groups/public/</url>
      </mirror>
     </mirrors>
mirrors可以直接配置在setting.xml文件中。
如何部署构件到私服中
neuxs中的type中hosts仓库的主要作用是:储存组织内部的构件。
步骤一:配置部署的位置
<distributionManagement>
        <repository>
            <id>releases</id>
            <name>Local Nexus Repository</name>
            <url>http://127.0.0.1:8081/nexus/content/repositories/releases/</url>
        </repository>
        <snapshotRepository>
            <id>Snapshots</id>
            <name>Local Nexus Repository</name>
            <url>http://127.0.0.1:8081/nexus/content/repositories/snapshots</url>
        </snapshotRepository>
    </distributionManagement>
步骤二:在setting.xml 配置部署所需权限
<server>
  <id>nexus-releases</id>
  <username>admin</username>
  <password>admin123</password>
</server>
<server>
  <id>nexus-snapshots</id>
  <username>admin</username>
  <password>admin123</password>
</server>
步骤三:
使用命令
mvn deploy
问题如何区分部署release与snapshot
项目的配置不同就是不同的
snapshot版本
<groupId>cc.mzone</groupId>
<artifactId>m1</artifactId>
<version>0.1-SNAPSHOT</version><!--添加的-SNAPSHOT说明是release版本>
<packaging>jar</packaging>
正式版
<groupId>cc.mzone</groupId>
<artifactId>m1</artifactId>
<version>0.1</version>
<packaging>jar</packaging>