一、目标
- 使用vue.js作为前端javascript框架,结合html5+ES6语法,在移动端Chrome浏览器中,完成兼容Android和iOS的拍照功能;
- 预览拍照图片;
- 基于一般项目的诉求,封装成可复用的拍照组件;
二、步骤
1、基于上篇博文(Vue.js实战——获取浏览器经纬度的各种坑_4)搭建的项目框架(geo_location4),复制粘贴生成geo_location5项目;
2、拍照的核心代码分为2部分:
1)html标签代码:
<input id="camera" type="file" accept="image/*" capture="camera"/>2)JS解析代码
//获取拍照对象
let camera = document.getElementById("camera");
//给拍照对象添加内容改变的监听事件,注意后面不能使用ES6的箭头函数
camera.addEventListener("change", function () {
    let file = this.files[0];
    if (!file || !file.type || !/image\/\w+/.test(file.type)) {
        console.log("No picture error!");
    } else {
        let reader = new FileReader();
        reader.readAsDataURL(file);
        reader.onload = function (e) {
            //this.result为当前拍照照片的base64字符串(该base64和图片者等价)
            console.log("current base64 picture is:"+this.result);
        }
    }
});
3、编写拍照功能代码。需要新增文件src/pages/camera.html、src/components/Camera.vue、src/js/camera.js及src/commons/camera-sdk.js,并同时修改webpack.config.js文件以集成camera功能代码。源码详见:geo_location5,此处仅列举下关键源码:
1)src/components/Camera.vue关键代码如下:
<template>
    <div class="camera">
        <h1>Click following button to task a picture:</h1>
        <input id="camera" type="file" accept="image/*" capture="camera">
        <div class="preview-img" v-if="previewImg!==''">
            <h2>Current photos is:</h2>
            <img :src="previewImg">
        </div>
    </div>
</template>

<script>
    import CameraSdk from "../commons/camera-sdk";
    export default {
        name: "Camera",
        data() {
            return {
                previewImg: ""
            };
        },
        mounted: function() {
            console.log("start to init camera now.");
            let self = this;
            CameraSdk.takePictures("camera", {
                success: res => {
                    console.log("current picture is:" + res);
                    self.previewImg = res;
                },
                error: res => {
                    console.log("failed to get picture:" + res);
                    self.previewImg = "";
                }
            });
        }
    };
</script>
2)src/commons/camera-sdk.js代码如下:
export default class Camera {
    static takePictures(cameraId, param) {
        let camera = document.getElementById(cameraId);
        //给拍照对象添加内容改变的监听事件,注意后面不能使用ES6的箭头函数
        camera.addEventListener("change", function () {
            let file = this.files[0];
            //校验拍照文件是否存在
            if (!file || !file.type || !/image\/\w+/.test(file.type)) {
                console.log("No picture error!");
                param.error("No picture error!");
            } else {
                //读取拍照文件的base64字符串(该base64和图片者等价)
                let reader = new FileReader();
                reader.readAsDataURL(file);
                reader.onload = function (e) {
                    //this.result为当前拍照照片的base64字符串
                    console.log("current base64 picture is:" + this.result);
                    //获取图片成功后,回调外部方法返回对应的图片信息
                    param.success(this.result);
                }
            }
        });
    }
}
4、全部代码编写完毕后,执行命令npm run dev开始调试运行效果,主界面如下:

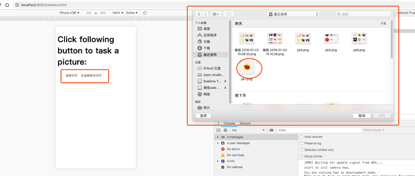
5、点击”选择文件…”文本区域,会出现如下的文件选择窗口,该窗口在手机上实际为调用摄像头拍照。
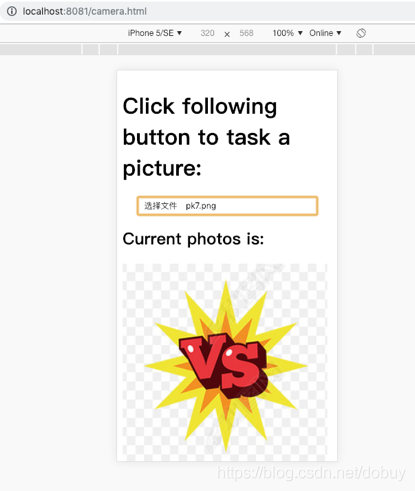
6、选择1张图片并点击打开,显示效果如下,说明图片已经可以预览了。
7、通过观测浏览器控制台日志,可以看到图片的base64字符串前缀是以:”data:image/png;base64,”,这在ios和Android系统中是有区别的,为了兼容性,需要统一换成更加标准的前缀:”data:image/jpeg/png;base64,”。修改camera-sdk.js中的reader.onload代码:
reader.onload = function (e) {
    //this.result为当前拍照照片的base64字符串
    console.log("current base64 picture is:" + this.result);
    let index = this.result.indexOf(',');
    let img = this.result;
    if (index >= 0 && index < img.length) {
        img = img.substring(index + 1);
        img = "data:image/jpeg/png;base64," + img;
    }
    //获取图片成功后,回调外部方法返回对应的图片信息
    param.success(img);
}
8、系统默认的拍照组件显示特别难看,需要定制一个图标,然后绑定系统拍照组件的change事件即可。(留给你去实现)
9、还可以进一步封装:即把拍照的input框也封装在camera-sdk.js内部,这样外面就只需一个图片调用拍照sdk,无需任何额外操作即可完成拍照。首先,我们先列出camera-sdk.js代码:
export default class Camera {
    static takePictures(cameraId, param) {
        let cameraId = "camera";
        let camera = document.getElementById(cameraId);
        if (!camera) {
            camera = document.createElement("input");
            camera.setAttribute("id", cameraId);
            camera.setAttribute("type", "file");
            camera.setAttribute("accept", "image/*");
            camera.setAttribute("capture", "camera");
            camera.style.display = "none";

            //给拍照对象添加内容改变的监听事件,注意后面不能使用ES6的箭头函数
            camera.addEventListener("change", function () {
                let file = this.files[0];
                //校验拍照文件是否存在
                if (!file || !file.type || !/image\/\w+/.test(file.type)) {
                    console.log("No picture error!");
                    param.error("No picture error!");
                } else {
                    //读取拍照文件的base64字符串(该base64和图片者等价)
                    let reader = new FileReader();
                    reader.readAsDataURL(file);
                    reader.onload = function (e) {
                        //this.result为当前拍照照片的base64字符串
                        console.log("current base64 picture is:" + this.result);
                        let index = this.result.indexOf(',');
                        let img = this.result;
                        if (index >= 0 && index < img.length) {
                            img = img.substring(index + 1);
                            img = "data:image/jpeg/png;base64," + img;
                        }
                        //获取图片成功后,回调外部方法返回对应的图片信息
                        param.success(img);
                    }
                }
            });
            document.body.appendChild(camera);
        }
        camera.click();
    }
}
Camera.vue关键代码如下:
<template>
	<div class="camera">
		<h1>Click following button to task a picture:</h1>
		<img src="button.png" @click="takePictures">
		<div class="preview-img" v-if="previewImg!==''">
			<h2>Current photos is:</h2>
			<img :src="previewImg">
		</div>
	</div>
</template>

<script>
	import CameraSdk from "../commons/camera-sdk";
	export default {
		name: "Camera",
		data() {
			return {
				previewImg: ""
			};
		},
		methods: {
			takePictures: function() {
				console.log("start to task a picture now.");
				let self = this;
				CameraSdk.takePictures({
					success: res => {
						console.log("current picture is:" + res);
						self.previewImg = res;
					},
					error: res => {
						console.log("failed to get picture:" + res);
						self.previewImg = "";
					}
				});
			}
		}
	};
</script>
10、拍照效果如下:

11、按照上一步封装的拍照组件代码见geo_location6。
三、总结
- 目前浏览器的功能已经非常强大了,在移动端使用浏览器原生的功能可以很好的兼容各个平台,比如Android/iOS,再比如:微信,微博等应用平台;
- 学无止境,在项目的过程中会碰到各种各样的问题,这需要不停的探索,循序渐进地改进。比如,我觉得步骤8已经很好了,但是按照建议使用了步骤9的方式实现后,会感觉到豁然开朗;
4、参考资料
[1] https://blog.csdn.net/sxmfendou/article/details/76178973