Java EE 目录:https://blog.csdn.net/dkbnull/article/details/87932809
0. 开发环境
- IDE:IntelliJ IDEA 2017.1 x64
- jdk:1.8.0_91
- Spring Boot:2.1.1.RELEASE
- Maven:3.3.9
- MySQL:5.7.13
1. 引入依赖
<dependency>
    <groupId>org.mybatis.spring.boot</groupId>
    <artifactId>mybatis-spring-boot-starter</artifactId>
    <version>1.3.2</version>
</dependency>

<dependency>
	<groupId>mysql</groupId>
	<artifactId>mysql-connector-java</artifactId>
	<version>8.0.15</version>
	<scope>runtime</scope>
</dependency>
这里,如果使用的 MySQL 是 8.X版本的话,mysql-connector-java 版本必须是 8.0以上,否则会报错:
java.sql.SQLException: Unable to load authentication plugin 'caching_sha2_password'.
2. 引入数据源
这里根据个人习惯使用 properties 或 yml 文件配置,本项目使用的是更为简洁的 yml 配置文件。
删除原来的 application.properties ,新建 application.yml。
application.yml 增加如下配置信息
spring:
  datasource:
    url: jdbc:mysql://127.0.0.1:3306/test?serverTimezone=GMT%2B8
    username: root
    password: root
    driver-class-name: com.mysql.cj.jdbc.Driver
这里,如果使用的 mysql-connector-java 是5.X版本的话,driver-class-name 可以直接省略使用默认,或者配置为 com.mysql.jdbc.Driver
到这里,Spring Boot就可以访问数据库了,我们来做下测试。
3. 测试
3.1 新建数据库表
CREATE SCHEMA `test` ;

CREATE TABLE `test`.`test` (
  `id` INT NOT NULL AUTO_INCREMENT,
  `name` VARCHAR(45) NOT NULL,
  PRIMARY KEY (`id`));

INSERT INTO `test`.`test` (`name`) VALUES ('张三');
INSERT INTO `test`.`test` (`name`) VALUES ('李四');
INSERT INTO `test`.`test` (`name`) VALUES ('王五');
INSERT INTO `test`.`test` (`name`) VALUES ('周六');
3.2 创建实体
package cn.wbnull.springbootdemo.model;

public class TestModel {

    private int id;
    private String name;

    public int getId() {
        return id;
    }

    public void setId(int id) {
        this.id = id;
    }

    public String getName() {
        return name;
    }

    public void setName(String name) {
        this.name = name;
    }
}
3.3 DAO层
package cn.wbnull.springbootdemo.dao;

import cn.wbnull.springbootdemo.model.TestModel;
import org.apache.ibatis.annotations.Insert;
import org.apache.ibatis.annotations.Mapper;
import org.apache.ibatis.annotations.Param;
import org.apache.ibatis.annotations.Select;

import java.util.List;

@Mapper
public interface TestMapper {

    @Select("select id,name from test")
    List<TestModel> select();

    @Insert("insert into test(name) values(#{name})")
    int insert(@Param("name") String name);
}
3.4 Service层
package cn.wbnull.springbootdemo.service;

import cn.wbnull.springbootdemo.dao.TestMapper;
import cn.wbnull.springbootdemo.model.TestModel;
import org.springframework.beans.factory.annotation.Autowired;
import org.springframework.stereotype.Service;

import java.util.List;

@Service
public class MySQLTestService {

    @Autowired
    private TestMapper testMapper;  //这里会有报错,不用管

    public List<TestModel> select() {
        return testMapper.select();
    }

    public int insert(String name) {
        return testMapper.insert(name);
    }
}
这里使用 @Autowired 自动装配TestMapper时会有报错,原因是TestMapper使用了@Mapper注解,idea不能把@Mapper注解的TestMapper识别为Bean,但实际运行时@Mapper会被Spring识别为Bean,自动装配不会出错。所以这里的报错可以不用在意。
但如果看着代码中有报错很不顺眼,可以在TestMapper类增加@Repository注解,标注该类为DAO组件。
3.5 Controller层
package cn.wbnull.springbootdemo.controller;

import cn.wbnull.springbootdemo.model.TestModel;
import cn.wbnull.springbootdemo.service.MySQLTestService;
import org.springframework.beans.factory.annotation.Autowired;
import org.springframework.context.annotation.Scope;
import org.springframework.web.bind.annotation.PostMapping;
import org.springframework.web.bind.annotation.RequestMapping;
import org.springframework.web.bind.annotation.RequestParam;
import org.springframework.web.bind.annotation.RestController;

import java.util.List;

@RestController
@Scope("prototype")
@RequestMapping("/mysql/test")
public class MySQLTestController {

    @Autowired
    private MySQLTestService mySQLTestService;

    @PostMapping(value = "/select")
    public List<TestModel> select() throws Exception {
        return mySQLTestService.select();
    }

    @PostMapping(value = "/insert")
    public int insert(@RequestParam(value = "name") String name) throws Exception {
        return mySQLTestService.insert(name);
    }
}
3.6 测试
使用Postman进行测试,输出结果如下
3.6.1 select

3.6.2 insert
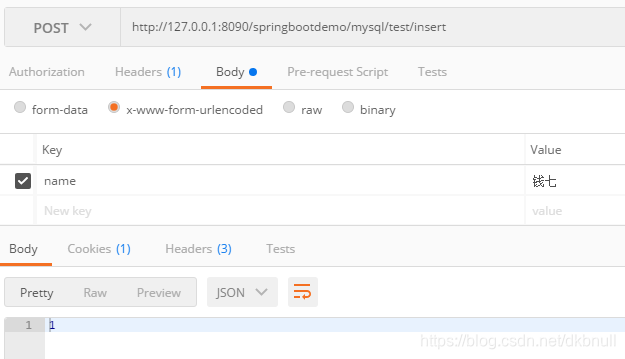
Postman接收到输出为1,表示成功,我们去查下数据库
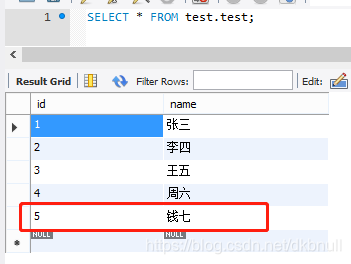
数据成功插入。
4. MyBatis映射文件
以上,我们访问数据库时,SQL语句还是写死在代码里面,处理起来并没有很方便。通常,我们把SQL语句与代码分离,使用MyBatis映射文件方式来访问数据库。
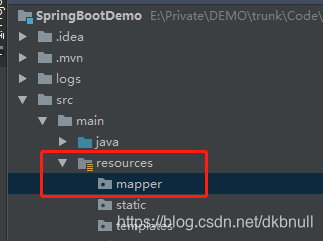
4.1 MyBatis配置
我们在resources文件夹下新建mapper文件夹,用于存放MyBatis映射文件
application.yml 增加MyBatis配置信息
mybatis:
  mapper-locations: classpath:mapper/*.xml  #对应mapper映射xml文件所在路径
  type-aliases-package: cn.wbnull.springbootdemo.model  #对应实体类路径
完整配置如下,注意spring与mybatis都是根节点
spring:
  datasource:
    url: jdbc:mysql://127.0.0.1:3306/test?serverTimezone=GMT%2B8
    username: root
    password: root
    driver-class-name: com.mysql.cj.jdbc.Driver
#
mybatis:
  mapper-locations: classpath:mapper/*.xml  #对应mapper映射xml文件所在路径
  type-aliases-package: cn.wbnull.springbootdemo.model  #对应实体类路径
4.2 DAO层
我们创建一个新的DAO类
package cn.wbnull.springbootdemo.dao;

import cn.wbnull.springbootdemo.model.TestModel;

import java.util.List;

public interface TestMapperV2 {

    List<TestModel> select();

    int insert(TestModel testModel);
}
4.3 创建MyBatis映射文件
resources/mapper下新建映射文件 TestMapper.xml
<?xml version="1.0" encoding="UTF-8" ?>
<!DOCTYPE mapper PUBLIC "-//mybatis.org//DTD Mapper 3.0//EN" "http://mybatis.org/dtd/mybatis-3-mapper.dtd" >
<mapper namespace="cn.wbnull.springbootdemo.dao.TestMapperV2">
    <resultMap id="BaseResultMap" type="cn.wbnull.springbootdemo.model.TestModel">
        <id column="id" property="id" jdbcType="INTEGER"/>
        <result column="name" property="name" jdbcType="VARCHAR"/>
    </resultMap>
    <sql id="Base_Column_List">
        id, name
    </sql>
    <select id="select" resultMap="BaseResultMap">
        select
        <include refid="Base_Column_List"/>
        from test
    </select>
    <insert id="insert" parameterType="cn.wbnull.springbootdemo.model.TestModel">
        insert into test (id, name
        )
        values (#{id,jdbcType=INTEGER}, #{name,jdbcType=VARCHAR}
        )
    </insert>
</mapper>
这里着重注意这几点
1、<mapper namespace=“cn.wbnull.springbootdemo.dao.TestMapperV2”> namespace 一定要对应自己dao包所在的包路径,对应我们需要匹配的dao层类
2、<resultMap id=“BaseResultMap” type=“cn.wbnull.springbootdemo.model.TestModel”> type 一定要对应我们需要匹配的实体类
3、 <id column=“id” property=“id” jdbcType=“INTEGER”/>
<result column=“name” property=“name” jdbcType=“VARCHAR”/>
对应数据库表的字段
4、<select id=“select” resultMap=“BaseResultMap”>
select <include refid=“Base_Column_List”/> from test
</select>
<select> 表示这是一条查询语句, id=“select” 一定要与dao层需要匹配的方法名一致,resultMap 表示对应的返回值类型
5、<insert id=“insert” parameterType=“cn.wbnull.springbootdemo.model.TestModel”> parameterType表示对应的输入参数类型
4.4 Service层
创建一个新的Service类
package cn.wbnull.springbootdemo.service;

import cn.wbnull.springbootdemo.dao.TestMapperV2;
import cn.wbnull.springbootdemo.model.TestModel;
import org.springframework.beans.factory.annotation.Autowired;
import org.springframework.stereotype.Service;

import java.util.List;

@Service
public class MySQLTestServiceV2 {

    @Autowired
    private TestMapperV2 testMapperV2;  //这里会有报错,不用管

    public List<TestModel> select() {
        return testMapperV2.select();
    }

    public int insert(int id, String name) {
        TestModel testModel = new TestModel();
        testModel.setId(id);
        testModel.setName(name);

        return testMapperV2.insert(testModel);
    }
}
4.5 Controller层
创建一个新的Controller类
package cn.wbnull.springbootdemo.controller;

import cn.wbnull.springbootdemo.model.TestModel;
import cn.wbnull.springbootdemo.service.MySQLTestServiceV2;
import org.springframework.beans.factory.annotation.Autowired;
import org.springframework.context.annotation.Scope;
import org.springframework.web.bind.annotation.PostMapping;
import org.springframework.web.bind.annotation.RequestMapping;
import org.springframework.web.bind.annotation.RequestParam;
import org.springframework.web.bind.annotation.RestController;

import java.util.List;

@RestController
@Scope("prototype")
@RequestMapping("/mysql/test")
public class MySQLTestControllerV2 {

    @Autowired
    private MySQLTestServiceV2 mySQLTestServiceV2;

    @PostMapping(value = "/selectV2")
    public List<TestModel> select() throws Exception {
        return mySQLTestServiceV2.select();
    }

    @PostMapping(value = "/insertV2")
    public int insert(@RequestParam(value = "id") int id,
                      @RequestParam(value = "name") String name) throws Exception {
        return mySQLTestServiceV2.insert(id, name);
    }
}
4.6 项目启动类
增加@MapperScan(“cn.wbnull.springbootdemo.dao”),对应DAO层的包名
package cn.wbnull.springbootdemo;

import org.mybatis.spring.annotation.MapperScan;
import org.springframework.boot.SpringApplication;
import org.springframework.boot.autoconfigure.SpringBootApplication;

@SpringBootApplication
@MapperScan("cn.wbnull.springbootdemo.dao")
public class SpringBootDemoApplication {

	public static void main(String[] args) {
		SpringApplication.run(SpringBootDemoApplication.class, args);
	}
}
4.7 测试
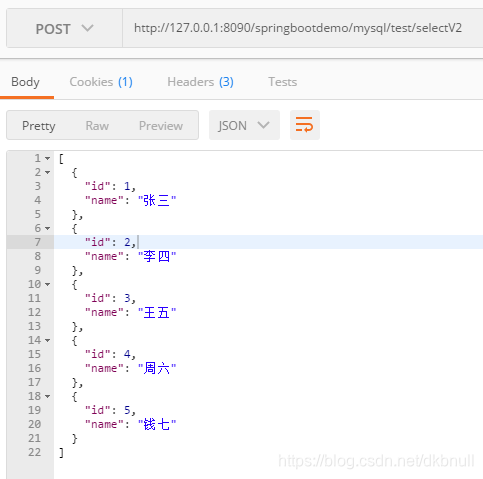
4.7.1 select
4.7.2 insert

Postman接收到输出为1,表示成功,我们去查下数据库

数据成功插入
截至这里,Spring Boot已成功整合MyBatis并连接上了数据库,且测试正常。
但我们实际开发过程中,如果存在大量数据库表,那我们就需要创建大量的实体类、DAO层、映射文件,工作量较大。我们使用mybatis generator来自动生成代码。
5. Generator
5.1 新建数据库表
我们先新建一个数据库表,便于一会自动生成代码使用
CREATE TABLE `test`.`testv2` (
  `id` INT NOT NULL AUTO_INCREMENT,
  `username` VARCHAR(45) NOT NULL,
  `password` VARCHAR(45) NOT NULL,
  PRIMARY KEY (`id`));
5.2 Generator配置文件
在resources文件夹下新建generator文件夹,新建generatorConfig.xml
<?xml version="1.0" encoding="UTF-8"?>
<!DOCTYPE generatorConfiguration
        PUBLIC "-//mybatis.org//DTD MyBatis Generator Configuration 1.0//EN"
        "http://mybatis.org/dtd/mybatis-generator-config_1_0.dtd">
<generatorConfiguration>
    <!--数据库驱动,选择本地硬盘上的数据库驱动包,建议与pom.xml引入的jar包版本相同-->
    <classPathEntry
            location="D:\Program Files\Maven\repository\mysql\mysql-connector-java\8.0.15\mysql-connector-java-8.0.15.jar"/>
    <context id="DB2Tables" targetRuntime="MyBatis3">
        <commentGenerator>
            <property name="suppressDate" value="true"/>
            <!--是否去除自动生成的注释,true:是  false:否-->
            <property name="suppressAllComments" value="true"/>
        </commentGenerator>

        <!--数据库驱动类、链接url、用户名、密码,与application.yml配置相同即可-->
        <jdbcConnection driverClass="com.mysql.cj.jdbc.Driver"
                        connectionURL="jdbc:mysql://127.0.0.1:3306/test?serverTimezone=GMT%2B8"
                        userId="root"
                        password="root">
        </jdbcConnection>

        <javaTypeResolver>
            <property name="forceBigDecimals" value="false"/>
        </javaTypeResolver>

        <!--生成实体类的包名和位置-->
        <javaModelGenerator targetPackage="cn.wbnull.springbootdemo.model"
                            targetProject="src/main/java">
            <property name="enableSubPackages" value="true"/>
            <property name="trimStrings" value="true"/>
        </javaModelGenerator>

        <!--生成映射文件的包名和位置-->
        <sqlMapGenerator targetPackage="mapper"
                         targetProject="src/main/resources">
            <property name="enableSubPackages" value="true"/>
        </sqlMapGenerator>

        <!--生成DAO的包名和位置-->
        <javaClientGenerator type="XMLMAPPER"
                             targetPackage="cn.wbnull.springbootdemo.dao"
                             targetProject="src/main/java">
            <property name="enableSubPackages" value="true"/>
        </javaClientGenerator>

        <!--需要自动生成代码的数据库表
         tableName表示数据库中的表名或视图名 domainObjectName表示实体类名-->
        <table tableName="testv2" domainObjectName="TestV2"
               enableCountByExample="false" enableUpdateByExample="false"
               enableDeleteByExample="false" enableSelectByExample="false" selectByExampleQueryId="false"/>
    </context>
</generatorConfiguration>
5.3 引入依赖
<plugin>
	<groupId>org.mybatis.generator</groupId>
	<artifactId>mybatis-generator-maven-plugin</artifactId>
	<version>1.3.2</version>
	<configuration>
		<configurationFile>${basedir}/src/main/resources/generator/generatorConfig.xml</configurationFile>
		<overwrite>true</overwrite>
		<verbose>true</verbose>
	</configuration>
</plugin>
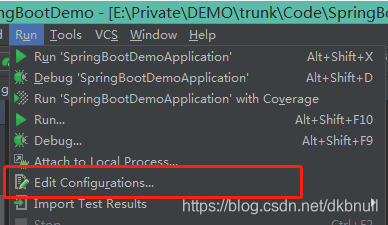
5.4 Generator配置
1、Run --> Edit Configurations…
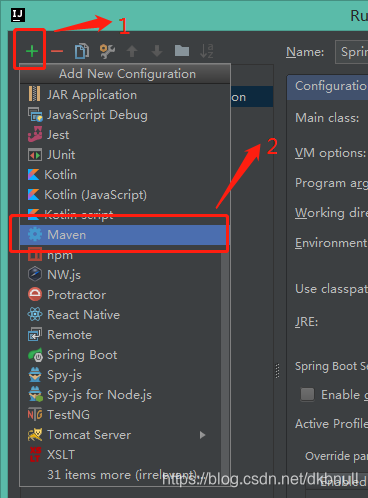
2、增加Maven配置
3、增加Generator配置 (mybatis-generator:generate -e),OK
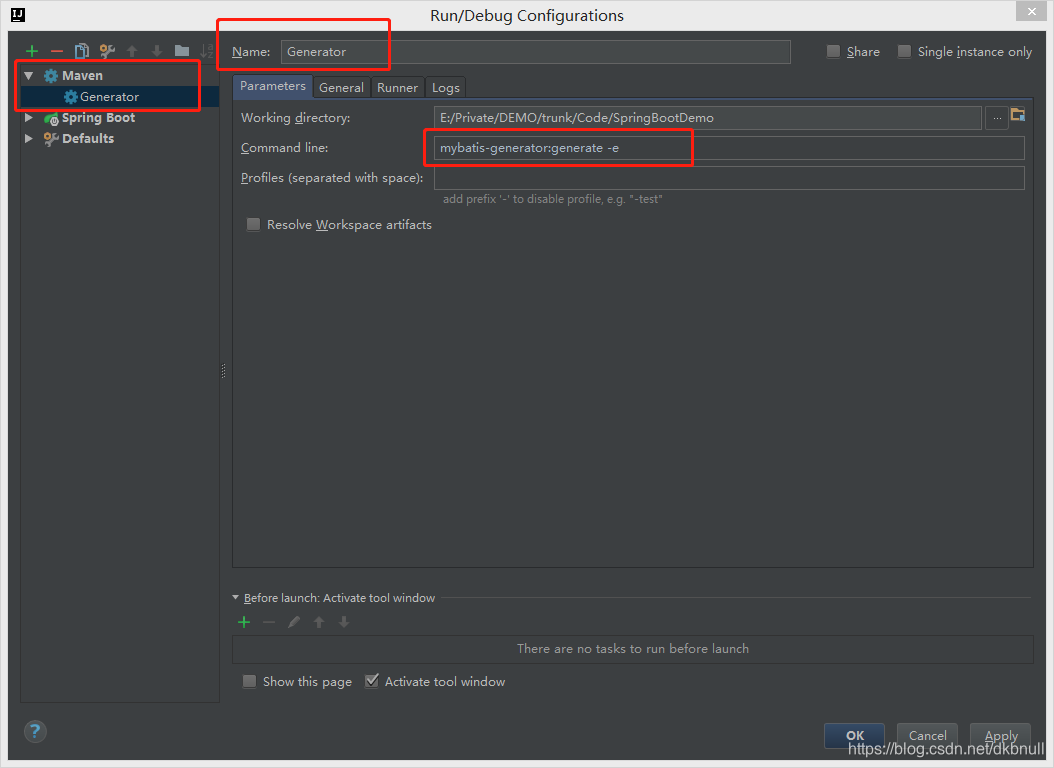
4、运行
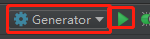
生成代码如下。这里我们运行成功后,同一个表,不要运行多次,否则mapper映射文件中会生成多次的代码。
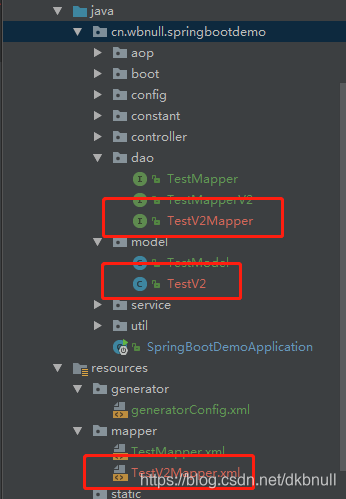
package cn.wbnull.springbootdemo.model;

public class TestV2 {
    private Integer id;

    private String username;

    private String password;

    public Integer getId() {
        return id;
    }

    public void setId(Integer id) {
        this.id = id;
    }

    public String getUsername() {
        return username;
    }

    public void setUsername(String username) {
        this.username = username == null ? null : username.trim();
    }

    public String getPassword() {
        return password;
    }

    public void setPassword(String password) {
        this.password = password == null ? null : password.trim();
    }
}
package cn.wbnull.springbootdemo.dao;

import cn.wbnull.springbootdemo.model.TestV2;

public interface TestV2Mapper {
    int insert(TestV2 record);

    int insertSelective(TestV2 record);
}
<?xml version="1.0" encoding="UTF-8" ?>
<!DOCTYPE mapper PUBLIC "-//mybatis.org//DTD Mapper 3.0//EN" "http://mybatis.org/dtd/mybatis-3-mapper.dtd" >
<mapper namespace="cn.wbnull.springbootdemo.dao.TestV2Mapper" >
  <resultMap id="BaseResultMap" type="cn.wbnull.springbootdemo.model.TestV2" >
    <result column="id" property="id" jdbcType="INTEGER" />
    <result column="username" property="username" jdbcType="VARCHAR" />
    <result column="password" property="password" jdbcType="VARCHAR" />
  </resultMap>
  <insert id="insert" parameterType="cn.wbnull.springbootdemo.model.TestV2" >
    insert into testv2 (id, username, password
      )
    values (#{id,jdbcType=INTEGER}, #{username,jdbcType=VARCHAR}, #{password,jdbcType=VARCHAR}
      )
  </insert>
  <insert id="insertSelective" parameterType="cn.wbnull.springbootdemo.model.TestV2" >
    insert into testv2
    <trim prefix="(" suffix=")" suffixOverrides="," >
      <if test="id != null" >
        id,
      </if>
      <if test="username != null" >
        username,
      </if>
      <if test="password != null" >
        password,
      </if>
    </trim>
    <trim prefix="values (" suffix=")" suffixOverrides="," >
      <if test="id != null" >
        #{id,jdbcType=INTEGER},
      </if>
      <if test="username != null" >
        #{username,jdbcType=VARCHAR},
      </if>
      <if test="password != null" >
        #{password,jdbcType=VARCHAR},
      </if>
    </trim>
  </insert>
</mapper>
5.5 测试
5.5.1 Service层
package cn.wbnull.springbootdemo.service;

import cn.wbnull.springbootdemo.dao.TestV2Mapper;
import cn.wbnull.springbootdemo.model.TestV2;
import org.springframework.beans.factory.annotation.Autowired;
import org.springframework.stereotype.Service;

@Service
public class MySQLTestV2Service {

    @Autowired
    private TestV2Mapper testV2Mapper;  //这里会有报错,不用管

    public int insert(int id, String username, String password) {
        TestV2 testV2 = new TestV2();
        testV2.setId(id);
        testV2.setUsername(username);
        testV2.setPassword(password);

        return testV2Mapper.insert(testV2);
    }
}
5.5.1 Controller层
package cn.wbnull.springbootdemo.controller;

import cn.wbnull.springbootdemo.service.MySQLTestV2Service;
import org.springframework.beans.factory.annotation.Autowired;
import org.springframework.context.annotation.Scope;
import org.springframework.web.bind.annotation.PostMapping;
import org.springframework.web.bind.annotation.RequestMapping;
import org.springframework.web.bind.annotation.RequestParam;
import org.springframework.web.bind.annotation.RestController;

@RestController
@Scope("prototype")
@RequestMapping("/mysql/testv2")
public class MySQLTestV2Controller {

    @Autowired
    private MySQLTestV2Service mySQLTestV2Service;

    @PostMapping(value = "/insert")
    public int insert(@RequestParam(value = "id") int id,
                      @RequestParam(value = "username") String username,
                      @RequestParam(value = "password") String password
    ) throws Exception {
        return mySQLTestV2Service.insert(id, username, password);
    }
}
5.5.2 insert

Postman接收到输出为1,表示成功,我们去查下数据库
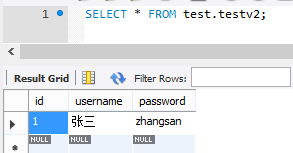
数据成功插入
这样,对于大量的数据库表,我们就可以使用Generator来生成基本的代码,然后自己再添加其他所需要的代码即可。
GitHub:https://github.com/dkbnull/SpringBootDemo
微信:https://mp.weixin.qq.com/s/TVtmbSBrctv9R9EucIggYg
微博:https://weibo.com/ttarticle/p/show?id=2309404339889012367676