1.JSP简介

如:

所以我们html文件修改成文jsp文件需要:

1.1 jsp的执行过程
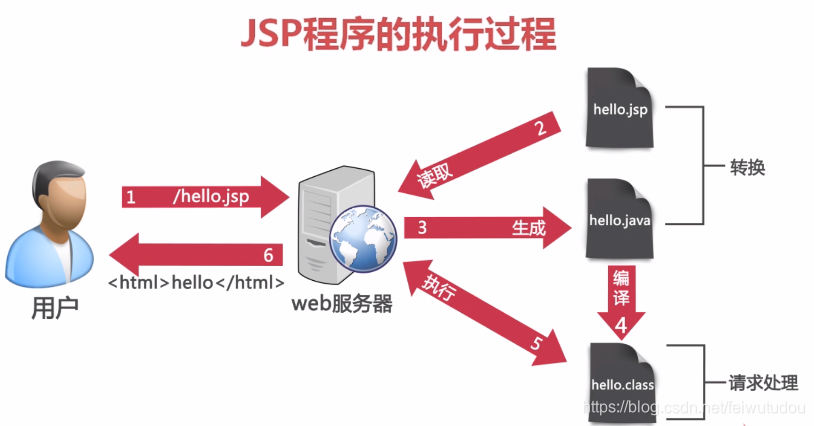
我们创建一个项目名为javaweb的文件,当用户提交访问hello.jsp文件的请求时,我们的Tomcat会收到信息,并把javaweb中对应的hello.jsp转换hello.java最后编译成hello.class文件,最后输出(可在Tomcat文件夹中的work文件夹中查找)
1.2 jsp的基本语法学习
1.2.1 jsp声明语法

<%@ page import="static java.lang.System.out" %><%--
  Created by IntelliJ IDEA.
  User: Administrator
  Date: 2019/1/22 0022
  Time: 15:16
  To change this template use File | Settings | File Templates.
--%>
<%@ page contentType="text/html;charset=UTF-8" language="java" %>
<html>
<head>
    <title>你好</title>
</head>
<body>

声明:
<%!
    String st = "你好,世界!!!!";

    String get(String st) {
        return st;
    }
%>
<hr>

输出:
<%
    st="你猜猜我是谁";
    out.println(st);
    out.println(get("你大爷的"));

%>
</body>
</html>
通过例子我们可以得出,要想设置方法和成员变量我们必须得用"<%! %>",且里面不能有任何的逻辑语句(if,for等),如果仅仅是局部变量,我们只需要使用"<%%>"就可以了,而且里面是可以执行逻辑语句的.
为了更加的透彻比较<%!和<%的区别,我们举例如下:
<%--
  Created by IntelliJ IDEA.
  User: Administrator
  Date: 2019/1/22 0022
  Time: 15:59
  To change this template use File | Settings | File Templates.
--%>
<%@ page contentType="text/html;charset=UTF-8" language="java" %>
<html>
<head>
    <title>jsp成员变量和局部变量</title>
</head>
<body>
<%!
    int cheng = 0;
%>
成员变量:
<%
    int ju = 0;
    cheng++;
    ju++;
    out.println(cheng);
%>

<hr>
局部变量:
<%
    out.println(ju);
%>

</body>
</html>
结果输出:

从这里可以看出,成员变量的生命周期是随程序而走的,而局部变量只会在页面中完成.
1.2.2 jsp程序脚本

<%--
  Created by IntelliJ IDEA.
  User: Administrator
  Date: 2019/1/22 0022
  Time: 15:48
  To change this template use File | Settings | File Templates.
--%>
<%@ page contentType="text/html;charset=UTF-8" language="java" %>
<html>
<head>
    <title>jsp程序脚本</title>
</head>
<body>

java的写法:
<%
    int i = 10;
    if (i > 10) {
        out.println("i>10");
    } else {
        out.println("i>=10");
    }
%>

<hr>

脚本的写法:
<% if (i > 10) { %>
<span>i>10</span>
<% } else { %>
<span>i<=10</span>
<% } %>


</body>
</html>
这样交叉式的写法有利于我们后期页面样式变化而变化;
1.2.3 jsp内容输出表达式

<%--
  Created by IntelliJ IDEA.
  User: Administrator
  Date: 2019/1/22 0022
  Time: 16:10
  To change this template use File | Settings | File Templates.
--%>
<%@ page contentType="text/html;charset=UTF-8" language="java" %>
<html>
<head>
    <title>jsp内容输出表达式</title>
</head>
<body>
<% int i=10;%>
jsp的输出:
<%=i%>
<hr>
普通输出:
<%
    out.println(i);
%>
</body>
</html>
1.2.4 jsp包引入语法
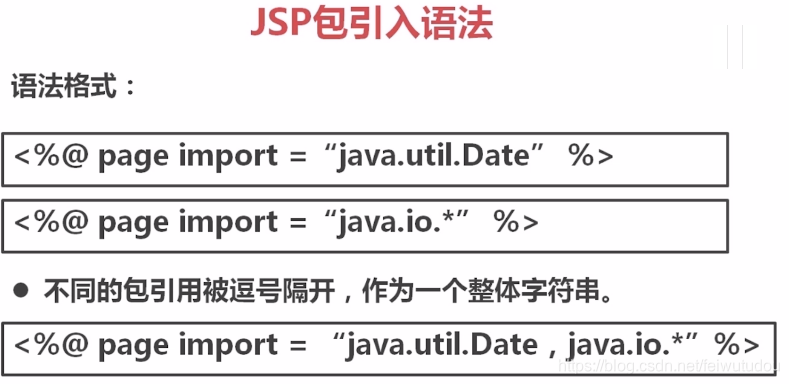
<%@ page import="java.text.SimpleDateFormat" %>
<%@ page import="java.util.Date" %><%--
  Created by IntelliJ IDEA.
  User: Administrator
  Date: 2019/1/22 0022
  Time: 16:17
  To change this template use File | Settings | File Templates.
--%>
<%@ page contentType="text/html;charset=UTF-8" language="java" %>
<html>
<head>
    <title>jsp包引入语法</title>
</head>
<body>

<%!
    public String gettime() {
        SimpleDateFormat cuo = new SimpleDateFormat("y-MM-dd HH:mm:ss");
        Date time = new Date();
        return cuo.format(time);
    }
%>

<%=gettime()%>
</body>
</html>
1.3 jsp的内置对象
什么是内置对象

1.3.1 request,out,response对象应用

我们模拟一个工作人员登陆的场景来实现我们的对象应用:
先创建员工Emp类:
package xitong;

public class Emp {
    private int id;
    private String name;
    private String pwd;
    private String email;

    public Emp(int id, String name, String pwd, String email) {
        this.id = id;
        this.name = name;
        this.pwd = pwd;
        this.email = email;
    }

    public int getId() {
        return id;
    }

    public void setId(int id) {
        this.id = id;
    }

    public String getName() {
        return name;
    }

    public void setName(String name) {
        this.name = name;
    }

    public String getPwd() {
        return pwd;
    }

    public void setPwd(String pwd) {
        this.pwd = pwd;
    }

    public String getEmail() {
        return email;
    }

    public void setEmail(String email) {
        this.email = email;
    }
}
我们这里面不使用数据库,所以用map来存储我们员工的信息:
package xitong;

import java.util.HashMap;
import java.util.Map;

public class Db {
    public static Map<String, Emp> d = new HashMap<String, Emp>();

    static {
        d.put("1", new Emp(1, "王武", "111", "[email protected]"));
        d.put("2", new Emp(2, "李四", "222", "[email protected]"));
        d.put("3", new Emp(3, "赵六", "333", "[email protected]"));
    }

    public static boolean is_cunzai(Emp e) {
        for (Emp v : d.values()) {
            if (v.getName().equals(e.getName()) && v.getPwd().equals(e.getPwd())){
                return true;
            }
        }
        return false;
    }
}
最后展示我们login.jsp
<%--
  Created by IntelliJ IDEA.
  User: Administrator
  Date: 2019/1/23 0023
  Time: 13:52
  To change this template use File | Settings | File Templates.
--%>
<%@ page contentType="text/html;charset=UTF-8" language="java" %>
<html>
<head>
    <title>人事管理系统</title>
</head>
<body>
<h3 align="center">人事管理系统登陆页面</h3>
<hr>

<form action="dologin.jsp">
    <table align="center">
        <tr>
            <td>
                账号
            </td>
            <td>
                <input type="text" name="name">
            </td>

            <td>
                密码
            </td>
            <td>
                <input type="password" name="pwd">
            </td>
            <td>
                <input type="submit" value="登陆">
            </td>

        </tr>
    </table>

</form>

</body>
</html>
以及我们登陆执行的dologin.jsp
<%@ page import="xitong.Emp" %>
<%@ page import="xitong.Db" %>
<%@ page import="java.util.Map" %><%--
  Created by IntelliJ IDEA.
  User: Administrator
  Date: 2019/1/23 0023
  Time: 13:59
  To change this template use File | Settings | File Templates.
--%>
<%@ page contentType="text/html;charset=UTF-8" language="java" %>
<html>
<head>
    <title>处理登陆页面</title>
</head>
<body>
处理的页面:
<hr>
request.getParameter(String name) 通过一个控件的name就可以获取控件的值
<br>
<%
    String name = request.getParameter("name");
    String pwd = request.getParameter("pwd");
    out.println("账号是:" + name + " 密码是:" + pwd);
%>
<br>

<hr>
request的请求参数
<br>
<%=request.getContextPath()%>
<br>

<%=request.getHeaders("host")%>
<br>

<%=request.getPathInfo()%>
<br>

<%=request.getClass()%>
<br>

<hr>
response的返回参数
<br>
<%=response.getCharacterEncoding()%>
<br>

<hr>

<%
    Emp e = new Emp(0, name, pwd, "");
    Db d = new Db();
    boolean rel = d.is_cunzai(e);
    if (rel) {
%>
<h3 align="center">欢迎来到人事系统首页</h3>
<hr>
<table align="center" border="1" width="500px">
    <tr>
        <td>
            id
        </td>
        <td>
            员工名称
        </td>
        <td>
            邮箱
        </td>
    </tr>
    <%
        for (Emp v : d.d.values()) {
    %>
    <tr>
        <td>
            <%=v.getId()%>
        </td>
        <td>
            <%= v.getName()%>
        </td>
        <td>
            <%=v.getEmail()%>
        </td>
    </tr>
    <%
        }
    %>
</table>
<%
    } else {
        out.println("失败");
    }
%>


</body>
</html>
最后登陆效果如下:

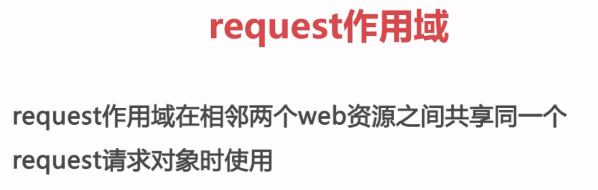
request作用域
设置request_test.jsp页面:
<%--
  Created by IntelliJ IDEA.
  User: Administrator
  Date: 2019/1/23 0023
  Time: 14:55
  To change this template use File | Settings | File Templates.
--%>
<%@ page contentType="text/html;charset=UTF-8" language="java" %>
<html>
<head>
    <title>request 作用域的展示</title>
</head>
<body>
request 作用域的设置,以及把此次request和response转发给request_test.jsp
<%
    request.setAttribute("name", "奔波儿灞");
    request.getRequestDispatcher("get_request.jsp").forward(request, response);
%>
<hr>
<%--<%=request.getAttribute("name")%>--%>
</body>
</html>
完后设置get_request.jsp页面:
<%--
  Created by IntelliJ IDEA.
  User: Administrator
  Date: 2019/1/23 0023
  Time: 14:59
  To change this template use File | Settings | File Templates.
--%>
<%@ page contentType="text/html;charset=UTF-8" language="java" %>
<html>
<head>
    <title>获取name</title>
</head>
<body>
我是get_request.jsp,我在获取request.getAttribute("name")的值
<br>
<%=request.getAttribute("name")%>

</body>
</html>
结果输出:
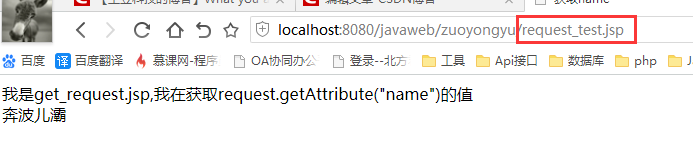
当我们访问request_test.jsp的页面时,由于本页面的request和response全部都转发到了get_request.jsp页面,所以我们显示的页面就是get_request.jsp,而且也能在get_request.jsp中获取request.getAttribute("name")的值
1.3.2 pageContext,page对象应用

创建context.jsp文件
<%--
  Created by IntelliJ IDEA.
  User: Administrator
  Date: 2019/1/23 0023
  Time: 15:31
  To change this template use File | Settings | File Templates.
--%>
<%@ page contentType="text/html;charset=UTF-8" language="java" %>
<html>
<head>
    <%
        pageContext.include("header.jsp");
    %>
    <%=this.getServletInfo()%>
</head>
<body>
pageContext的作用:
<br>
1.forward方法完成请求的转发;
<br>
2.include方法完成页面的包含关系;
<hr>
page的作用:
<br>
获取页面的基本信息
<%
    //    pageContext.forward("a.jsp?name=moooooc");
%>


</body>
</html>
创建header.jsp文件
<%--
  Created by IntelliJ IDEA.
  User: Administrator
  Date: 2019/1/23 0023
  Time: 15:48
  To change this template use File | Settings | File Templates.
--%>
<%@ page contentType="text/html;charset=UTF-8" language="java" %>
<html>
<head>
    <title>header</title>
    <h1>这是一个header 666666</h1>
</head>

</html>
结果展示:
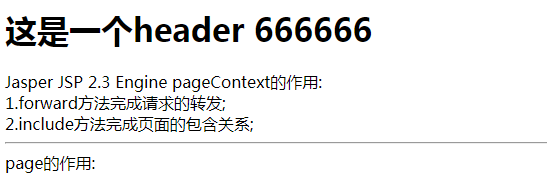
pageContext作用域:
![]()
1.3.3 session,config,exception对象应用
session
设置session的页面set.jsp
<%--
  Created by IntelliJ IDEA.
  User: Administrator
  Date: 2019/1/23 0023
  Time: 16:25
  To change this template use File | Settings | File Templates.
--%>
<%@ page contentType="text/html;charset=UTF-8" language="java" %>
<html>
<head>
    <title>设置session</title>
</head>
<body>
设置session
<%
    session.setAttribute("name","拿破仑");
%>
<br>
销毁session时用户session.removeAttribute(String name)

</body>
</html>
获取session的get.jsp
<%--
  Created by IntelliJ IDEA.
  User: Administrator
  Date: 2019/1/23 0023
  Time: 16:26
  To change this template use File | Settings | File Templates.
--%>
<%@ page contentType="text/html;charset=UTF-8" language="java" %>
<html>
<head>
    <title>获取session</title>
</head>
<body>
<%=session.getAttribute("name")%>
</body>
</html>
session的作用域:

config
config是获取配置信息,一般来说用的很少
exception
是统一设置错误页面,假如我们在jsp页面中使用 throw new Exception("这其实是404");那么必须要在头部page页面中使用errorPage的声明字段

完后我们可以在error.jsp中使用exception
<%--
  Created by IntelliJ IDEA.
  User: Administrator
  Date: 2019/1/23 0023
  Time: 16:49
  To change this template use File | Settings | File Templates.
--%>
<%@ page contentType="text/html;charset=UTF-8" language="java" isErrorPage="true" %>
<html>
<head>
    <title>这是404页面</title>
</head>
<body>
<%=exception.getMessage()%>

</body>
</html>
1.3.4 application对象应用

我们可以修改之前的dologin.jsp
<%@ page import="xitong.Emp" %>
<%@ page import="xitong.Db" %>
<%@ page import="java.util.Map" %><%--
  Created by IntelliJ IDEA.
  User: Administrator
  Date: 2019/1/23 0023
  Time: 13:59
  To change this template use File | Settings | File Templates.
--%>
<%@ page contentType="text/html;charset=UTF-8" language="java" %>
<html>
<head>
    <title>处理登陆页面</title>
</head>
<body>
处理的页面:
<hr>
request.getParameter(String name) 通过一个控件的name就可以获取控件的值
<br>
<%
    String name = request.getParameter("name");
    String pwd = request.getParameter("pwd");
    out.println("账号是:" + name + " 密码是:" + pwd);
%>
<br>

<hr>
request的请求参数
<br>
<%=request.getContextPath()%>
<br>

<%=request.getHeaders("host")%>
<br>

<%=request.getPathInfo()%>
<br>

<%=request.getClass()%>
<br>

<hr>
response的返回参数
<br>
<%=response.getCharacterEncoding()%>
<br>

<hr>

<%
    Emp e = new Emp(0, name, pwd, "");
    Db d = new Db();
    boolean rel = d.is_cunzai(e);
    if (rel) {
        session.setAttribute("name", name);
        Object o = application.getAttribute("count");
        if (o == null) {
            application.setAttribute("count", 1);
        } else {
            application.setAttribute("count", (int) o + 1);
        }
%>

<h3 align="right">次数:<%=application.getAttribute("count")%>
    <h3 align="right">登陆账户:<%=session.getAttribute("name")%>
    </h3>
    <h3 align="center">欢迎来到人事系统首页</h3>
    <hr>
    <table align="center" border="1" width="500px">
        <tr>
            <td>
                id
            </td>
            <td>
                员工名称
            </td>
            <td>
                邮箱
            </td>
            <td>
                操作
            </td>
        </tr>
        <%
            for (Emp v : d.d.values()) {
        %>
        <tr>
            <td>
                <%=v.getId()%>
            </td>
            <td>
                <%= v.getName()%>
            </td>
            <td>
                <%=v.getEmail()%>
            </td>
            <td>
                <a href="update.jsp?id=<%=v.getId()%>">修改</a>
            </td>
        </tr>
        <%
            }
        %>
    </table>
        <%
    } else {
        throw new Exception("这其实是404");
    }
%>


</body>
</html>
2.XML
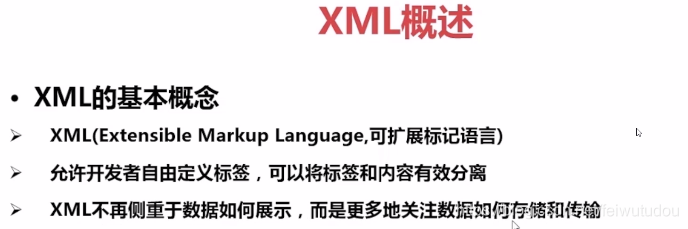
2.1 XML基础
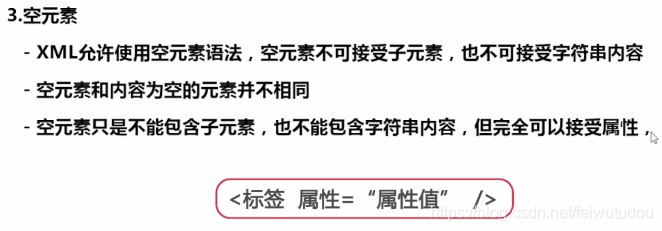
2.1.1 XML的文档规则


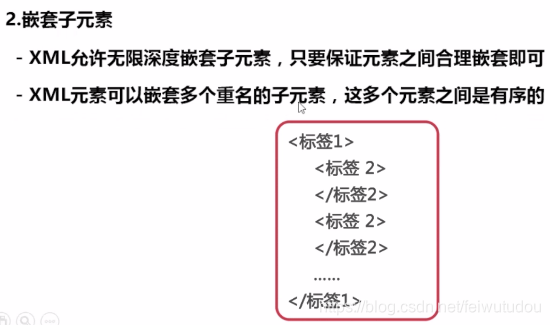
列举一个简单的例子:
<?xml version="1.0" encoding="UTF-8"?>
<书籍列表>
    <计算机书籍>
        <书名>Spring Boot入门</书名>
        <作者>王小丫</作者>
        <价格>89</价格>
    </计算机书籍>
    <计算机书籍>
        <书名>Spring SSM入门</书名>
        <作者>李小狗</作者>
        <价格>20</价格>
    </计算机书籍>

    <名著 书名="三国演义" 作者="罗贯中" 价格="12" />

</书籍列表>
2.1.2 字符数据
假如我们输出以下xml的段落,会有报错:

因为在XML中"<"和">"(小于和大于)是不能识别的,但是我们有两种办法可以解决:
1.字符数据的引用处理;
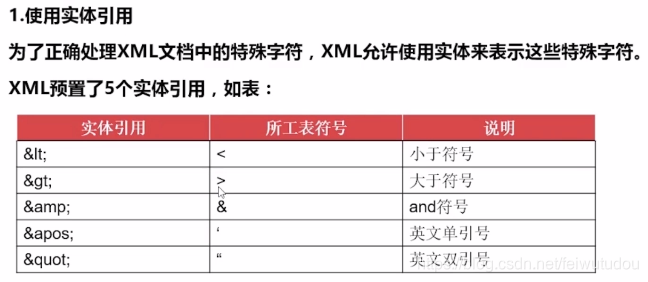

使用替换完成"小于符号"的输出;或者是使用CDATA标记:


2.1.3 命名空间


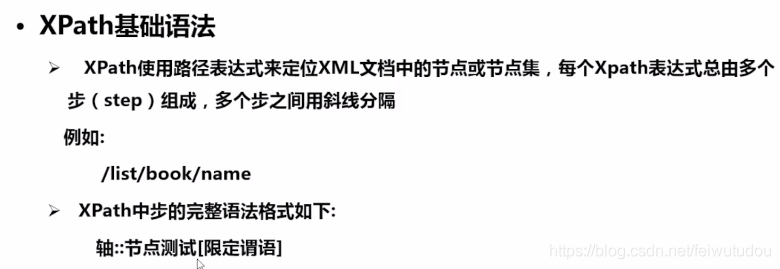
2.2 XPath语言

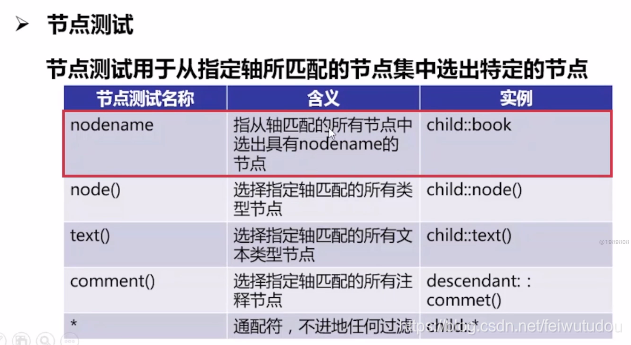
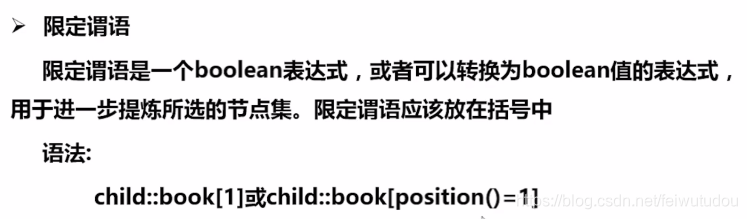
2.2.1 XPath的基本语法


2.3 DOM,SAX,Dom4j和JAXP解析
JAXP的基础概念

JAXP中对SAX的支持

我们这里使用Dom4j来展示对XML文件的操作,https://dom4j.github.io(可去官方下载)
读取XML文件
先创建q.xml文件
<?xml version="1.0" encoding="UTF-8"?>
<书籍列表>
<计算机书籍 xmlns:ji="http://www.baidu.com">
<ji:书名>Spring Boot入门</ji:书名>
<作者>王小丫</作者>
<价格>89</价格>
</计算机书籍>
<计算机书籍>
<书名>Spring SSM入门</书名>
<作者>李小狗</作者>
<价格>20</价格>
</计算机书籍>
<名著 书名="三国演义" 作者="罗贯中" 价格="12"/>
<计算>1+3<4</计算>
<计算><![CDATA[1+3<4]]></计算>
</书籍列表>读取xml的main.java
package xml;

import org.dom4j.Document;
import org.dom4j.DocumentException;
import org.dom4j.Element;
import org.dom4j.io.SAXReader;

import java.util.List;

public class jiexi_xml {
    public static void main(String[] args) {

        SAXReader sax = new SAXReader();//创建一个SAXReader对象
        Document document = null;//获取document对象,如果文档无节点,则会抛出Exception提前结束
        try {
            document = sax.read("C:\\Users\\Administrator\\Desktop\\q.xml");
        } catch (DocumentException e) {
            e.printStackTrace();
        }
        Element root = document.getRootElement();//获取根节点
        getNodes(root);
    }

    public static void getNodes(Element root) {
        System.out.println("--------------------");

        //当前节点的名称、文本内容和属性
        System.out.println("当前节点名称:" + root.getName());//当前节点名称
        System.out.println("当前节点的内容:" + root.getTextTrim());//当前节点内容


        //获取根节点下面的所有子节点(不包过子节点的子节点)
        List<Element> list = root.elements();
        //遍历List的方法
        for (Element e : list) {
            if ("".equals(e.getTextTrim())) {
                //节点内容为空,让其子节点继续获取
                getNodes(e);
            } else {
                System.out.println("节点名称:" + e.getName() + "   属性值:" + e.getTextTrim());
            }
        }
    }
}
通过Dom4j生成XML文件
package xml;

import org.dom4j.Document;
import org.dom4j.DocumentHelper;
import org.dom4j.Element;
import org.dom4j.io.OutputFormat;
import org.dom4j.io.XMLWriter;

import java.io.*;

public class shengcheng {

    public static void witer(Document document, String url) throws IOException {
        //实例化输出格式对象
        OutputFormat format = OutputFormat.createPrettyPrint();
        //设置输出编码
        format.setEncoding("UTF-8");
        //创建需要写入的File对象
        File file = new File("C:\\Users\\Administrator\\Desktop\\qq1.xml");
        //生成XMLWriter对象,构造函数中的参数为需要输出的文件流和格式
        XMLWriter writer = new XMLWriter(new FileOutputStream(file), format);
        //开始写入,write方法中包含上面创建的Document对象
        writer.write(document);
    }

    public static void main(String[] args) throws IOException {
        Document document = DocumentHelper.createDocument();

        //生成根节点
        Element root = document.addElement("书籍列表");

        //添加子元素
        Element ji = root.addElement("计算机书籍").addNamespace("ji", "http://www.baidu.com"); //添加命令空间
        ji.addElement("书名").addText("Spring Boot入门");   //添加元素并为元素添加内容
        ji.addElement("作者").addText("王小丫");
        ji.addElement("价格").addText("89");


        Element ji1 = root.addElement("计算机书籍");
        ji1.addElement("书名").addText("Spring SSM入门");   //添加元素并为元素添加内容
        ji1.addElement("作者").addText("李小狗");
        ji1.addElement("价格").addText("20");

        root.addElement("名著").addAttribute("书名", "三国演义").addAttribute("作者", "罗贯中").addAttribute("价格", "12");

        root.addElement("计算").addText("1+3<4");
        root.addElement("计算").addCDATA("1+3<4");

        witer(document, "C:\\Users\\Administrator\\Desktop\\qq1.xml");
    }
}
生成XML效果如下:

3.Servlet

我们之前使用的jsp页面的本质就是servlet,我们可以理解为jsp的页面是完全的混编,前后不分离,要是写大型项目的话会累死后端,且效率低下,所以在此基础上,有了我们前后端分离的servlet,方便我们后期实现MVC,实现分离和提高效率.
我们来创建一个HttpServlet的服务来展示,先创建login.java继承HttpServlet,重写GET和POST的方法
package servlet_demo;

import javax.servlet.ServletException;
import javax.servlet.http.HttpServlet;
import javax.servlet.http.HttpServletRequest;
import javax.servlet.http.HttpServletResponse;
import java.io.IOException;

public class login extends HttpServlet {

    @Override
    protected void doGet(HttpServletRequest req, HttpServletResponse resp) throws ServletException, IOException {
        System.out.println("doget");
    }

    @Override
    protected void doPost(HttpServletRequest req, HttpServletResponse resp) throws ServletException, IOException {
        System.out.println("dopost");
    }
}
完后我们必须在web中WEB-INF的web.xml文件中配置路径

 <!--为servlet_demo.login类配置别名-->
    <servlet>
        <servlet-name>login</servlet-name>
        <servlet-class>servlet_demo.login</servlet-class>
    </servlet>
    <!--为servlet_demo.login类配置虚拟路径-->
    <servlet-mapping>
        <servlet-name>login</servlet-name>
        <url-pattern>/login</url-pattern>
</servlet-mapping>最后我们开启Tomcat,访问我们的本地路径:http://localhost:8080/javaweb/login,最后可以在控制台中查看到:

除了修改web.xml文件,我们也可以通过重写WebServlet来进行路径的修改:
package servlet_demo;

import javax.servlet.ServletException;
import javax.servlet.annotation.WebServlet;
import javax.servlet.http.HttpServlet;
import javax.servlet.http.HttpServletRequest;
import javax.servlet.http.HttpServletResponse;
import java.io.IOException;

@WebServlet("/login")
public class login extends HttpServlet {

    @Override
    protected void doGet(HttpServletRequest req, HttpServletResponse resp) throws ServletException, IOException {
        System.out.println("doget");
        resp.getWriter().append("222222222222");
    }

    @Override
    protected void doPost(HttpServletRequest req, HttpServletResponse resp) throws ServletException, IOException {
        System.out.println("dopost");
    }
}
那么我们便可以通过@WebServlet("")方法来实现页面的路径指定,不再需要配置web.xml文件了;
3.1 Servlet的生命周期
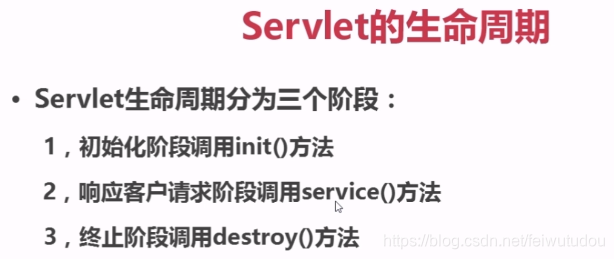
生命周期的原理图:

servlet的相应和请求
package servlet_demo;

import javax.servlet.ServletException;
import javax.servlet.annotation.WebServlet;
import javax.servlet.http.HttpServlet;
import javax.servlet.http.HttpServletRequest;
import javax.servlet.http.HttpServletResponse;
import java.io.IOException;

@WebServlet("/login")
public class login extends HttpServlet {

    @Override
    protected void doGet(HttpServletRequest req, HttpServletResponse resp) throws ServletException, IOException {
        String name =req.getParameter("name");
        String pwd =req.getParameter("pwd");
        System.out.println("name:"+name);
        System.out.println("pwd:"+pwd);
        resp.getWriter().append("name="+name).append("pwd="+pwd);
        resp.getWriter().append("name="+name).append("pwd="+pwd);
        resp.getWriter().append("name="+name).append("pwd="+pwd);
    }

    @Override
    protected void doPost(HttpServletRequest req, HttpServletResponse resp) throws ServletException, IOException {
        System.out.println("dopost");
    }
}
3.2 ServletContext与ServletConfig

3.2.1 ServletContext
在这里ServletContext的用法和意义其实与jsp中的application是一样的,都可以调用本地的this关键字来执行:
set.java
package servlet_demo;

import javax.servlet.ServletContext;
import javax.servlet.ServletException;
import javax.servlet.annotation.WebServlet;
import javax.servlet.http.HttpServlet;
import javax.servlet.http.HttpServletRequest;
import javax.servlet.http.HttpServletResponse;
import java.io.IOException;

@WebServlet("/set")
public class set extends HttpServlet {
    @Override
    protected void doGet(HttpServletRequest req, HttpServletResponse resp) throws ServletException, IOException {
        ServletContext context=this.getServletContext();
        context.setAttribute("host","127.0.0.1");
    }
}
get.java
package servlet_demo;
import javax.servlet.ServletContext;
import javax.servlet.ServletException;
import javax.servlet.annotation.WebServlet;
import javax.servlet.http.HttpServlet;
import javax.servlet.http.HttpServletRequest;
import javax.servlet.http.HttpServletResponse;
import java.io.IOException;
import java.net.URLEncoder;
@WebServlet("/get")
public class get extends HttpServlet {
protected void doGet(HttpServletRequest request, HttpServletResponse response) throws ServletException, IOException {
//设置输出的utf-8格式
response.setCharacterEncoding("UTF-8");
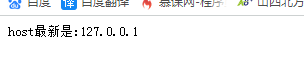
ServletContext context=this.getServletContext();
Object host= context.getAttribute("host");
response.getWriter().append("host最新是:"+host.toString());
}
}
结果输出:
3.2.2 ServletConfig
ServletConfig和ServletContext类似,也可以配置key-values值,但是作用域只限于web.xml中.
编写web.xml文件
<?xml version="1.0" encoding="UTF-8"?>
<web-app xmlns="http://xmlns.jcp.org/xml/ns/javaee"
         xmlns:xsi="http://www.w3.org/2001/XMLSchema-instance"
         xsi:schemaLocation="http://xmlns.jcp.org/xml/ns/javaee http://xmlns.jcp.org/xml/ns/javaee/web-app_4_0.xsd"
         version="4.0">

    <servlet>
        <servlet-name>config</servlet-name>
        <servlet-class>servlet_demo.config</servlet-class>
        <init-param>
            <param-name>host</param-name>
            <param-value>127.0.0.1:8080</param-value>
        </init-param>
    </servlet>
    <servlet-mapping>
        <servlet-name>config</servlet-name>
        <url-pattern>/config</url-pattern>
    </servlet-mapping>
</web-app>
创建config.java
package servlet_demo;

import javax.servlet.ServletConfig;
import javax.servlet.ServletException;
import javax.servlet.http.HttpServlet;
import javax.servlet.http.HttpServletRequest;
import javax.servlet.http.HttpServletResponse;
import java.io.IOException;

public class config extends HttpServlet {
    protected void doGet(HttpServletRequest request, HttpServletResponse response) throws ServletException, IOException {
        response.setCharacterEncoding("UTF-8");

        ServletConfig sc = this.getServletConfig();
        String str = sc.getInitParameter("host");
        System.out.println(str);
        response.getWriter().append("本项目的host为:" + str);
    }
}
结果为:

3.3 转发和重定向

3.3.1 转发和重定向的基本使用
创建login.jsp页面
<%--
  Created by IntelliJ IDEA.
  User: Administrator
  Date: 2019/1/23 0023
  Time: 13:52
  To change this template use File | Settings | File Templates.
--%>
<%@ page contentType="text/html;charset=UTF-8" language="java" %>
<html>
<head>
    <title>人事管理系统</title>
</head>
<body>
<h3 align="center">人事管理系统登陆页面</h3>
<hr>

<form action="http://localhost:8080/javaweb/login">
    <table align="center">
        <tr>
            <td>
                账号
            </td>
            <td>
                <input type="text" name="name">
            </td>

            <td>
                密码
            </td>
            <td>
                <input type="password" name="pwd">
            </td>
            <td>
                <input type="submit" value="登陆">
            </td>

        </tr>
    </table>

</form>

</body>
</html>
创建login.java
package servlet_demo;

import javax.servlet.ServletException;
import javax.servlet.annotation.WebServlet;
import javax.servlet.http.HttpServlet;
import javax.servlet.http.HttpServletRequest;
import javax.servlet.http.HttpServletResponse;
import java.io.IOException;

@WebServlet("/login")
public class login extends HttpServlet {

    @Override
    protected void doGet(HttpServletRequest req, HttpServletResponse resp) throws ServletException, IOException {
        resp.setCharacterEncoding("UTF-8");

        String name = req.getParameter("name");
        String pwd = req.getParameter("pwd");
        resp.getWriter().append("name=" + name).append("pwd=" + pwd);

        //如果name=admin pwd=111 跳转到success.jsp页面,否则跳转到fial.jsp页面
        if ("admin".equals(name) && "111".equals(pwd)) {
            //通过转发实现页面的跳转功能
            req.getRequestDispatcher("/emp/success.jsp").forward(req, resp);
        } else {
            //通过重定向实现页面的跳转功能
            resp.sendRedirect("/javaweb/emp/fail.jsp");
        }

    }

    @Override
    protected void doPost(HttpServletRequest req, HttpServletResponse resp) throws ServletException, IOException {
        System.out.println("dopost");
    }
}
3.3.2 转发和重定向带参数跳转
chuandi.java
package servlet_demo;

import javax.servlet.ServletContext;
import javax.servlet.ServletException;
import javax.servlet.annotation.WebServlet;
import javax.servlet.http.HttpServlet;
import javax.servlet.http.HttpServletRequest;
import javax.servlet.http.HttpServletResponse;
import java.io.IOException;

@WebServlet("/di")
public class chuandi extends HttpServlet {
    @Override
    protected void doGet(HttpServletRequest req, HttpServletResponse resp) throws ServletException, IOException {
        //带参数转发
        req.setAttribute("aaa","111111112222333445");
        req.getRequestDispatcher("/emp/di.jsp").forward(req,resp);

        //通过重定向带参数过去
        ServletContext sc=req.getServletContext();
        sc.setAttribute("goods","玩具狗");
        resp.sendRedirect("/javaweb/emp/di.jsp");
    }

    @Override
    protected void doPost(HttpServletRequest req, HttpServletResponse resp) throws ServletException, IOException {
        super.doPost(req, resp);
    }
}
di.jsp
<%--
  Created by IntelliJ IDEA.
  User: Administrator
  Date: 2019/2/17 0017
  Time: 09:24
  To change this template use File | Settings | File Templates.
--%>
<%@ page contentType="text/html;charset=UTF-8" language="java" %>
<html>
<head>
    <title>传递</title>
    <boy>
        转发传递
        <%
            String a = (String) request.getAttribute("aaa");
            out.print(a);
        %>

        重定向传递
        <%
            String good = (String) application.getAttribute("goods");
            out.print(good);
        %>
    </boy>
</head>
<body>

</body>
</html>
4.MVC设计模式
4.1 mvc的基本概念

Model 1的流程展示:

Model 2的流程展示:

MVC开发流程
