限流与防刷
互联网项目与传统项目不同的互联网项目是暴露在互联网中,面向的是全体网民,这时候可能出现以下两种访问形式需要我们采取一些必要措施对我们的服务进行保护。
1、大量正常用户高频访问导致服务器宕机
2、恶意用户高频访问导致服务器宕机
3、网页爬虫
对于这些情况我们需要对用户的访问进行限流访问,我们可以依次对Nginx、tomcat、接口进行限流。
Nginx是粒度最大的一层,这层的频度设置我们需要谨慎操作,这里将影响我们整个网站访问,Nginx层的频度设置应该在我们应用服务器宕机阀值之下,下面我们看下具体怎么设置
Nginx限流设置
对IP/域名限流
http {
     limit_conn_zone $binary_remote_addr zone=perip :10m; # 保存IP的缓存为10M;16000个IP地址的状态信息约1MB
     limit_conn_zone $server_name zone=perserver:10m;
     ...
     server {
       limit_conn perserver 100;# 此域名下最多有100个连接
       limit_conn perip 10;# 一个IP最多有10个连接
         ...
     }
}
# $binary_remote_addr 要限流的IP地址
# $server_name 要限流的域名
location / {
        limit_req zone=perip burst=20 nodelay;# urst排队大小,nodelay不限制单个请求间的时间
        proxy_pass http://XXX.com;
}
# 限流白名单
geo $limit {
    default   1;
    192.168.2.0/24  0;# 192.168.2.1-192.168.2.254 且子网掩码是255.255.255.0 网段不限流
    # 24 表示子网掩码 255.255.255.0
    # 16 表示子网掩码 255.255.0.0
    # 8 表示子网掩码 255.0.0.0
}

map $limit $limit_key {
    1 $binary_remote_addr;
    0 "";
}

limit_req_zone $limit_key zone=mylimit:10m rate=1r/s;

location / {
        limit_req zone=perid burst=1 nodelay;
        proxy_pass http://XXXX.com;
}令牌算法限流(摘自https://blog.csdn.net/sunnyyoona/article/details/51228456)
令牌桶算法最初来源于计算机网络。在网络传输数据时,为了防止网络拥塞,需限制流出网络的流量,使流量以比较均匀的速度向外发送。令牌桶算法就实现了这个功能,可控制发送到网络上数据的数目,并允许突发数据的发送。
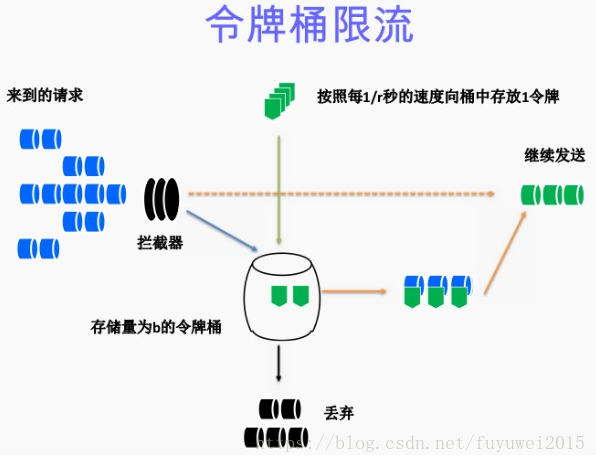
算法描述:
假如用户配置的平均发送速率为r,则每隔1/r秒一个令牌被加入到桶中(每秒会有r个令牌放入桶中);
假设桶中最多可以存放b个令牌。如果令牌到达时令牌桶已经满了,那么这个令牌会被丢弃;
当一个n个字节的数据包到达时,就从令牌桶中删除n个令牌(不同大小的数据包,消耗的令牌数量不一样),并且数据包被发送到网络;
如果令牌桶中少于n个令牌,那么不会删除令牌,并且认为这个数据包在流量限制之外(n个字节,需要n个令牌。该数据包将被缓存或丢弃);
算法允许最长b个字节的突发,但从长期运行结果看,数据包的速率被限制成常量r。对于在流量限制外的数据包可以以不同的方式处理:(1)它们可以被丢弃;(2)它们可以排放在队列中以便当令牌桶中累积了足够多的令牌时再传输;(3)它们可以继续发送,但需要做特殊标记,网络过载的时候将这些特殊标记的包丢弃。
注意:
令牌桶算法不能与另外一种常见算法漏桶算法相混淆。这两种算法的主要区别在于漏桶算法能够强行限制数据的传输速率,而令牌桶算法在能够限制数据的平均传输速率外,还允许某种程度的突发传输。在令牌桶算法中,只要令牌桶中存在令牌,那么就允许突发地传输数据直到达到用户配置的门限,因此它适合于具有突发特性的流量。
结合Lua对不同接口计数限流
例如应用每秒限制100个请求
http {
    local shared_data = ngx.shared.dict
    shared_data:set("draw", 0)

    content_by_lua_block {
        local request_uri = ngx.var.request_uri;
        if string.sub(request_uri,1,22) == "/activity/lottery/draw" then
              local val, err = ngx.shared.dict:incr("draw", 1); #进来一个请求就加1
              if val > 100 then #限流100
                  ngx.log(ngx.ERR,"draw limit val is:"..val)
                  ngx.exit(503)
              end
              ....业务处理
        end
    }
...
  log_by_lua_block{
        local request_uri = ngx.var.request_uri;
        if string.sub(request_uri,1,22) == "/activity/lottery/draw" then
              local val, err = ngx.shared.dict:incr("draw", -1); #出去一个请求就减1
              if val < 0 then
                  ngx.shared.dict:set("draw", 0);
              end
        end

  }
}
下面我们在看一个使用Lua操作redis,通过对redis的key计数和有效期设置来实现限流
下面的代码配置到nginx.conf即可使用例如:
server {
    listen  80;

    location / {
        access_by_lua_file /opt/lua/access/rateLimter.lua;
        proxy_pass http://www.xxx.com;
    }
}
# nginx常用lua模块还有
lua_code_cache
语法:lua_code_cache on | off
默认: on
适用上下文:http、server、location、location if
这个指令是指定是否开启lua的代码编译缓存,开发时可以设置为off,以便lua文件实时生效,如果是生产线上,为了性能,建议开启。
lua_package_path
语法:lua_package_path <lua-style-path-str>
默认:由lua的环境变量决定
适用上下文:http
设置lua代码的寻找目录。
例如:lua_package_path "/opt/nginx/conf/www/?.lua;;";
具体的路径设置要参考lua的模块机制
init_by_lua(_file)
语法:init_by_lua <lua-script-str>
适用上下文:http
 init_by_lua 'cjson = require "cjson"';

    server {
        location = /api {
            content_by_lua '
                ngx.say(cjson.encode({dog = 5, cat = 6}))
            ';
        }
    }
从这段配置代码,我们可以看出,其实这个指令就是初始化一些lua的全局变量,以便后续的代码使用。
注:有(_file)的选项代表可以直接引用外部的lua源代码文件,效果与直接写配置文件一样,不过可维护性当然是分开好点。
init_worker_by_lua(_file)
类似于上面的,不过是作用在work进程的,先于work进程启动而调用。
set_by_lua(_file)
语法:set_by_lua $res <lua-script-str> [$arg1 $arg2 ...]
适用上下文:server、location、location if
 location /foo {
        set $diff ''; # we have to predefine the $diff variable here

        set_by_lua $sum '
            local a = 32
            local b = 56

            ngx.var.diff = a - b;  -- write to $diff directly
            return a + b;          -- return the $sum value normally
        ';
        echo "sum = $sum, diff = $diff";
    }
这个指令是为了能够让nginx的变量与lua的变量相互作用赋值。
content_by_lua(_file)
语法:content_by_lua <lua-script-str>
适用上下文:location、location if
        location /nginx_var {
            # MIME type determined by default_type:
            default_type 'text/plain';

            # try access /nginx_var?a=hello,world
            content_by_lua "ngx.print(ngx.var['arg_a'], '\\n')";
        }
通过这个指令,可以由lua直接确定nginx响应页面的正文。
rewrite_by_lua(_file)
语法:rewrite_by_lua <lua-script-str>
适用上下文:location、location if
这个指令更多的是为了替代HttpRewriteModule的rewrite指令来使用的,优先级低于rewrite指令
比如
 location /foo {
          set $a 12; # create and initialize $a
          set $b ''; # create and initialize $b
          rewrite_by_lua 'ngx.var.b = tonumber(ngx.var.a) + 1';
          if ($b = '13') {
             rewrite ^ /bar redirect;
             break;
          }

         echo "res = $b";
    }
这个并不会像预期的那样子,因为我猜测,rewrite_by_lua是开启一个协程去工作的,可是下面却继续执行下去了,所以得不到预期的结果。
此时如果由lua代码来控制rewrite,那就没有问题了。
    location /foo {
        set $a 12; # create and initialize $a
        set $b ''; # create and initialize $b
        rewrite_by_lua '
            ngx.var.b = tonumber(ngx.var.a) + 1
            if tonumber(ngx.var.b) == 13 then
                return ngx.redirect("/bar");
            end
        ';

        echo "res = $b";
    }
access_by_lua(_file)
语法:access_by_lua <lua-script-str>
适用上下文:http, server, location, location if
 location / {
        deny    192.168.1.1;
        allow   192.168.1.0/24;
        allow   10.1.1.0/16;
        deny    all;

        access_by_lua '
            local res = ngx.location.capture("/mysql", { ... })
            ...
        ';

        # proxy_pass/fastcgi_pass/...
    }
    顾名思义,这个指令用在验证通过或者需要验证的时候。


header_filter_by_lua(_file)
语法:header_filter_by_lua <lua-script-str>
适用上下文:http, server, location, location if
    location / {
        proxy_pass http://mybackend;
        header_filter_by_lua 'ngx.header.Foo = "blah"';
    }
用lua的代码去指定http响应的 header一些内容。


body_filter_by_lua(_file)
语法:body_filter_by_lua <lua-script-str>
适用上下文:http, server, location, location if
   location /t {
        echo hello world;
        echo hiya globe;

        body_filter_by_lua '
            local chunk = ngx.arg[1]
            if string.match(chunk, "hello") then
                ngx.arg[2] = true  -- new eof
                return
            end

            -- just throw away any remaining chunk data
            ngx.arg[1] = nil
        ';
    }
这个指令可以用来篡改http的响应正文的。
脚本存放目录:/opt/lua/access/rateLimter.lua
local function close_redis(red)
    if not red then
        return
    end
    local pool_max_idle_time = 10000
    local pool_size = 100
    local ok, err = red:set_keepalive(pool_max_idle_time, pool_size)

    if not ok then
        ngx_log(ngx_ERR, "set redis keepalive error : ", err)
    end
end

local function wait()
   ngx.sleep(1)
end

local redis = require "resty.redis"
local red = redis:new()
red:set_timeout(1000)
local ip = "redis-ip"
local port = redis-port
local ok, err = red:connect(ip,port)
if not ok then
    return close_redis(red)
end

local uri = ngx.var.uri
local uriKey = "req:uri:"..uri
res, err = red:eval("local res, err = redis.call('incr',KEYS[1]) if res == 1 then local resexpire, err = redis.call('expire',KEYS[1],KEYS[2]) end return (res)",2,uriKey,1)
while (res > 10)
do
   local twait, err = ngx.thread.spawn(wait)
   ok, threadres = ngx.thread.wait(twait)
   if not ok then
      ngx_log(ngx_ERR, "wait sleep error: ", err)
      break;
   end
   res, err = red:eval("local res, err = redis.call('incr',KEYS[1]) if res == 1 then local resexpire, err = redis.call('expire',KEYS[1],KEYS[2]) end return (res)",2,uriKey,1)
end
close_redis(red)
下面我们在看一个防刷的Lua代码示例
local function close_redis(red)
    if not red then
        return
    end
    local pool_max_idle_time = 10000
    local pool_size = 100
    local ok, err = red:set_keepalive(pool_max_idle_time, pool_size)

    if not ok then
        ngx_log(ngx_ERR, "set redis keepalive error : ", err)
    end
end

local redis = require "resty.redis"
local red = redis:new()
red:set_timeout(1000)
local ip = "redis-ip"
local port = redis-port
local ok, err = red:connect(ip,port)
if not ok then
    return close_redis(red)
end

local clientIP = ngx.req.get_headers()["X-Real-IP"]
if clientIP == nil then
   clientIP = ngx.req.get_headers()["x_forwarded_for"]
end
if clientIP == nil then
   clientIP = ngx.var.remote_addr
end

local incrKey = "user:"..clientIP..":freq"
local blockKey = "user:"..clientIP..":block"

local is_block,err = red:get(blockKey)
if tonumber(is_block) == 1 then
   ngx.exit(ngx.HTTP_FORBIDDEN)
   return close_redis(red)
end

res, err = red:incr(incrKey)

if res == 1 then
   res, err = red:expire(incrKey,1)
end

if res > 200 then
    res, err = red:set(blockKey,1)
    res, err = red:expire(blockKey,600)
end

close_redis(red)
Nginx黑名单
当我们发现一些恶意访问的IP之后我们可以把他们放到黑名单里,配置如下:
# 白名单设置,访问根目录
location / {
                allow 123.34.22.155;
                deny  all;# allow 优先级>deny
}

# 黑名单设置,访问根目录,这时候访问Nginx会出现403 forbidden字样
location / {
                deny 123.34.22.155;
}

# 特定目录访问限制
location /tree/list {
                allow 123.34.22.155;
                deny  all;
}
或者我们可以通过Luau+redis来动态管理黑名单IP
首先修改nginx.conf
lua_shared_dict ip_blacklist 1m;

server {
    listen  80;

    location / {
        access_by_lua_file lua/ip_blacklist.lua;
        proxy_pass http://real_server;
    }
}
local redis_host = "192.168.1.132"
local redis_port = 6379
local redis_pwd = 123456
local redis_db = 2
-- connection timeout for redis in ms.
local redis_connection_timeout = 100
-- a set key for blacklist entries
local redis_key = "ip_blacklist"
-- cache lookups for this many seconds
local cache_ttl = 60
-- end configuration
local ip = ngx.var.remote_addr
local ip_blacklist = ngx.shared.ip_blacklist
local last_update_time = ip_blacklist:get("last_update_time");
-- update ip_blacklist from Redis every cache_ttl seconds:
if last_update_time == nil or last_update_time < ( ngx.now() - cache_ttl ) then
local redis = require "resty.redis";
local red = redis:new();
red:set_timeout(redis_connect_timeout);
local ok, err = red:connect(redis_host, redis_port);
if not ok then
ngx.log(ngx.ERR, "Redis connection error while connect: " .. err);
else
local ok, err = red:auth(redis_pwd)
if not ok then
ngx.log(ngx.ERR, "Redis password error while auth: " .. err);
else
local new_ip_blacklist, err = red:smembers(redis_key);
if err then
ngx.log(ngx.ERR, "Redis read error while retrieving ip_blacklist: " .. err);
else
ngx.log(ngx.ERR, "Get data success:" .. new_ip_blacklist)
-- replace the locally stored ip_blacklist with the updated values:
ip_blacklist:flush_all();
for index, banned_ip in ipairs(new_ip_blacklist) do
ip_blacklist:set(banned_ip, true);
end
-- update time
ip_blacklist:set("last_update_time", ngx.now());
end
end
end
end
if ip_blacklist:get(ip) then
ngx.log(ngx.ERR, "Banned IP detected and refused access: " .. ip);
return ngx.exit(ngx.HTTP_FORBIDDEN);
end